

Salt and Vinegar Stain Removal: Sounds like a science experiment gone wrong, right? But trust me, it’s actually your secret weapon against those stubborn stains that seem impossible to get rid of! We’ve all been there – a clumsy spill, a mysterious mark, and suddenly your favorite rug or shirt is looking a little worse for wear. Before you resign yourself to living with the blemish or spending a fortune on professional cleaning, let’s explore the magic of salt and vinegar.
Using vinegar for cleaning has roots that stretch back centuries. Ancient civilizations, from the Egyptians to the Romans, recognized its potent cleaning and disinfecting properties. Salt, too, has long been valued for its absorbent qualities. Combining these two humble ingredients creates a powerful, natural cleaning solution that’s both effective and eco-friendly.
Why do you need this salt and vinegar stain removal trick in your arsenal? Because life happens! Spills are inevitable, and harsh chemical cleaners can be expensive, damaging to fabrics, and harmful to the environment. This DIY method offers a safe, affordable, and surprisingly effective alternative. I’m going to show you how to tackle a variety of common stains using this simple yet powerful combination. Get ready to say goodbye to those pesky marks and hello to a cleaner, fresher home!
DIY Salt and Vinegar Stain Removal: A Comprehensive Guide
Hey there, fellow DIY enthusiasts! Let’s face it, spills happen. And sometimes, those spills involve a dreaded combination of salt and vinegar – a culinary delight on chips, but a potential nightmare on your favorite fabrics or surfaces. But don’t despair! I’m here to share my tried-and-true method for tackling these stubborn stains, using readily available household items and a little bit of elbow grease.
Understanding the Enemy: Why Salt and Vinegar Stains are Tricky
Before we dive into the removal process, it’s helpful to understand why salt and vinegar stains can be so persistent. Vinegar, being acidic, can sometimes affect dyes or finishes, especially on delicate materials. Salt, on the other hand, can leave behind a residue that attracts moisture and dirt, leading to discoloration or a sticky patch. The combination of the two can create a stain that’s both chemically and physically challenging to remove.
Materials You’ll Need
Here’s a list of everything you’ll need to wage war on those pesky salt and vinegar stains:
* Clean White Cloths or Sponges: Avoid colored cloths, as the dye could transfer to the stained area. Microfiber cloths are excellent for their absorbency.
* Distilled White Vinegar: Yes, we’re fighting fire with fire! But trust me, a diluted vinegar solution is key to neutralizing the stain.
* Baking Soda: This acts as a gentle abrasive and helps to absorb odors.
* Dish Soap (Mild and Clear): A small amount of dish soap can help to break down any remaining residue.
* Warm Water: Essential for diluting solutions and rinsing.
* Spray Bottle (Optional): For easy application of the cleaning solution.
* Vacuum Cleaner (with upholstery attachment, if applicable): To remove loose particles and dry residue.
* Soft-Bristled Brush (Optional): For gently scrubbing stubborn stains on durable surfaces.
* Hair Dryer (Optional): To speed up the drying process.
* Gloves (Optional): To protect your hands, especially if you have sensitive skin.
General Stain Removal Guide: The Core Steps
No matter what surface you’re dealing with, these are the fundamental steps to follow:
* Act Fast: The sooner you address the stain, the easier it will be to remove. Fresh stains are always easier to tackle than old, set-in ones.
* Blot, Don’t Rub: Rubbing can spread the stain and damage the fibers of the material. Always blot gently with a clean cloth.
* Test in an Inconspicuous Area: Before applying any cleaning solution to the entire stain, test it on a hidden area (like the inside seam of upholstery or a corner of a rug) to ensure it doesn’t cause discoloration or damage.
* Work from the Outside In: This prevents the stain from spreading further. Start blotting or scrubbing from the edges of the stain and work your way towards the center.
* Rinse Thoroughly: After applying a cleaning solution, rinse the area thoroughly with clean water to remove any residue.
* Dry Completely: Moisture can lead to mold or mildew growth, so it’s crucial to dry the area completely after cleaning.
Specific Stain Removal Techniques: Let’s Get Down to Business!
Now, let’s get into the nitty-gritty of removing salt and vinegar stains from different surfaces.
Removing Salt and Vinegar Stains from Clothing
This is probably the most common scenario. Here’s how I tackle it:
1. Blot the Excess: Immediately blot up as much of the salt and vinegar mixture as possible with a clean, dry cloth.
2. Rinse with Cold Water: Hold the stained area under cold running water to flush out the remaining salt and vinegar.
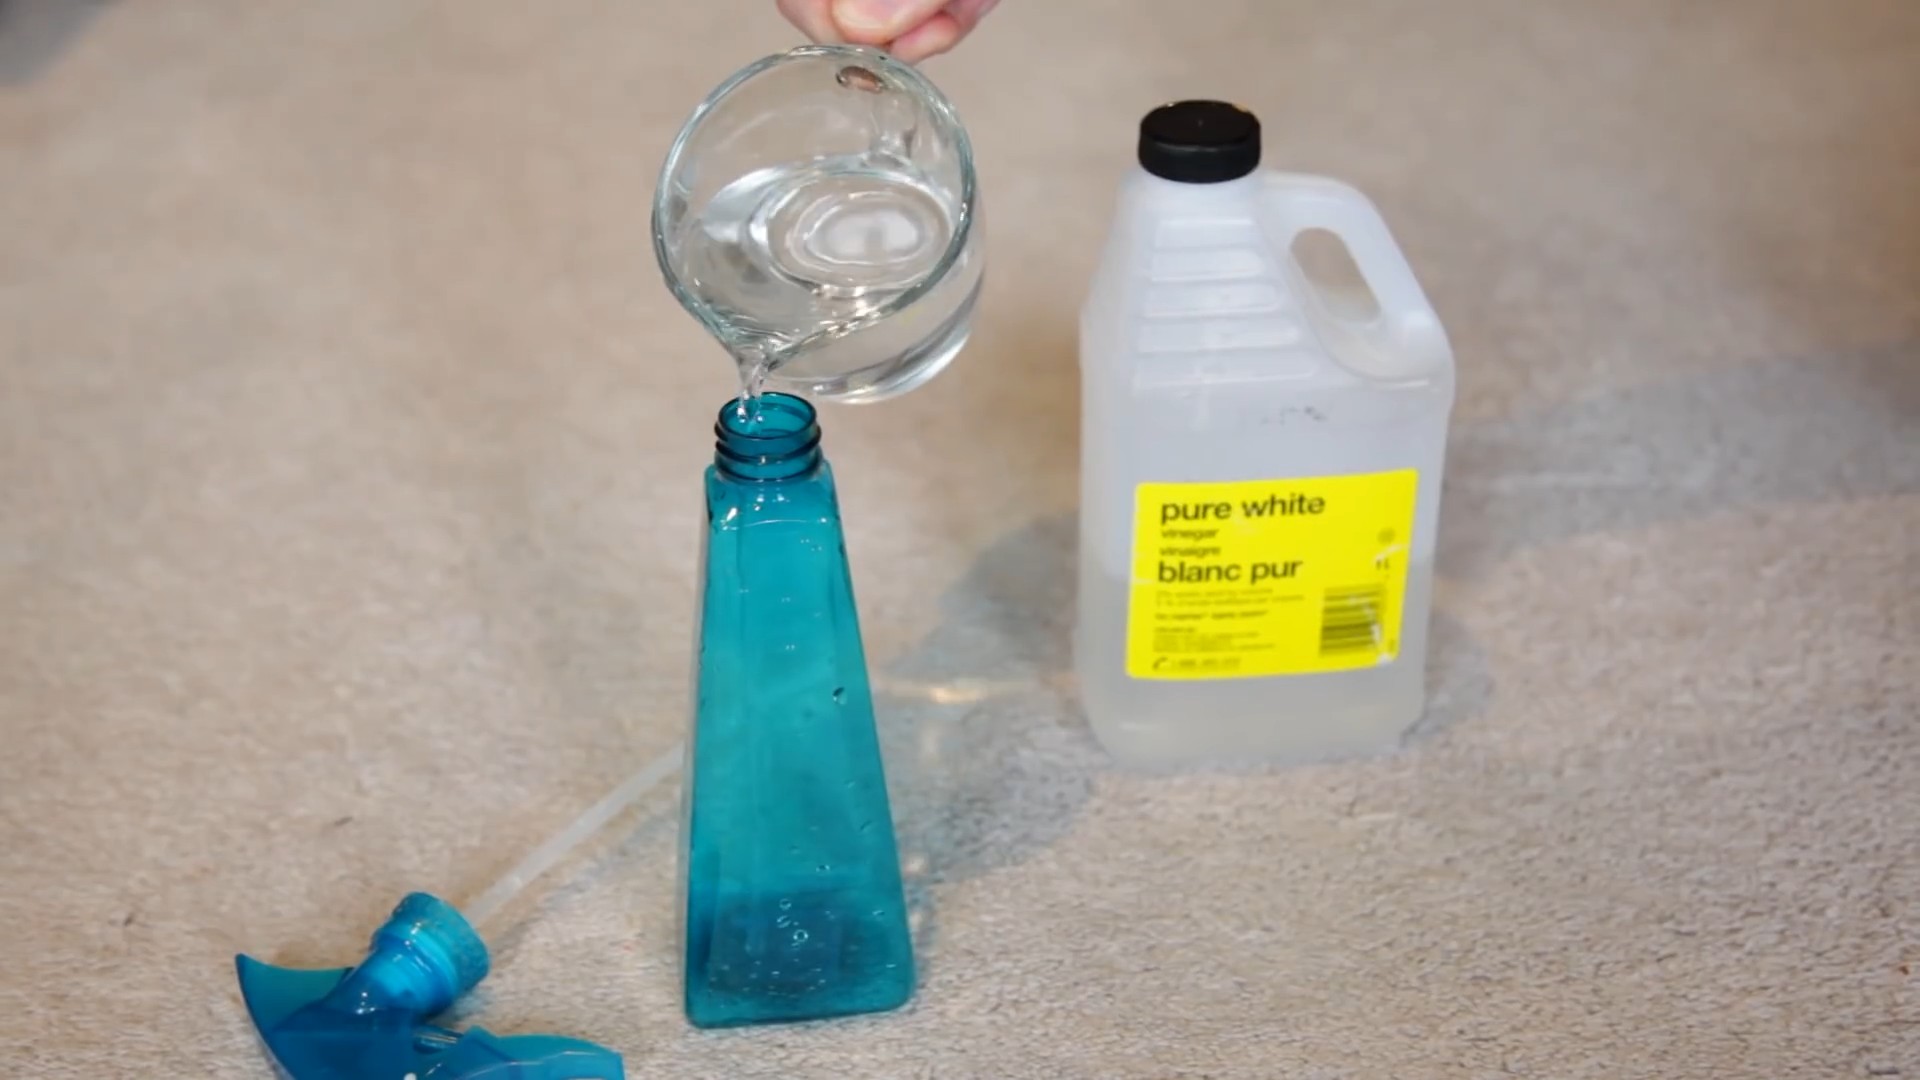
3. Pre-Treat with Vinegar Solution: Mix equal parts distilled white vinegar and water in a bowl or spray bottle. Apply the solution to the stained area and let it sit for 10-15 minutes.
4. Launder as Usual: Wash the garment according to the care label instructions. Use a mild detergent.
5. Check Before Drying: Before putting the garment in the dryer, check to see if the stain is completely gone. If not, repeat steps 3 and 4. Drying a stained garment can set the stain permanently.
6. Air Dry if Necessary: If the stain persists after washing, air dry the garment instead of putting it in the dryer. Sunlight can sometimes help to fade stains.
Removing Salt and Vinegar Stains from Upholstery
Upholstery can be a bit trickier, as you can’t just throw it in the washing machine. Here’s my method:
1. Blot the Spill: As with clothing, immediately blot up as much of the spill as possible with a clean, dry cloth.
2. Vacuum the Area: Use a vacuum cleaner with an upholstery attachment to remove any loose salt crystals or debris.
3. Prepare a Cleaning Solution: Mix 1 teaspoon of mild dish soap with 1 cup of warm water.
4. Apply the Solution: Dip a clean cloth into the cleaning solution and gently blot the stained area. Avoid soaking the fabric.
5. Blot with Clean Water: Use a clean, damp cloth to blot the area and remove any soap residue.
6. Vinegar Rinse (Optional): If the stain is particularly stubborn, you can try a vinegar rinse. Mix 1 tablespoon of distilled white vinegar with 1 cup of water. Apply the solution to the stained area and blot with a clean, damp cloth.
7. Dry the Area: Use a clean, dry cloth to blot up as much moisture as possible. You can also use a hair dryer on a low setting to speed up the drying process. Be careful not to overheat the fabric.
8. Vacuum Again: Once the area is completely dry, vacuum it again to restore the fabric’s texture.
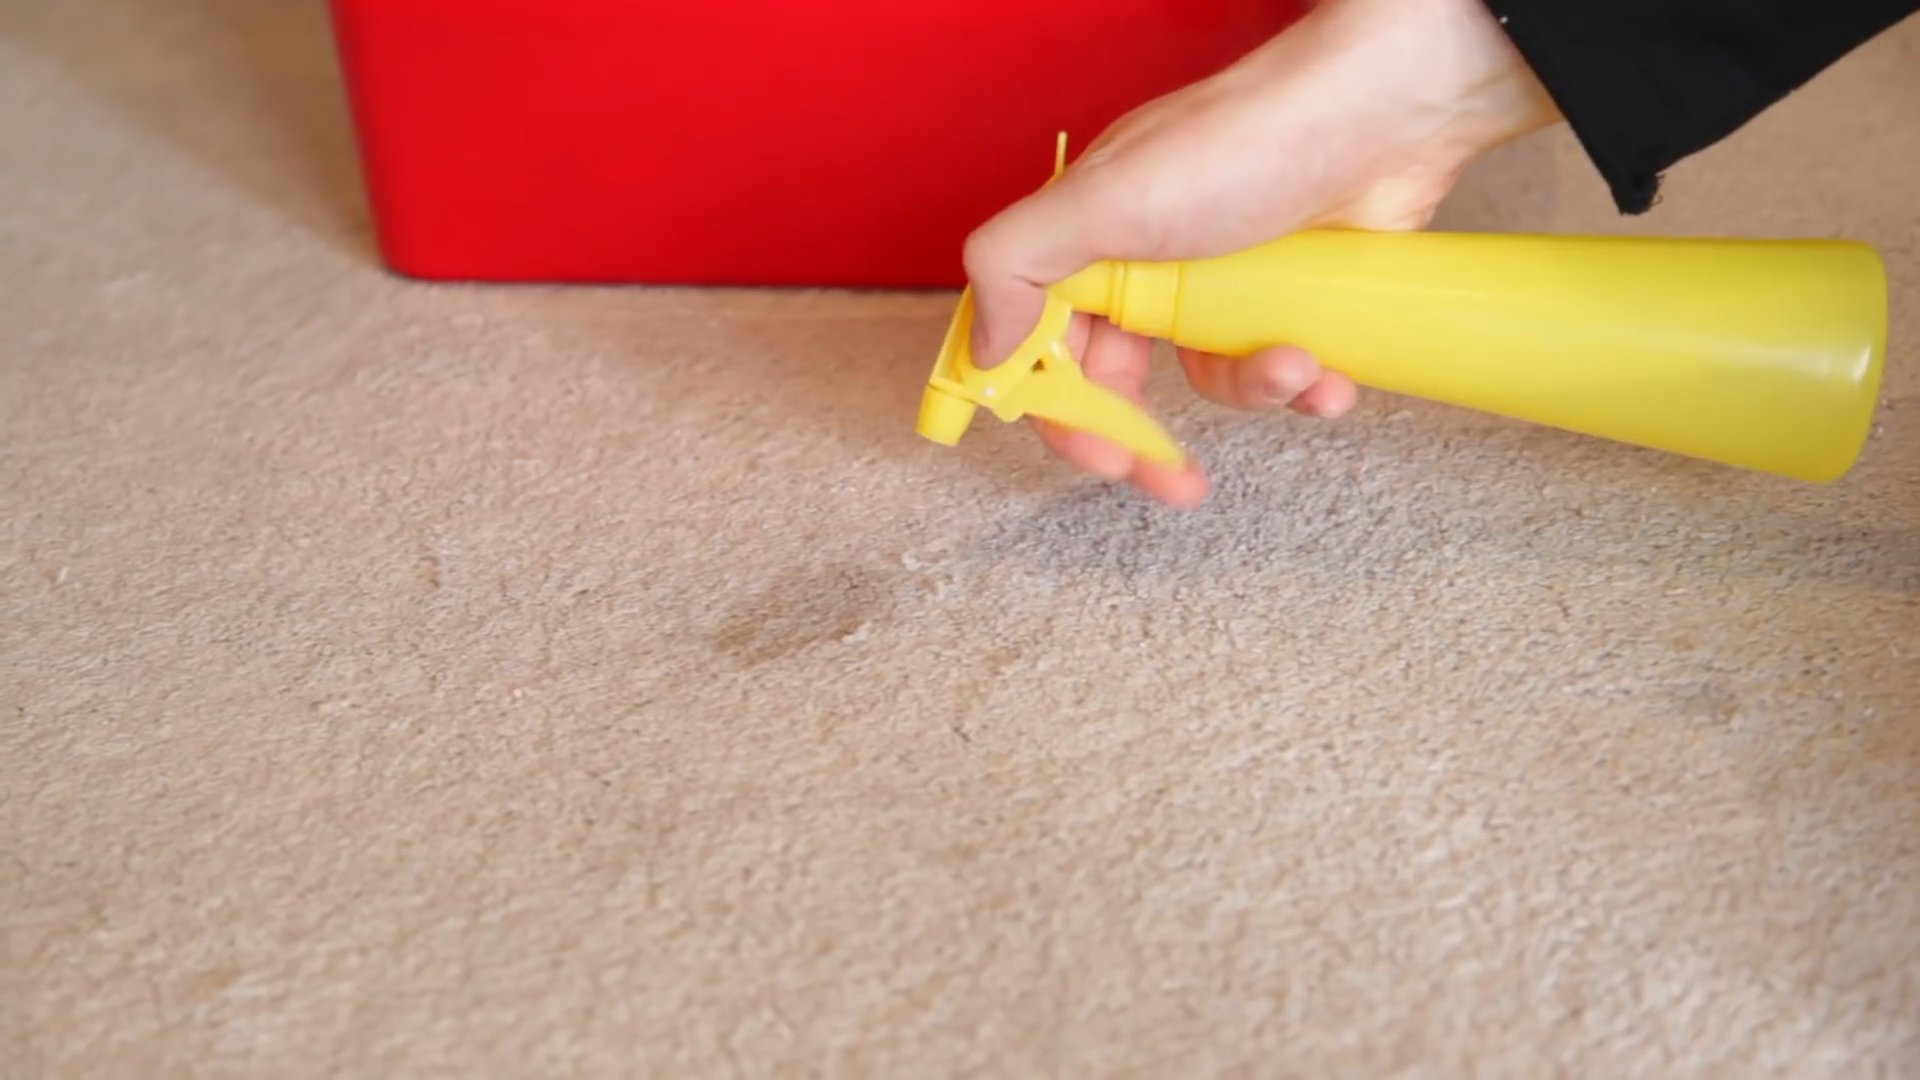
Removing Salt and Vinegar Stains from Carpets and Rugs
Carpets and rugs are similar to upholstery, but they can often handle a bit more scrubbing.
1. Blot the Spill: As always, start by blotting up as much of the spill as possible with a clean, dry cloth.
2. Vacuum the Area: Use a vacuum cleaner to remove any loose salt crystals or debris.
3. Prepare a Cleaning Solution: Mix 1/4 teaspoon of mild dish soap with 1 cup of warm water.
4. Apply the Solution: Dip a clean cloth or sponge into the cleaning solution and gently blot the stained area. Avoid soaking the carpet or rug.
5. Scrub Gently (Optional): If the stain is stubborn, you can use a soft-bristled brush to gently scrub the area. Be careful not to damage the fibers of the carpet or rug.
6. Blot with Clean Water: Use a clean, damp cloth to blot the area and remove any soap residue.
7. Vinegar Rinse (Optional): For stubborn stains, mix 1 tablespoon of distilled white vinegar with 1 cup of water. Apply the solution to the stained area and blot with a clean, damp cloth.
8. Dry the Area: Use a clean, dry cloth to blot up as much moisture as possible. You can also use a fan or a hair dryer on a low setting to speed up the drying process.
9. Weight the Area (Optional): To prevent the carpet or rug from curling up as it dries, you can place a heavy object (like a book or a brick wrapped in a towel) on top of the cleaned area.
10. Vacuum Again: Once the area is completely dry, vacuum it again to restore the carpet or rug’s texture.
Removing Salt and Vinegar Stains from Hard Surfaces (Wood, Tile, Countertops)
Hard surfaces are generally easier to clean, but it’s still important to be careful, especially with wood finishes.
1. Wipe Up the Spill: Immediately wipe up the spill with a clean, damp cloth.
2. Prepare a Cleaning Solution: Mix equal parts distilled white vinegar and water in a spray bottle.
3. Spray and Wipe: Spray the cleaning solution onto the stained area and let it sit for a few minutes. Then, wipe the area clean with a damp cloth.
4. Dry the Surface: Dry the surface with a clean, dry cloth.
5. Baking Soda Paste (For Stubborn Stains): If the stain is particularly stubborn, you can try making a paste of baking soda and water. Apply the paste to the stained area and let it sit for 15-20 minutes. Then, wipe the area clean with a damp cloth and dry it thoroughly.
6. Wood Polish (For Wood Surfaces): If you’re cleaning a wood surface, you may want to apply a wood polish after cleaning to restore the finish.
Preventative Measures
Conclusion
So, there you have it! This simple yet incredibly effective salt and vinegar stain removal trick is a game-changer for anyone who’s ever battled stubborn stains. Forget harsh chemicals and expensive stain removers that promise the world but often fall short. This DIY solution harnesses the power of two pantry staples to lift stains naturally and affordably.
Why is this a must-try? Because it works! The acidity of the vinegar helps to break down the stain, while the salt acts as a gentle abrasive, lifting the discoloration from the fabric. It’s a winning combination that’s safe for most fabrics (always test in an inconspicuous area first, of course!) and environmentally friendly. Plus, think of all the money you’ll save by ditching those pricey commercial stain removers.
But the beauty of this method lies in its versatility. While we’ve focused on the basic salt and vinegar solution, feel free to experiment with variations to tackle different types of stains. For instance, for particularly stubborn stains, you could try pre-treating the area with a paste of baking soda and water before applying the salt and vinegar. Or, for delicate fabrics, you might dilute the vinegar with a bit more water to lessen its intensity. You can also add a few drops of your favorite essential oil, like lavender or lemon, to the solution for a more pleasant scent. Remember to always test any variation on a hidden area of the fabric first to ensure it doesn’t cause any discoloration or damage.
This isn’t just about removing stains; it’s about empowering you to take control of your cleaning routine and embrace a more sustainable and cost-effective approach. It’s about knowing that you have a powerful weapon against everyday messes, right there in your kitchen.
We’re confident that once you try this salt and vinegar stain removal method, you’ll be amazed by the results. It’s a simple, effective, and affordable solution that will quickly become your go-to for tackling all sorts of stains. So, go ahead, give it a try! We’re eager to hear about your experiences. Share your before-and-after photos, your tips and tricks, and any variations you’ve discovered in the comments below. Let’s build a community of stain-fighting experts! We believe in the power of shared knowledge and experiences, and your feedback will help others discover the magic of this simple DIY solution. Don’t let those pesky stains win – reclaim your fabrics and enjoy a cleaner, brighter home with the power of salt and vinegar!
Frequently Asked Questions (FAQ)
What types of stains does this salt and vinegar stain removal method work best on?
This method is particularly effective on a wide range of common household stains, including:
* **Food stains:** Coffee, tea, juice, wine, sauces, and even some grease stains can be effectively treated with salt and vinegar.
* **Mildew stains:** The vinegar’s acidity helps to kill mildew and remove its unsightly stains from fabrics.
* **Sweat stains:** Salt and vinegar can help to break down the proteins in sweat that cause discoloration and odor.
* **Dirt and mud stains:** The abrasive action of the salt, combined with the dissolving power of vinegar, can lift dirt and mud from fabrics.
* **Grass stains:** While grass stains can be tricky, salt and vinegar can often lighten them significantly, especially when applied promptly.
However, it’s important to note that some stains, such as permanent ink or set-in oil stains, may require more specialized treatment.
Is this method safe for all types of fabrics?
While salt and vinegar are generally safe for most fabrics, it’s always crucial to test the solution on an inconspicuous area first to ensure it doesn’t cause any discoloration or damage. Delicate fabrics like silk, wool, and linen may be more sensitive to vinegar’s acidity, so it’s best to dilute the vinegar with more water in these cases. Avoid using this method on fabrics that are labeled “dry clean only.”
How long should I leave the salt and vinegar solution on the stain?
The amount of time you leave the solution on the stain will depend on the severity of the stain. For light stains, 15-30 minutes may be sufficient. For more stubborn stains, you can leave the solution on for up to an hour or even overnight. Just be sure to keep the area moist by re-applying the solution as needed.
Can I use any type of salt and vinegar?
For salt, regular table salt or sea salt will work fine. Avoid using coarse salt, as it may be too abrasive for delicate fabrics. For vinegar, white distilled vinegar is generally recommended, as it’s clear and won’t stain fabrics. Avoid using colored vinegars, such as apple cider vinegar or balsamic vinegar, as they may leave a stain of their own.
What if the stain doesn’t come out completely after the first treatment?
Don’t give up! Some stains may require multiple treatments. Repeat the process as needed, and consider using a slightly stronger concentration of vinegar or leaving the solution on for a longer period. You can also try gently scrubbing the stain with a soft brush or cloth.
Will the vinegar smell linger after treatment?
The vinegar smell will typically dissipate as the fabric dries. To speed up the process and further reduce the odor, you can rinse the treated area thoroughly with water and then wash the item as usual. You can also add a few drops of your favorite essential oil to the rinse water for a more pleasant scent.
Can I use this method on carpets or upholstery?
Yes, you can use this method on carpets and upholstery, but it’s even more important to test the solution on an inconspicuous area first. Apply the solution sparingly and avoid soaking the fabric. After treatment, blot the area with a clean, damp cloth to remove any residue. You can also use a wet/dry vacuum to extract any excess moisture.
Is this method environmentally friendly?
Yes, using salt and vinegar for stain removal is a much more environmentally friendly option than using harsh chemicals and commercial stain removers. Vinegar is a natural and biodegradable substance, and salt is a readily available mineral. By using this DIY method, you can reduce your reliance on synthetic chemicals and minimize your impact on the environment.
What other natural stain removal methods can I try?
Besides salt and vinegar, there are several other natural stain removal methods you can try, including:
* **Baking soda:** Baking soda is a gentle abrasive and deodorizer that can be used to treat a variety of stains.
* **Lemon juice:** Lemon juice is a natural bleaching agent that can be used to lighten stains on white fabrics.
* **Hydrogen peroxide:** Hydrogen peroxide is a mild disinfectant and bleaching agent that can be used to treat blood stains and other organic stains.
* **Sunlight:** Sunlight is a natural bleaching agent that can help to fade stains on fabrics.
Remember to always test any stain removal method on an inconspicuous area first to ensure it doesn’t cause any discoloration or damage.
Where can I share my experiences and ask further questions?
We encourage you to share your experiences and ask further questions in the comments section below this article. We’re eager to hear about your successes and challenges with this salt and vinegar stain removal method. You can also find helpful tips and advice from other readers in the comments section. Let’s build a community of stain-fighting experts!

Leave a Comment