

Clean keyboard safely – it’s something we all need to do, but often put off, right? I know I’m guilty of it! Let’s be honest, our keyboards are breeding grounds for dust, crumbs, and who-knows-what-else. Think about it: we eat at our desks, we type with our hands after touching countless surfaces, and all that grime ends up nestled between the keys. Yuck!
But fear not, fellow keyboard warriors! This isn’t just about aesthetics; keeping your keyboard clean is crucial for hygiene and even its longevity. A dirty keyboard can lead to sticky keys, malfunctioning components, and a generally unpleasant typing experience. Plus, in today’s world, where we’re all more conscious of germs and cleanliness, a sparkling keyboard is a must.
While the modern keyboard is a relatively recent invention, the desire to keep our tools clean is age-old. From ancient scribes meticulously caring for their quills to modern-day tech enthusiasts obsessing over their gadgets, the principle remains the same: taking care of our equipment ensures its optimal performance and longevity. This DIY guide will provide you with simple, effective, and safe methods to clean keyboard safely, using items you probably already have at home. So, ditch the dust bunnies and let’s get cleaning!

DIY Keyboard Cleaning: A Deep Dive for a Sparkling Clean Setup
Hey everyone! Let’s face it, our keyboards are germ magnets. Crumbs, dust, and who-knows-what-else accumulate between the keys, making them a breeding ground for nasties. But fear not! I’m going to walk you through a super effective DIY keyboard cleaning process that will leave your keyboard looking and feeling brand new. This isn’t just a quick wipe-down; we’re going deep!
What You’ll Need: The Arsenal of Clean
Before we dive in, let’s gather our cleaning supplies. Having everything ready will make the process smooth and efficient.
* Compressed Air: This is your best friend for blasting out loose debris.
* Small Screwdriver or Keycap Puller: For safely removing keycaps (optional, but highly recommended for a thorough clean).
* Small Bowl or Container: For soaking keycaps.
* Mild Dish Soap: A gentle cleanser for the keycaps.
* Microfiber Cloths: These are lint-free and perfect for wiping down surfaces.
* Cotton Swabs: For getting into those hard-to-reach crevices.
* Isopropyl Alcohol (70% or higher): For disinfecting and removing stubborn grime.
* Small Brush (Soft Bristled): An old toothbrush works great for scrubbing.
* Vacuum Cleaner with Brush Attachment (Optional): For sucking up larger debris.
* Paper Towels: For drying.
Section 1: Preparation is Key (Pun Intended!)
Before we start attacking the grime, let’s get our keyboard ready for its spa day.
1. Unplug Your Keyboard: This is crucial! Never, ever clean an electronic device while it’s plugged in. Safety first!
2. Take a Before Photo: Trust me, you’ll want to see the dramatic before-and-after transformation. Plus, if you’re removing keycaps, it’s helpful to have a reference photo to remember where everything goes.
3. Vacuum Loose Debris (Optional): If your keyboard is particularly dusty or crumb-filled, use the brush attachment on your vacuum cleaner to gently suck up the loose debris. Be careful not to dislodge any keycaps.
Section 2: Keycap Removal (The Deep Clean Begins!)
This step is optional, but I highly recommend it for a truly deep clean. Removing the keycaps allows you to get to all the gunk hiding underneath.
1. Choose Your Method: You can use a keycap puller (the safest and easiest option) or a small screwdriver. If using a screwdriver, be extremely careful not to scratch the keycaps or the keyboard base.
2. Gently Remove Keycaps: For keycap pullers, slide the wires under opposite corners of the keycap and gently pull straight up. For screwdrivers, carefully pry up one corner of the keycap at a time, working your way around until it pops off.
3. Organize Your Keycaps: As you remove the keycaps, place them in a container or lay them out on a towel in the same arrangement as they are on the keyboard. This will make reassembly much easier. If you don’t have a keycap puller, you can still clean the keyboard, just skip the keycap soaking step and focus on cleaning around the keys.
4. Special Note for Stabilizer Keys: Larger keys like the spacebar, shift keys, and enter key often have stabilizers underneath. These are small metal bars that help keep the key stable. Be extra careful when removing these keys, and take note of how the stabilizers are attached so you can reattach them correctly later. Sometimes, these stabilizers can be a pain to reattach, so take a close look at how they are connected before removing the keycap.
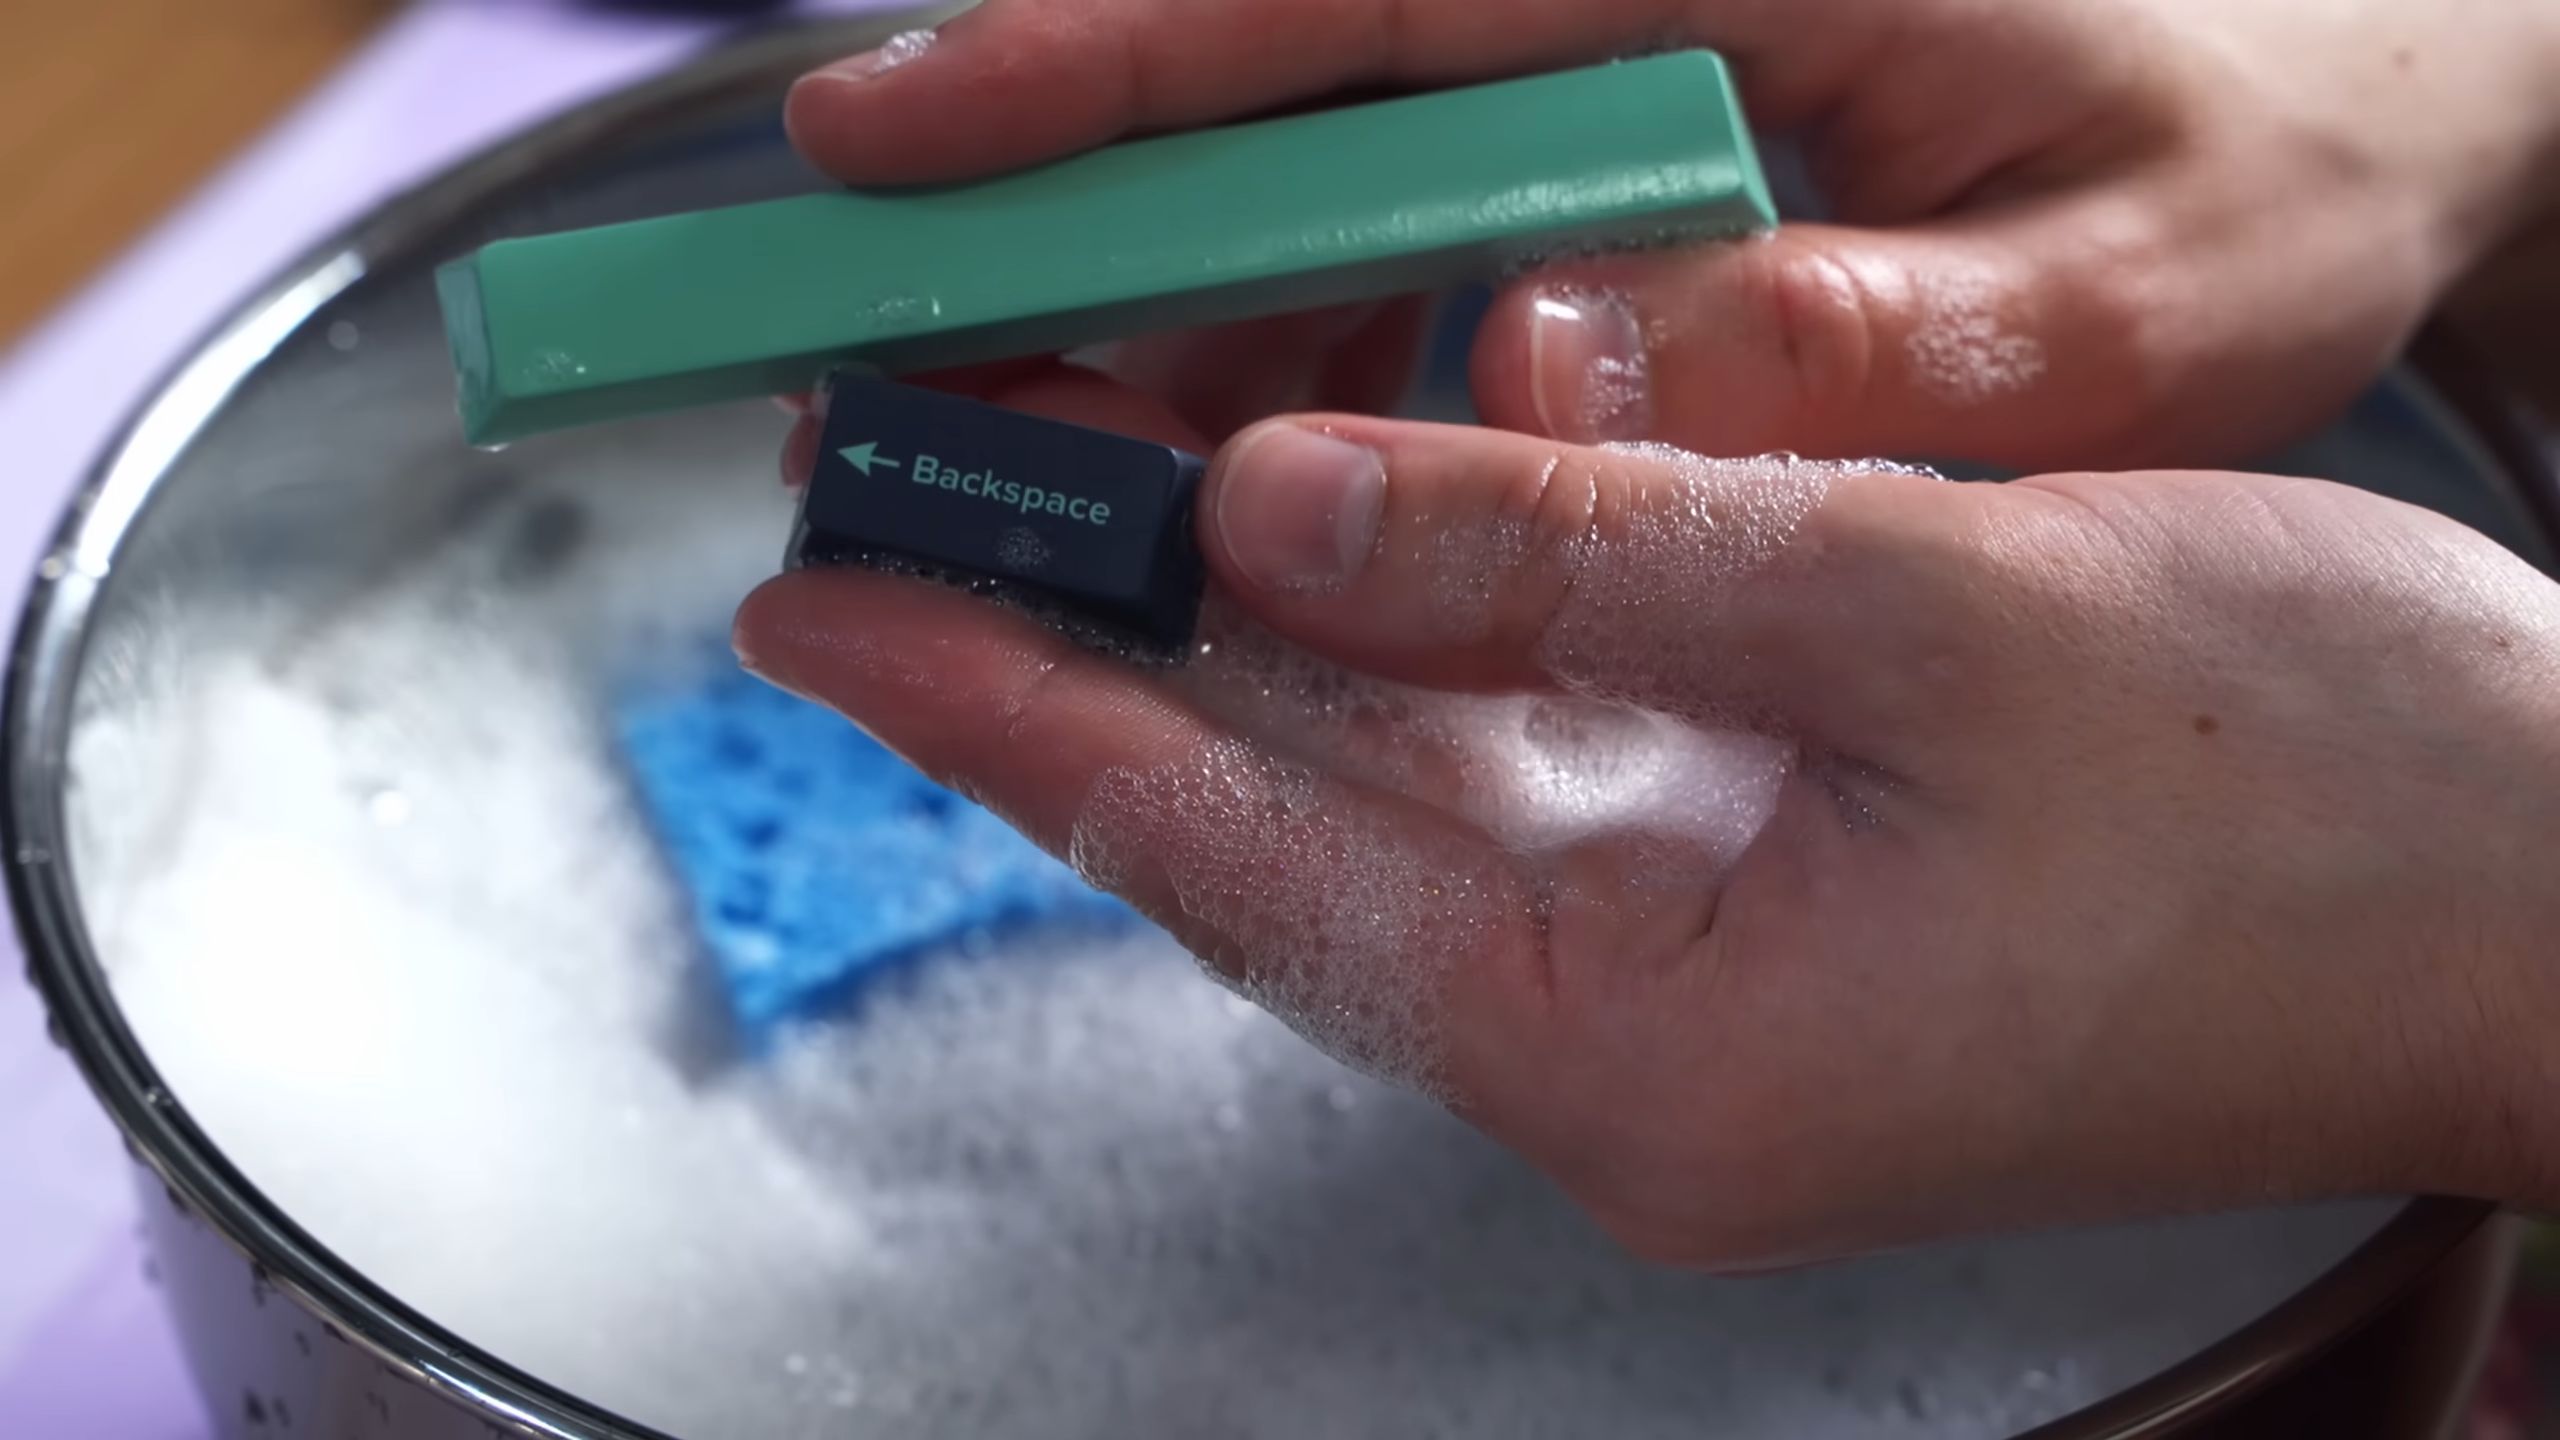
Section 3: Keycap Cleaning: A Soapy Soak
Now that we’ve removed the keycaps, let’s give them a good cleaning.
1. Prepare the Soapy Water: Fill your bowl or container with warm water and add a few drops of mild dish soap. Don’t use too much soap, or it will be difficult to rinse off.
2. Soak the Keycaps: Place the keycaps in the soapy water and let them soak for about 15-30 minutes. This will help loosen any dirt and grime.
3. Agitate and Scrub: After soaking, gently agitate the keycaps in the water to loosen any remaining debris. You can also use a soft-bristled brush (like an old toothbrush) to scrub any stubborn spots.
4. Rinse Thoroughly: Remove the keycaps from the soapy water and rinse them thoroughly under clean, running water. Make sure to remove all traces of soap.
5. Dry the Keycaps: Spread the keycaps out on a clean towel or paper towels to dry completely. You can also use a microfiber cloth to gently pat them dry. Make sure they are completely dry before reattaching them to the keyboard. I usually let them air dry overnight to be absolutely sure.
Section 4: Keyboard Base Cleaning: Getting Down and Dirty
With the keycaps soaking or drying, let’s turn our attention to the keyboard base itself. This is where all the crumbs and dust tend to accumulate.
1. Compressed Air Attack: Use the compressed air to blast out any loose debris from between the keys. Hold the can at an angle and use short bursts of air. Be sure to get into all the nooks and crannies.
2. Isopropyl Alcohol Wipe Down: Dampen a microfiber cloth with isopropyl alcohol (70% or higher). Wring out any excess alcohol so the cloth is damp, not soaking wet. Gently wipe down the entire keyboard base, paying special attention to areas where grime is visible.
3. Cotton Swab Detail Work: Use cotton swabs dipped in isopropyl alcohol to clean hard-to-reach areas, such as around the edges of the keys and in the corners of the keyboard base.
4. Stubborn Stain Removal: For stubborn stains, you can use a slightly more abrasive cleaner, such as a magic eraser. However, be very careful when using these types of cleaners, as they can damage the keyboard’s finish. Test the cleaner on an inconspicuous area first to make sure it doesn’t cause any discoloration or damage.
5. Final Wipe Down: Once you’ve cleaned the entire keyboard base, use a clean, dry microfiber cloth to wipe away any remaining residue.
Section 5: Reassembly: Putting It All Back Together
Once the keycaps are completely dry and the keyboard base is clean, it’s time to reassemble everything.
1. Refer to Your Before Photo: This is where that before photo comes in handy! Use it as a reference to make sure you put the keycaps back in the correct positions.
2. Reattach the Keycaps: Gently press the keycaps back onto the keyboard. You should hear a click when they are securely attached.
3. Stabilizer Keys: Pay special attention to the stabilizer keys (spacebar, shift keys, enter key). Make sure the stabilizers are properly aligned and attached before pressing the keycaps into place. This can be a bit tricky, so be patient and refer to your notes or photos if needed.
4. Double Check: Once you’ve reattached all the keycaps, double-check to make sure everything is in the correct position and that all the keys are working properly.
5. Plug It In: Finally, plug your keyboard back in and enjoy your sparkling clean setup!
Extra Tips and Tricks for Keyboard Cleaning Success
* Frequency: How often you clean your keyboard depends on how often you use it and how prone it is to getting dirty. I recommend cleaning it at least once a month, or more often if you notice it getting particularly grimy.
* Prevention: The best way to keep your keyboard clean is to prevent it from getting dirty in the first place. Avoid eating or drinking near your keyboard, and wash your hands regularly.
* Keyboard Covers: Consider using a keyboard cover to protect your keyboard from dust, spills, and other debris.
* Different Keyboard Types: The cleaning process may vary slightly depending on the type of keyboard you have. For example, mechanical keyboards may require special tools or techniques for removing and cleaning the keycaps. Always consult the manufacturer’s instructions before cleaning your keyboard.
* Don’t Overdo It: Be gentle when cleaning your keyboard. Avoid using harsh chemicals or abrasive cleaners, as these can damage the keyboard’s finish.
* Patience is Key: Cleaning a keyboard can be a time-consuming process, but it’s worth it to have a clean and hygienic workspace. Don’t rush the process, and take your time to do it right.
Troubleshooting Common Keyboard Cleaning Issues
* Sticky Keys: If you have sticky keys after cleaning your keyboard, it could be due to residue from the cleaning solution. Try removing the keycaps and
Conclusion
So, there you have it! A simple, effective, and surprisingly satisfying way to tackle that grime-covered keyboard lurking on your desk. We’ve walked you through a method that utilizes readily available household items to achieve a level of cleanliness that those expensive, pre-packaged keyboard cleaning kits simply can’t match. Why spend a fortune on something you can easily accomplish with a little elbow grease and a few clever techniques?
This DIY keyboard cleaning trick isn’t just about aesthetics; it’s about hygiene. Think of all the crumbs, dust, and who-knows-what-else that accumulate between those keys. Regularly cleaning your keyboard can significantly reduce the spread of germs and allergens, contributing to a healthier workspace and a happier you. Plus, a clean keyboard is a more responsive keyboard. No more sticky keys or missed keystrokes!
But the best part? This method is incredibly versatile. Feel free to experiment with variations to suit your specific needs and preferences. For example, if you have a particularly stubborn stain, try using a slightly stronger cleaning solution, like a diluted mixture of isopropyl alcohol and water (always test on an inconspicuous area first!). You can also use different types of brushes, such as a soft toothbrush or a small detailing brush, to reach those hard-to-get-to crevices.
Consider adding a drop or two of essential oil to your cleaning solution for a subtle, refreshing scent. Lavender, tea tree, or eucalyptus are all excellent choices. Just be sure to use pure essential oils and avoid adding too much, as some oils can be harsh on certain plastics.
Another variation involves using compressed air to dislodge loose debris before you even begin wiping down the keys. This can save you a lot of time and effort, especially if your keyboard is particularly dusty.
Ultimately, the key to success with this DIY keyboard cleaning trick is to be patient and thorough. Don’t rush the process, and be sure to pay attention to detail. The results will be well worth the effort.
We are confident that once you try this method, you’ll never go back to using those expensive, ineffective cleaning kits again. It’s a cost-effective, eco-friendly, and highly satisfying way to keep your keyboard looking and functioning its best.
So, what are you waiting for? Gather your supplies, roll up your sleeves, and get ready to transform your keyboard from a germ-infested wasteland into a sparkling clean oasis. And most importantly, don’t forget to share your experience with us! We’d love to hear your tips, tricks, and variations on this DIY keyboard cleaning method. Leave a comment below and let us know how it worked for you. Your feedback will help us refine this guide and make it even better for future readers. Let’s banish those dirty keyboards together!
Frequently Asked Questions (FAQ)
Q: How often should I clean my keyboard?
A: The frequency of keyboard cleaning depends on your usage and environment. If you use your keyboard heavily or work in a dusty environment, you should aim to clean it at least once a week. For lighter users, cleaning it every two to four weeks should suffice. However, if you spill something on your keyboard, clean it immediately to prevent damage. Regular cleaning not only keeps your keyboard looking good but also prevents the buildup of germs and allergens.
Q: What kind of cleaning solution should I use?
A: For general cleaning, a mixture of distilled water and a mild dish soap is usually sufficient. Avoid using harsh chemicals or abrasive cleaners, as they can damage the keyboard’s surface. For stubborn stains or sticky residue, you can use a diluted solution of isopropyl alcohol (70% or higher) and water. Always test the solution on an inconspicuous area of the keyboard first to ensure it doesn’t cause any discoloration or damage. Remember to use a soft, lint-free cloth to apply the cleaning solution.
Q: Can I use a vacuum cleaner to clean my keyboard?
A: While a vacuum cleaner can be used to remove loose debris from your keyboard, it’s important to use it with caution. Use a low suction setting and a brush attachment to avoid damaging the keys. Be careful not to dislodge any keys while vacuuming. Compressed air is generally a safer and more effective option for removing dust and crumbs from between the keys.
Q: Is it safe to remove the keycaps for cleaning?
A: Removing the keycaps can allow for a more thorough cleaning, but it’s important to do it carefully. Use a keycap puller to avoid damaging the keys or the keyboard. Before removing the keycaps, take a picture of the keyboard layout so you can easily put them back in the correct positions. Once the keycaps are removed, you can wash them with warm soapy water and a soft brush. Make sure the keycaps are completely dry before reattaching them to the keyboard.
Q: What if I spill liquid on my keyboard?
A: Spilling liquid on your keyboard can be a disaster, but quick action can minimize the damage. Immediately unplug the keyboard and turn it upside down to allow the liquid to drain out. Use a clean, absorbent cloth to wipe up any excess liquid. If the liquid was sugary or sticky, you may need to remove the keycaps and clean the affected areas with a damp cloth. Allow the keyboard to dry completely before plugging it back in. In severe cases, you may need to disassemble the keyboard and clean the internal components.
Q: How do I clean a mechanical keyboard?
A: Cleaning a mechanical keyboard is similar to cleaning a regular keyboard, but there are a few extra considerations. Mechanical keyboards often have removable keycaps, which makes cleaning easier. Use a keycap puller to remove the keycaps and clean them with warm soapy water. Use compressed air to remove dust and debris from the keyboard’s base. You can also use a damp cloth to wipe down the base, but be careful not to get any liquid inside the switches. Make sure everything is completely dry before reassembling the keyboard.
Q: Can I use disinfecting wipes to clean my keyboard?
A: Disinfecting wipes can be used to clean your keyboard, but it’s important to use them sparingly and avoid getting too much moisture on the keyboard. Choose wipes that are specifically designed for electronics and avoid those that contain harsh chemicals or bleach. Wring out any excess liquid from the wipe before using it on the keyboard. Wipe the keyboard gently and allow it to air dry completely before using it again.
Q: How do I prevent my keyboard from getting dirty in the first place?
A: Preventing your keyboard from getting dirty is easier than cleaning it. Avoid eating or drinking near your keyboard. Wash your hands regularly before using your keyboard. Use a keyboard cover to protect it from dust and spills. Regularly dust your desk and surrounding area to minimize the amount of dust that accumulates on your keyboard. By taking these simple precautions, you can keep your keyboard clean and extend its lifespan.

Leave a Comment