

Growing Sweet Corn in Containers might sound like a farm-sized dream crammed into a tiny pot, but trust me, it’s totally achievable! I know what you’re thinking: cornfields stretching as far as the eye can see, not a balcony garden. But that’s the beauty of DIY – we can bend the rules and bring the countryside to our concrete jungles.
Corn, a staple crop with roots tracing back thousands of years to indigenous cultures in the Americas, has always been synonymous with abundance and community. From ancient civilizations relying on it for sustenance to modern-day summer barbecues, corn holds a special place in our hearts (and stomachs!). But what if you don’t have acres of land to dedicate to this golden goodness? That’s where container gardening comes in!
In today’s world, where space is a premium and access to fresh, homegrown produce can be limited, learning how to grow your own food, even in small spaces, is more important than ever. Imagine stepping onto your patio and harvesting your own sweet, juicy corn on the cob, knowing exactly where it came from and how it was grown. No more bland, store-bought corn! This DIY guide will give you the secrets to successfully growing sweet corn in containers, transforming your limited space into a mini-cornfield. I’m excited to show you how!
Growing Sweet Corn in Containers: A Bumper Harvest on Your Patio!
Hey there, fellow gardening enthusiasts! Ever dreamt of sinking your teeth into a juicy, homegrown ear of sweet corn, but thought you didn’t have the space? Well, I’m here to tell you that you absolutely can grow sweet corn, even if all you have is a patio, balcony, or small yard! Container gardening opens up a world of possibilities, and sweet corn is no exception. It might seem a little daunting at first, but trust me, with the right approach, you’ll be enjoying fresh, sweet corn in no time. Let’s dive in!
Choosing the Right Variety
First things first, not all sweet corn varieties are created equal when it comes to container gardening. We need to think small(er).
* Dwarf Varieties are Key: Look for varieties specifically bred for smaller spaces. These are often labeled as “dwarf,” “short-stalked,” or “patio” varieties. Some great options include ‘On Deck’, ‘Golden Midget’, ‘Trinity’, and ‘Baby Corn’. These typically reach a height of 4-5 feet, making them much more manageable in containers.
* Days to Maturity: Consider the “days to maturity” listed on the seed packet. Shorter maturity times mean you’ll be harvesting sooner, which is always a plus! Look for varieties that mature in 60-80 days.
* Disease Resistance: Choose varieties that are known to be resistant to common corn diseases in your area. This will save you a lot of headaches down the road.
Gathering Your Supplies
Okay, now that we’ve got our variety picked out, let’s gather everything we need. This is where the fun begins!
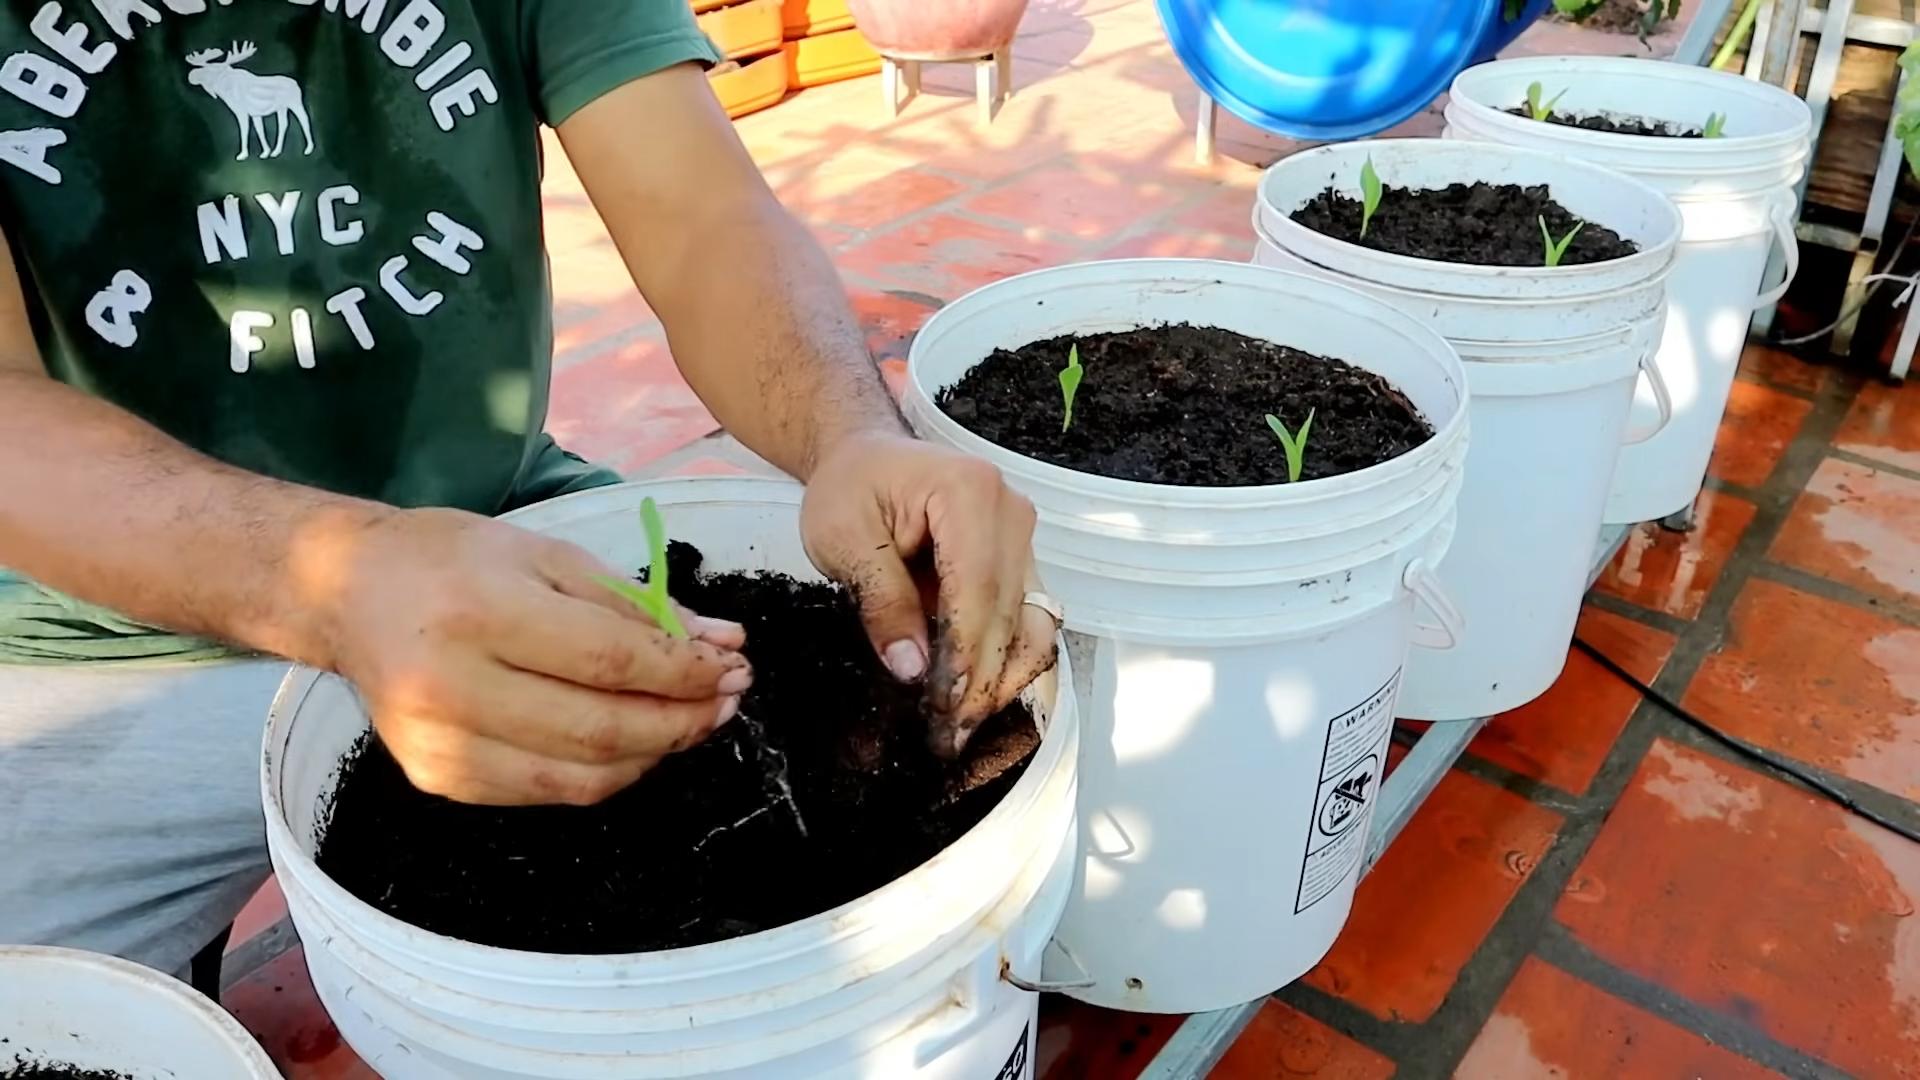
* Large Containers: This is crucial! Sweet corn needs plenty of room for its roots to grow. I recommend using containers that are at least 12-18 inches in diameter and 12 inches deep. The bigger, the better, honestly. Think large pots, half whiskey barrels, or even sturdy plastic tubs.
* High-Quality Potting Mix: Don’t skimp on the potting mix! Use a well-draining mix specifically formulated for containers. Avoid using garden soil, as it can become compacted in containers and doesn’t provide adequate drainage. I like to use a mix that includes peat moss, perlite, and vermiculite.
* Slow-Release Fertilizer: Sweet corn is a heavy feeder, meaning it needs a lot of nutrients to thrive. Incorporate a slow-release fertilizer into your potting mix at planting time. Look for a balanced fertilizer with an NPK ratio of around 10-10-10 or 14-14-14.
* Watering Can or Hose: You’ll need a way to water your corn regularly. A watering can with a gentle rose head is ideal for young seedlings, while a hose with a spray nozzle works well for mature plants.
* Sunlight: Sweet corn needs at least 6-8 hours of direct sunlight per day. Choose a location that gets plenty of sun.
* Optional: Stakes or Trellis: Depending on the variety you choose and how windy your location is, you might want to provide some support for your corn stalks. Stakes or a small trellis can help prevent them from falling over.
* Seeds: Of course, don’t forget your sweet corn seeds!
Planting Your Sweet Corn
Alright, let’s get our hands dirty! Planting sweet corn in containers is pretty straightforward.
1. Prepare Your Containers: Fill your containers with the high-quality potting mix, leaving a few inches of space at the top. Mix in the slow-release fertilizer according to the package directions.
2. Sow the Seeds: Plant the sweet corn seeds about 1-2 inches deep and 4-6 inches apart. I usually plant 3-4 seeds per container and then thin them out later if necessary.
3. Water Thoroughly: After planting, water the containers thoroughly until the water drains out of the bottom. This will help settle the soil and ensure good seed-to-soil contact.
4. Provide Sunlight: Place the containers in a location that receives at least 6-8 hours of direct sunlight per day.
5. Keep the Soil Moist: Keep the soil consistently moist, but not waterlogged. Check the soil moisture regularly and water when the top inch feels dry to the touch.
Caring for Your Sweet Corn
Now that your sweet corn is planted, it’s time to nurture it and help it grow into a bountiful harvest.
1. Thinning Seedlings: Once the seedlings emerge and have a few sets of true leaves, thin them out to the strongest plant per container. This will give the remaining plant plenty of room to grow.
2. Watering: Sweet corn needs consistent watering, especially during hot, dry weather. Water deeply and regularly, ensuring that the soil is moist but not waterlogged. I usually water every day or two, depending on the weather.
3. Fertilizing: In addition to the slow-release fertilizer you incorporated at planting time, you’ll need to provide supplemental feedings throughout the growing season. Use a liquid fertilizer diluted to half strength every 2-3 weeks. Look for a fertilizer that is high in nitrogen during the early stages of growth and then switch to a fertilizer that is higher in phosphorus and potassium as the plants begin to tassel and form ears.
4. Pollination: Sweet corn is wind-pollinated, meaning that the pollen from the tassels (the male flowers at the top of the plant) needs to be transferred to the silks (the female flowers that emerge from the developing ears). In a container setting, you might need to assist with pollination to ensure a good harvest. You can do this by gently shaking the stalks or using a small paintbrush to transfer pollen from the tassels to the silks. I usually do this in the morning when the pollen is most active.
5. Pest and Disease Control: Keep an eye out for common corn pests, such as corn earworms, aphids, and spider mites. You can control these pests with insecticidal soap, neem oil, or other organic pest control methods. Also, watch out for diseases like rust and leaf blight. Ensure good air circulation around the plants and avoid overhead watering to help prevent these diseases. If you notice any signs of disease, treat the plants with a fungicide.
6. Support: As the corn stalks grow taller, they may become top-heavy and prone to falling over, especially in windy conditions. Provide support by staking the stalks or using a small trellis. Tie the stalks loosely to the stakes or trellis with twine.
Harvesting Your Sweet Corn
The moment we’ve all been waiting for! Harvesting your homegrown sweet corn is one of the most rewarding experiences in gardening.
1. Timing is Key: The key to harvesting sweet corn at its peak flavor is to pick it at the right time. The ears are usually ready to harvest about 20-25 days after the silks first appear.
2. Check the Silks: The silks should be dry and brown, but still slightly moist.
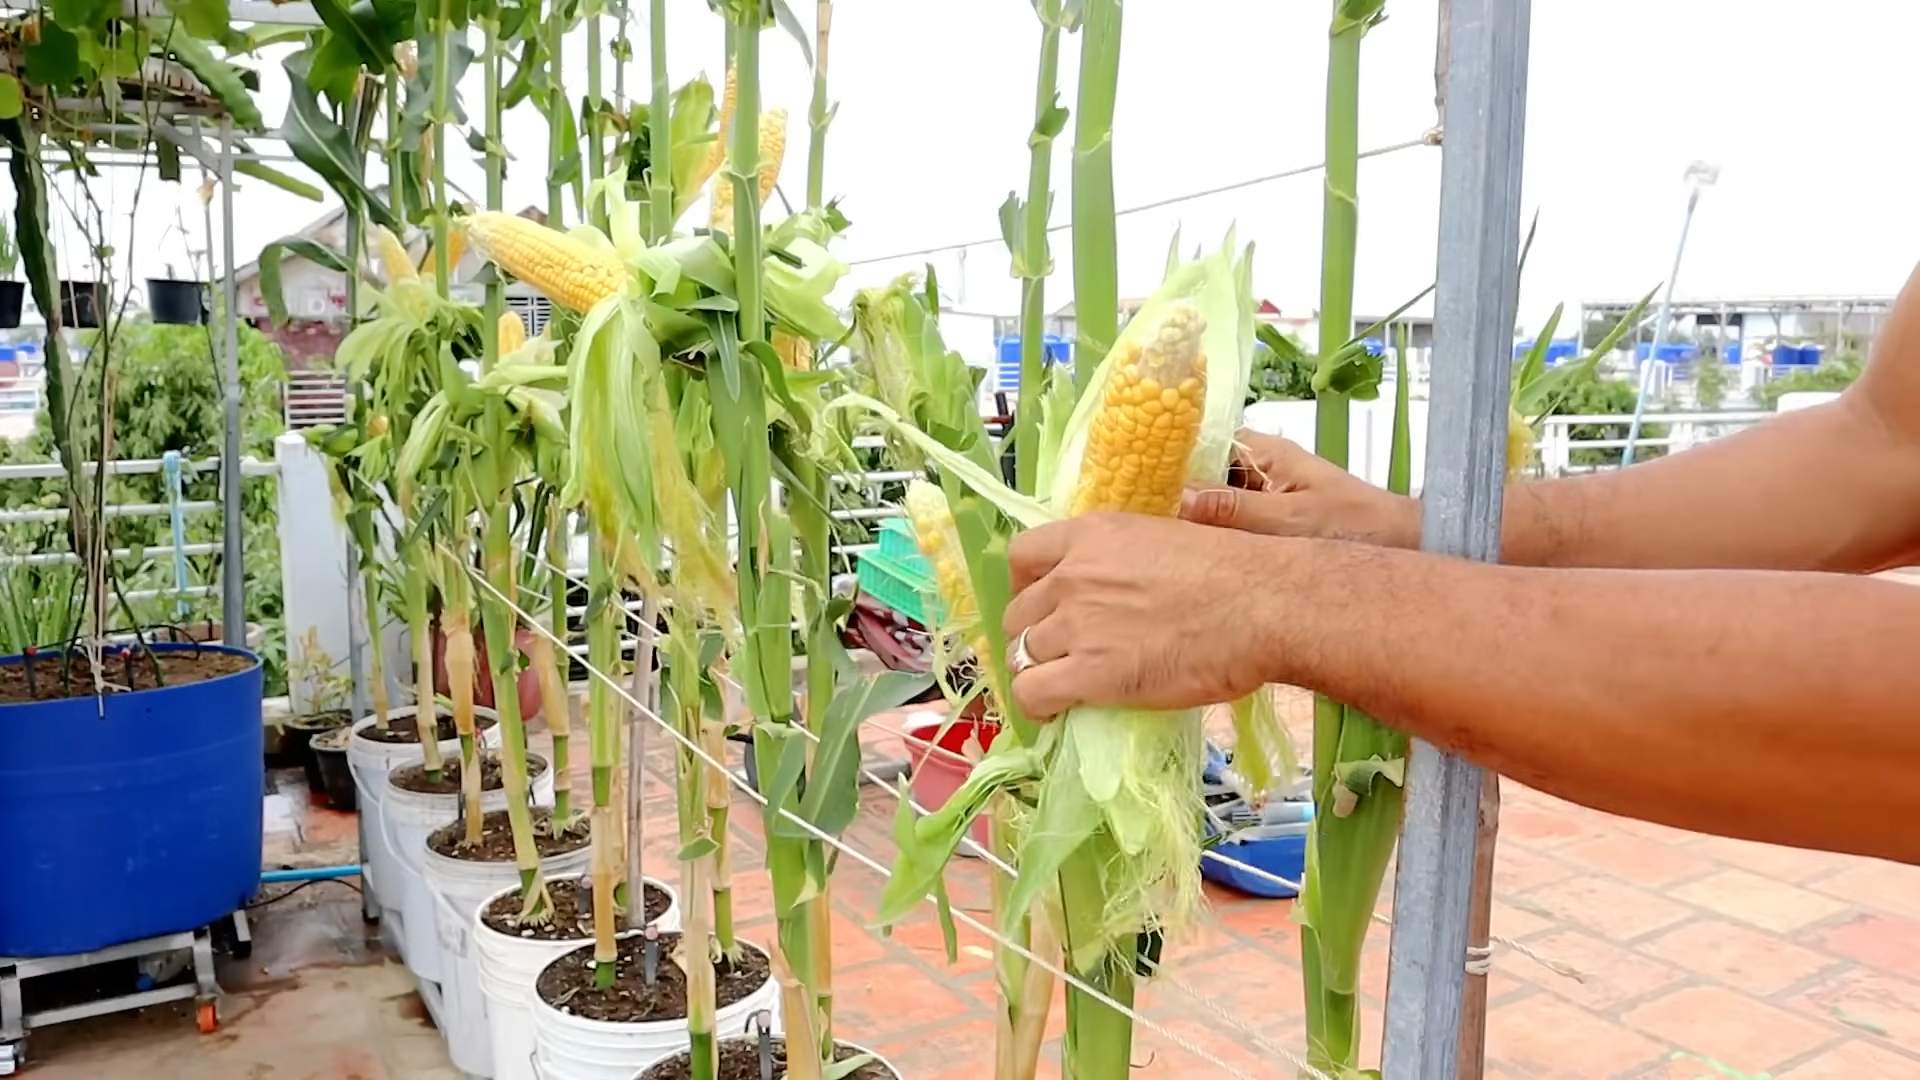
3. Feel the Ear: Gently feel the ear through the husk. It should feel plump and full, with well-developed kernels.
4. Peel Back the Husk: Carefully peel back a portion of the husk to check the kernels. They should be plump and milky when punctured. If the liquid is clear, the corn is not ripe yet. If it’s pasty, it’s overripe.
5. Harvest: To harvest, grasp the ear firmly and twist it downward. It should snap off easily from the stalk.
6. Enjoy Immediately: Sweet corn is best enjoyed fresh, so cook it as soon as possible after harvesting. You can grill it, boil it, steam it, or roast it. The possibilities are endless!
Troubleshooting
Even with the best planning, sometimes things don’t go exactly as expected. Here are a few common problems you might encounter and how to address them:
* Poor Pollination: If you’re not getting well-filled ears, poor pollination is likely the culprit. Try hand-pollinating the plants as described above.
* Stunted Growth: Stunted growth can be caused by a variety of factors, including nutrient deficiencies, lack of sunlight, or pest infestations. Make sure your plants are getting enough sunlight, water, and fertilizer. Check for pests and treat them accordingly.
* Yellowing Leaves: Yellowing leaves can indicate a nutrient deficiency, particularly nitrogen. Fertilize the plants with a nitrogen-rich fertilizer.
* Ears Not Filling Out: This could be due to poor pollination or insufficient watering. Ensure adequate pollination and consistent watering.
Additional Tips for Success
* Succession Planting: To extend your harvest season, plant sweet corn seeds every 2-3 weeks. This will ensure a continuous supply of fresh corn throughout the summer.
* Companion Planting: Plant sweet corn alongside other beneficial plants, such as beans, squash, and cucumbers
Conclusion
So, there you have it! Growing sweet corn in containers might seem like a daunting task at first, but with the right knowledge and a little bit of effort, you can enjoy the unparalleled taste of homegrown corn, even without a sprawling backyard. This DIY trick is a must-try for several compelling reasons. First and foremost, it democratizes access to fresh, delicious sweet corn. No longer are you limited by the size of your property; a sunny balcony, patio, or even a well-lit deck can become your personal cornfield.
Beyond accessibility, container gardening offers a level of control that traditional in-ground planting simply can’t match. You have complete command over the soil composition, ensuring your corn receives the precise nutrients it needs to thrive. You can also easily move your containers to chase the sun or protect them from unexpected weather events. This level of control translates to healthier plants and, ultimately, a more bountiful harvest.
Furthermore, growing your own sweet corn is an incredibly rewarding experience. From the moment you sow the seeds to the day you harvest those plump, juicy ears, you’ll witness the miracle of nature unfold before your eyes. It’s a fantastic way to connect with your food, appreciate the effort that goes into producing it, and teach children about the wonders of gardening.
But the benefits don’t stop there. Growing sweet corn in containers is also a sustainable practice. By reducing your reliance on commercially grown corn, you’re minimizing your carbon footprint and supporting local food systems. Plus, you can compost your corn stalks and husks to enrich your soil, creating a closed-loop system that’s good for the environment.
Ready to take your container corn game to the next level? Consider experimenting with different varieties of sweet corn. There are numerous cultivars available, each with its own unique flavor profile and growing characteristics. Try a super-sweet variety for an extra sugary treat, or opt for a bicolor variety for a visually stunning harvest. You can also companion plant your corn with other vegetables and herbs, such as beans, squash, and basil, to create a thriving ecosystem in your containers.
Another variation to explore is succession planting. By staggering your planting dates, you can extend your harvest season and enjoy fresh sweet corn for a longer period. Simply sow a new batch of seeds every few weeks, and you’ll have a continuous supply of delicious corn throughout the summer.
Don’t be afraid to get creative with your container selection. While large plastic pots are a popular choice, you can also use repurposed containers, such as old buckets, barrels, or even grow bags. Just make sure your containers have adequate drainage holes to prevent waterlogging.
We wholeheartedly encourage you to try this DIY trick and experience the joy of growing your own sweet corn in containers. It’s a fun, rewarding, and sustainable way to enjoy fresh, delicious corn, no matter where you live. Once you’ve harvested your first crop, we’d love to hear about your experience! Share your tips, tricks, and photos with us in the comments below. Let’s build a community of container corn growers and inspire others to give it a try. Happy gardening!
Frequently Asked Questions (FAQ)
What is the best size container for growing sweet corn?
The ideal container size for growing sweet corn is at least 12 inches in diameter and 12 inches deep. However, larger containers, such as 15-20 gallons, are even better as they provide more room for the roots to grow and support the tall stalks. Remember that sweet corn needs to be planted in blocks for proper pollination, so consider using a rectangular container that can accommodate multiple plants. The larger the container, the more stable it will be, preventing it from tipping over in windy conditions.
How many sweet corn plants can I grow in one container?
This depends on the size of your container. As a general rule, allow at least 8-10 inches of space between plants. In a 12-inch diameter container, you can typically grow 2-3 sweet corn plants. In a larger container, such as a 20-gallon pot, you can grow 4-6 plants. Remember that sweet corn relies on wind pollination, so planting in blocks rather than rows is crucial for successful ear development. Overcrowding can lead to stunted growth and reduced yields.
What type of soil is best for growing sweet corn in containers?
Sweet corn thrives in well-draining, nutrient-rich soil. A good potting mix should consist of equal parts of compost, peat moss (or coconut coir), and perlite or vermiculite. Compost provides essential nutrients, peat moss (or coconut coir) helps retain moisture, and perlite or vermiculite improves drainage. Avoid using garden soil in containers, as it can become compacted and hinder root growth. You can also amend your potting mix with slow-release fertilizer to provide a steady supply of nutrients throughout the growing season.
How often should I water sweet corn grown in containers?
Sweet corn requires consistent moisture, especially during germination and ear development. Water deeply whenever the top inch of soil feels dry to the touch. In hot, sunny weather, you may need to water your corn plants daily. Avoid overwatering, as this can lead to root rot. Ensure your containers have adequate drainage holes to prevent waterlogging. A good rule of thumb is to water until you see water draining from the bottom of the container.
How much sunlight does sweet corn need?
Sweet corn needs at least 6-8 hours of direct sunlight per day to thrive. Choose a location for your containers that receives full sun exposure. If you live in a particularly hot climate, you may need to provide some afternoon shade to prevent the plants from scorching. Insufficient sunlight can lead to weak stalks, poor ear development, and reduced yields.
How do I pollinate sweet corn in containers?
Sweet corn is wind-pollinated, meaning that pollen from the tassels (the male flowers at the top of the plant) needs to reach the silks (the female flowers that emerge from the ears). In a container setting, where plants may be more sheltered from the wind, you may need to assist with pollination. You can do this by gently shaking the stalks or using a small paintbrush to transfer pollen from the tassels to the silks. Repeat this process every day for about a week, starting when the silks first emerge.
When is the best time to harvest sweet corn?
Sweet corn is typically ready to harvest about 20-25 days after the silks emerge. To check for ripeness, peel back a portion of the husk and puncture a kernel with your fingernail. If the liquid that comes out is milky, the corn is ready to harvest. If the liquid is clear, the corn needs more time to mature. If the liquid is doughy, the corn is overripe. The silks should also be brown and dry. Harvest in the early morning for the best flavor.
What are some common pests and diseases that affect sweet corn?
Common pests that affect sweet corn include corn earworms, aphids, and spider mites. Diseases include corn smut and rust. You can control pests by handpicking them off the plants, using insecticidal soap, or introducing beneficial insects. Prevent diseases by providing good air circulation, avoiding overhead watering, and using disease-resistant varieties. Regularly inspect your plants for signs of pests or diseases and take action promptly.
Can I grow sweet corn in containers indoors?
While it’s possible to grow sweet corn indoors, it’s challenging due to the plant’s high light requirements and need for wind pollination. You would need to provide very strong artificial lighting and manually pollinate the plants. It’s generally easier and more successful to grow sweet corn in containers outdoors, where it can receive ample sunlight and natural wind pollination.
How do I store sweet corn after harvesting?
Sweet corn is best eaten fresh, as its sugars begin to convert to starch soon after harvesting. If you can’t eat it right away, store it in the refrigerator, unhusked, for up to a few days. For longer storage, you can freeze the kernels. To freeze, blanch the ears in boiling water for a few minutes, then cut the kernels off the cob and freeze them in airtight containers or freezer bags.
Leave a Comment