

Grow potatoes cheap DIY – sounds like a dream, right? Well, grab your gardening gloves because it’s a dream you can absolutely make a reality! Forget those pricey supermarket spuds; I’m about to share some incredible DIY tricks that will have you harvesting a bumper crop of potatoes without breaking the bank.
Potatoes have a fascinating history, stretching back thousands of years to the Andes Mountains in South America, where they were a staple food. Over time, they spread across the globe, becoming a vital part of cuisines worldwide. But did you know that you don’t need acres of land or a fortune to cultivate your own delicious potatoes?
In today’s world, where grocery bills seem to climb higher every week, learning how to grow potatoes cheap DIY is more relevant than ever. Imagine the satisfaction of digging up your own homegrown potatoes, knowing exactly where they came from and how they were grown. Plus, it’s a fantastic way to connect with nature, reduce your carbon footprint, and enjoy the freshest, most flavorful potatoes imaginable. So, let’s dive into these simple, budget-friendly DIY hacks and get your potato-growing journey started!

Grow Potatoes Like a Pro (Without Breaking the Bank!)
Hey there, fellow gardening enthusiasts! I’m so excited to share my favorite budget-friendly method for growing potatoes. Forget fancy equipment and expensive setups – we’re going back to basics and maximizing our yield with minimal cost. This guide will walk you through every step, from choosing the right potatoes to harvesting your delicious crop. Let’s get digging!
Choosing Your Seed Potatoes
First things first, you can’t just plant any old potato from the grocery store. Those are often treated to prevent sprouting. You need “seed potatoes,” which are potatoes specifically grown for planting.
* Certified Seed Potatoes: These are the gold standard. They’re guaranteed to be disease-free and true to type. You can find them at garden centers or online retailers.
* Organic Potatoes from the Store (with eyes): If you’re on a super tight budget, you can try using organic potatoes from the grocery store, but only if they have visible “eyes” (those little buds that will sprout). Make sure they are certified organic to avoid any sprout inhibitors.
* Variety Matters: Consider what kind of potatoes you like to eat. Do you prefer russets for baking, Yukon Golds for mashing, or red potatoes for boiling? Choose varieties that thrive in your climate.
Sprouting (Chitting) Your Potatoes
This step is crucial for getting a head start and ensuring a robust harvest. Chitting simply means encouraging your seed potatoes to sprout before planting.
1. Timing is Key: Start chitting about 4-6 weeks before your last expected frost.
2. Find a Bright, Cool Spot: Place your seed potatoes in a cool (around 60-70°F or 15-21°C), bright location, but out of direct sunlight. An unheated garage, shed, or even a windowsill works well.
3. Egg Cartons or Trays: Stand the potatoes upright in egg cartons or trays, with the “eyes” facing upwards. This encourages the sprouts to grow upwards towards the light.
4. Patience is a Virtue: Over the next few weeks, you’ll see small, green sprouts emerging from the eyes. These are what we want!
5. Don’t Let Them Get Too Long: Aim for sprouts that are about 1/2 to 1 inch long. If they get too long and spindly, they’re more likely to break off when you plant them.
Preparing Your Planting Area
Potatoes need well-drained soil and plenty of sunlight (at least 6-8 hours per day).
1. Choose a Sunny Location: As I mentioned, sunlight is essential for potato growth.
2. Soil Preparation: Potatoes prefer slightly acidic soil (pH 6.0-6.5). Amend your soil with compost or well-rotted manure to improve drainage and fertility. I like to add a generous amount of compost – it really makes a difference!
3. Loosen the Soil: Use a garden fork or tiller to loosen the soil to a depth of at least 12 inches. This allows the potato roots to spread easily.
4. Consider Raised Beds: If you have heavy clay soil, raised beds are a great option. They improve drainage and warm up faster in the spring.
Planting Your Seed Potatoes
Now for the fun part – getting those potatoes in the ground!
1. Cut Large Seed Potatoes (Optional): If your seed potatoes are larger than an egg, you can cut them into pieces, making sure each piece has at least 2-3 eyes. Let the cut pieces dry for a day or two to callous over before planting. This helps prevent rot.
2. Dig Trenches: Dig trenches that are about 4-6 inches deep and 2-3 feet apart.
3. Space the Potatoes: Place the seed potatoes (or potato pieces) in the trenches, with the sprouts facing upwards, spacing them about 12 inches apart.
4. Cover with Soil: Gently cover the potatoes with soil, leaving a slight mound.
5. Water Well: Water the planting area thoroughly to settle the soil.
“Hilling” Your Potatoes
This is a crucial technique for maximizing your potato yield. Hilling involves gradually covering the potato plants with soil as they grow.
1. Why Hill? Hilling encourages the plants to produce more potatoes along the buried stems. It also protects the developing potatoes from sunlight, which can cause them to turn green and produce solanine, a toxic compound.
2. When to Start Hilling: When the potato plants are about 6-8 inches tall, it’s time to start hilling.
3. How to Hill: Use a hoe or shovel to draw soil from the sides of the trench up around the base of the plants, burying the stems up to the bottom leaves.
4. Repeat the Process: Continue hilling every 2-3 weeks as the plants grow, until you have a mound of soil about 12 inches high.
Watering and Fertilizing
Potatoes need consistent moisture, especially during tuber formation.
1. Water Regularly: Water deeply whenever the top inch of soil feels dry. Avoid overwatering, which can lead to rot.
2. Fertilize Sparingly: Potatoes are heavy feeders, but avoid over-fertilizing, which can result in excessive foliage growth at the expense of tuber development. I like to use a balanced organic fertilizer, following the package instructions.
3. Side-Dress with Compost: You can also side-dress the plants with compost every few weeks to provide a slow-release source of nutrients.
Pest and Disease Control
Keep an eye out for common potato pests and diseases.
* Colorado Potato Beetles: These beetles can defoliate your plants. Handpick them off or use an organic insecticide like neem oil.
* Flea Beetles: These tiny beetles can create small holes in the leaves. Row covers can help prevent flea beetle damage.
* Potato Blight: This fungal disease can cause rapid defoliation and tuber rot. Choose blight-resistant varieties and practice good sanitation (remove infected foliage).
Harvesting Your Potatoes
The moment we’ve all been waiting for!
1. When to Harvest: You can harvest “new potatoes” (small, tender potatoes) about 2-3 weeks after the plants flower. For mature potatoes, wait until the foliage starts to die back.
2. Test Dig: Before harvesting the entire crop, dig up a few plants to check the size and maturity of the potatoes.
3. Dig Carefully: Use a garden fork to carefully dig around the plants, being careful not to damage the potatoes.
4. Gently Lift: Gently lift the plants from the soil and collect the potatoes.
5. Cure the Potatoes: Let the potatoes dry in a cool, dark, well-ventilated place for a week or two to cure. This helps them develop a thicker skin and improves their storage life.
6. Storage: Store cured potatoes in a cool, dark, dry place (around 40-50°F or 4-10°C). Avoid storing them near apples or onions, as these release ethylene gas, which can cause potatoes to sprout.
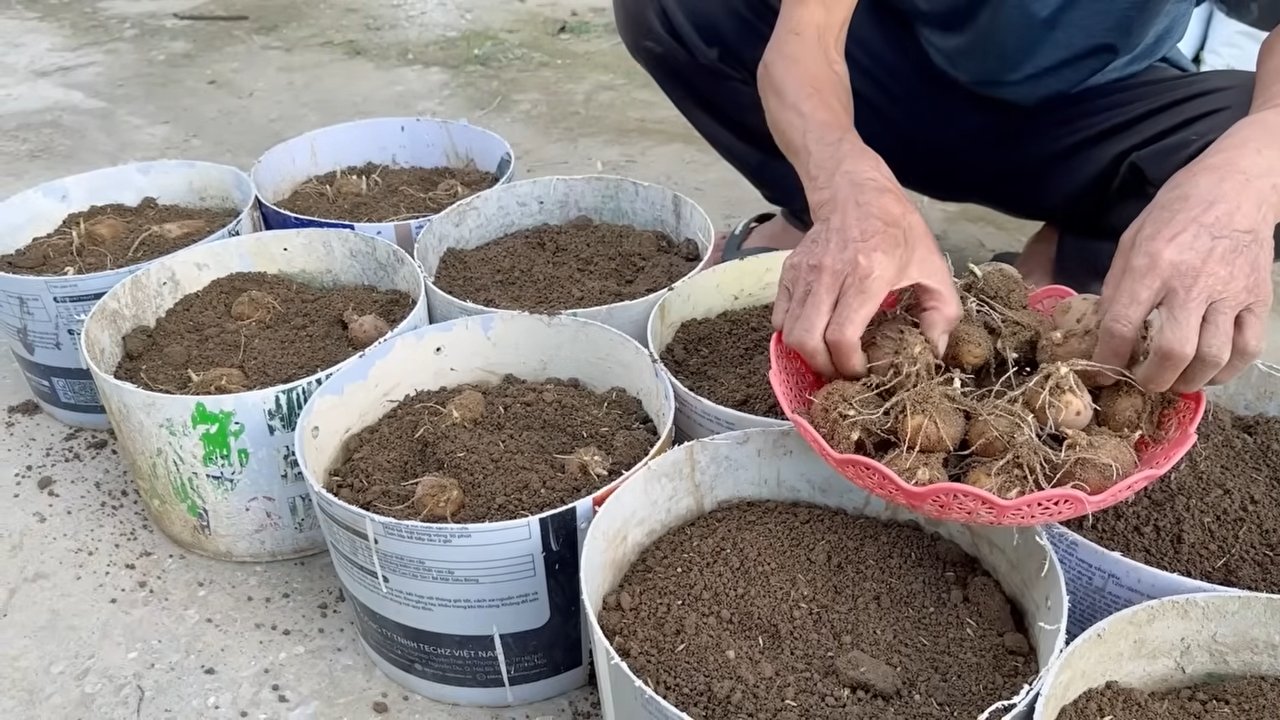
Bonus Tip: Growing Potatoes in Containers
If you have limited space, you can also grow potatoes in containers.
* Choose a Large Container: Select a container that is at least 20 gallons in size.
* Use a Well-Draining Potting Mix: Avoid using garden soil, as it can become compacted in containers.
* Plant as Described Above: Plant your seed potatoes in the container, following the same spacing guidelines as for in-ground planting.
* Hill as the Plants Grow: As the plants grow, add more potting mix to the container, burying the stems up to the bottom leaves.
* Water Regularly: Container-grown potatoes will need more frequent watering than those grown in the ground.
Troubleshooting
* No Sprouts: If your seed potatoes aren’t sprouting, make sure they’re getting enough light and are kept in a cool environment.
* Yellowing Leaves: Yellowing leaves can indicate a nutrient deficiency or overwatering. Check your soil and adjust your watering accordingly.
* Small Potatoes: Small potatoes can be caused by insufficient watering, poor soil fertility, or overcrowding. Make sure you’re providing adequate water and nutrients, and space your plants properly.
Growing potatoes is a rewarding experience, and with these tips, you can enjoy a bountiful harvest without spending a fortune. Happy gardening!
Conclusion
So, there you have it! Growing your own potatoes doesn’t have to break the bank. This simple, effective, and incredibly rewarding DIY method for growing potatoes cheaply opens up a world of possibilities, bringing the joy of homegrown produce right to your backyard, balcony, or even a sunny windowsill. Forget the expensive seed potatoes and specialized equipment; with a little resourcefulness and this easy-to-follow guide, you can cultivate a bountiful harvest of delicious, earthy potatoes.
This isn’t just about saving money; it’s about connecting with your food, understanding the growing process, and enjoying the unparalleled flavor of freshly dug potatoes. Imagine the satisfaction of serving a meal featuring potatoes you nurtured from sprout to spud! The taste difference alone is worth the effort.
But the benefits extend beyond the culinary. Gardening is a fantastic stress reliever, a great way to get some fresh air and sunshine, and a wonderful activity to share with family and friends. Involving children in the process can teach them valuable lessons about nature, sustainability, and where their food comes from.
Don’t be afraid to experiment! Try different varieties of potatoes to discover your favorites. Russets, Yukon Golds, red potatoes – each offers a unique flavor and texture. You can also adjust the size of your growing container to suit your space and needs. For smaller spaces, consider using grow bags or even large buckets. For larger gardens, you can adapt the method to create rows of potato plants.
Consider companion planting to further enhance your potato growing experience. Marigolds can help deter pests, while basil can improve the flavor of your potatoes. Research different companion plants to find the perfect combination for your garden.
And remember, this DIY method is all about sustainability. By using recycled materials and repurposing kitchen scraps, you’re reducing waste and contributing to a more eco-friendly lifestyle. It’s a win-win situation for you and the planet.
We encourage you to give this DIY potato growing trick a try. It’s easier than you think, and the rewards are well worth the effort. Once you’ve harvested your first crop of homegrown potatoes, be sure to share your experience with us! We’d love to hear your tips, tricks, and success stories. Post photos of your potato plants and harvests on social media using [Your Hashtag Here] and let’s inspire others to embrace the joy of growing their own food.
Don’t delay, start growing your own potatoes cheaply today! You’ll be amazed at how easy and rewarding it is. Happy gardening!
Frequently Asked Questions (FAQ)
What kind of potatoes work best for this DIY method?
Almost any type of potato can be grown using this method, but some varieties tend to be more successful than others. Generally, potatoes that are labeled as “seed potatoes” are specifically bred for growing and will produce the best results. However, you can also use potatoes from the grocery store, especially organic ones, as they are less likely to have been treated with sprout inhibitors.
Consider the climate in your area when choosing a potato variety. Some potatoes are better suited to warmer climates, while others thrive in cooler temperatures. Russet potatoes are a popular choice for baking and frying, while Yukon Gold potatoes are known for their creamy texture and buttery flavor. Red potatoes are great for boiling and salads. Experiment with different varieties to find your favorites.
How much sunlight do potatoes need?
Potatoes need at least six hours of direct sunlight per day to thrive. Choose a location that receives plenty of sunlight throughout the day. If you’re growing potatoes indoors, place them near a sunny window or use grow lights to supplement natural light. Insufficient sunlight can result in weak, leggy plants and a smaller harvest.
What kind of soil is best for growing potatoes?
Potatoes prefer well-drained, slightly acidic soil with a pH between 6.0 and 6.5. Amend your soil with compost or other organic matter to improve drainage and fertility. Avoid heavy clay soils, as they can become waterlogged and prevent the potatoes from developing properly. If you have clay soil, consider growing your potatoes in raised beds or containers filled with a well-draining potting mix.
How often should I water my potato plants?
Water your potato plants regularly, especially during dry periods. Keep the soil consistently moist, but avoid overwatering, as this can lead to root rot. Water deeply whenever the top inch of soil feels dry to the touch. Mulching around the plants can help retain moisture and suppress weeds.
How do I know when my potatoes are ready to harvest?
The timing of your potato harvest will depend on the variety of potato you’re growing and the growing conditions in your area. Generally, potatoes are ready to harvest when the foliage begins to turn yellow and die back. You can also gently dig around the base of the plant to check the size of the potatoes. If they are large enough for your liking, you can harvest them.
For “new potatoes,” which are smaller and have thinner skins, you can harvest them earlier in the season, about two to three weeks after the plants have flowered. These potatoes are best eaten fresh and don’t store well.
Can I grow potatoes in containers?
Yes, potatoes can be successfully grown in containers. Choose a large container with drainage holes, at least 15 gallons in size. Fill the container with a well-draining potting mix and follow the same planting and care instructions as for growing potatoes in the ground. Container-grown potatoes may require more frequent watering and fertilization than those grown in the ground.
What are some common potato pests and diseases?
Potatoes can be susceptible to various pests and diseases, including potato beetles, aphids, blight, and scab. Regularly inspect your plants for signs of pests or diseases and take appropriate action if necessary. Organic pest control methods, such as hand-picking pests or using insecticidal soap, can be effective. To prevent diseases, choose disease-resistant potato varieties and practice good sanitation in your garden.
How do I store my harvested potatoes?
Store your harvested potatoes in a cool, dark, and well-ventilated place. The ideal storage temperature is between 40 and 50 degrees Fahrenheit. Avoid storing potatoes near apples or bananas, as these fruits release ethylene gas, which can cause potatoes to sprout prematurely. Properly stored potatoes can last for several months.
Can I use potatoes that have sprouted?
Yes, you can use potatoes that have sprouted, but you should remove the sprouts before cooking them. The sprouts contain solanine, a toxic compound that can cause illness if ingested in large quantities. Cut away the sprouts and any green areas on the potato before cooking. If the potato is heavily sprouted or has turned green throughout, it’s best to discard it.
Is this method really a cheap way to grow potatoes?
Absolutely! The core of this method focuses on utilizing resources you likely already have – leftover potatoes, recycled containers, and readily available soil amendments. Compared to purchasing certified seed potatoes and specialized gardening supplies, this DIY approach significantly reduces the cost of growing your own potatoes. The savings can be substantial, especially if you’re growing a large quantity of potatoes. This makes it an accessible and budget-friendly option for anyone interested in home gardening.
Leave a Comment