

Okra Farming Tips: Unlock the secrets to a bountiful harvest right in your backyard! Have you ever dreamed of plucking fresh, vibrant okra pods straight from your own garden? It’s more achievable than you think, and I’m here to guide you through every step of the process. For generations, okra has been a staple in Southern cuisine and beyond, with roots tracing back to Africa. Its resilience and nutritional value have made it a beloved crop worldwide.
But let’s face it, sometimes growing okra can feel like a challenge. Pests, diseases, and unpredictable weather can all throw a wrench in your plans. That’s where these DIY tricks and hacks come in! I’m going to share my tried-and-true methods for maximizing your okra yield, minimizing common problems, and enjoying a season filled with delicious, homegrown goodness. Whether you’re a seasoned gardener or just starting out, these okra farming tips will empower you to cultivate a thriving okra patch. Get ready to roll up your sleeves and discover the joy of growing your own okra!
Growing Okra: My Foolproof Guide to a Bountiful Harvest
Okra, also known as lady’s fingers, is a warm-season vegetable that’s surprisingly easy to grow, even if you don’t have a green thumb! I’ve been growing okra in my backyard garden for years, and I’ve learned a few tricks along the way to ensure a healthy and productive harvest. This guide will walk you through everything you need to know, from choosing the right variety to dealing with pests. Let’s get started!
Choosing the Right Okra Variety
Before you even think about planting, you need to pick the right okra variety for your climate and garden size. Here are a few of my favorites:
- Clemson Spineless: This is a classic choice and a reliable producer. It’s known for its smooth, spineless pods, making harvesting a breeze.
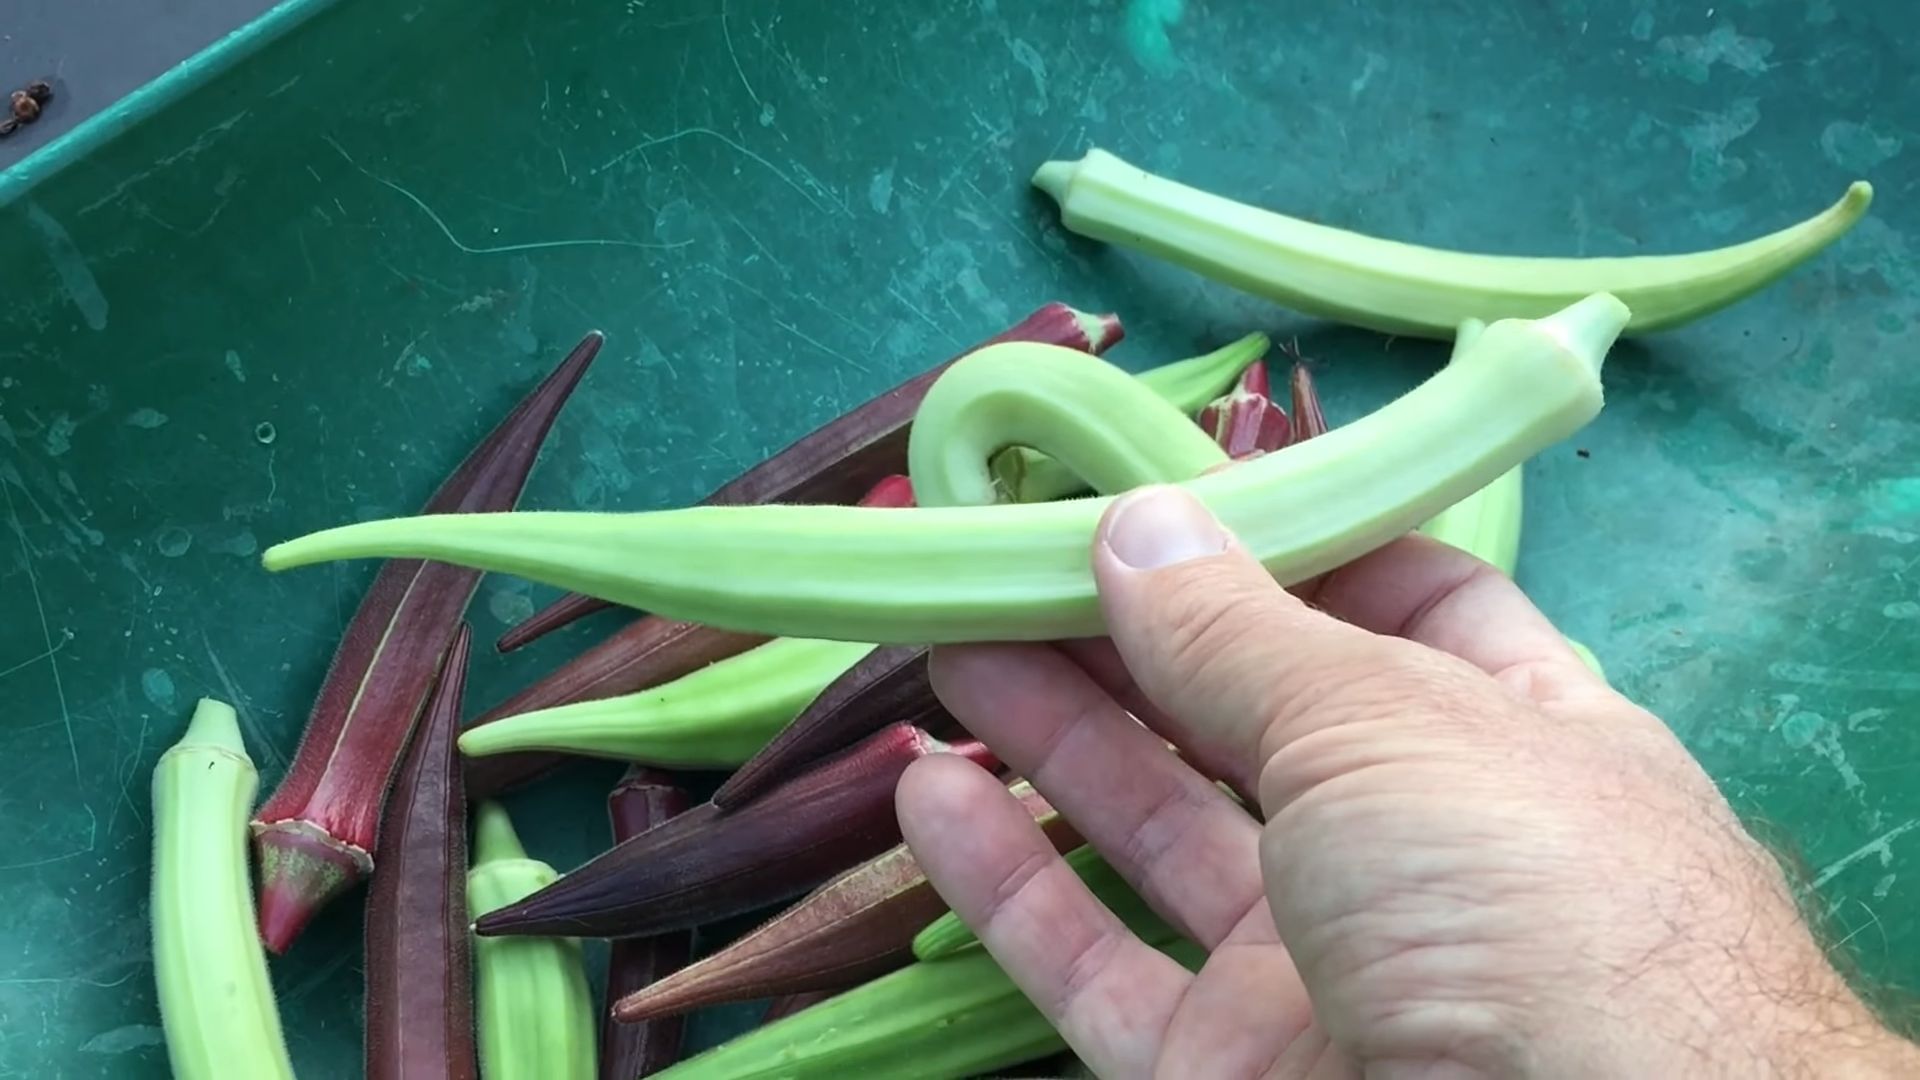
- Burgundy: If you want something a little different, try Burgundy okra. It has beautiful red pods that add a pop of color to your garden. The flavor is similar to green okra.
- Dwarf Green Long Pod: Perfect for smaller gardens or containers, this variety produces long, slender pods on compact plants.
- Emerald: Another spineless variety, Emerald okra is known for its dark green, tender pods and high yields.
Consider your space and climate when making your choice. Shorter varieties are ideal for containers or small gardens, while longer-season varieties thrive in warmer climates.
Preparing Your Garden Bed
Okra needs plenty of sunshine and well-drained soil to thrive. Here’s how I prepare my garden bed for planting:
- Sunlight: Choose a location that receives at least 6-8 hours of direct sunlight per day. Okra loves the sun!
- Soil: Okra prefers well-drained, sandy loam soil with a pH between 6.0 and 7.0. If your soil is heavy clay, amend it with compost or other organic matter to improve drainage.
- Soil Testing: I always recommend testing your soil before planting. This will tell you if your soil is lacking any essential nutrients. You can purchase a soil testing kit at most garden centers or send a sample to your local agricultural extension office.
- Amending the Soil: Based on your soil test results, amend your soil with compost, aged manure, or other organic matter. I like to add a balanced fertilizer (10-10-10) at planting time to give my okra plants a good start.
Planting Okra Seeds
Okra is a warm-season crop, so it’s important to wait until the soil has warmed up before planting. I usually wait until after the last frost and the soil temperature is consistently above 65°F (18°C).
- Soaking the Seeds: To speed up germination, I like to soak my okra seeds in warm water for 12-24 hours before planting. This helps to soften the seed coat and encourages sprouting.
- Planting Depth: Plant the seeds about ½ to 1 inch deep and 2-3 inches apart. You can always thin them later if needed.
- Row Spacing: Space rows about 3-4 feet apart to allow for adequate air circulation and sunlight penetration.
- Watering: After planting, water the seeds thoroughly. Keep the soil consistently moist until the seedlings emerge.
Caring for Your Okra Plants
Once your okra plants have sprouted, it’s important to provide them with proper care to ensure a healthy and productive harvest.
- Watering: Okra needs consistent moisture, especially during hot, dry weather. Water deeply once or twice a week, or more often if the soil dries out quickly. Avoid overhead watering, as this can promote fungal diseases. I prefer using a soaker hose or drip irrigation to water my okra plants.
- Fertilizing: Okra is a heavy feeder, so it benefits from regular fertilization. I like to side-dress my plants with a balanced fertilizer every 4-6 weeks. You can also use a liquid fertilizer, such as fish emulsion or seaweed extract.
- Weeding: Keep your garden bed free of weeds, as they can compete with your okra plants for nutrients and water. Hand-pull weeds regularly or use a hoe to cultivate the soil. Mulching around your plants can also help to suppress weed growth.
- Pruning: While not essential, pruning can help to improve air circulation and sunlight penetration. I like to remove any yellowing or damaged leaves, as well as any suckers that grow from the base of the plant.
Dealing with Pests and Diseases
Okra is generally a pest-resistant plant, but it can be susceptible to certain pests and diseases. Here are a few common problems and how to deal with them:
- Aphids: These tiny insects can suck the sap from your okra plants, causing them to weaken and yellow. You can control aphids by spraying them with a strong stream of water, insecticidal soap, or neem oil.
- Flea Beetles: These small, jumping beetles can chew holes in the leaves of your okra plants. You can control flea beetles by using row covers, diatomaceous earth, or insecticidal soap.
- Corn Earworms: These caterpillars can bore into the okra pods, causing damage and making them unmarketable. You can control corn earworms by hand-picking them off the plants, using Bacillus thuringiensis (Bt), or spraying with an insecticide.
- Fusarium Wilt: This fungal disease can cause your okra plants to wilt and die. To prevent Fusarium wilt, plant disease-resistant varieties, practice crop rotation, and avoid overwatering.
- Powdery Mildew: This fungal disease can cause a white, powdery coating on the leaves of your okra plants. To prevent powdery mildew, provide good air circulation, avoid overhead watering, and spray with a fungicide if necessary.
I always prefer to use organic pest control methods whenever possible. Neem oil, insecticidal soap, and Bacillus thuringiensis (Bt) are all effective and safe for use in the garden.
Harvesting Okra
Okra pods are ready to harvest about 50-60 days after planting. The key is to harvest them when they are young and tender, usually when they are 2-4 inches long.
- Harvesting Frequency: Check your okra plants every day or two, as the pods can grow quickly. The more you harvest, the more your plants will produce.
- Harvesting Technique: Use a sharp knife or pruning shears to cut the pods from the plant. Be careful not to damage the plant.
- Handling: Wear gloves when harvesting okra, as the pods can be prickly and irritating to the skin.
- Storage: Okra is best used fresh, but it can be stored in the refrigerator for up to a week. Wrap the pods in a paper towel and place them in a plastic bag.
Don’t let the pods get too large, as they will become tough and fibrous. Overripe pods can also reduce the plant’s overall productivity.
Extending the Harvest
To extend your okra harvest, try these tips:
- Succession Planting: Plant okra seeds every 2-3 weeks to ensure a continuous supply of pods throughout the growing season.
- Deadheading: Remove any spent flowers or old pods to encourage the plant to produce more.
- Fertilizing: Continue to fertilize your okra plants regularly to keep them healthy and productive.
Saving Okra Seeds
If you want to save seeds from your okra plants for next year, allow a few pods to mature on the plant. Let them dry completely on the plant, then harvest the pods and extract the seeds. Store the seeds in a cool, dry place until planting time.
- Selecting Pods: Choose healthy, vigorous plants to save seeds from. Select pods that are fully mature and have dried completely on the plant.
- Harvesting Seeds: Carefully break open the dried pods and remove the seeds.
- Drying Seeds: Spread the seeds out on a screen or paper towel and allow them to dry completely for several days.
- Storing Seeds: Store the dried seeds in an airtight container in a cool, dry place. Label the container with the variety and date.
Troubleshooting Common Okra Problems
Even with the best care, you may encounter some problems while growing okra. Here are a few common issues and how to address them:
- Yellowing Leaves: Yellowing leaves can be caused by a variety of factors, including nutrient deficiencies, overwatering, or pests. Check your soil pH and nutrient levels, adjust your watering schedule, and inspect your plants for pests.
- Stunted Growth

Conclusion
So, there you have it! Mastering okra farming doesn’t require a green thumb blessed by the gods. It’s about understanding the plant’s needs, implementing these simple yet effective DIY tricks, and consistently observing your garden. We’ve covered everything from soil preparation using readily available compost to natural pest control methods that won’t harm your precious okra pods or the environment.
Why is this a must-try? Because it empowers you to grow healthier, more abundant okra crops without breaking the bank. Imagine the satisfaction of harvesting baskets overflowing with vibrant green okra, knowing you nurtured them from seed to table using your own ingenuity and resourcefulness. Think of the delicious gumbo, stews, and fried okra dishes you can create, all starring ingredients grown with love and care in your own backyard.
But the benefits extend beyond just delicious meals. By embracing these DIY okra farming techniques, you’re contributing to a more sustainable and self-sufficient lifestyle. You’re reducing your reliance on commercially produced fertilizers and pesticides, minimizing your environmental impact, and fostering a deeper connection with the natural world.
Ready to take your okra farming to the next level?
Don’t be afraid to experiment! Try different companion planting combinations to see what works best in your specific climate and soil conditions. Consider adding a layer of mulch around your okra plants to conserve moisture and suppress weeds. Explore different organic fertilizers to boost growth and yield.
Here are a few variations to consider:
* Vertical Okra Farming: If you’re short on space, try growing okra vertically using trellises or cages. This not only maximizes your growing area but also improves air circulation and reduces the risk of fungal diseases.
* Succession Planting: Plant okra seeds every few weeks to ensure a continuous harvest throughout the growing season. This is especially useful if you have a long growing season.
* Okra Seed Saving: Save seeds from your best-performing okra plants to ensure a consistent supply of high-quality seeds for future seasons.The key to successful okra farming is observation and adaptation. Pay close attention to your plants, monitor their growth, and adjust your techniques as needed. Don’t be discouraged by setbacks; every gardener faces challenges. Learn from your mistakes, celebrate your successes, and never stop experimenting.
We’re confident that these DIY okra farming tips will help you achieve a bountiful harvest. But we also want to hear from you! Share your experiences, successes, and challenges in the comments below. What DIY tricks have you found most effective? What varieties of okra do you prefer to grow? What are your favorite okra recipes?
Let’s create a community of okra enthusiasts, sharing our knowledge and inspiring each other to grow the best okra possible. So, grab your gardening gloves, get your hands dirty, and start growing! We can’t wait to hear about your okra farming adventures. Happy gardening!
Frequently Asked Questions (FAQ)
What is the best time to plant okra?
Okra thrives in warm weather, so the best time to plant it is after the last frost when the soil has warmed up to at least 65 degrees Fahrenheit (18 degrees Celsius). In most regions, this is typically in late spring or early summer. Planting too early can result in poor germination and stunted growth. If you live in a region with a short growing season, you can start okra seeds indoors 4-6 weeks before the last frost and transplant them outdoors once the weather warms up.
How much sunlight does okra need?
Okra requires at least 6-8 hours of direct sunlight per day to thrive. Insufficient sunlight can lead to leggy growth, reduced flowering, and smaller okra pods. Choose a planting location that receives full sun throughout the day. If you’re growing okra in containers, make sure to place them in a sunny spot.
What type of soil is best for okra?
Okra prefers well-drained, fertile soil with a slightly acidic to neutral pH (6.0-7.0). Amend heavy clay soils with compost or other organic matter to improve drainage and aeration. Sandy soils can be improved by adding compost or peat moss to increase water retention. Before planting, conduct a soil test to determine the pH and nutrient levels. Amend the soil as needed based on the test results.
How often should I water okra?
Okra needs consistent moisture, especially during hot, dry weather. Water deeply and regularly, aiming to keep the soil consistently moist but not waterlogged. Avoid overhead watering, as this can promote fungal diseases. A good rule of thumb is to water okra plants 1-2 times per week, depending on the weather conditions. Mulching around the plants can help conserve moisture and reduce the need for frequent watering.
What are some common pests and diseases that affect okra?
Okra can be susceptible to various pests and diseases, including aphids, flea beetles, nematodes, and fungal diseases like powdery mildew and Fusarium wilt. Regularly inspect your plants for signs of pests or diseases. Use organic pest control methods, such as insecticidal soap or neem oil, to control aphids and flea beetles. Practice crop rotation and choose disease-resistant varieties to prevent fungal diseases. Ensure good air circulation around the plants to reduce humidity and the risk of fungal infections.
How do I harvest okra?
Okra pods are typically ready to harvest 50-60 days after planting. Harvest the pods when they are young and tender, typically 2-4 inches long. Use a sharp knife or pruning shears to cut the pods from the plant. Wear gloves when harvesting okra, as the pods can be prickly and irritating to the skin. Harvest okra pods every 1-2 days to encourage continuous production. Overripe okra pods become tough and fibrous.
Can I grow okra in containers?
Yes, okra can be successfully grown in containers. Choose a large container, at least 12 inches in diameter and 12 inches deep, to provide enough space for the roots to grow. Use a well-draining potting mix and ensure the container has drainage holes. Place the container in a sunny location and water regularly. Fertilize okra plants in containers every 2-3 weeks with a balanced fertilizer.
How can I improve okra yield?
Several factors can influence okra yield, including soil fertility, sunlight, watering, and pest control. Ensure your okra plants receive adequate sunlight, water, and nutrients. Amend the soil with compost or other organic matter to improve fertility. Control pests and diseases promptly to prevent damage to the plants. Prune lower leaves to improve air circulation and encourage pod production. Consider using a foliar fertilizer to boost growth and yield.
What are some good companion plants for okra?
Companion planting can benefit okra by attracting beneficial insects, repelling pests, and improving soil health. Some good companion plants for okra include basil, marigolds, peppers, and tomatoes. Basil repels aphids and other pests, while marigolds attract beneficial insects like ladybugs. Peppers and tomatoes can provide shade for okra plants during hot weather. Avoid planting okra near plants that compete for nutrients or attract pests, such as cabbage and potatoes.
How do I save okra seeds?
To save okra seeds, allow some of the pods to mature fully on the plant. The pods will turn brown and dry out. Once the pods are completely dry, harvest them and remove the seeds. Spread the seeds out on a tray to dry completely for a few days. Store the dried seeds in an airtight container in a cool, dry place. Okra seeds can remain viable for several years if stored properly.
Leave a Comment