

Bitter Gourd Growing Guide: Your Path to a Bountiful Harvest!
Have you ever dreamed of strolling through your own backyard, plucking fresh, vibrant bitter gourds straight from the vine? I know I have! There’s something incredibly satisfying about growing your own food, and bitter gourd, with its unique flavor and impressive health benefits, is a fantastic choice. But let’s be honest, cultivating this intriguing vegetable can sometimes feel like a bit of a challenge. That’s where this DIY guide comes in – your secret weapon to mastering the art of bitter gourd cultivation!
The bitter gourd, also known as bitter melon or karela, boasts a rich history, deeply rooted in Asian and African cultures. For centuries, it’s been treasured not only for its distinctive taste but also for its medicinal properties. From traditional remedies to culinary delights, the bitter gourd has earned its place as a staple in many households. But even with its long history, many gardeners struggle to achieve a successful harvest.
Why do you need this bitter gourd growing guide? Because I’m going to share all the insider tips and tricks I’ve learned over the years. From selecting the perfect seeds to tackling common pests and diseases, I’ll walk you through every step of the process. Imagine the satisfaction of serving up a delicious, homegrown bitter gourd dish to your family and friends, knowing you nurtured it from seed to table. This guide will empower you to overcome the hurdles and unlock the secrets to a thriving bitter gourd patch, even if you’re a complete beginner. Let’s get growing!
Growing Bitter Gourd Like a Pro: A DIY Guide
Hey there, fellow gardening enthusiasts! I’m so excited to share my tried-and-true method for growing bitter gourd, also known as bitter melon or karela. It might have a reputation for its, well, bitterness, but trust me, fresh, homegrown bitter gourd is a culinary delight. Plus, it’s packed with nutrients! This guide will walk you through every step, from seed to harvest, ensuring you have a bountiful crop.
Choosing the Right Variety and Starting Seeds
First things first, let’s talk about choosing the right variety and getting those seeds started.
* Variety Selection: There are several varieties of bitter gourd, each with slightly different shapes, sizes, and levels of bitterness. Some popular choices include ‘Long Green,’ ‘White Pearl,’ and ‘Chinese Bitter Melon.’ I personally prefer ‘Long Green’ because it’s relatively easy to grow and has a good yield.
* Seed Starting vs. Direct Sowing: You can either start seeds indoors or directly sow them into the ground. I highly recommend starting seeds indoors, especially if you live in an area with a shorter growing season. This gives your plants a head start and protects them from early-season pests and diseases.
* Soaking Seeds: Bitter gourd seeds have a tough outer shell, so soaking them before planting significantly improves germination rates.
Step-by-Step Seed Starting:
1. Soak the Seeds: Place the bitter gourd seeds in a bowl of lukewarm water and let them soak for 24-48 hours. This softens the seed coat and encourages germination. I usually change the water once during the soaking period.
2. Prepare Seed Starting Trays or Pots: Fill seed starting trays or small pots (about 2-3 inches in diameter) with a well-draining seed starting mix. I like to use a mix of peat moss, vermiculite, and perlite.
3. Plant the Seeds: Make a small hole (about ½ inch deep) in the center of each pot or cell. Place one seed in each hole and cover it gently with the seed starting mix.
4. Water Gently: Water the soil gently using a spray bottle or watering can with a fine rose. Avoid overwatering, as this can lead to fungal diseases.
5. Provide Warmth and Light: Place the seed starting trays or pots in a warm location with plenty of sunlight. A sunny windowsill or a greenhouse is ideal. If you don’t have enough natural light, you can use grow lights. I keep my grow lights on for about 14-16 hours a day.
6. Maintain Moisture: Keep the soil consistently moist but not soggy. Check the soil moisture daily and water as needed.
7. Transplant Seedlings: Once the seedlings have developed 2-3 sets of true leaves (usually after 3-4 weeks), they are ready to be transplanted into the garden.
Preparing the Garden Bed
Now that our seedlings are thriving, let’s get the garden bed ready for them. Bitter gourd needs a sunny spot with well-drained soil.
* Sunlight: Bitter gourd requires at least 6-8 hours of direct sunlight per day. Choose a location in your garden that receives plenty of sunshine.
* Soil Preparation: Bitter gourd prefers well-drained, fertile soil with a pH of 6.0-7.0. Before planting, amend the soil with plenty of organic matter, such as compost or well-rotted manure. This will improve soil drainage, fertility, and water retention.
* Trellising: Bitter gourd is a climbing vine, so it needs a strong trellis or support structure to grow on. You can use a fence, an arbor, or a homemade trellis. I prefer using a sturdy trellis made of wood or metal.
Step-by-Step Garden Bed Preparation:
1. Clear the Area: Remove any weeds, rocks, or debris from the planting area.
2. Amend the Soil: Spread a 2-3 inch layer of compost or well-rotted manure over the soil surface.
3. Till the Soil: Use a garden fork or tiller to incorporate the compost or manure into the soil to a depth of 6-8 inches.
4. Create Raised Beds (Optional): If your soil is poorly drained, consider creating raised beds. This will improve drainage and prevent root rot.
5. Install Trellis: Install the trellis or support structure before planting the seedlings. Make sure the trellis is strong enough to support the weight of the mature vines and fruits.
Transplanting and Caring for Your Bitter Gourd Plants
The big day has arrived! Time to get those seedlings into their permanent home.
* Timing: Transplant the seedlings after the last frost date in your area. Bitter gourd is sensitive to frost, so it’s important to wait until the weather is warm and settled.
* Spacing: Space the seedlings about 2-3 feet apart along the trellis. This will give them enough room to grow and spread out.
* Watering: Water the plants regularly, especially during hot, dry weather. Bitter gourd needs consistent moisture to thrive.
* Fertilizing: Fertilize the plants every 2-3 weeks with a balanced fertilizer. I like to use a liquid fertilizer diluted to half strength.
* Pruning: Prune the vines regularly to encourage branching and fruit production. Remove any yellowing or diseased leaves.
Step-by-Step Transplanting and Care:
1. Harden Off Seedlings: Before transplanting, harden off the seedlings by gradually exposing them to outdoor conditions for a week or so. This will help them adjust to the sun, wind, and temperature changes.
2. Dig Holes: Dig holes that are slightly larger than the root balls of the seedlings.
3. Remove Seedlings from Pots: Gently remove the seedlings from their pots, being careful not to damage the roots.
4. Plant Seedlings: Place the seedlings in the holes and backfill with soil. Gently firm the soil around the base of the plants.
5. Water Thoroughly: Water the plants thoroughly after transplanting.
6. Mulch: Apply a layer of mulch around the base of the plants to help retain moisture, suppress weeds, and regulate soil temperature. I use straw or wood chips for mulch.
7. Train Vines: As the vines grow, train them to climb the trellis. Gently guide the vines and tie them to the trellis with soft twine or plant ties.
8. Monitor for Pests and Diseases: Keep an eye out for pests and diseases, such as aphids, spider mites, and powdery mildew. Treat any problems promptly with organic pest control methods. I use neem oil spray for most pests.
Pollination and Fruit Development
Bitter gourd produces separate male and female flowers on the same plant. The female flowers have a small, immature fruit behind them. Pollination is essential for fruit development.
* Pollination: Bitter gourd is typically pollinated by insects, such as bees and butterflies. However, if you’re not seeing enough fruit set, you may need to hand-pollinate the flowers.
* Hand-Pollination: To hand-pollinate, use a small paintbrush to transfer pollen from the male flowers to the female flowers. Do this in the morning, when the flowers are open.
Step-by-Step Hand-Pollination:
1. Identify Male and Female Flowers: Male flowers have a long, slender stem, while female flowers have a small, immature fruit behind them.
2. Collect Pollen: Use a small paintbrush to collect pollen from the male flowers. Gently brush the paintbrush over the anthers (the pollen-bearing parts) of the male flowers.
3. Transfer Pollen: Transfer the pollen to the stigma (the receptive part) of the female flowers. Gently brush the paintbrush over the stigma of the female flowers.
4. Repeat: Repeat this process for all the female flowers that you want to pollinate.
Harvesting and Storing Bitter Gourd
Finally, the moment we’ve been waiting for – harvest time!
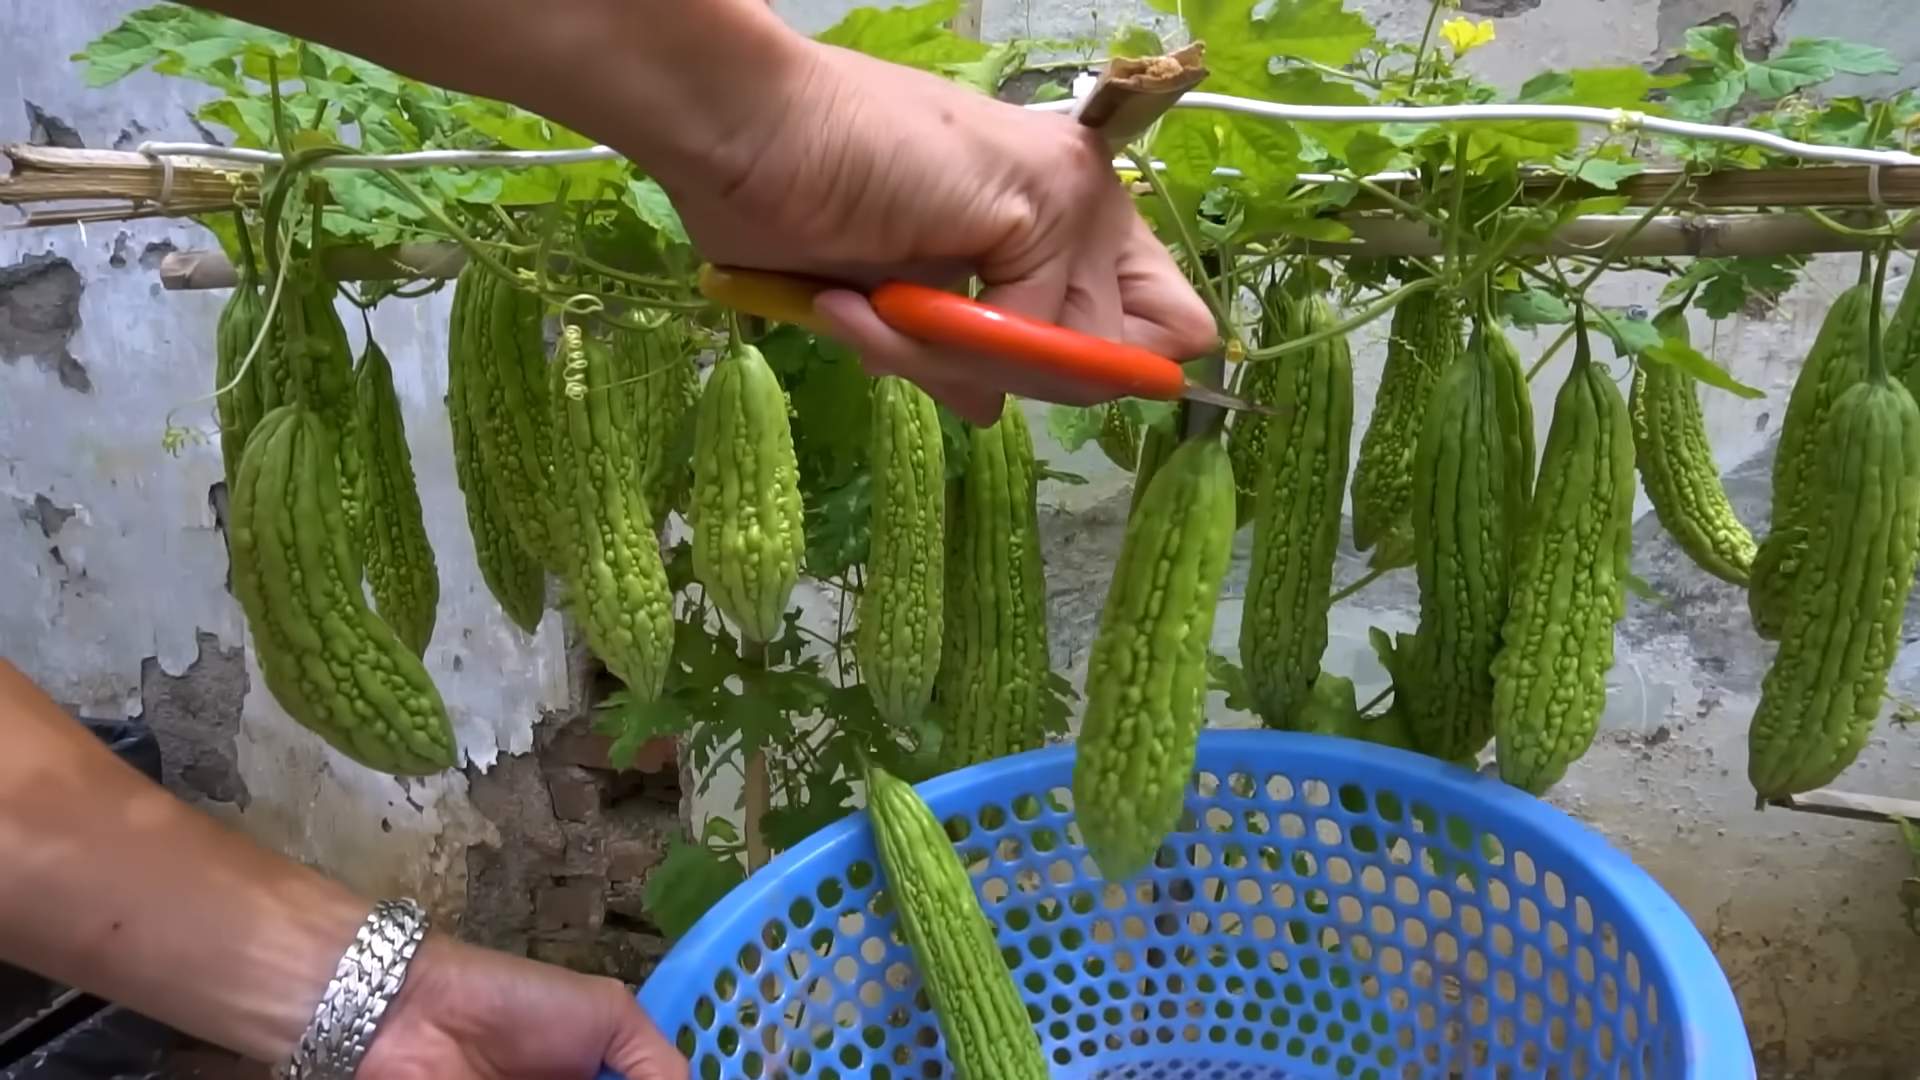
* Harvesting: Bitter gourd is typically harvested when it is still green and slightly immature. The fruits will be firm and have a slightly glossy appearance. Overripe fruits will turn yellow or orange and become more bitter.
* Timing: Harvest the fruits about 8-12 weeks after transplanting, depending on the variety and growing conditions.
* Method: Use a sharp knife or pruning shears to cut the fruits from the vine. Leave a small piece of stem attached to the fruit.
* Storing: Store the harvested fruits in the refrigerator for up to a week. Wrap them in a plastic bag or container to prevent them from drying out.
Step-by-Step Harvesting and Storing:
1. Check for Ripeness: Look for fruits that are green, firm, and slightly glossy.
2. Cut the
Conclusion
So, there you have it! Growing your own bitter gourd isn’t just about having fresh produce; it’s about embracing a rewarding gardening experience and enjoying the unique, slightly bitter flavor that this vegetable offers. This DIY trick, focusing on [mention the specific trick from the main article, e.g., “vertical trellising” or “seed scarification”], is a game-changer because it maximizes your yield, minimizes space, and ensures healthier, more robust plants.
Think about it: no more struggling with sprawling vines taking over your garden. No more worrying about fruits rotting on the ground. With this simple yet effective method, you’ll be harvesting a bounty of bitter gourds in no time. Plus, you’ll have the satisfaction of knowing you grew them yourself, using sustainable and cost-effective techniques.
But the fun doesn’t stop there! Feel free to experiment with different varieties of bitter gourd. Some are longer and thinner, while others are shorter and rounder. Each has its own unique flavor profile, so find the one that suits your taste buds best. You can also try companion planting to further enhance your garden’s health and productivity. Marigolds, for example, are known to deter pests, while basil can improve the flavor of your bitter gourds.
And don’t be afraid to get creative with your trellising system. While a simple fence or netting works wonders, you can also build a more elaborate structure using bamboo poles, repurposed materials, or even a decorative archway. Let your imagination run wild and create a garden that’s both functional and beautiful.
Ultimately, the key to successful bitter gourd cultivation lies in consistent care and attention. Regularly water your plants, fertilize them as needed, and keep an eye out for pests and diseases. With a little bit of effort, you’ll be rewarded with a plentiful harvest of this nutritious and delicious vegetable.
We strongly encourage you to try this DIY trick for growing bitter gourd. It’s easy, effective, and incredibly rewarding. Once you’ve given it a shot, we’d love to hear about your experience! Share your photos, tips, and tricks in the comments below. Let’s build a community of bitter gourd enthusiasts and learn from each other. Happy gardening!
Frequently Asked Questions (FAQs)
What is the best time to plant bitter gourd?
The ideal time to plant bitter gourd is during the late spring or early summer, after the last frost has passed. Bitter gourd thrives in warm weather, with temperatures consistently above 70°F (21°C). In warmer climates, you can even plant a second crop in late summer for a fall harvest. However, be mindful of the shorter days and cooler temperatures, as this may affect the plant’s growth and fruit production. If you live in an area with a short growing season, consider starting your seeds indoors 4-6 weeks before the last expected frost. This will give your plants a head start and ensure a more bountiful harvest.
How much sunlight does bitter gourd need?
Bitter gourd requires at least 6-8 hours of direct sunlight per day to thrive. Sunlight is essential for photosynthesis, the process by which plants convert light energy into chemical energy for growth and fruit production. Choose a planting location that receives ample sunlight throughout the day. If you’re growing bitter gourd indoors, supplement with grow lights to ensure adequate light exposure. Insufficient sunlight can lead to stunted growth, reduced fruit production, and pale, weak plants.
What kind of soil is best for growing bitter gourd?
Bitter gourd prefers well-drained, fertile soil that is rich in organic matter. The ideal soil pH is between 6.0 and 7.0. Before planting, amend your soil with compost, aged manure, or other organic materials to improve its fertility and drainage. Avoid heavy clay soils, as they can become waterlogged and inhibit root growth. If you have clay soil, consider adding sand or perlite to improve drainage. You can also grow bitter gourd in raised beds or containers filled with a high-quality potting mix.
How often should I water bitter gourd?
Bitter gourd needs consistent watering, especially during hot, dry weather. Water deeply and regularly, ensuring that the soil remains moist but not waterlogged. The frequency of watering will depend on the weather conditions, soil type, and the plant’s stage of growth. As a general rule, water your bitter gourd plants every 2-3 days, or more often if the soil feels dry to the touch. Avoid overhead watering, as this can promote fungal diseases. Instead, water at the base of the plant, using a soaker hose or drip irrigation system.
What are some common pests and diseases that affect bitter gourd?
Bitter gourd is susceptible to several pests and diseases, including aphids, spider mites, fruit flies, powdery mildew, and downy mildew. Regularly inspect your plants for signs of infestation or disease. If you spot any problems, take action immediately to prevent them from spreading. You can control aphids and spider mites with insecticidal soap or neem oil. Fruit flies can be managed with traps or by covering the fruits with netting. Powdery mildew and downy mildew can be prevented by ensuring good air circulation and avoiding overhead watering. If these diseases do occur, treat them with a fungicide.
How do I harvest bitter gourd?
Bitter gourd is typically harvested when the fruits are still green and slightly immature. The exact timing will depend on the variety and your personal preference. Generally, you can harvest bitter gourd about 8-12 weeks after planting. The fruits should be firm and have a slightly waxy coating. Use a sharp knife or pruning shears to cut the fruits from the vine, leaving a short stem attached. Avoid bruising or damaging the fruits during harvest.
Why is my bitter gourd not producing fruit?
There are several reasons why your bitter gourd may not be producing fruit. These include:
* **Insufficient sunlight:** Bitter gourd needs at least 6-8 hours of direct sunlight per day to produce fruit.
* **Poor pollination:** Bitter gourd requires pollination to set fruit. If there are not enough pollinators in your area, you may need to hand-pollinate the flowers.
* **Nutrient deficiencies:** Bitter gourd needs adequate nutrients to produce fruit. Fertilize your plants regularly with a balanced fertilizer.
* **Pest or disease problems:** Pests and diseases can weaken your plants and reduce fruit production.
* **Stress:** Environmental stress, such as drought or extreme temperatures, can also affect fruit production.
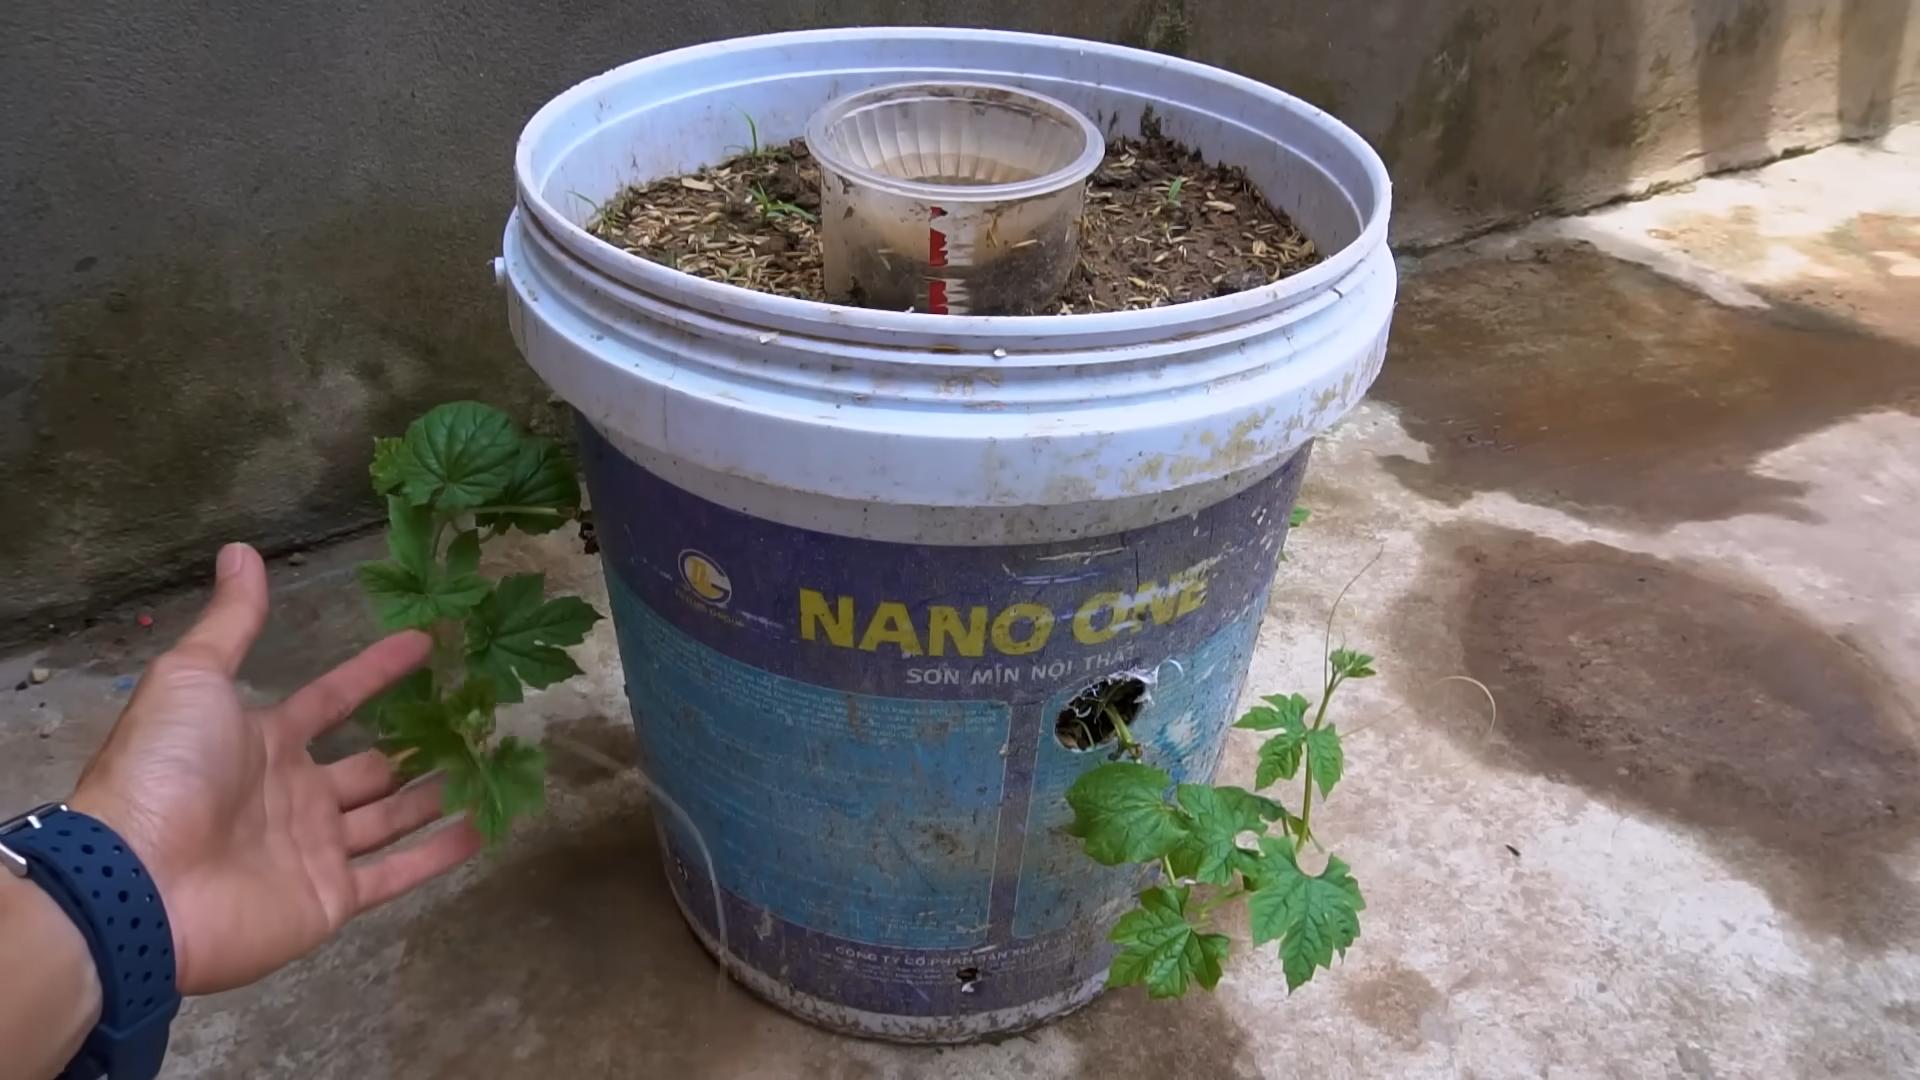
Can I grow bitter gourd in a container?
Yes, you can grow bitter gourd in a container, but you’ll need to choose a large container that is at least 12 inches in diameter and 12 inches deep. Fill the container with a high-quality potting mix and provide a trellis or other support for the vines to climb. Water and fertilize your container-grown bitter gourd plants regularly.
How do I save seeds from bitter gourd?
To save seeds from bitter gourd, allow the fruits to mature fully on the vine until they turn orange or yellow. Once the fruits are ripe, harvest them and scoop out the seeds. Wash the seeds thoroughly and spread them out on a paper towel to dry. Once the seeds are completely dry, store them in an airtight container in a cool, dark place.
What are some ways to cook with bitter gourd?
Bitter gourd can be cooked in a variety of ways, including stir-frying, steaming, boiling, and baking. It is often used in Asian cuisine, particularly in Indian, Chinese, and Filipino dishes. Before cooking, it’s recommended to soak the bitter gourd in salted water for at least 30 minutes to reduce its bitterness. You can also blanch the bitter gourd in boiling water for a few minutes to further reduce its bitterness. Some popular bitter gourd dishes include bitter gourd stir-fry, bitter gourd curry, and stuffed bitter gourd.


Leave a Comment