

Deep Clean Your Fridge: Is your refrigerator more of a science experiment than a food storage unit? Let’s face it, we’ve all been there! That lingering odor, the mysterious spills, and the forgotten leftovers lurking in the back – it’s a universal kitchen woe. But fear not, because I’m here to guide you through a simple, effective, and dare I say, satisfying deep clean of your fridge!
While refrigerators are a relatively modern invention, the concept of keeping food cold has been around for centuries. From ancient ice houses to the ingenious root cellars of our ancestors, people have always sought ways to preserve their precious provisions. Today, our fridges are technological marvels, but they still require a little TLC to function optimally and keep our food fresh and safe.
Why is a deep clean so important? Well, beyond the obvious aesthetic benefits, regularly deep cleaning your fridge prevents the growth of harmful bacteria and mold, extends the shelf life of your groceries, and even improves the overall energy efficiency of your appliance. Plus, knowing exactly what’s in your fridge can save you money by preventing food waste. So, grab your cleaning supplies, roll up your sleeves, and let’s get started on transforming your fridge from a breeding ground for bacteria into a sparkling sanctuary for your food!
Deep Clean Your Fridge: A Sparkling Sanctuary for Your Food!
Okay, let’s be honest, when was the last time you *really* cleaned your fridge? Like, beyond just wiping up a spill? If you’re anything like me, it’s probably been a while. But fear not! I’m going to walk you through a super thorough deep clean that will leave your fridge sparkling, smelling fresh, and ready to keep your food happy and healthy. Trust me, it’s worth the effort!
Getting Prepared: Gather Your Supplies and Empty the Fridge
Before we dive in, let’s get everything we need ready. This will make the whole process much smoother.
* Cleaning Supplies: You’ll need warm water, dish soap (I prefer a gentle, natural one), baking soda, white vinegar, a spray bottle, a couple of clean cloths or sponges (microfiber cloths are great!), paper towels, an old toothbrush, and maybe even a toothpick or cotton swab for those really stubborn spots.
* Containers: Have some empty containers or bowls ready to temporarily store food that needs to stay cold.
* Trash Bags: For any expired or spoiled food.
* Cooler (Optional): If you’re doing this on a particularly warm day, a cooler with ice packs can help keep your food at the optimal temperature while you work.
Now for the fun part (just kidding!). Let’s empty that fridge!
1. Unplug the Fridge: This is super important for safety! Unplug your fridge from the power outlet.
2. Remove All Food: Take everything out of the fridge, including condiments, drinks, leftovers, and produce. As you remove items, check expiration dates and toss anything that’s past its prime. Be honest with yourself! That mystery jar in the back? Probably time to say goodbye.
3. Sort and Store: Group similar items together and place them in your temporary containers or cooler. This will help you keep track of everything and prevent food from spoiling.
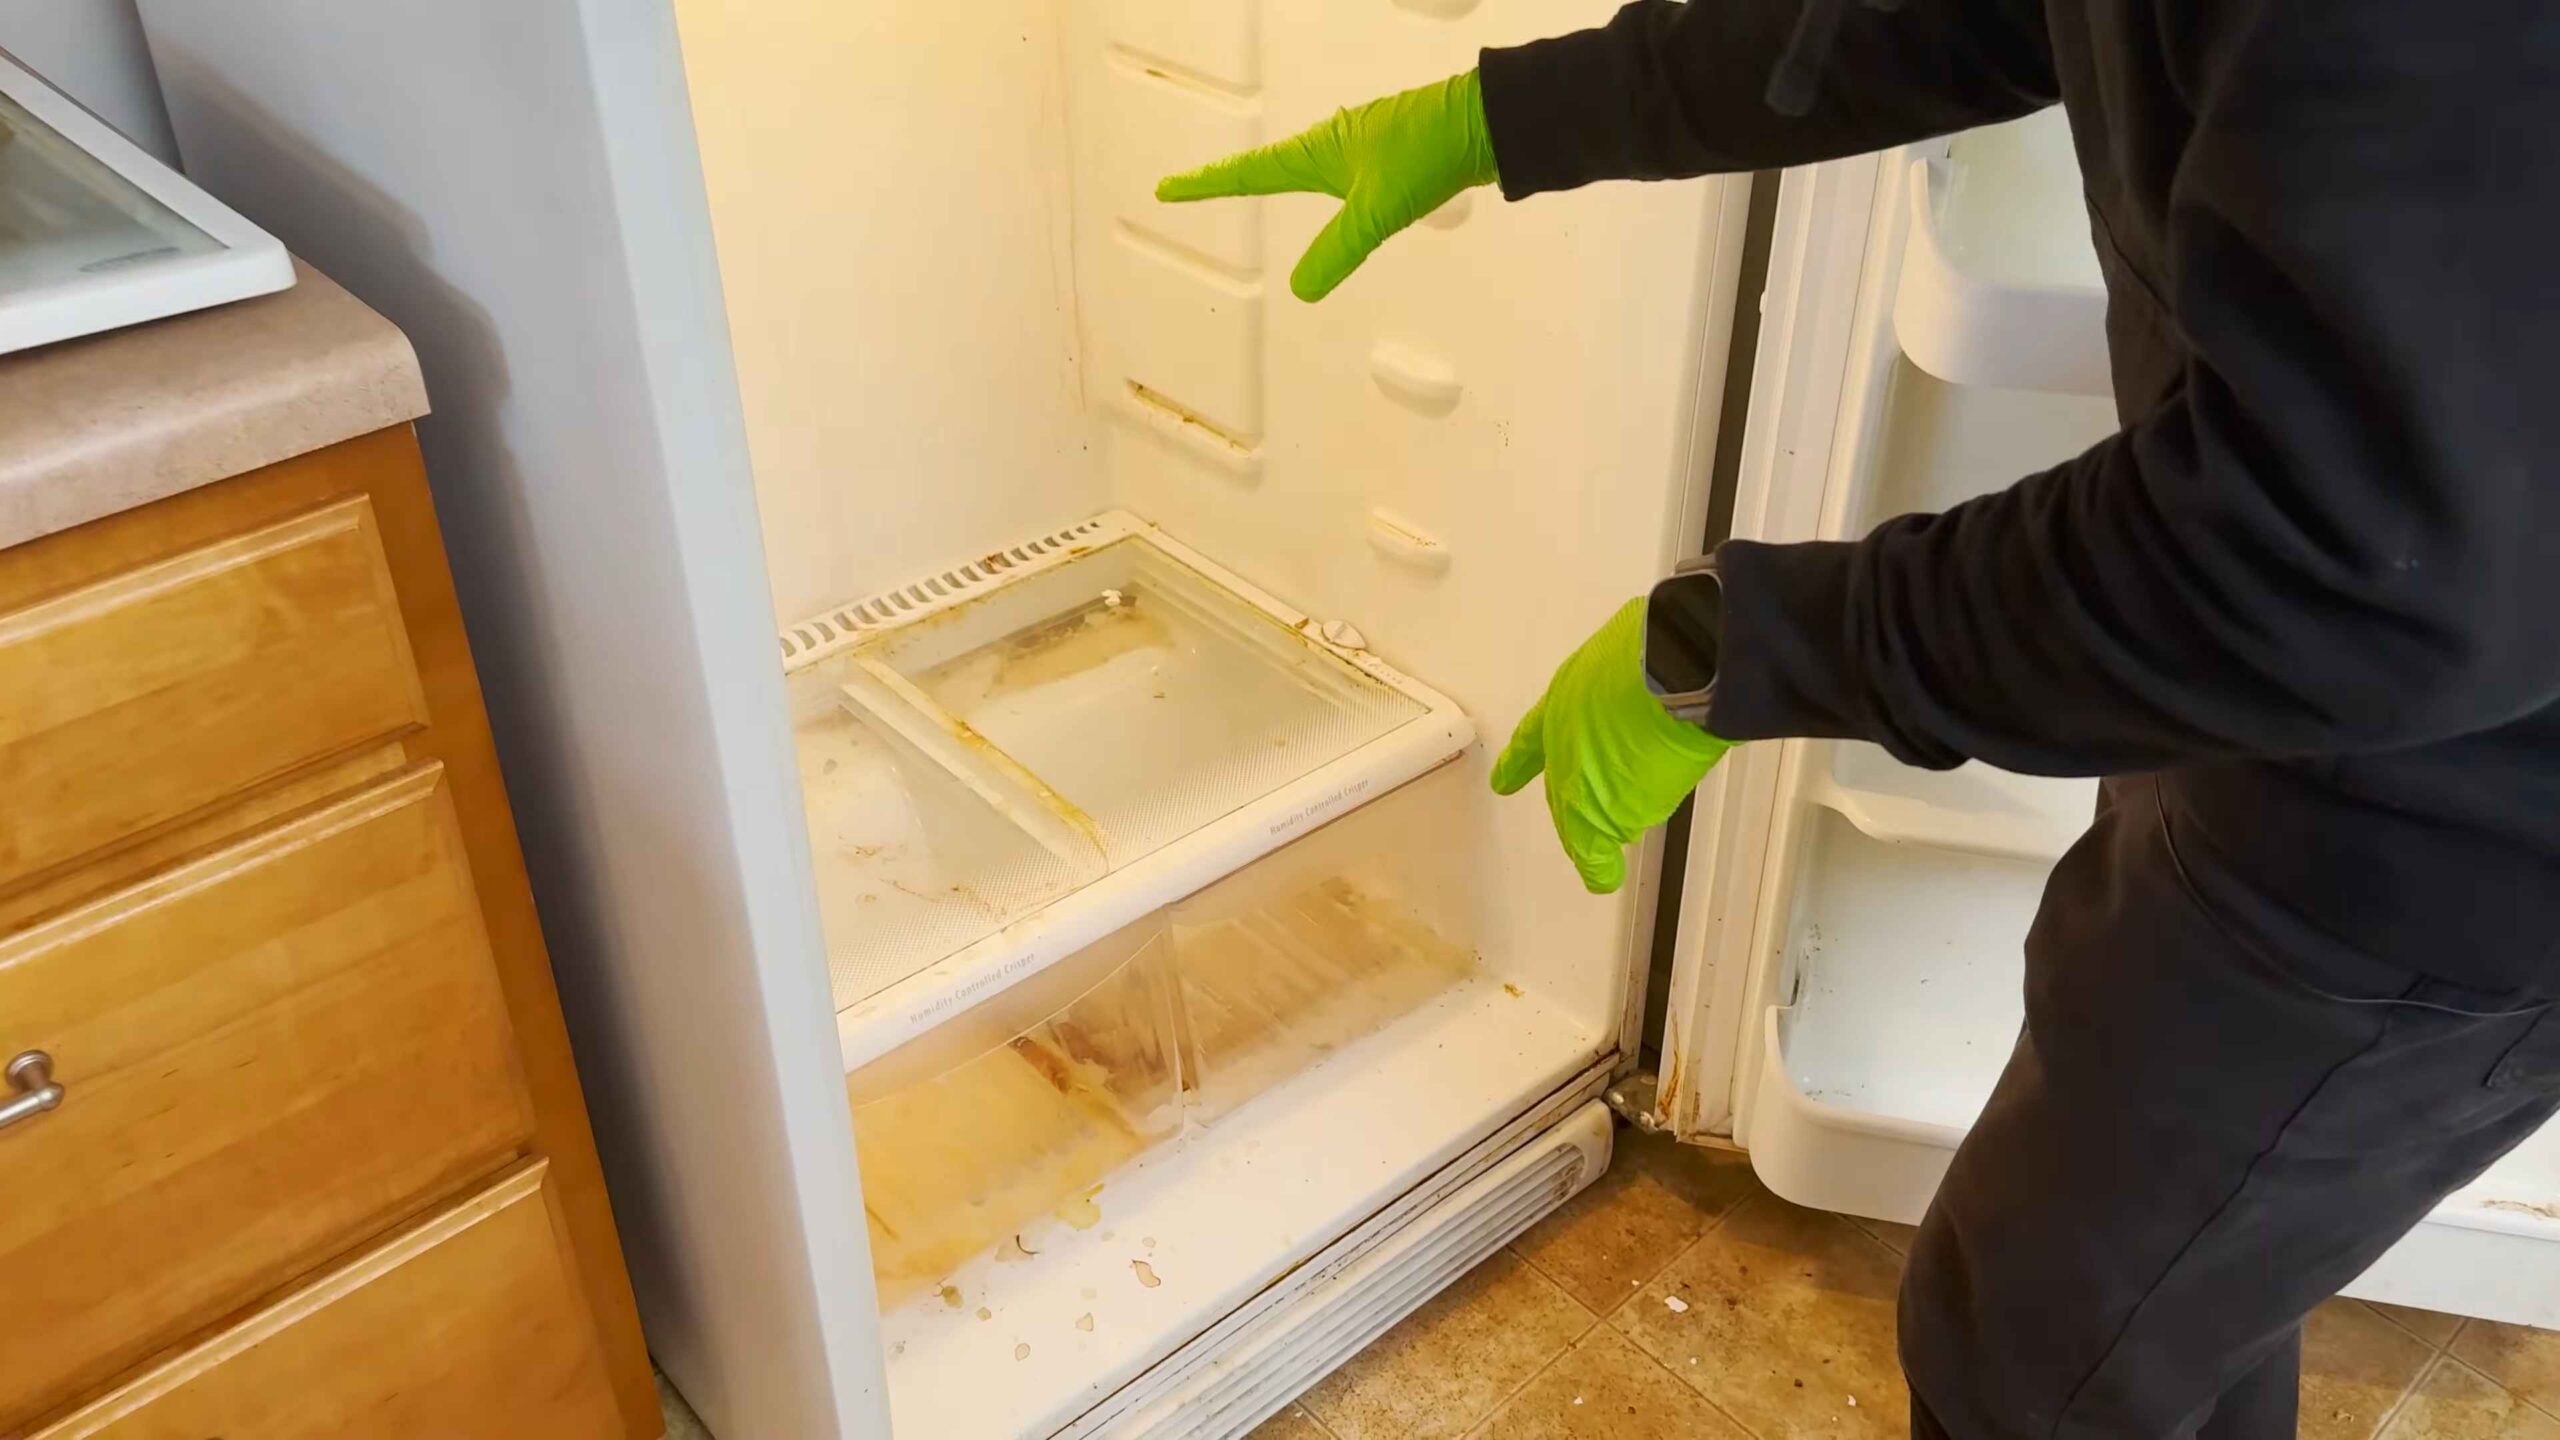
4. Remove Shelves and Drawers: Take out all the removable shelves, drawers, and door compartments. This will allow you to clean them thoroughly and reach every nook and cranny inside the fridge.
Cleaning the Interior: From Top to Bottom
Alright, with the fridge empty and unplugged, we can finally get to the cleaning!
1. Prepare Your Cleaning Solution: In a bowl or bucket, mix warm water with a squirt of dish soap. You don’t need a ton of soap, just enough to create a slightly sudsy solution.
2. Wash the Interior Surfaces: Dip a clean cloth or sponge into the soapy water and wring it out well. Wipe down all the interior surfaces of the fridge, including the walls, ceiling, and floor. Pay special attention to any spills, stains, or sticky spots.
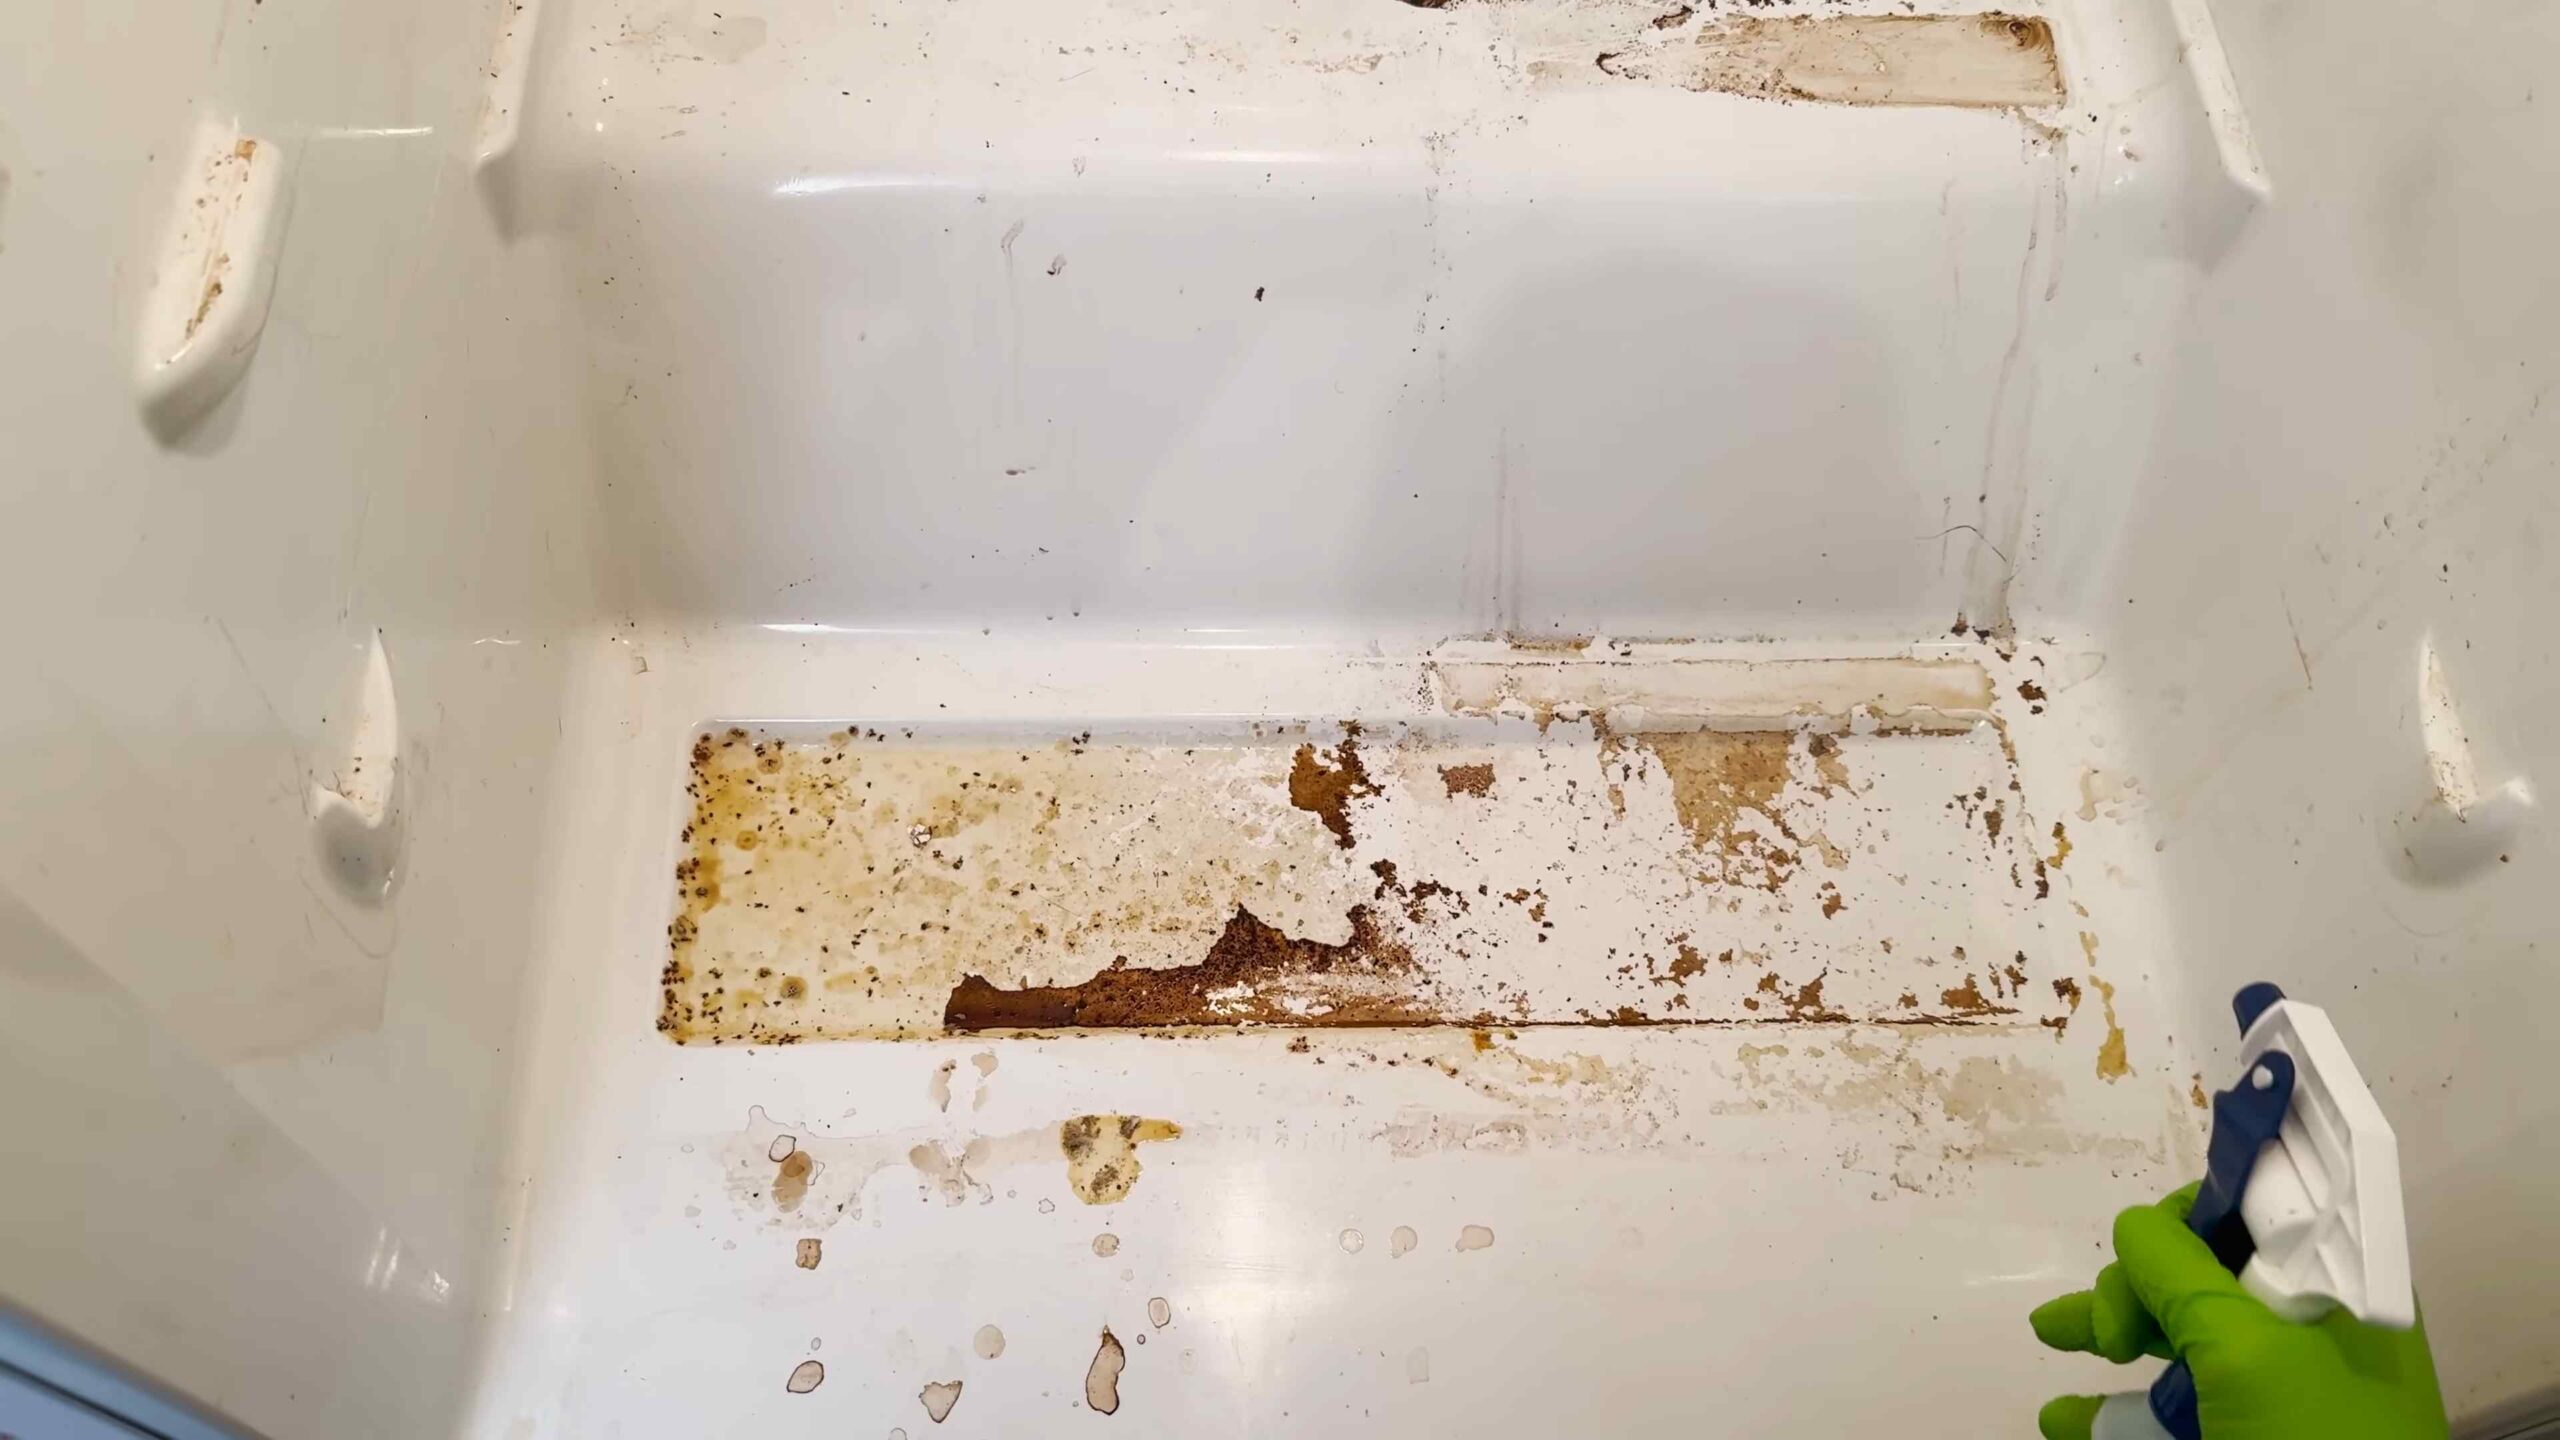
3. Tackle Stubborn Stains: For tougher stains, make a paste of baking soda and water. Apply the paste to the stain, let it sit for a few minutes, and then scrub gently with a cloth or sponge. You can also try using a solution of equal parts white vinegar and water in a spray bottle. Spray the solution on the stain, let it sit for a few minutes, and then wipe it clean.
4. Clean the Door Seals: The door seals (also known as gaskets) are often overlooked, but they can accumulate dirt and grime. Use a damp cloth or sponge to wipe down the door seals, making sure to get into all the crevices. An old toothbrush can be helpful for cleaning tight spots.
5. Rinse with Clean Water: Once you’ve cleaned all the interior surfaces, rinse them with a clean, damp cloth to remove any soap residue.
6. Dry Thoroughly: Use a clean, dry cloth or paper towels to dry all the interior surfaces. This will help prevent mold and mildew from growing.
Cleaning the Shelves and Drawers: A Sparkling Finish
Now that the inside of the fridge is clean, let’s tackle those shelves and drawers.
1. Wash with Soapy Water: Wash the shelves, drawers, and door compartments with warm, soapy water. Use a sponge or cloth to scrub away any dirt, grime, or food residue.
2. Rinse Thoroughly: Rinse the shelves and drawers with clean water to remove any soap residue.
3. Sanitize (Optional): If you want to sanitize the shelves and drawers, you can spray them with a solution of equal parts white vinegar and water. Let the solution sit for a few minutes, and then wipe it clean.
4. Dry Completely: Dry the shelves, drawers, and door compartments thoroughly with a clean, dry cloth or paper towels before putting them back in the fridge.
Addressing Odors: Baking Soda to the Rescue!
Even after cleaning, your fridge might still have a lingering odor. Here’s how to get rid of it:
1. Baking Soda Absorption: Place an open box of baking soda in the fridge. Baking soda is a natural odor absorber and will help neutralize any lingering smells.
2. Vinegar Solution (Optional): For a more intense odor removal, you can place a bowl of white vinegar in the fridge overnight. The vinegar will absorb any remaining odors. Just be prepared for a slight vinegar smell initially, which will dissipate.
3. Coffee Grounds (Alternative): Another option is to place a bowl of dry, unused coffee grounds in the fridge. Coffee grounds also have odor-absorbing properties.
Reassembling and Restocking: The Final Touches
We’re almost there! Now it’s time to put everything back together and restock the fridge.
1. Replace Shelves and Drawers: Once the interior of the fridge is completely dry, replace the shelves, drawers, and door compartments.
2. Organize Your Food: As you restock the fridge, take the opportunity to organize your food. Place items that expire sooner in the front and items that last longer in the back. Use clear containers to store leftovers and produce, which will help you see what you have and prevent food from going to waste.
3. Check Temperature Settings: Make sure your fridge is set to the correct temperature. The ideal temperature for a refrigerator is between 35°F and 38°F (1.7°C and 3.3°C).
4. Plug the Fridge Back In: Plug the fridge back into the power outlet.
5. Wait Before Adding Perishables: Allow the fridge to cool down to the proper temperature before adding perishable items. This may take a few hours.
Maintaining Your Clean Fridge: Tips for the Future
Now that you’ve gone to all this effort, you’ll want to keep your fridge clean! Here are a few tips:
* Wipe Up Spills Immediately: Don’t let spills sit and harden. Wipe them up as soon as they happen to prevent stains and odors.
* Check Expiration Dates Regularly: Get in the habit of checking expiration dates on a regular basis and tossing out any expired food.
* Clean Regularly: Aim to do a quick clean of your fridge every week or two. This will help prevent dirt and grime from building up.
* Use Shelf Liners: Consider using shelf liners to protect your shelves from spills and make cleaning easier.
* Ventilation: Ensure your fridge has proper ventilation. Don’t overcrowd it, as this can restrict airflow and make it work harder.
And that’s it! You’ve successfully deep cleaned your fridge. Now you can enjoy a sparkling clean and organized space for your food. Happy cleaning!
Conclusion
So, there you have it! Deep cleaning your fridge might seem like a daunting task, but with these simple, effective DIY tricks, it transforms from a chore into an achievable accomplishment. We’ve walked you through the steps, highlighted the problem areas, and armed you with the knowledge to tackle even the most stubborn spills and lingering odors.
But why is this deep clean so crucial? Beyond the obvious aesthetic benefits of a sparkling clean refrigerator, it’s about food safety, efficiency, and extending the lifespan of your appliance. A clean fridge operates more efficiently, saving you money on your energy bill. It also prevents cross-contamination, keeping your food fresher for longer and reducing the risk of foodborne illnesses. Plus, let’s be honest, opening a clean and organized fridge just feels good!
This isn’t just about wiping down shelves; it’s about creating a healthier and more efficient kitchen environment. It’s about taking control of your food storage and ensuring that everything you consume is kept in optimal conditions. And the best part? You don’t need expensive cleaning products or specialized equipment. Most of the supplies you need are likely already in your pantry.
Ready to take your fridge cleaning to the next level? Consider these variations:
* Essential Oil Infusion: Add a few drops of your favorite essential oil (lemon, grapefruit, or tea tree are great choices) to your cleaning solution for a refreshing scent and added antibacterial properties.
* Baking Soda Paste for Stubborn Stains: For those truly stubborn stains that just won’t budge, create a paste of baking soda and water. Apply it to the stain, let it sit for a few minutes, and then scrub gently.
* Activated Charcoal Odor Absorber: Place a small bowl of activated charcoal in your fridge to absorb lingering odors. Replace it every few weeks for optimal freshness.
* Vinegar Power: For a natural disinfectant boost, use a solution of equal parts white vinegar and water. Vinegar is a powerful cleaner and deodorizer.
We’ve shown you how to deep clean your fridge like a pro, now it’s your turn to put these tips into action. Don’t be intimidated by the task; break it down into manageable steps, and you’ll be amazed at the results.
We’re confident that these DIY tricks will make a significant difference in the cleanliness and efficiency of your refrigerator. But don’t just take our word for it! Try them out for yourself and see the difference.
We encourage you to share your experiences with us! Did you find a particular tip especially helpful? Did you discover a new variation that worked wonders for you? Let us know in the comments below. Your feedback will help other readers and contribute to a community of clean and organized kitchens. So, go ahead, tackle that fridge, and share your success story! We can’t wait to hear from you. Remember, a clean fridge is a happy fridge, and a happy fridge means a healthier and happier you!
Frequently Asked Questions (FAQ)
How often should I deep clean my fridge?
Ideally, you should aim to deep clean your fridge every 3-6 months. This frequency helps prevent the buildup of bacteria, mold, and unpleasant odors. However, if you notice spills, leaks, or lingering smells, it’s best to clean them up immediately, regardless of your scheduled deep clean. Regular spot cleaning, such as wiping up spills as they happen, can also extend the time between deep cleans. Consider your usage habits and the types of food you typically store when determining the optimal cleaning schedule for your fridge.
What’s the best way to remove stubborn stains from my fridge shelves?
Stubborn stains often require a bit more elbow grease and a targeted approach. As mentioned earlier, a paste of baking soda and water is an excellent solution. Apply the paste to the stain, let it sit for 15-20 minutes to allow the baking soda to penetrate the stain, and then scrub gently with a non-abrasive sponge or cloth. For particularly tough stains, you can also try using a solution of equal parts white vinegar and water. Let it soak for a few minutes before scrubbing. Avoid using harsh chemicals or abrasive cleaners, as they can damage the fridge’s surfaces.
How can I prevent my fridge from smelling bad?
Preventing odors is often easier than removing them. Here are a few tips:
* Clean up spills immediately: Don’t let spills linger, as they can quickly lead to unpleasant smells.
* Store food properly: Use airtight containers to prevent odors from escaping and contaminating other foods.
* Check expiration dates regularly: Discard any expired or spoiled food promptly.
* Use odor absorbers: Place a box of baking soda or a bowl of activated charcoal in your fridge to absorb odors. Replace them every few weeks.
* Clean regularly: Regular spot cleaning and deep cleaning will help prevent the buildup of odor-causing bacteria and mold.
Is it safe to use bleach to clean my fridge?
While bleach is a powerful disinfectant, it’s generally not recommended for cleaning your fridge. Bleach can be harsh and potentially harmful if it comes into contact with food. It can also leave behind a strong odor that’s difficult to remove. Instead, opt for safer and more natural cleaning solutions like vinegar, baking soda, or dish soap. If you do choose to use bleach, dilute it heavily with water and rinse thoroughly afterward. Ensure the fridge is completely dry before storing food.
What’s the best way to clean the rubber seals around my fridge door?
The rubber seals around your fridge door are prone to collecting dirt, mold, and mildew. To clean them effectively, use a solution of warm water and dish soap. Dip a clean cloth or sponge into the solution and gently wipe the seals. For stubborn mold or mildew, you can use a solution of equal parts white vinegar and water. Use an old toothbrush to scrub the seals gently. Be sure to dry the seals thoroughly after cleaning to prevent moisture buildup.
Can I use a dishwasher to clean my fridge shelves and drawers?
Many fridge shelves and drawers are dishwasher-safe, but it’s essential to check your appliance’s manual first. If the shelves and drawers are dishwasher-safe, place them on the top rack to avoid warping or damage from the heating element. Use a mild detergent and a gentle cycle. If you’re unsure whether a particular shelf or drawer is dishwasher-safe, it’s best to wash it by hand with warm water and dish soap.
How long does it take to deep clean a fridge?
The time it takes to deep clean your fridge depends on its size and condition. A small, relatively clean fridge might take only 30-45 minutes, while a large, heavily soiled fridge could take 1-2 hours. Breaking the task down into smaller steps and having all your cleaning supplies ready can help speed up the process.
What are the benefits of a clean fridge beyond aesthetics?
Beyond the obvious aesthetic appeal, a clean fridge offers several significant benefits:
* Improved food safety: A clean fridge reduces the risk of cross-contamination and foodborne illnesses.
* Extended food shelf life: Proper storage and a clean environment help keep food fresher for longer.
* Increased energy efficiency: A clean fridge operates more efficiently, saving you money on your energy bill.
* Reduced odors: A clean fridge is less likely to develop unpleasant odors.
* Better organization: A clean fridge is easier to organize, making it easier to find what you need.
What tools and supplies do I need to deep clean my fridge?
Here’s a list of essential tools and supplies:
* Warm water
* Dish soap
* White vinegar
* Baking soda
* Clean cloths or sponges
* Old toothbrush
* Bucket or bowl
* Trash bags
* Optional: Essential oils, activated charcoal
How do I prevent food from spoiling quickly in my fridge?
Proper food storage is key to preventing spoilage. Here are a few tips:
* Store food in airtight containers: This helps prevent moisture loss and contamination.
* Keep your fridge at the correct temperature: The ideal temperature is between 37°F (3°C) and 40°F (4°C).
* Store food in the appropriate zones: Store meat and poultry on the bottom shelf to prevent drips from contaminating other foods. Store dairy products on the middle shelves. Store fruits and vegetables in the crisper drawers.
* Don’t overfill your fridge: Overcrowding can restrict airflow and lead to uneven cooling.
* Rotate your food: Use older items first to prevent them from expiring.


Leave a Comment