

DIY Raffia Wall Hanging: Ready to add a touch of bohemian charm and natural texture to your home? I’m so excited to share this super easy and incredibly stylish DIY project with you! Forget those expensive store-bought decorations; we’re diving into the world of crafting a stunning raffia wall hanging that will instantly elevate any room.
Raffia, derived from the raffia palm tree native to Madagascar, has been used for centuries in various cultures for everything from textiles and baskets to roofing and even medicinal purposes. Its natural durability and earthy aesthetic have made it a beloved material across the globe. Now, we’re bringing its timeless appeal into our homes with this simple yet impactful craft.
In today’s fast-paced world, creating something beautiful with our own hands is more important than ever. This DIY raffia wall hanging is not only a fantastic way to personalize your space and express your creativity, but it’s also a budget-friendly alternative to pricey art. Plus, it’s incredibly therapeutic! Who doesn’t need a little mindful crafting in their life? So, grab your raffia, and let’s get started on creating a unique piece of art that you’ll be proud to display!
DIY Raffia Wall Hanging: A Step-by-Step Guide to Bohemian Bliss
Hey there, fellow crafters! I’m so excited to share this super fun and surprisingly easy DIY project with you: a gorgeous raffia wall hanging. It’s the perfect way to add a touch of bohemian charm to any room, and trust me, you don’t need to be a crafting pro to pull this off. I’ll walk you through every step, so grab your supplies and let’s get started!
What You’ll Need:
* Raffia: Lots of it! I recommend getting a large bundle, especially if you want a full and textured look. Natural raffia is beautiful, but feel free to experiment with dyed raffia for a pop of color.
* Wooden Dowel or Branch: This will be the base of your wall hanging. A natural branch adds a rustic touch, while a smooth dowel offers a more polished look. Choose whatever speaks to you!
* Scissors: A good pair of sharp scissors is essential for trimming the raffia.
* Measuring Tape or Ruler: To ensure your raffia strands are the same length.
* Yarn or Twine: For hanging your masterpiece. Choose a color that complements your raffia.
* Optional: Beads, feathers, or other embellishments to personalize your wall hanging.
* Optional: Hot glue gun and glue sticks (for attaching embellishments).
* Optional: Comb or brush to neaten the raffia.
Preparing Your Raffia
Before we dive into the knotting, let’s get the raffia ready. This step is crucial for a neat and even wall hanging.
1. Measure and Cut: Decide on the desired length of your raffia strands. I usually go for lengths between 12 and 24 inches, but feel free to experiment. Once you’ve decided, use your measuring tape and scissors to cut a bunch of raffia strands to that length. The more strands you cut, the fuller your wall hanging will be. I like to cut a large batch at once to save time.
2. Organize Your Strands: To keep things manageable, I recommend bundling your cut raffia strands into smaller groups. You can use rubber bands or simply tie them together with a piece of raffia. This will prevent them from getting tangled and make the knotting process much smoother.
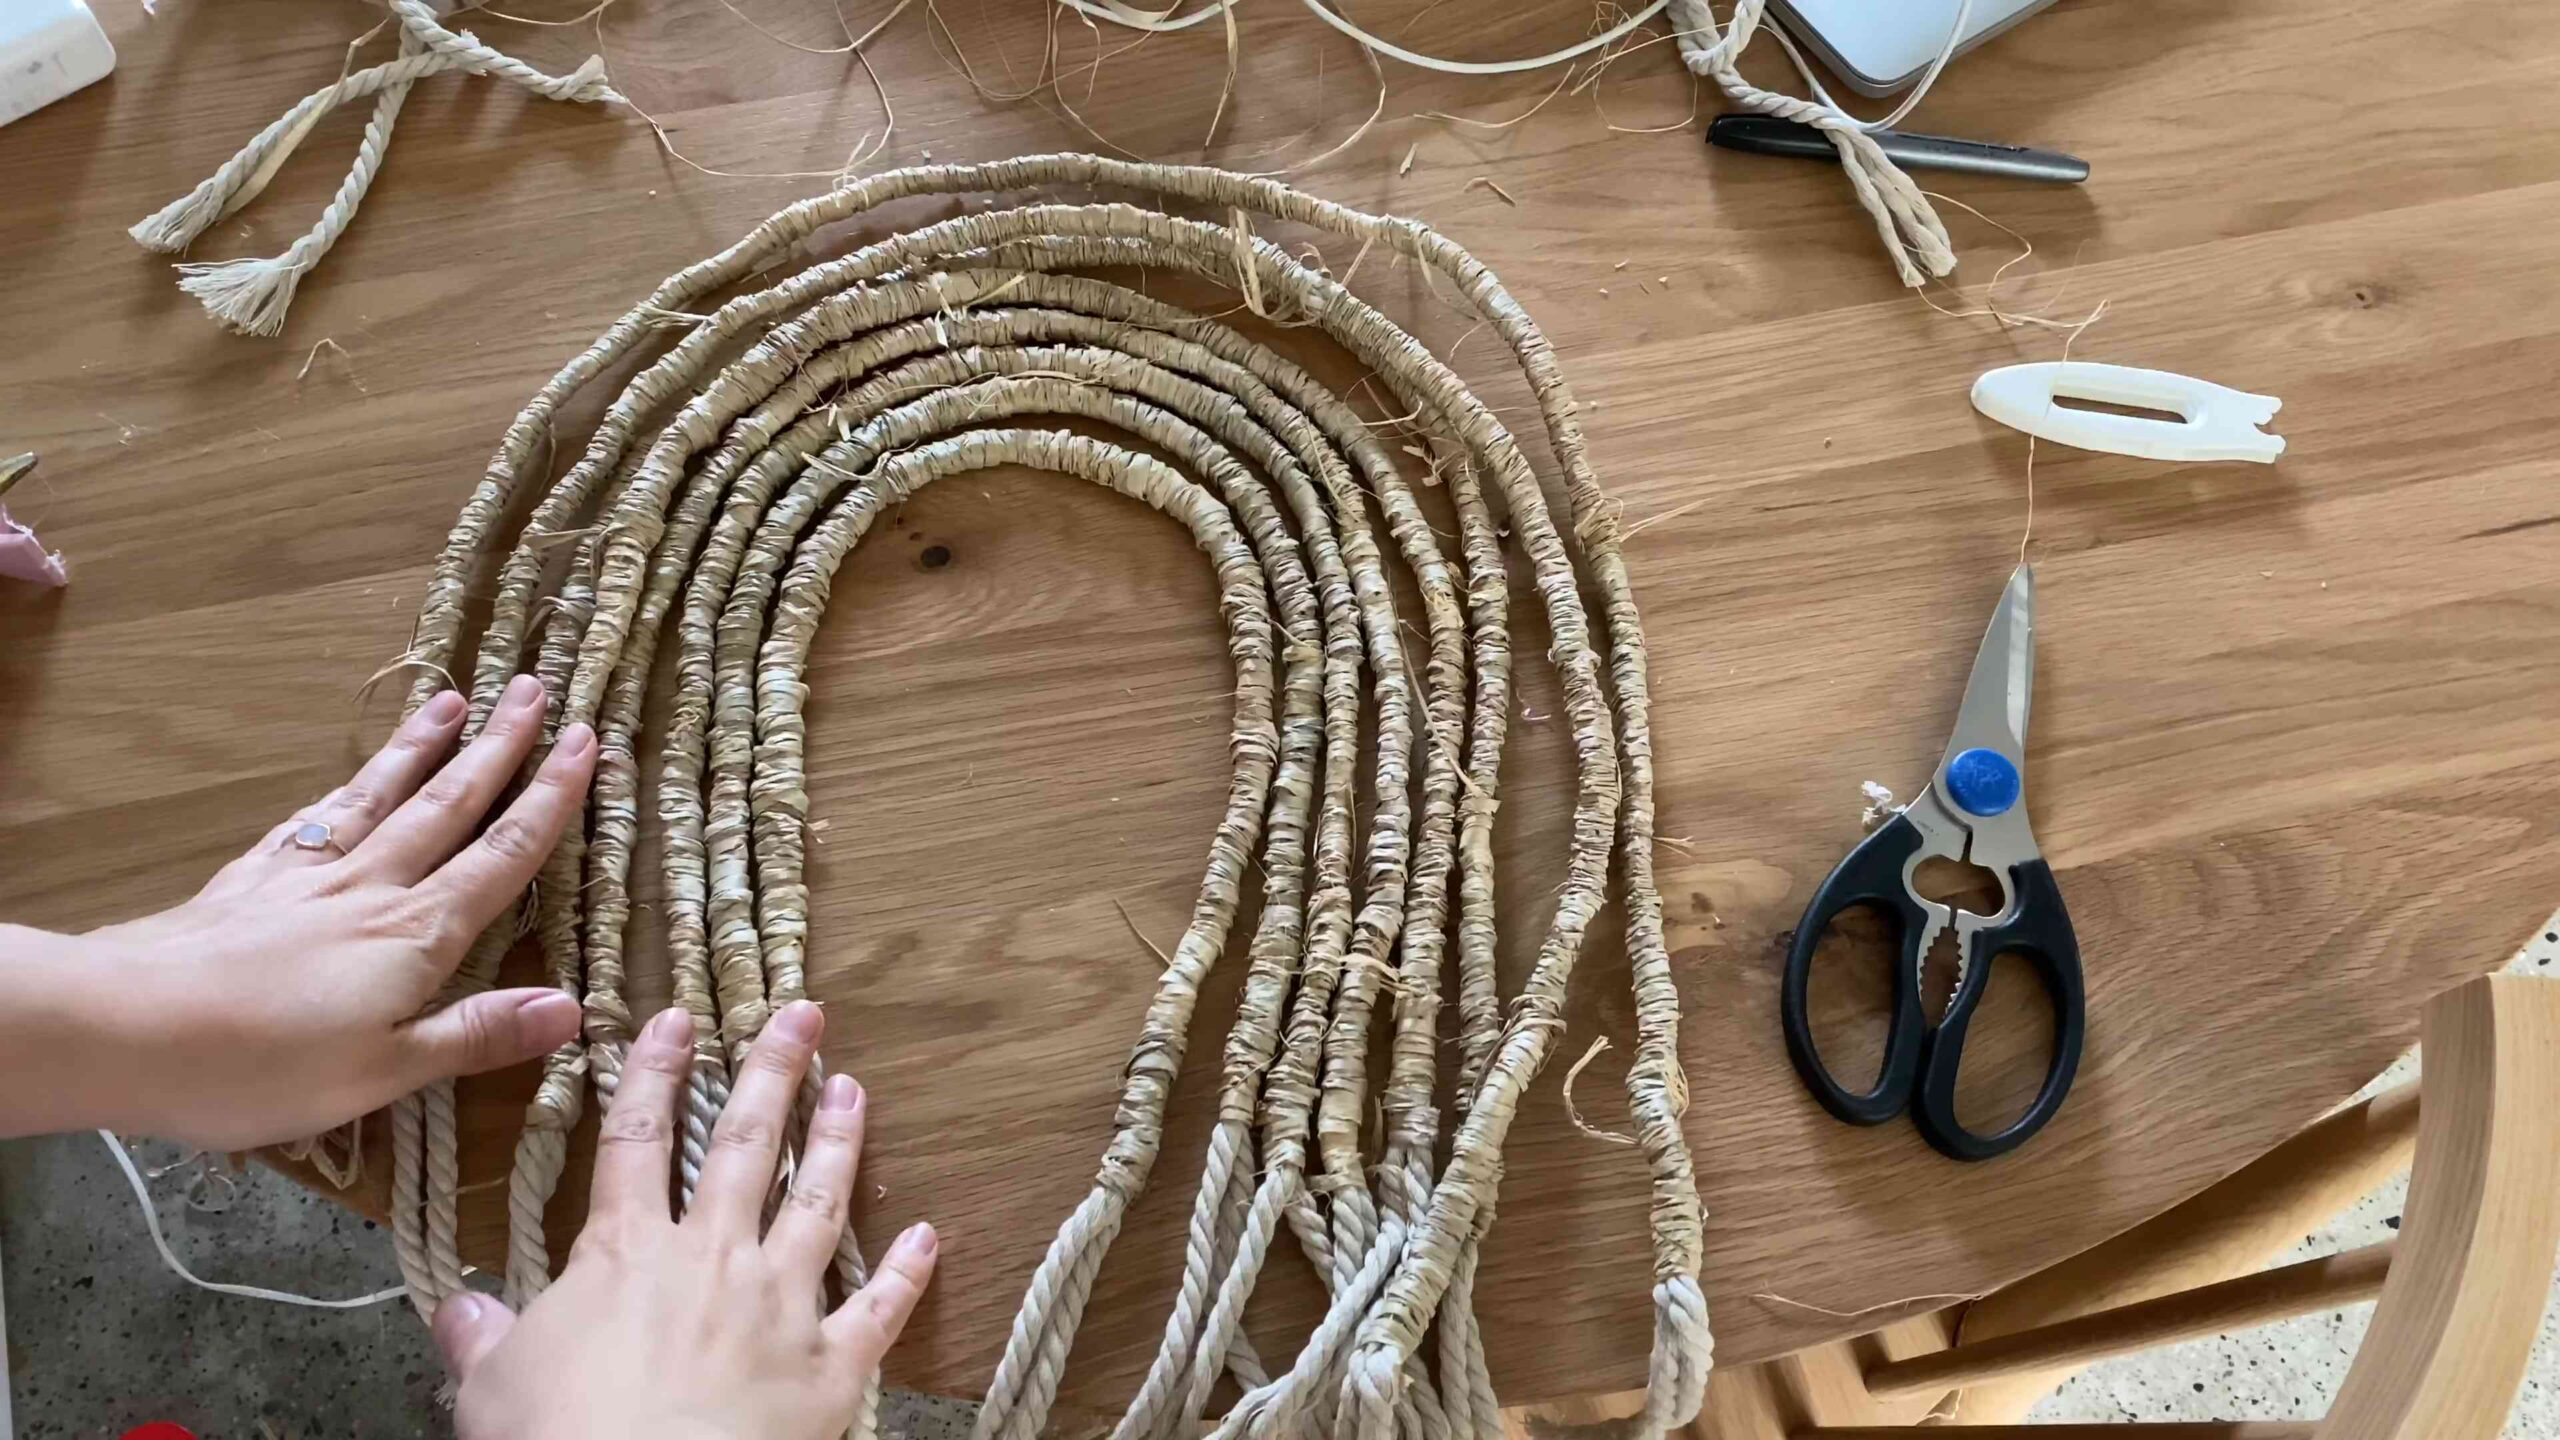
Attaching the Raffia to the Dowel
This is where the magic happens! We’ll be using a simple lark’s head knot to attach the raffia to the dowel. Don’t worry, it’s easier than it sounds.
1. Fold a Bundle in Half: Take one of your raffia bundles and fold it in half, creating a loop at the top.
2. Position the Loop: Place the loop behind the dowel, with the ends of the raffia bundle hanging down in front.
3. Pull the Ends Through: Reach through the loop from the front of the dowel and grab the ends of the raffia bundle. Pull the ends completely through the loop.
4. Tighten the Knot: Gently pull down on the ends of the raffia bundle to tighten the knot. Make sure the knot is snug against the dowel, but not so tight that it distorts the raffia.
5. Repeat: Continue adding raffia bundles to the dowel using the lark’s head knot. Pack the knots closely together to create a full and dense wall hanging. I like to alternate the direction of the knots (one facing left, one facing right) to create a more balanced look.
6. Maintain Even Spacing: As you add more raffia, periodically check the spacing between the knots. Adjust them as needed to ensure a consistent and even appearance.
Creating Different Textures and Patterns
Now for the fun part: adding some personality to your wall hanging! There are tons of ways to create different textures and patterns with raffia. Here are a few of my favorites:
1. Varying Lengths: Cut some raffia strands shorter than others to create a layered effect. This adds depth and dimension to your wall hanging.
2. Adding Knots: Tie knots in some of the raffia strands to create texture and visual interest. You can use simple overhand knots or get creative with more complex knotting techniques.
3. Braiding: Braid small sections of raffia and incorporate them into your wall hanging. This adds a touch of elegance and sophistication.
4. Color Blocking: Use different colors of raffia to create geometric patterns or color blocks. This is a great way to add a modern twist to your bohemian wall hanging.
5. Gathering: Gather a section of raffia and tie it off with a piece of yarn or raffia to create a pouf or tassel effect.
6. Weaving: Weave sections of raffia together to create a more intricate and textured pattern. You can use a simple over-under weave or experiment with more complex weaving techniques.
Adding Embellishments (Optional)
If you want to take your wall hanging to the next level, consider adding some embellishments. This is where you can really let your creativity shine!
1. Beads: String beads onto some of the raffia strands for a touch of sparkle and glamour. Choose beads that complement the colors of your raffia.
2. Feathers: Attach feathers to the raffia using hot glue or by tying them on with yarn. Feathers add a whimsical and bohemian touch.
3. Wooden Beads: Use wooden beads to add a natural and earthy element to your wall hanging.
4. Shells: Incorporate seashells for a coastal-inspired look.
5. Crystals: Add crystals for a touch of sparkle and positive energy.
6. Fabric Scraps: Tie on small pieces of fabric for added texture and color.
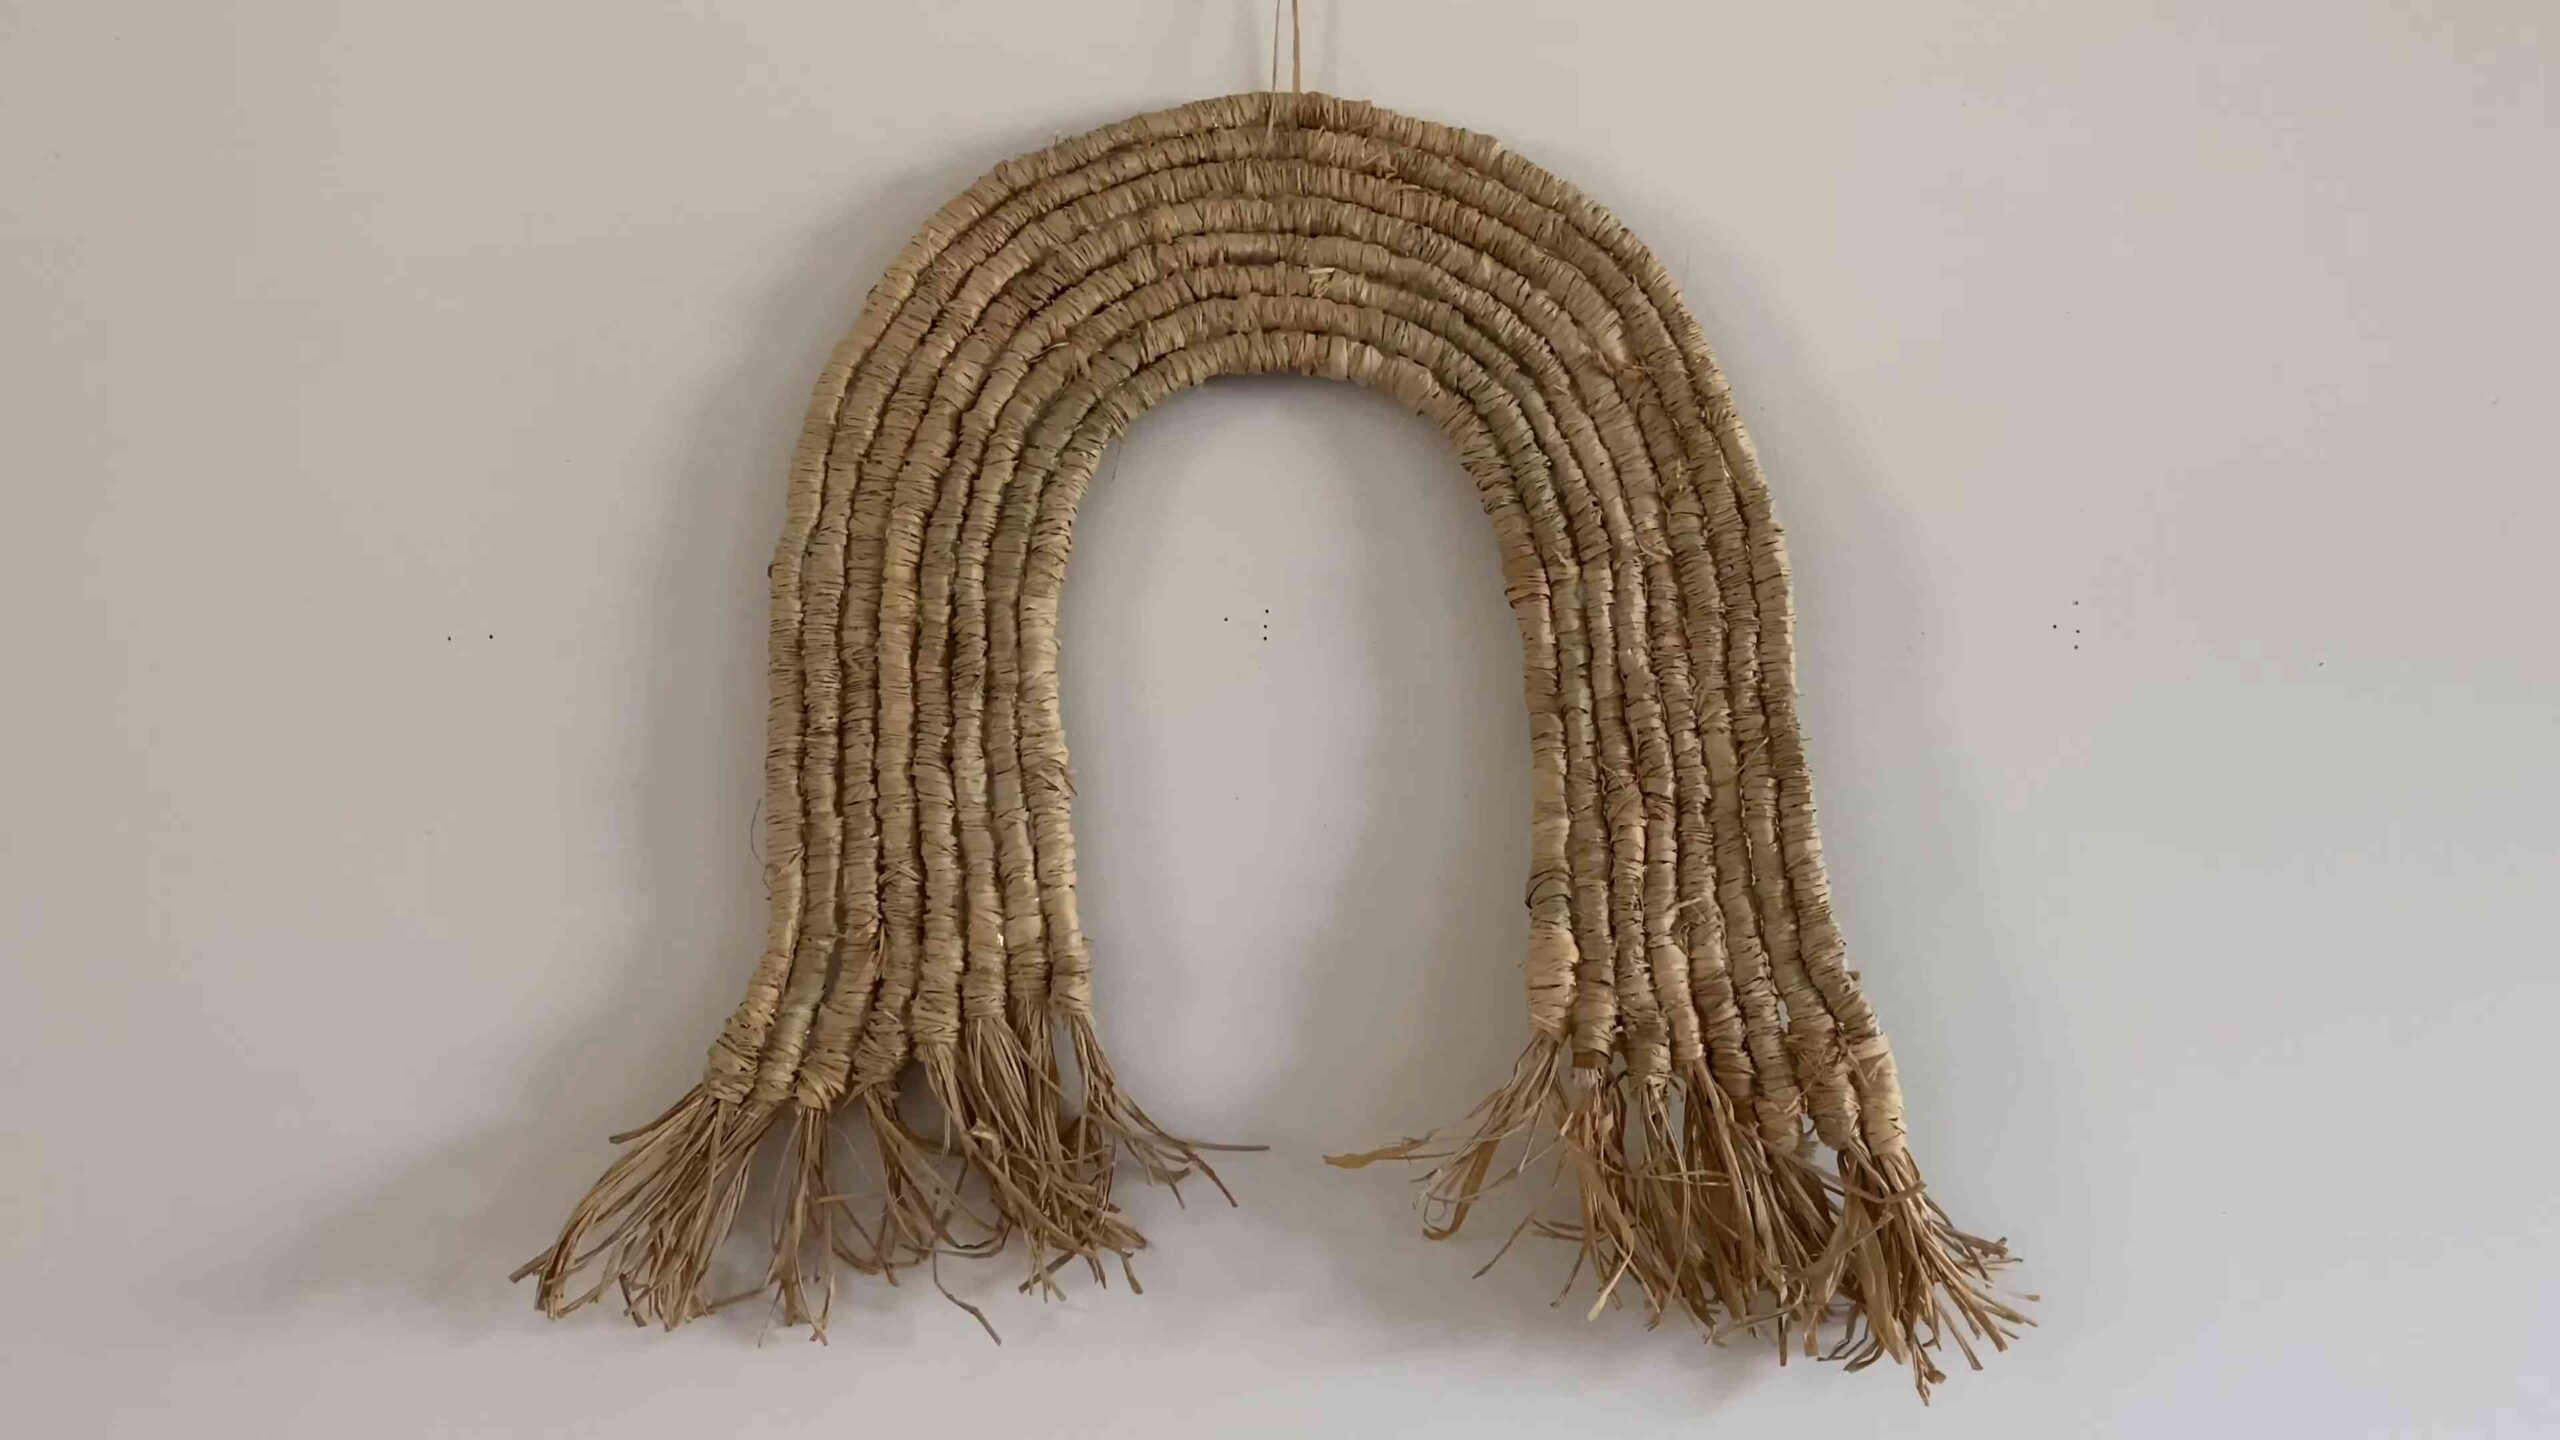
Trimming and Shaping
Once you’ve added all the raffia and embellishments you want, it’s time to trim and shape your wall hanging. This is where you’ll refine the overall look and create a polished finish.
1. Hang Your Wall Hanging: Hang your wall hanging on a wall or door to get a better perspective of its shape and balance.
2. Trim the Bottom: Use your scissors to trim the bottom of the raffia to create a clean and even line. You can trim it straight across, create a V-shape, or experiment with other asymmetrical shapes.
3. Shape the Sides: Trim the sides of the raffia to create a more defined shape. You can taper the sides inward, create a rounded shape, or leave them as is for a more natural look.
4. Neaten the Raffia: Use a comb or brush to neaten the raffia and remove any loose strands. This will give your wall hanging a more polished and professional look.
5. Final Touches: Step back and admire your work! Make any final adjustments as needed to ensure you’re happy with the overall look and feel of your wall hanging.
Hanging Your Masterpiece
Almost there! Now it’s time to hang your beautiful raffia wall hanging and enjoy your handiwork.
1. Attach Hanging Yarn or Twine: Cut a length of yarn or twine and tie it securely to each end of the dowel. Make sure the yarn is long enough to hang your wall hanging at the desired height.
2. Find the Perfect Spot: Choose a spot in your home where you want to display your wall hanging. Consider the size and shape of the wall hanging, as well as the overall decor of the room.
3. Hang and Enjoy: Hang your wall hanging on a nail or hook and step back to admire your creation. You did it!
Tips and Tricks for Success
* Don’t Be Afraid to Experiment: This is your project, so don’t be afraid to experiment with different colors, textures, and patterns. The possibilities are endless!
* Take Breaks: Knotting raffia can be a bit repetitive, so take breaks as needed to avoid hand fatigue.
* Use a Drop Cloth: Raffia can be a bit messy, so protect your work surface with a drop cloth or newspaper.
* Have Fun! The most important thing is to have fun and enjoy the process of creating something beautiful with your own two hands.
I hope you enjoyed this tutorial! I can’t wait to see what you create. Happy crafting!
Conclusion
So, there you have it! Crafting your own raffia wall hanging isn’t just a fun afternoon project; it’s a gateway to personalized home décor that reflects your unique style and creativity. We’ve walked you through the steps, from gathering your materials to adding those final, finishing touches. But why is this DIY trick a must-try?
Firstly, it’s incredibly budget-friendly. Compared to purchasing a pre-made raffia wall hanging from a store, creating your own allows you to control costs and utilize materials you might already have on hand. Think about repurposing old picture frames or using scraps of fabric to add texture and visual interest.
Secondly, it’s a fantastic way to unleash your inner artist. The possibilities are truly endless when it comes to design. Experiment with different colors of raffia, incorporating dyed strands for a vibrant pop or sticking to natural tones for a more bohemian vibe. You can also play with different weaving techniques, knotting styles, and embellishments like beads, feathers, or even small pieces of driftwood.
Thirdly, a handmade raffia wall hanging adds a personal touch to your space that mass-produced items simply can’t replicate. It’s a conversation starter, a testament to your creativity, and a unique piece of art that you can proudly display in your home. Imagine the satisfaction of telling guests, “I made that!”
Ready to take your raffia wall hanging to the next level? Consider these variations:
* **Ombre Effect:** Dye your raffia in varying shades of a single color to create a stunning ombre effect. Start with a light shade at the top and gradually darken towards the bottom.
* **Geometric Patterns:** Use masking tape to create clean lines and geometric patterns on your backing before attaching the raffia. This is a great way to add a modern touch to your wall hanging.
* **Mixed Media:** Incorporate other natural materials like jute, cotton rope, or even dried flowers to add texture and dimension to your design.
* **Miniature Wall Hangings:** Scale down the project and create a series of smaller raffia wall hangings to create a gallery wall effect. These are perfect for smaller spaces or as thoughtful handmade gifts.
* **Raffia Mobile:** Instead of attaching the raffia to a solid backing, suspend it from a hoop or branch to create a beautiful and whimsical mobile.
We truly believe that anyone can create a stunning raffia wall hanging with a little patience and creativity. Don’t be afraid to experiment, make mistakes, and most importantly, have fun!
Now, we want to hear from you! Have you tried making your own raffia wall hanging? What design did you choose? What challenges did you encounter, and how did you overcome them? Share your creations and experiences with us in the comments below or tag us on social media using #DIYRaffiaWallHanging. We can’t wait to see what you come up with! Let’s inspire each other and spread the joy of handmade home décor.
Frequently Asked Questions (FAQ)
What kind of raffia should I use for my wall hanging?
The best type of raffia for a wall hanging is natural raffia fiber. It’s durable, flexible, and has a beautiful natural texture. You can find it at most craft stores or online retailers. Look for raffia that is sustainably sourced and ethically produced. Avoid synthetic raffia, as it may not have the same natural look and feel. Also, consider the color of the raffia. Natural raffia comes in a light tan color, but you can also find dyed raffia in a variety of colors. Choose colors that complement your home décor.
How much raffia do I need for a wall hanging?
The amount of raffia you need will depend on the size and design of your wall hanging. As a general rule, it’s always better to have more than you think you’ll need. For a small wall hanging (approximately 12 inches wide and 18 inches long), you’ll likely need at least 100 grams of raffia. For a larger wall hanging, you may need 200 grams or more. It’s also a good idea to purchase extra raffia in case you make mistakes or want to add more layers to your design.
What kind of backing should I use for my raffia wall hanging?
There are several options for the backing of your raffia wall hanging. Some popular choices include:
* **Wooden Dowel:** A wooden dowel is a classic and versatile option. It provides a sturdy base for your wall hanging and can be easily hung on a wall.
* **Driftwood:** Driftwood adds a natural and rustic touch to your wall hanging. It’s a great option if you’re going for a bohemian or coastal vibe.
* **Metal Hoop:** A metal hoop can be used to create a circular or semi-circular wall hanging. It’s a modern and stylish option.
* **Canvas:** A stretched canvas provides a flat and stable surface for your raffia wall hanging. It’s a good option if you want to create a more structured design.
* **Cardboard:** For a budget-friendly option, you can use a piece of sturdy cardboard as your backing. Just make sure to cover it with fabric or paint to give it a more finished look.
How do I attach the raffia to the backing?
There are several ways to attach the raffia to the backing, depending on the type of backing you’re using. Here are a few common methods:
* **Knotting:** This is a simple and effective method for attaching raffia to a dowel or hoop. Simply tie the raffia strands to the backing using a basic knot.
* **Gluing:** You can use hot glue or fabric glue to attach the raffia to a canvas or cardboard backing. Apply the glue to the backing and then press the raffia strands into the glue.
* **Sewing:** If you’re using a fabric backing, you can sew the raffia strands onto the fabric using a needle and thread. This is a more time-consuming method, but it creates a very secure attachment.
* **Wrapping:** For a dowel or hoop, you can wrap the raffia around the backing to create a textured effect. Secure the ends of the raffia with glue or knots.
How do I care for my raffia wall hanging?
Raffia is a natural fiber, so it’s important to care for your wall hanging properly to keep it looking its best. Here are a few tips:
* **Dust Regularly:** Use a soft brush or duster to remove dust from your wall hanging on a regular basis.
* **Avoid Direct Sunlight:** Direct sunlight can fade the color of the raffia over time. Hang your wall hanging in a location that is not exposed to direct sunlight.
* **Keep Away from Moisture:** Raffia can be damaged by moisture. Avoid hanging your wall hanging in a humid environment, such as a bathroom.
* **Spot Clean:** If your wall hanging gets stained, spot clean it with a damp cloth and mild soap. Avoid using harsh chemicals or detergents.
* **Store Properly:** If you need to store your wall hanging, wrap it in acid-free tissue paper and store it in a cool, dry place.
Can I dye my raffia?
Yes, you can definitely dye your raffia! This is a great way to customize your wall hanging and create a unique color palette. Use a fiber-reactive dye specifically designed for natural fibers. Follow the instructions on the dye package carefully. It’s always a good idea to test the dye on a small piece of raffia first to make sure you achieve the desired color. Remember to wear gloves and protect your work surface when dyeing raffia.
What if my raffia wall hanging starts to unravel?
If your raffia wall hanging starts to unravel, don’t panic! You can easily fix it. Simply trim any loose ends with scissors. If the raffia is coming loose from the backing, you can reattach it using glue, knots, or sewing, depending on the method you originally used. A little bit of maintenance can keep your raffia wall hanging looking beautiful for years to come.
Leave a Comment