

Grow peanuts in foam box? Absolutely! Imagine harvesting a bounty of fresh, homegrown peanuts right from your own backyard, balcony, or even a sunny windowsill. It sounds like a dream, right? But with this simple DIY trick, it can become a delicious reality. For centuries, peanuts, originally from South America, have been a staple crop, providing sustenance and joy across cultures. From boiled peanuts in the American South to peanut sauces in Southeast Asia, this humble legume has a rich and diverse history.
But why should you bother growing your own peanuts, especially in a foam box? Well, for starters, it’s incredibly rewarding to nurture a plant from seed to harvest. Plus, you get to control exactly what goes into your food, ensuring it’s free from harmful pesticides and chemicals. And let’s be honest, store-bought peanuts just don’t compare to the fresh, nutty flavor of homegrown ones. This DIY project is perfect for urban gardeners, those with limited space, or anyone who wants to try something new and exciting. I’m going to show you how easy it is to grow peanuts in foam box, even if you don’t have a green thumb. Get ready to impress your friends and family with your peanut-growing prowess!
Grow Your Own Peanuts in a Foam Box: A Fun and Easy DIY Project!
Hey there, fellow gardening enthusiasts! Ever thought about growing your own peanuts? It’s surprisingly easy, even if you don’t have a traditional garden. I’m going to walk you through how to cultivate these delicious legumes right in a foam box. Trust me, it’s a rewarding experience, and you’ll be snacking on homegrown peanuts before you know it!
Why a Foam Box?
Foam boxes are fantastic for several reasons:
* Excellent Drainage: With a few modifications, they provide great drainage, preventing waterlogging, which peanuts hate.
* Temperature Regulation: Foam helps insulate the soil, keeping it warmer in cooler climates and cooler in hotter climates. This is crucial for peanut growth.
* Lightweight and Portable: You can easily move the box around to find the sunniest spot in your yard or even bring it indoors if the weather gets too harsh.
* Recycling at its Finest: Give those old foam boxes a new life!
Materials You’ll Need
Before we dive in, gather these supplies:
* A large foam box (the kind used for shipping produce or seafood works perfectly)
* Peanut seeds (raw, unsalted peanuts from the grocery store can work, but seeds specifically for planting are best)
* Potting soil (a well-draining mix is essential)
* Sand (for improving drainage)
* Compost (for added nutrients)
* Drill or sharp knife (for drainage holes)
* Watering can or hose
* Optional: Landscape fabric (to line the box)
* Optional: Fertilizer specifically formulated for legumes
Step-by-Step Guide to Growing Peanuts in a Foam Box
Okay, let’s get our hands dirty! Here’s the breakdown:
Phase 1: Preparing the Foam Box
1. Drill Drainage Holes: This is the most crucial step. Using your drill or knife, create several drainage holes in the bottom of the foam box. I recommend spacing them about 4-6 inches apart. The goal is to ensure excess water can escape easily. Don’t skimp on this step; soggy soil is a peanut’s worst enemy!
2. Line the Box (Optional): While not strictly necessary, lining the box with landscape fabric can help prevent soil from washing out through the drainage holes and also helps retain moisture. Simply cut the fabric to fit the inside of the box, leaving some overlap at the top.
3. Prepare the Soil Mix: Peanuts thrive in well-draining soil. I like to create a mix of equal parts potting soil, sand, and compost. The potting soil provides a good base, the sand improves drainage, and the compost adds essential nutrients. Mix everything thoroughly in a large container or directly in the foam box.
Phase 2: Planting the Peanut Seeds
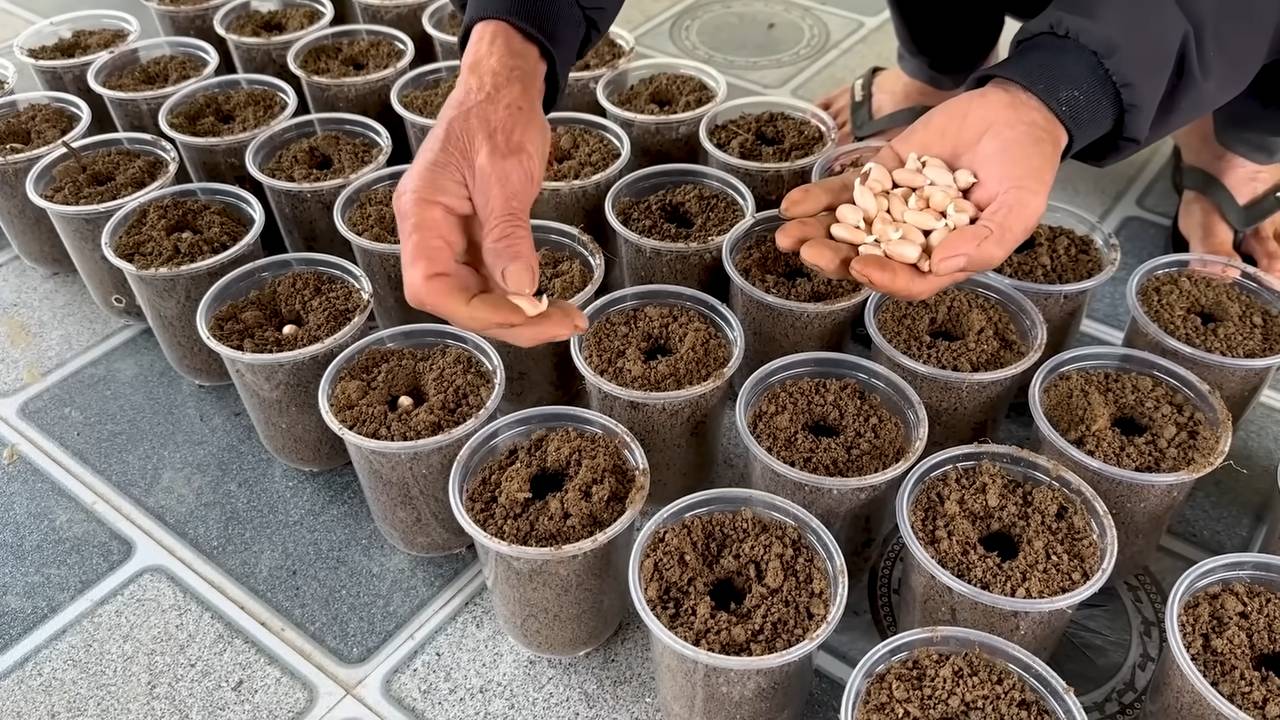
1. Soak the Seeds (Optional): Soaking the peanut seeds in water for 24 hours before planting can help speed up germination. This isn’t mandatory, but I’ve found it gives them a little head start.
2. Planting Depth: Dig small holes about 1-2 inches deep and 6-8 inches apart. This spacing allows the plants enough room to spread out as they grow.
3. Place the Seeds: Place one peanut seed in each hole, and cover it gently with soil.
4. Water Thoroughly: After planting, water the soil thoroughly until it’s evenly moist. Be careful not to overwater; you want the soil to be damp, not soggy.
Phase 3: Caring for Your Peanut Plants
1. Sunlight: Peanuts need at least 6-8 hours of direct sunlight per day. Place your foam box in the sunniest spot you can find. If you live in a particularly hot climate, some afternoon shade might be beneficial.
2. Watering: Water regularly, especially during dry spells. The soil should be consistently moist, but never waterlogged. Check the soil moisture by sticking your finger about an inch deep. If it feels dry, it’s time to water.
3. Fertilizing (Optional): If your soil is lacking in nutrients, you can fertilize your peanut plants with a fertilizer specifically formulated for legumes. Follow the instructions on the fertilizer package carefully. I usually fertilize every 4-6 weeks.
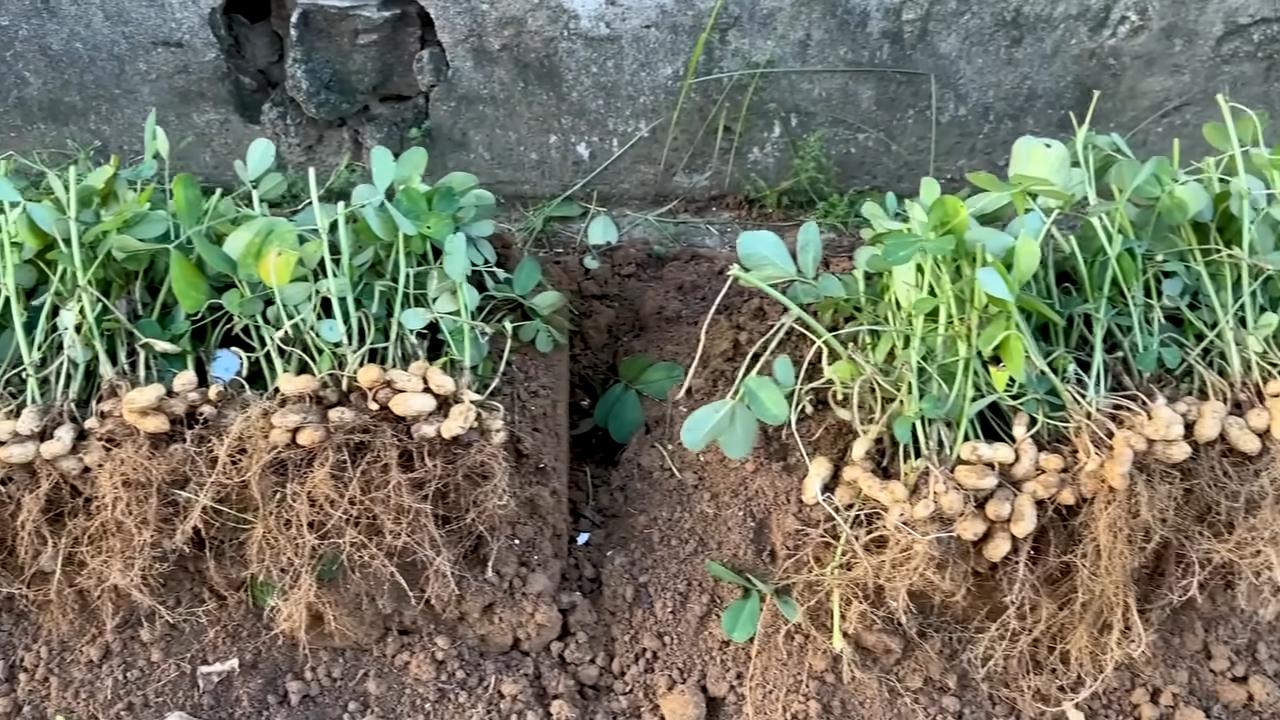
4. Hilling: As your peanut plants grow, you’ll notice small yellow flowers appearing. After the flowers fade, “pegs” will emerge from the base of the plant and grow downwards into the soil. These pegs are where the peanuts will develop. To encourage peanut production, gently hill the soil around the base of the plants, covering the pegs with soil. This gives them a dark, moist environment to grow in.
5. Weed Control: Keep the area around your peanut plants free of weeds. Weeds compete with the peanuts for nutrients and water. Hand-pulling weeds is the best option to avoid damaging the peanut plants.
Phase 4: Harvesting Your Peanuts
1. Timing is Key: Peanuts typically take about 120-150 days to mature. The best time to harvest is when the leaves start to turn yellow and the plant begins to look a bit tired.
2. Digging Up the Plants: Carefully dig up the entire plant, being careful not to damage the peanuts. I like to use a garden fork to loosen the soil around the plant before pulling it up.
3. Cleaning the Peanuts: Gently shake off as much soil as possible from the peanuts.
4. Curing the Peanuts: This is an important step to ensure your peanuts taste their best. Hang the entire plant upside down in a well-ventilated area for about 2-4 weeks. This allows the peanuts to dry and cure properly. You can also spread the peanuts out in a single layer on a screen or tray to dry.
5. Separating the Peanuts: Once the peanuts are cured, you can separate them from the plant.
6. Roasting (Optional): Roasting your homegrown peanuts is a delicious way to enjoy them. Spread the peanuts in a single layer on a baking sheet and roast them in a preheated oven at 350°F (175°C) for about 15-20 minutes, or until they are golden brown and fragrant. Keep a close eye on them to prevent burning.
Troubleshooting
* Poor Germination: If your peanut seeds don’t germinate, it could be due to several factors: old seeds, poor soil, or improper watering. Try using fresh seeds and ensuring the soil is well-draining and consistently moist.
* Yellowing Leaves: Yellowing leaves can indicate a nutrient deficiency. Try fertilizing your plants with a fertilizer specifically formulated for legumes.
* Pests: Peanuts can be susceptible to pests like aphids and spider mites. Inspect your plants regularly and treat any infestations promptly with an appropriate insecticide or organic pest control method.
* Disease: Fungal diseases can also affect peanut plants. Ensure good air circulation around the plants and avoid overwatering to prevent fungal growth.
Tips for Success
* Choose the Right Variety: There are different varieties of peanuts, so choose one that is well-suited to your climate.
* Start with Good Soil: Well-draining soil is essential for peanut growth. Amend your soil with sand and compost to improve drainage and fertility.
* Don’t Overwater: Overwatering can lead to root rot and other problems. Water regularly, but allow the soil to dry out slightly between waterings.
* Be Patient: Peanuts take time to mature, so be patient and don’t give up!
Growing peanuts in a foam box is a fun and rewarding project that anyone can do. With a little bit of care and attention, you’ll be enjoying homegrown peanuts in no time! Happy gardening!
Conclusion
So, there you have it! Growing peanuts in a foam box might sound unconventional, but as we’ve explored, it’s a surprisingly effective and rewarding method, especially if you’re short on space, dealing with poor soil, or simply looking for a fun and engaging gardening project. This DIY trick offers a controlled environment, protecting your precious peanut plants from harsh weather, pesky critters, and the challenges of unpredictable soil conditions.
But why is this method a must-try? Beyond the sheer novelty, growing peanuts in a foam box allows for better drainage, preventing root rot, a common issue when growing peanuts directly in the ground. The foam box also acts as insulation, maintaining a more consistent soil temperature, which is crucial for optimal peanut development. Plus, the portability of the foam box means you can easily move your peanut plants to chase the sun or shelter them from unexpected frosts.
Think of the possibilities! You can experiment with different peanut varieties, from the classic Virginia peanuts to the smaller, sweeter Spanish peanuts. You could even try adding companion plants like marigolds or basil to your foam box to deter pests and enhance the overall health of your peanut plants. Consider adding a layer of mulch on top of the soil to help retain moisture and suppress weeds.
Don’t be afraid to get creative! Perhaps you want to paint your foam box with a vibrant design or add drainage holes along the sides for extra ventilation. The beauty of this DIY project is that it’s entirely customizable to your preferences and needs.
We understand that venturing into uncharted gardening territory can be a little daunting, but we assure you, growing peanuts in a foam box is a relatively simple and straightforward process. With a little patience and attention, you’ll be harvesting your own homegrown peanuts in no time.
We wholeheartedly encourage you to give this DIY trick a try. Imagine the satisfaction of cracking open your own freshly grown peanuts, knowing that you nurtured them from seed to harvest. It’s a truly rewarding experience that connects you to the natural world and provides you with a delicious and healthy snack.
And most importantly, we want to hear about your experience! Share your successes, your challenges, and any variations you’ve tried. Post pictures of your peanut-filled foam boxes on social media using #FoamBoxPeanuts and let’s create a community of peanut-growing enthusiasts. Your insights and experiences will help others discover the joys of this unique gardening method. So, grab a foam box, some peanut seeds, and get ready to embark on a peanut-growing adventure! You might just surprise yourself with what you can achieve.
Frequently Asked Questions (FAQ)
What kind of foam box should I use?
Ideally, you should use a clean, food-grade foam box that’s at least 12 inches deep. This will provide ample space for the peanut roots to develop. Styrofoam coolers or insulated shipping containers work well. Make sure the box is sturdy enough to hold the weight of the soil and plants. Avoid using boxes that have contained harsh chemicals or pesticides. If you’re unsure, it’s best to err on the side of caution and opt for a new or unused box.
What type of soil is best for growing peanuts in a foam box?
Peanuts thrive in well-draining, sandy loam soil. Avoid heavy clay soils, as they can become waterlogged and hinder root development. You can purchase a pre-mixed potting soil specifically formulated for vegetables, or you can create your own mix by combining equal parts garden soil, sand, and compost. The compost will provide essential nutrients for your peanut plants, while the sand will improve drainage.
How often should I water my peanut plants in a foam box?
Water your peanut plants regularly, especially during hot and dry weather. The soil should be consistently moist but not waterlogged. Check the soil moisture by sticking your finger about an inch deep into the soil. If it feels dry, it’s time to water. Avoid overwatering, as this can lead to root rot. During periods of heavy rain, you may need to reduce watering frequency.
How much sunlight do peanut plants need?
Peanut plants require at least 6-8 hours of direct sunlight per day. Choose a sunny location for your foam box where the plants will receive ample sunlight throughout the day. If you live in a particularly hot climate, you may need to provide some afternoon shade to prevent the plants from scorching.
When is the best time to plant peanuts in a foam box?
The best time to plant peanuts is after the last frost, when the soil temperature has warmed to at least 65 degrees Fahrenheit. In most regions, this is typically in late spring or early summer. You can start peanut seeds indoors 4-6 weeks before the last frost to get a head start on the growing season.
How long does it take for peanuts to mature in a foam box?
Peanuts typically take 120-150 days to mature, depending on the variety and growing conditions. You’ll know your peanuts are ready to harvest when the foliage begins to yellow and the pods feel plump and full.
How do I harvest peanuts from a foam box?
To harvest peanuts, carefully dig up the entire plant, being careful not to damage the pods. Gently shake off any excess soil and allow the plants to dry in a well-ventilated area for several days. Once the plants are dry, you can remove the peanuts from the pods.
Can I reuse the soil in my foam box for future peanut crops?
It’s generally not recommended to reuse the soil for future peanut crops, as it may harbor diseases or pests. However, you can amend the soil with fresh compost and fertilizer to improve its fertility and drainage. Alternatively, you can use the old soil for other plants that are not susceptible to the same diseases as peanuts.
Are there any common pests or diseases that affect peanut plants in foam boxes?
Common pests that can affect peanut plants include aphids, spider mites, and leafhoppers. Diseases that can affect peanut plants include leaf spot and root rot. Regularly inspect your plants for signs of pests or diseases and take appropriate action if necessary. You can use organic pesticides or fungicides to control pests and diseases.
Can I grow other plants in the same foam box as peanuts?
While it’s possible to grow other plants in the same foam box as peanuts, it’s generally not recommended, as they may compete for resources and increase the risk of pests and diseases. However, you can grow companion plants like marigolds or basil, which can help deter pests and improve the overall health of your peanut plants.
What fertilizer should I use for peanuts grown in a foam box?
Peanuts benefit from a fertilizer that is low in nitrogen and high in phosphorus and potassium. A 5-10-10 fertilizer is a good option. Apply the fertilizer according to the package directions. Avoid over-fertilizing, as this can lead to excessive foliage growth and reduced peanut production.
How do I store harvested peanuts?
Store harvested peanuts in a cool, dry place in an airtight container. Roasted peanuts can be stored for several months, while raw peanuts should be stored in the refrigerator or freezer to prevent them from going rancid.
Is growing peanuts in a foam box organic?
Growing peanuts in a foam box can be organic if you use organic soil, fertilizer, and pest control methods. Make sure to choose products that are certified organic by a reputable organization.

Leave a Comment