

DIY Rope Basket: Ever find yourself staring at a tangled mess of rope, wondering if there’s more to life than just knots and tangles? I have! And let me tell you, there is! We’re about to embark on a creative journey that transforms humble rope into a stylish and functional storage solution. Forget those generic plastic bins – we’re crafting a beautiful, handmade rope basket that will add a touch of rustic charm to any room.
Basket weaving, in general, boasts a rich history, dating back thousands of years across various cultures. From carrying food to storing precious belongings, baskets have always been essential tools. While our modern take might not involve foraging for reeds in the wilderness, it still taps into that primal urge to create something useful and beautiful with our own hands.
Why do you need this DIY rope basket trick in your life? Well, think about it: clutter is the enemy of calm. And let’s be honest, we all have clutter! This project is not just about making a basket; it’s about organizing your space, adding a personal touch to your décor, and experiencing the satisfaction of creating something unique. Plus, it’s a fantastic way to upcycle old rope or twine. So, grab your supplies, and let’s dive into this fun and rewarding DIY rope basket project! I promise, you’ll love the results.
DIY Rope Basket: A Stylish and Functional Home Decor Project
Hey there, fellow DIY enthusiasts! Today, I’m super excited to share a project that’s both incredibly satisfying and adds a touch of rustic charm to any space: a DIY rope basket! These baskets are perfect for storing blankets, toys, plants, or just about anything you can think of. Plus, they’re surprisingly easy to make, even if you’re a beginner. So, grab your supplies, and let’s get crafting!
What You’ll Need: The Essentials
Before we dive in, let’s gather all the necessary materials. Having everything on hand will make the process smooth and enjoyable.
* **Rope:** This is the star of the show! I recommend using a thick cotton rope (at least 1/4 inch diameter) for a sturdy and visually appealing basket. The amount of rope you need will depend on the size of your desired basket. For a medium-sized basket (around 12 inches in diameter and 8 inches tall), you’ll need approximately 100-150 feet of rope. It’s always better to have a little extra than not enough!
* **Hot Glue Gun and Glue Sticks:** A high-temperature hot glue gun is essential for securely bonding the rope coils together. Make sure you have plenty of glue sticks on hand, as you’ll be using quite a bit.
* **Scissors or Utility Knife:** For cutting the rope to the desired length. A sharp pair of scissors or a utility knife will do the trick.
* **Bowl or Container (Optional):** This will serve as a mold to help you shape the base of your basket. A mixing bowl or a plastic container works perfectly.
* **Clothespins or Clips (Optional):** These can be helpful for holding the rope coils in place while the glue dries, especially when you’re working on the sides of the basket.
* **Leather Scraps or Fabric (Optional):** For creating handles. This is totally optional, but handles make the basket more functional and add a nice decorative touch.
* **Needle and Thread (Optional):** If you choose to add handles, you’ll need a needle and thread to sew them onto the basket.
* **Ruler or Measuring Tape:** To measure the rope and ensure your basket is the desired size.
* **Protective Surface:** Cover your work area with a drop cloth or newspaper to protect it from glue drips.
Getting Started: Creating the Base
The base is the foundation of your basket, so it’s important to get it right. Here’s how I like to do it:
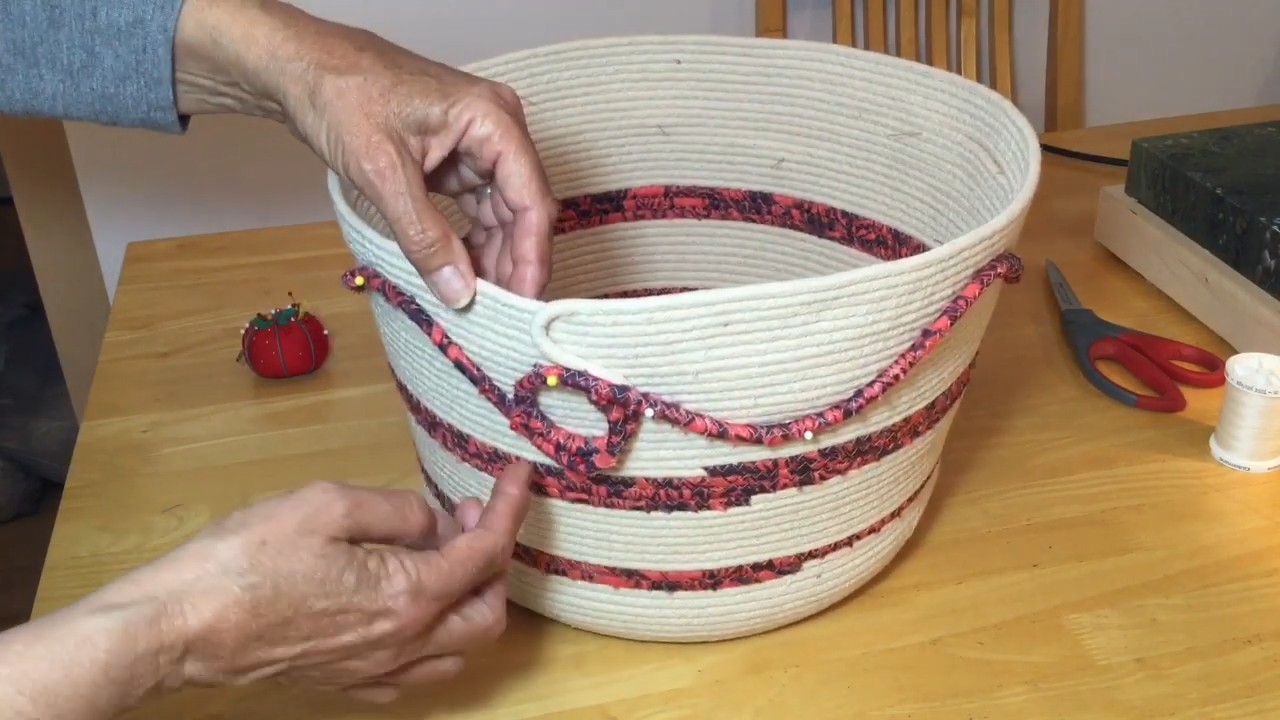
1. **Form the Initial Coil:** Start by creating a small, tight coil with the end of your rope. Apply a generous amount of hot glue to the inside of the coil to secure it. This will be the very center of your basket’s base.
2. **Continue Coiling and Gluing:** Slowly coil the rope around the initial coil, applying hot glue to the inner edge of the rope as you go. Press the rope firmly against the previous coil to ensure a strong bond. I like to work in small sections, applying glue and then pressing the rope together before moving on. This prevents the glue from drying too quickly.
3. **Maintain a Flat Surface:** As you continue coiling, make sure the base remains flat. If it starts to buckle or curve, gently flatten it with your hands. You can also use a heavy object, like a book, to weigh it down while the glue dries.
4. **Use a Mold (Optional):** If you’re having trouble keeping the base flat, you can use a bowl or container as a mold. Simply place the coiled rope inside the bowl and continue coiling and gluing, following the shape of the bowl. This will help you create a perfectly round and flat base.
5. **Determine the Base Size:** Continue coiling until the base reaches your desired size. For a medium-sized basket, I usually aim for a base that’s around 6-8 inches in diameter.
Building Up the Sides: Shaping Your Basket
Once the base is complete, it’s time to start building up the sides of your basket. This is where the basket starts to take shape, and it’s really exciting to see it come together!
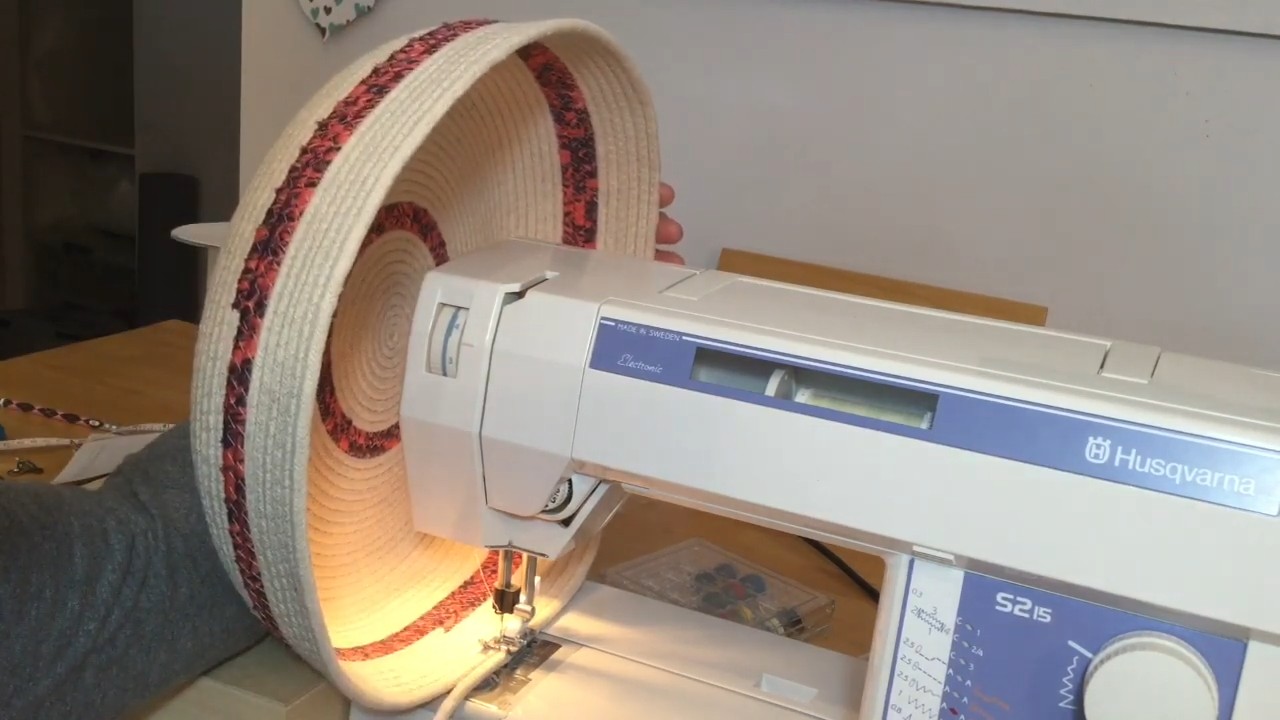
1. **Transition to the Sides:** To transition from the base to the sides, simply start angling the rope upwards as you coil. Instead of gluing the rope directly on top of the previous coil, glue it slightly to the side, creating a gentle curve.
2. **Maintain Consistent Angle:** Try to maintain a consistent angle as you coil the rope upwards. This will ensure that your basket has a uniform shape. If you want a more flared basket, increase the angle. If you want a straighter basket, keep the angle more subtle.
3. **Use Clothespins or Clips (Optional):** As you build up the sides, the rope coils may start to shift or separate. To prevent this, use clothespins or clips to hold the coils in place while the glue dries. This is especially helpful when you’re working on taller baskets.
4. **Continue Coiling and Gluing:** Continue coiling and gluing the rope, working your way up the sides of the basket. Remember to apply plenty of hot glue and press the rope firmly against the previous coil.
5. **Check for Stability:** Periodically check the stability of the basket as you build it up. If you notice any weak spots, apply extra glue to reinforce them.
6. **Achieve Desired Height:** Continue coiling until the basket reaches your desired height. For a medium-sized basket, I usually aim for a height of around 8-10 inches.
Finishing Touches: Adding Handles and Securing the End
Now that the basket is the right shape and size, it’s time to add the finishing touches. This includes securing the end of the rope and adding handles, if desired.
1. **Secure the End of the Rope:** When you reach the desired height, cut the rope, leaving a few inches of extra length. Apply a generous amount of hot glue to the end of the last coil and carefully tuck the end of the rope underneath the coil, hiding it from view. This will create a clean and finished edge.
2. **Reinforce the End:** To ensure that the end of the rope stays securely in place, apply a few extra dabs of hot glue around the area. You can also use a small piece of fabric or leather to cover the end of the rope for added security and a decorative touch.
3. **Adding Handles (Optional):** If you want to add handles to your basket, now is the time to do it.
* **Cut the Handles:** Cut two pieces of leather or fabric to the desired length for the handles. I usually aim for handles that are around 6-8 inches long.
* **Fold and Glue (Optional):** If you’re using fabric, you may want to fold the edges of the fabric inwards and glue them down to create a more finished edge.
* **Attach the Handles:** Position the handles on opposite sides of the basket, making sure they are evenly spaced. Use a needle and thread to sew the handles securely onto the basket. You can also use hot glue, but sewing will provide a stronger and more durable attachment.
* **Reinforce the Handles:** To reinforce the handles, you can add a few extra stitches or dabs of hot glue around the attachment points.
Final Inspection and Cleanup
Before you start using your new rope basket, take a moment to inspect it for any loose ends or weak spots. Apply extra glue as needed to reinforce any areas that need attention.
1. **Remove Excess Glue:** Carefully remove any excess glue strings or blobs from the basket. You can use a pair of tweezers or your fingers to gently peel them away.
2. **Clean Up Your Work Area:** Once you’re satisfied with the finished product, clean up your work area. Dispose of any scraps of rope, glue sticks, and other materials.
Enjoy Your Handmade Rope Basket!
Congratulations! You’ve successfully created your own DIY rope basket. Now you can proudly display it in your home and use it to store all sorts of things. These baskets also make wonderful gifts for friends and family.
Remember to experiment with different rope colors, sizes, and handle styles to create a basket that perfectly matches your personal taste and decor. I hope you enjoyed this tutorial, and I can’t wait to see what you create! Happy crafting!
Conclusion
So, there you have it! Crafting your own DIY rope basket isn’t just a fun afternoon project; it’s a gateway to personalized home décor, sustainable living, and a serious sense of accomplishment. Forget those mass-produced, generic storage solutions. This method allows you to create a truly unique piece that reflects your individual style and perfectly complements your existing décor.
Why is this DIY rope basket a must-try? Because it’s incredibly versatile. Need a stylish planter for your favorite indoor greenery? Done. Looking for a chic way to organize your blankets and throws? This basket has you covered. Want a charming storage solution for toys in the kids’ room? Look no further. The possibilities are truly endless.
But the benefits extend beyond mere aesthetics and functionality. By creating your own rope basket, you’re actively participating in a more sustainable lifestyle. You can repurpose old ropes, giving them a new lease on life and reducing waste. You’re also avoiding the environmental impact associated with the production and transportation of mass-produced goods.
And let’s not forget the therapeutic aspect of crafting. In our increasingly digital world, taking the time to create something with your own hands can be incredibly grounding and rewarding. The repetitive motion of coiling and gluing the rope can be surprisingly meditative, allowing you to unwind and de-stress.
Ready to take your DIY rope basket to the next level? Consider these variations:
* Color Play: Experiment with different colored ropes or dyes to create a basket that perfectly matches your color scheme. Dip-dyeing the rope before you start building the basket can create a stunning ombre effect.
* Handle It: Add leather or rope handles for easy carrying. This is especially useful for larger baskets that will be used to store heavier items.
* Shape Shifter: Don’t limit yourself to a round basket. Experiment with oval, square, or even freeform shapes. Simply adjust the way you coil the rope to achieve your desired shape.
* Embellish It: Add embellishments like beads, shells, or fabric scraps to personalize your basket even further.
* Size Matters: Create a set of baskets in varying sizes to meet all your storage needs. A small basket for keys and mail, a medium basket for magazines, and a large basket for blankets – the possibilities are endless.
The key to a successful DIY rope basket is patience and attention to detail. Take your time, ensure that each coil is securely glued, and don’t be afraid to experiment. Remember, there’s no right or wrong way to do it. The beauty of DIY is that it’s all about expressing your creativity and creating something that’s uniquely yours.
So, what are you waiting for? Gather your supplies, unleash your inner crafter, and create a stunning DIY rope basket that you’ll be proud to display in your home. We can’t wait to see what you create! Share your finished projects with us on social media using #DIYRopeBasketCreations. We’re eager to see your unique designs and hear about your experience. Happy crafting!
Frequently Asked Questions (FAQ)
What kind of rope is best for a DIY rope basket?
The best type of rope for a DIY rope basket depends on the look you’re going for and the intended use of the basket. Cotton rope is a popular choice because it’s soft, easy to work with, and readily available. It also takes dye well, allowing for a wide range of color options. Jute rope offers a more rustic, natural look and is very durable. Manila rope is another strong option, ideal for larger baskets that will hold heavier items. Synthetic ropes like polypropylene are also an option, but they can be more difficult to glue and may not have the same aesthetic appeal as natural fibers. Consider the thickness of the rope as well. Thicker ropes will create a more substantial basket, while thinner ropes will result in a more delicate look. Ultimately, the best rope is the one that you find easiest to work with and that best suits your desired aesthetic.
What kind of glue should I use?
Choosing the right glue is crucial for a sturdy and long-lasting DIY rope basket. Hot glue is a popular choice because it dries quickly and provides a strong bond. However, it’s important to use a high-temperature hot glue gun and high-quality glue sticks for the best results. Fabric glue is another good option, especially for cotton rope. It’s flexible and creates a strong, permanent bond. For heavier ropes like jute or manila, consider using a construction adhesive or a strong craft glue specifically designed for porous materials. Always test the glue on a small piece of rope before starting your project to ensure that it adheres properly and doesn’t damage the rope. Also, be sure to follow the manufacturer’s instructions for application and drying time.
How do I prevent the basket from unraveling?
Preventing your DIY rope basket from unraveling is essential for its longevity. The key is to ensure that each coil of rope is securely glued to the previous one. Apply a generous amount of glue to the rope before pressing it firmly against the existing coil. Hold it in place for a few seconds to allow the glue to set. Pay particular attention to the starting point and the ending point of the basket, as these are the most vulnerable to unraveling. You can also reinforce these areas by adding extra glue or by stitching the rope together with a needle and thread. Another tip is to slightly overlap each coil of rope, creating a tighter and more secure bond. Finally, avoid overfilling the basket with heavy items, as this can put stress on the glued seams and increase the risk of unraveling.
Can I wash my DIY rope basket?
Whether or not you can wash your DIY rope basket depends on the type of rope and glue you used. If you used cotton rope and fabric glue, you may be able to gently hand wash the basket with mild soap and water. However, it’s important to avoid soaking the basket for extended periods, as this can weaken the glue and cause the rope to shrink. If you used hot glue or a construction adhesive, it’s best to spot clean the basket with a damp cloth. Avoid using harsh chemicals or abrasive cleaners, as these can damage the rope and the glue. Always allow the basket to air dry completely before using it again. To prevent the basket from getting dirty in the first place, consider using it to store items that are already clean and dry.
How do I make a larger or smaller basket?
Making a larger or smaller DIY rope basket is simply a matter of adjusting the length of the rope you use. For a larger basket, start with a longer piece of rope and continue coiling and gluing until you reach your desired size. For a smaller basket, use a shorter piece of rope. You can also adjust the height of the basket by adding more or fewer layers of rope. Remember to maintain a consistent tension as you coil the rope to ensure that the basket maintains its shape. If you’re making a very large basket, you may want to consider using a thicker rope for added stability. Conversely, if you’re making a very small basket, a thinner rope may be easier to work with.
How can I add handles to my rope basket?
Adding handles to your DIY rope basket makes it easier to carry and adds a touch of style. There are several ways to add handles, depending on the look you’re going for. One option is to create rope handles by braiding or twisting several strands of rope together. Attach the handles to the basket by gluing them securely in place or by stitching them on with a needle and thread. Another option is to use leather or faux leather straps for handles. Attach the straps to the basket using rivets or by sewing them on. You can also purchase pre-made handles from a craft store and attach them to the basket using glue or screws. When adding handles, be sure to position them evenly on opposite sides of the basket and reinforce the attachment points to ensure that they can support the weight of the basket’s contents.
What if I run out of rope in the middle of my project?
Running out of rope in the middle of your DIY rope basket project doesn’t have to be a disaster. Simply join the new rope to the end of the old rope by overlapping them slightly and gluing them securely together. You can also wrap the joint with a piece of twine or ribbon to conceal it and add extra strength. Try to position the joint on the inside of the basket where it will be less visible. If you’re using a patterned rope, be sure to match the pattern when joining the new rope to the old rope. With a little care and attention, you can seamlessly join the ropes and continue your project without any noticeable interruption.

Leave a Comment