

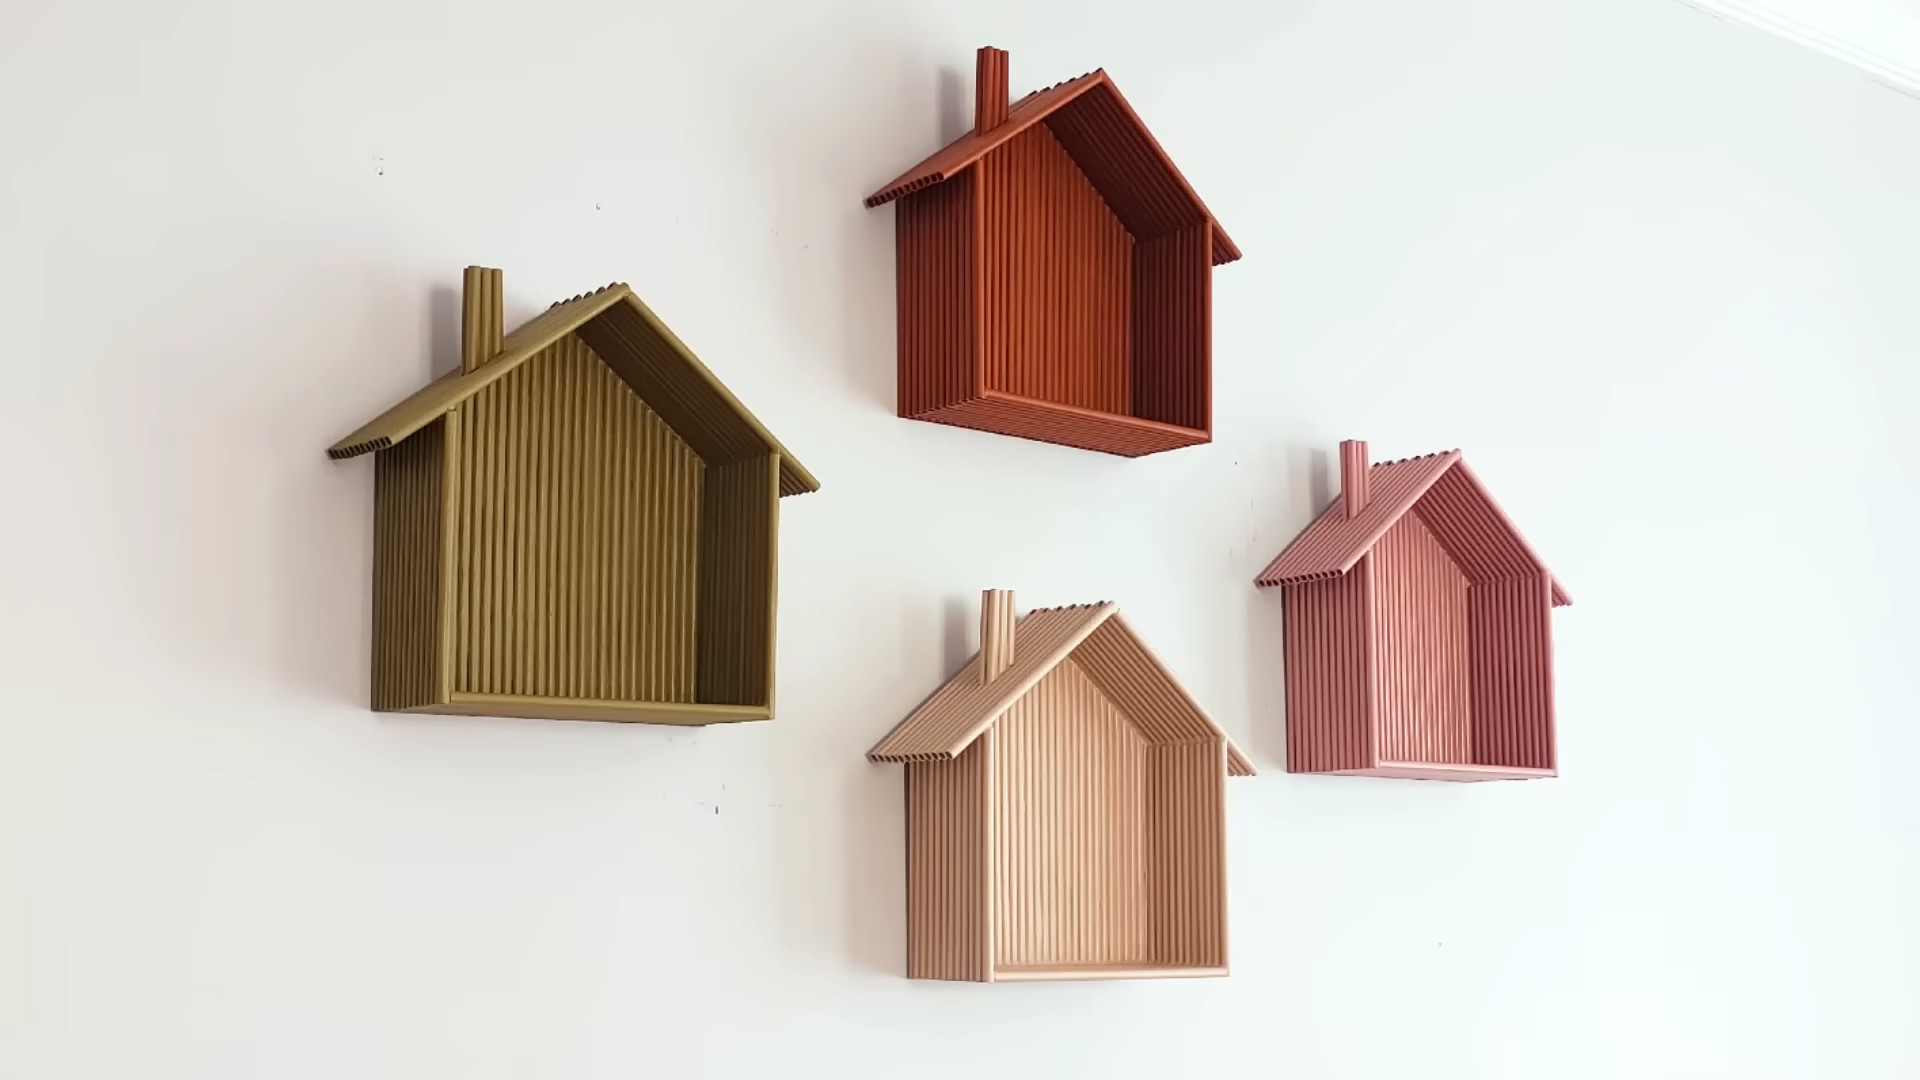
DIY Wall Shelf Upcycling: Tired of staring at that old, forgotten shelf gathering dust in your garage? I know I was! Before you even *think* about tossing it, let’s transform it into a stunning, functional piece that adds character and storage to your home. This isn’t just about saving money; it’s about breathing new life into something old and creating a unique piece that reflects your personality.
Upcycling, the art of transforming waste materials into new products of better quality or for better environmental value, has roots that stretch back centuries. Think of the resourceful pioneers who mended and repurposed everything they owned out of necessity. Today, upcycling is a conscious choice, a way to reduce waste and embrace creativity. And let’s be honest, there’s a certain satisfaction in saying, “I made that!”
In today’s world, where consumerism often reigns supreme, DIY Wall Shelf Upcycling offers a refreshing alternative. We’re constantly bombarded with the pressure to buy new, but this project empowers you to break free from that cycle. Plus, who doesn’t need more storage? Whether it’s for books, plants, or decorative items, a stylish upcycled shelf is a practical and beautiful addition to any room. So, grab that old shelf, and let’s get started on this fun and rewarding DIY adventure! I promise, you’ll love the results.
DIY Wall Shelf Upcycling: From Drab to Fab!
Hey there, fellow DIY enthusiasts! Are you staring at an old, unloved shelf, wondering if its best days are behind it? Well, grab your tools and get ready to breathe new life into that forgotten piece! We’re going to transform it into a stylish and functional wall shelf that will add character to any room. I’ll walk you through every step, so even if you’re a beginner, you can totally nail this project.
What You’ll Need: The Essential Supplies
Before we dive in, let’s gather our supplies. Having everything on hand will make the process smooth and enjoyable.
* **The Old Shelf:** Obviously! Assess its condition. Is it sturdy? Does it have any major damage that needs repair?
* **Sandpaper:** Various grits (80, 120, 220) for smoothing surfaces.
* **Primer:** A good quality primer is essential for proper paint adhesion.
* **Paint:** Choose your favorite color and finish (matte, satin, gloss). Consider using chalk paint for a vintage look.
* **Paintbrushes/Rollers:** Depending on the size of your shelf and the finish you want. Foam rollers are great for a smooth finish.
* **Wood Filler (Optional):** For filling any holes or imperfections.
* **Putty Knife (Optional):** For applying wood filler.
* **Painter’s Tape:** To protect areas you don’t want to paint.
* **Measuring Tape:** For accurate measurements.
* **Pencil:** For marking.
* **Drill:** With appropriate drill bits for mounting the shelf.
* **Screws/Wall Anchors:** Choose screws and wall anchors appropriate for your wall type and the weight the shelf will hold.
* **Level:** To ensure your shelf is perfectly straight.
* **Safety Glasses:** Protect your eyes from dust and debris.
* **Dust Mask:** To avoid inhaling dust particles.
* **Drop Cloth:** To protect your work surface.
* **Decorative Elements (Optional):** Stencils, decoupage paper, knobs, etc., to personalize your shelf.
* **Clear Sealer (Optional):** To protect the painted finish, especially if using chalk paint.
Phase 1: Preparation is Key
This is arguably the most important part of the process. A well-prepared surface will ensure a beautiful and long-lasting finish.
1. **Cleaning:** Start by thoroughly cleaning the shelf. Remove any dust, dirt, or grime with a damp cloth and mild detergent. Let it dry completely.
2. **Inspection and Repair:** Carefully inspect the shelf for any damage. If there are any holes or imperfections, fill them with wood filler. Apply the filler with a putty knife, making sure to overfill slightly. Let it dry completely according to the manufacturer’s instructions.
3. **Sanding:** Once the wood filler is dry, sand it smooth with 80-grit sandpaper, followed by 120-grit sandpaper. Sand the entire shelf to create a slightly rough surface for the primer to adhere to. Use 220-grit sandpaper for a final, smooth finish. Remember to wear your dust mask and safety glasses during this step!
4. **Wiping Down:** After sanding, wipe down the shelf with a tack cloth or a damp cloth to remove all sanding dust. This is crucial for a smooth paint finish.
5. **Taping (Optional):** If you want to create a two-toned look or protect certain areas, use painter’s tape to mask them off. Make sure the tape is firmly adhered to the surface to prevent paint bleed.
Phase 2: Priming for Perfection
Priming is essential for several reasons: it helps the paint adhere better, it seals the surface, and it provides a uniform base for the paint color.
1. **Applying the Primer:** Apply a thin, even coat of primer to the entire shelf using a paintbrush or roller. Follow the manufacturer’s instructions for application.
2. **Drying Time:** Allow the primer to dry completely according to the manufacturer’s instructions. This is crucial for proper adhesion.
3. **Light Sanding (Optional):** Once the primer is dry, you can lightly sand it with 220-grit sandpaper to remove any imperfections and create an even smoother surface. Remember to wipe away the sanding dust.
Phase 3: Painting Your Masterpiece
Now for the fun part! Choose your favorite paint color and get ready to transform your shelf.
1. **First Coat:** Apply a thin, even coat of paint to the shelf using a paintbrush or roller. Avoid applying too much paint at once, as this can lead to drips and runs.
2. **Drying Time:** Allow the first coat of paint to dry completely according to the manufacturer’s instructions.
3. **Second Coat:** Apply a second coat of paint to achieve full coverage and a richer color. Again, apply the paint in thin, even coats.
4. **Drying Time:** Allow the second coat of paint to dry completely.
5. **Additional Coats (Optional):** If necessary, apply additional coats of paint until you achieve the desired coverage and color. Remember to allow each coat to dry completely before applying the next.
6. **Removing Painter’s Tape:** If you used painter’s tape, carefully remove it while the paint is still slightly wet. This will prevent the paint from chipping.
Phase 4: Adding the Finishing Touches
This is where you can really personalize your shelf and make it your own!
1. **Decorative Elements (Optional):** If you want to add decorative elements, such as stencils, decoupage paper, or knobs, now is the time to do it. Follow the instructions for your chosen decorative elements.
2. **Clear Sealer (Optional):** If you used chalk paint or want to protect the painted finish, apply a clear sealer. This will help prevent scratches and wear. Apply the sealer according to the manufacturer’s instructions.
3. **Drying Time:** Allow the sealer to dry completely.
Phase 5: Mounting Your Shelf
Now that your shelf is beautifully transformed, it’s time to mount it on the wall.
1. **Locating Studs:** Use a stud finder to locate the wall studs. Mounting the shelf to the studs will provide the most secure support. If you can’t mount to studs, use appropriate wall anchors.
2. **Marking the Location:** Use a measuring tape and level to mark the desired location for the shelf on the wall.
3. **Drilling Pilot Holes:** Drill pilot holes into the wall at the marked locations. If you’re using wall anchors, follow the manufacturer’s instructions for drilling the holes.
4. **Attaching the Shelf:** Align the shelf with the pilot holes and attach it to the wall using screws. Make sure the screws are long enough to securely hold the shelf.
5. **Checking for Level:** Use a level to ensure the shelf is perfectly straight. Adjust as needed.
6. **Weight Test:** Before placing anything heavy on the shelf, give it a gentle weight test to make sure it’s securely mounted.
Extra Tips and Tricks for a Flawless Finish
* Practice your painting technique on a piece of scrap wood before painting the shelf. This will help you get a feel for the paint and avoid mistakes.
* Use a high-quality paintbrush or roller for a smooth, even finish.
* Don’t overload your paintbrush or roller with paint. This can lead to drips and runs.
* Apply the paint in thin, even coats.
* Allow each coat of paint to dry completely before applying the next.
* If you’re using chalk paint, consider waxing it for a durable and beautiful finish.
* Get creative with your decorative elements! Use stencils, decoupage paper, or knobs to personalize your shelf and make it your own.
* Don’t be afraid to experiment! DIY is all about having fun and expressing your creativity.
And there you have it! You’ve successfully upcycled an old shelf into a stylish and functional piece of furniture. Now, step back, admire your handiwork, and enjoy your beautiful new wall shelf! I hope you found this guide helpful, and I can’t wait to see what amazing creations you come up with! Happy DIY-ing!
Conclusion
So, there you have it! Transforming old, forgotten items into stylish and functional DIY wall shelves is not only incredibly rewarding but also a fantastic way to personalize your living space and embrace sustainable living. This simple upcycling project breathes new life into discarded materials, turning them into eye-catching storage solutions that reflect your unique personality.
Why is this DIY wall shelf upcycling trick a must-try? Because it’s more than just a craft project; it’s a statement. It’s a statement about reducing waste, embracing creativity, and adding a touch of handmade charm to your home. In a world of mass-produced furniture, these upcycled shelves stand out as unique pieces with a story to tell. They are conversation starters, testaments to your resourcefulness, and tangible reminders that beauty can be found in the unexpected.
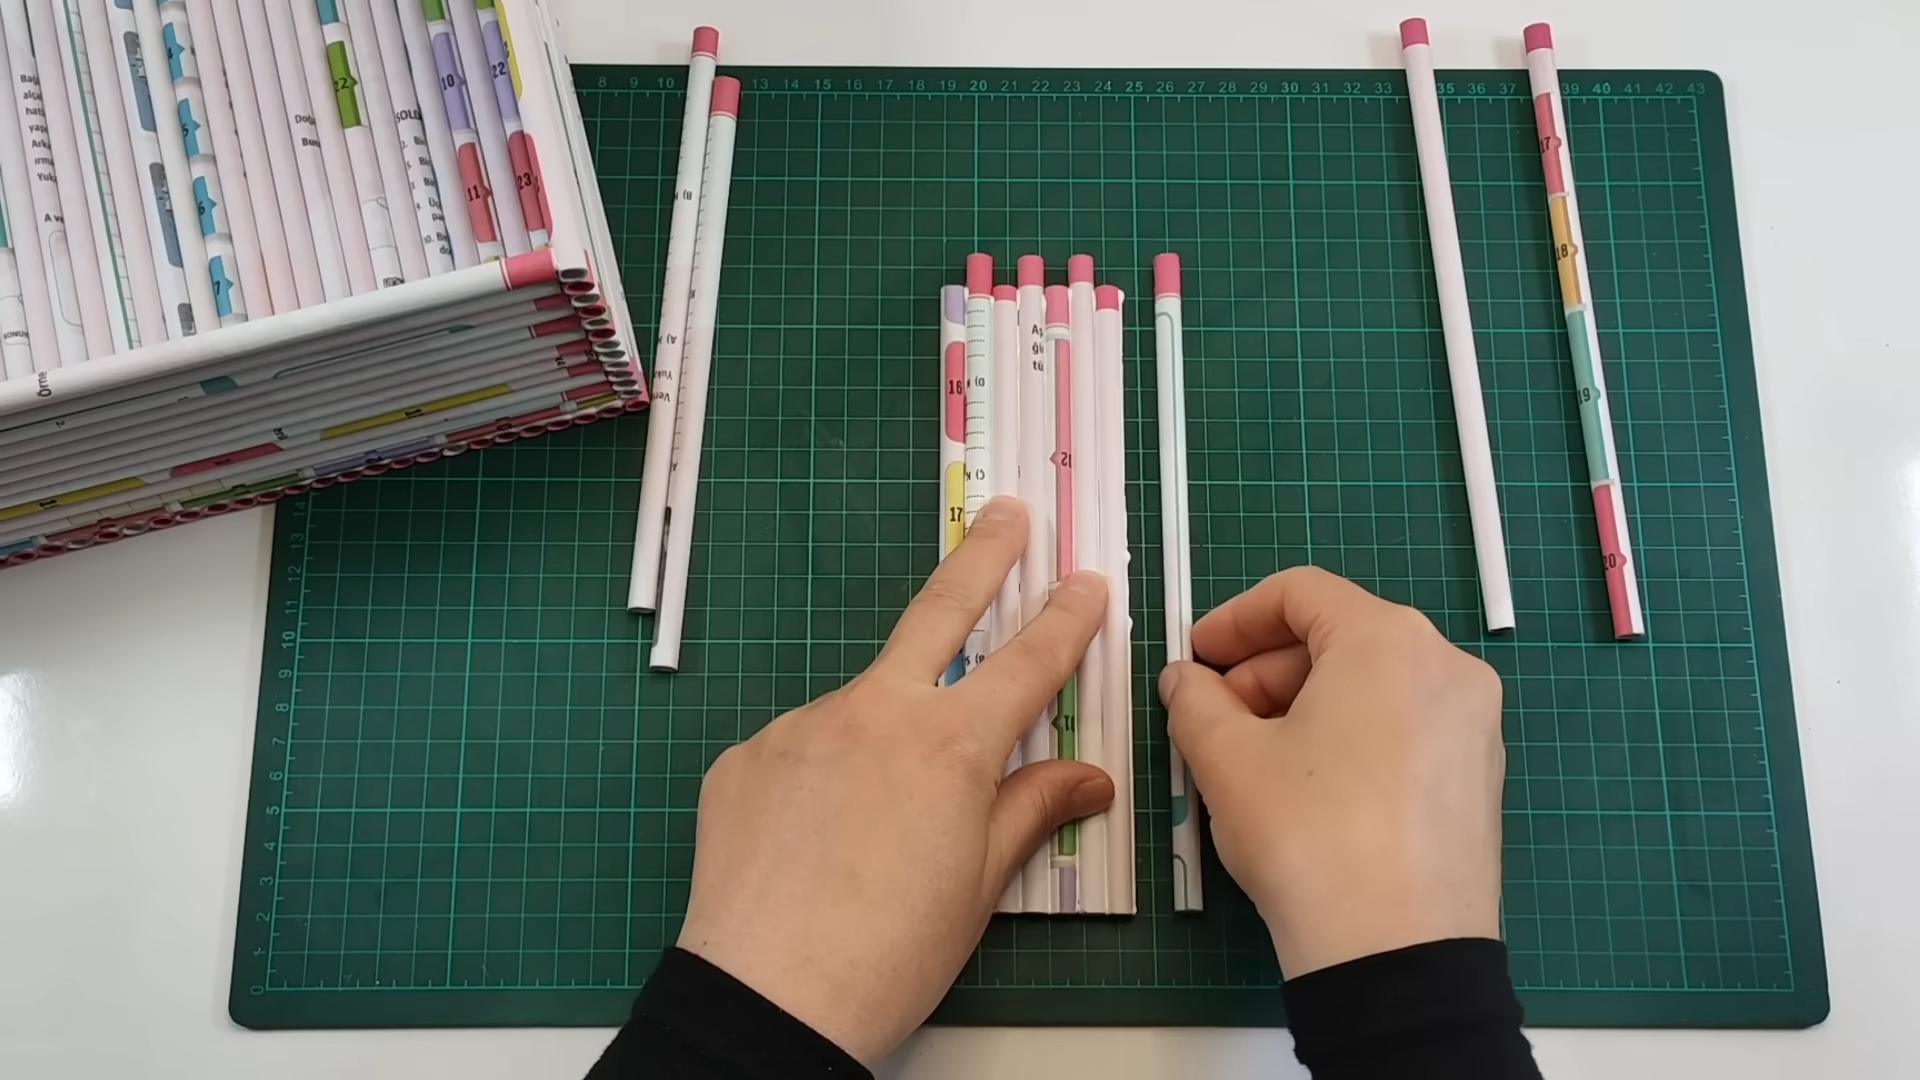
Beyond the environmental benefits and the aesthetic appeal, this project is also incredibly versatile. Feel free to experiment with different materials. Old wooden crates can be sanded and stained for a rustic look. Vintage suitcases can be transformed into quirky floating shelves. Even repurposed metal pipes can be combined with reclaimed wood for an industrial-chic vibe. The possibilities are truly endless!
Consider adding personal touches to your DIY wall shelves to make them even more special. Paint them in your favorite colors, decoupage them with interesting patterns, or add decorative hardware like vintage knobs or ornate brackets. You can also customize the size and shape of the shelves to perfectly fit your needs and the dimensions of your space. Need a narrow shelf for displaying small plants? No problem! Want a larger shelf for storing books and magazines? You got it!
Don’t be afraid to get creative and think outside the box. This project is all about expressing your individuality and creating something truly unique. And remember, even if you’re not a seasoned DIYer, this project is beginner-friendly and requires minimal tools and skills. With a little bit of effort and imagination, you can transform ordinary materials into extraordinary pieces of functional art.
We wholeheartedly encourage you to give this DIY wall shelf upcycling project a try. Gather your materials, unleash your creativity, and start building your own unique shelves today. And most importantly, don’t forget to share your creations with us! We’d love to see your upcycled masterpieces and hear about your experiences. Tag us on social media and let us know how this project has transformed your space. Let’s inspire each other to embrace sustainable living and create beautiful, personalized homes, one upcycled shelf at a time.
Frequently Asked Questions
What kind of materials can I use for DIY wall shelf upcycling?
The beauty of upcycling is that you can use a wide variety of materials! Some popular choices include:
* Old wooden crates or boxes: These are readily available and offer a rustic, farmhouse-style look.
* Reclaimed wood: Pallets, old doors, or even discarded furniture can be repurposed into beautiful shelves.
* Vintage suitcases: These add a touch of vintage charm and can be used as floating shelves.
* Metal pipes and fittings: Combine these with reclaimed wood for an industrial-chic aesthetic.
* Old books: Stack and secure them together to create unique and quirky shelves.
* Glass jars or bottles: These can be used to create small, decorative shelves for displaying plants or other small items.
* Ladders: An old ladder can be repurposed into a multi-tiered shelving unit.
Remember to choose materials that are sturdy and safe to use for shelving. Always clean and prepare the materials properly before starting your project.
How do I safely attach the shelves to the wall?
Safety is paramount when installing wall shelves. Here are some tips for secure attachment:
* Use appropriate hardware: Choose screws and anchors that are suitable for the type of wall you have (drywall, plaster, brick, etc.).
* Locate wall studs: Use a stud finder to locate the studs in your wall. Attaching the shelves to studs provides the strongest support.
* Use wall anchors: If you can’t attach to a stud, use heavy-duty wall anchors to distribute the weight of the shelf.
* Consider the weight capacity: Be mindful of the weight capacity of your shelves and avoid overloading them.
* Use a level: Ensure that the shelves are level before securing them to the wall.
* Double-check your work: After installation, give the shelves a gentle tug to make sure they are securely attached.
If you’re unsure about any aspect of the installation process, it’s always best to consult with a professional.
What tools do I need for this DIY project?
The tools you’ll need will depend on the materials you’re using and the complexity of your design. However, some basic tools that are commonly used for DIY wall shelf upcycling include:
* Measuring tape: For accurate measurements.
* Pencil: For marking cut lines and drill holes.
* Saw: For cutting wood or other materials to size.
* Drill: For creating pilot holes and attaching hardware.
* Screwdriver: For tightening screws.
* Sandpaper: For smoothing rough edges.
* Paintbrush or roller: For painting or staining the shelves.
* Level: For ensuring that the shelves are level.
* Stud finder: For locating wall studs.
* Safety glasses: To protect your eyes from debris.
* Work gloves: To protect your hands.
How can I customize my upcycled wall shelves?
Customization is where you can really let your creativity shine! Here are some ideas:
* Paint or stain: Choose colors and finishes that complement your décor.
* Decoupage: Apply decorative paper or fabric to the shelves using decoupage techniques.
* Add decorative hardware: Use vintage knobs, ornate brackets, or other decorative hardware to add a unique touch.
* Incorporate lighting: Add LED strip lights or small spotlights to illuminate your shelves.
* Create a gallery wall: Arrange multiple shelves in a creative pattern to create a gallery wall effect.
* Add stencils or patterns: Use stencils or freehand paint patterns onto the shelves.
* Personalize with photos or artwork: Display your favorite photos or artwork on the shelves.
How do I clean and maintain my upcycled wall shelves?
The cleaning and maintenance of your upcycled wall shelves will depend on the materials they are made from. However, some general tips include:
* Dust regularly: Use a soft cloth or duster to remove dust and debris.
* Wipe clean: Use a damp cloth to wipe away spills or stains.
* Avoid harsh chemicals: Avoid using harsh chemicals or abrasive cleaners, as these can damage the finish.
* Protect from moisture: If your shelves are made from wood, protect them from excessive moisture to prevent warping or rotting.
* Tighten hardware: Periodically check the hardware to ensure that it is still tight.
By following these simple tips, you can keep your upcycled wall shelves looking their best for years to come.
Leave a Comment