

Garlic Growing in Plastic Bottles: Unlock the secrets to a bountiful harvest, even without a sprawling garden! Have you ever dreamt of snipping fresh garlic straight from your own backyard, but felt limited by space? Well, dream no more! This DIY guide will revolutionize your gardening game, showing you how to cultivate delicious, pungent garlic right in repurposed plastic bottles.
For centuries, garlic has been revered not only for its culinary prowess but also for its medicinal properties. From ancient Egyptian tombs to traditional Italian kitchens, garlic has held a prominent place in human history and culture. Now, you can easily bring this time-honored tradition into your own home, regardless of your living situation.
I know what you’re thinking: “Garlic in plastic bottles? Really?” Absolutely! This method is perfect for apartment dwellers, balcony gardeners, or anyone looking to maximize their growing space. Plus, it’s an eco-friendly way to recycle those plastic bottles that might otherwise end up in a landfill. We’ll walk you through each step, from preparing the bottles to harvesting your flavorful bulbs. Get ready to discover the joy of garlic growing in plastic bottles – it’s easier than you think, and the results are incredibly rewarding!
Growing Garlic in Plastic Bottles: A DIY Guide
Hey there, fellow gardening enthusiasts! Ever thought about growing your own garlic but felt limited by space? Well, I’ve got a fantastic solution for you: growing garlic in plastic bottles! It’s a fun, eco-friendly, and surprisingly effective way to cultivate this flavorful bulb, even if you only have a balcony or a small patio. I’ve been doing this for a while now, and I’m excited to share my secrets with you. Let’s get started!
What You’ll Need
Before we dive into the nitty-gritty, let’s gather our supplies. This is a pretty low-cost project, which is always a win in my book!
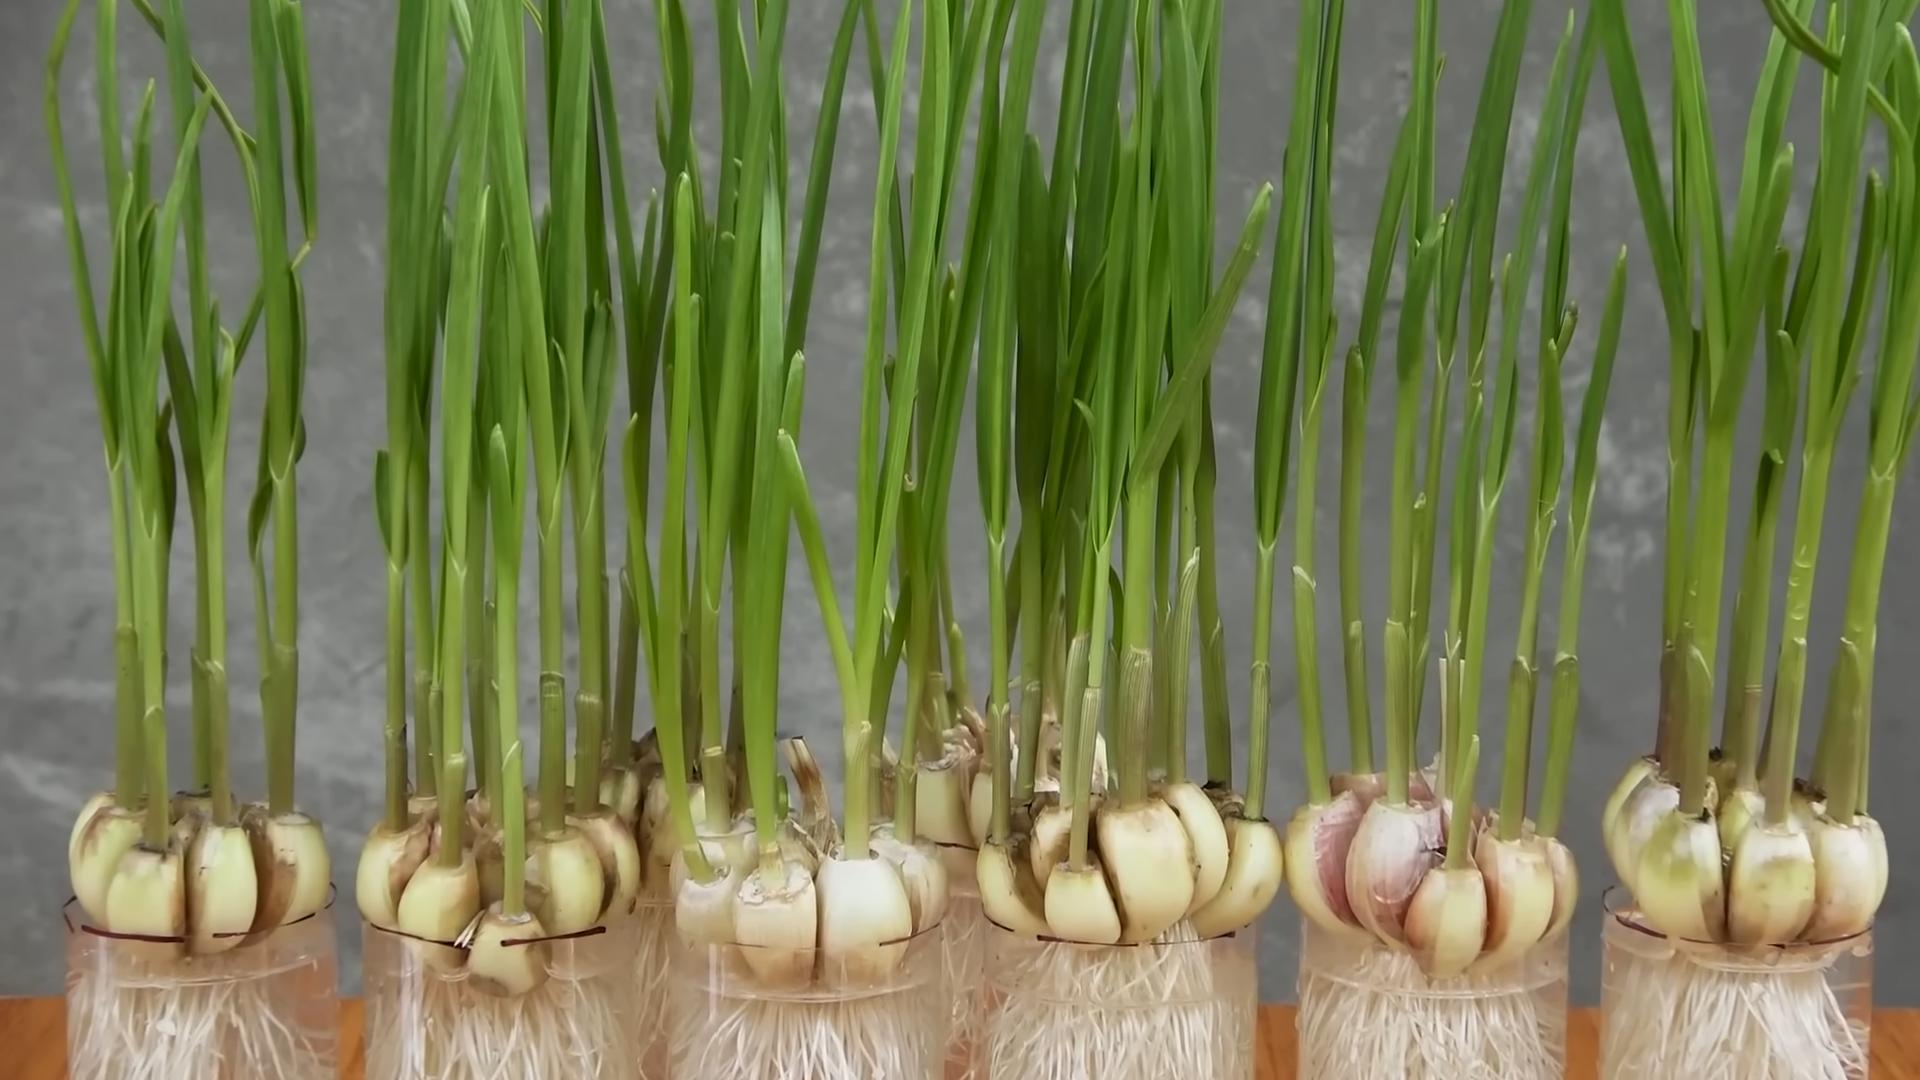
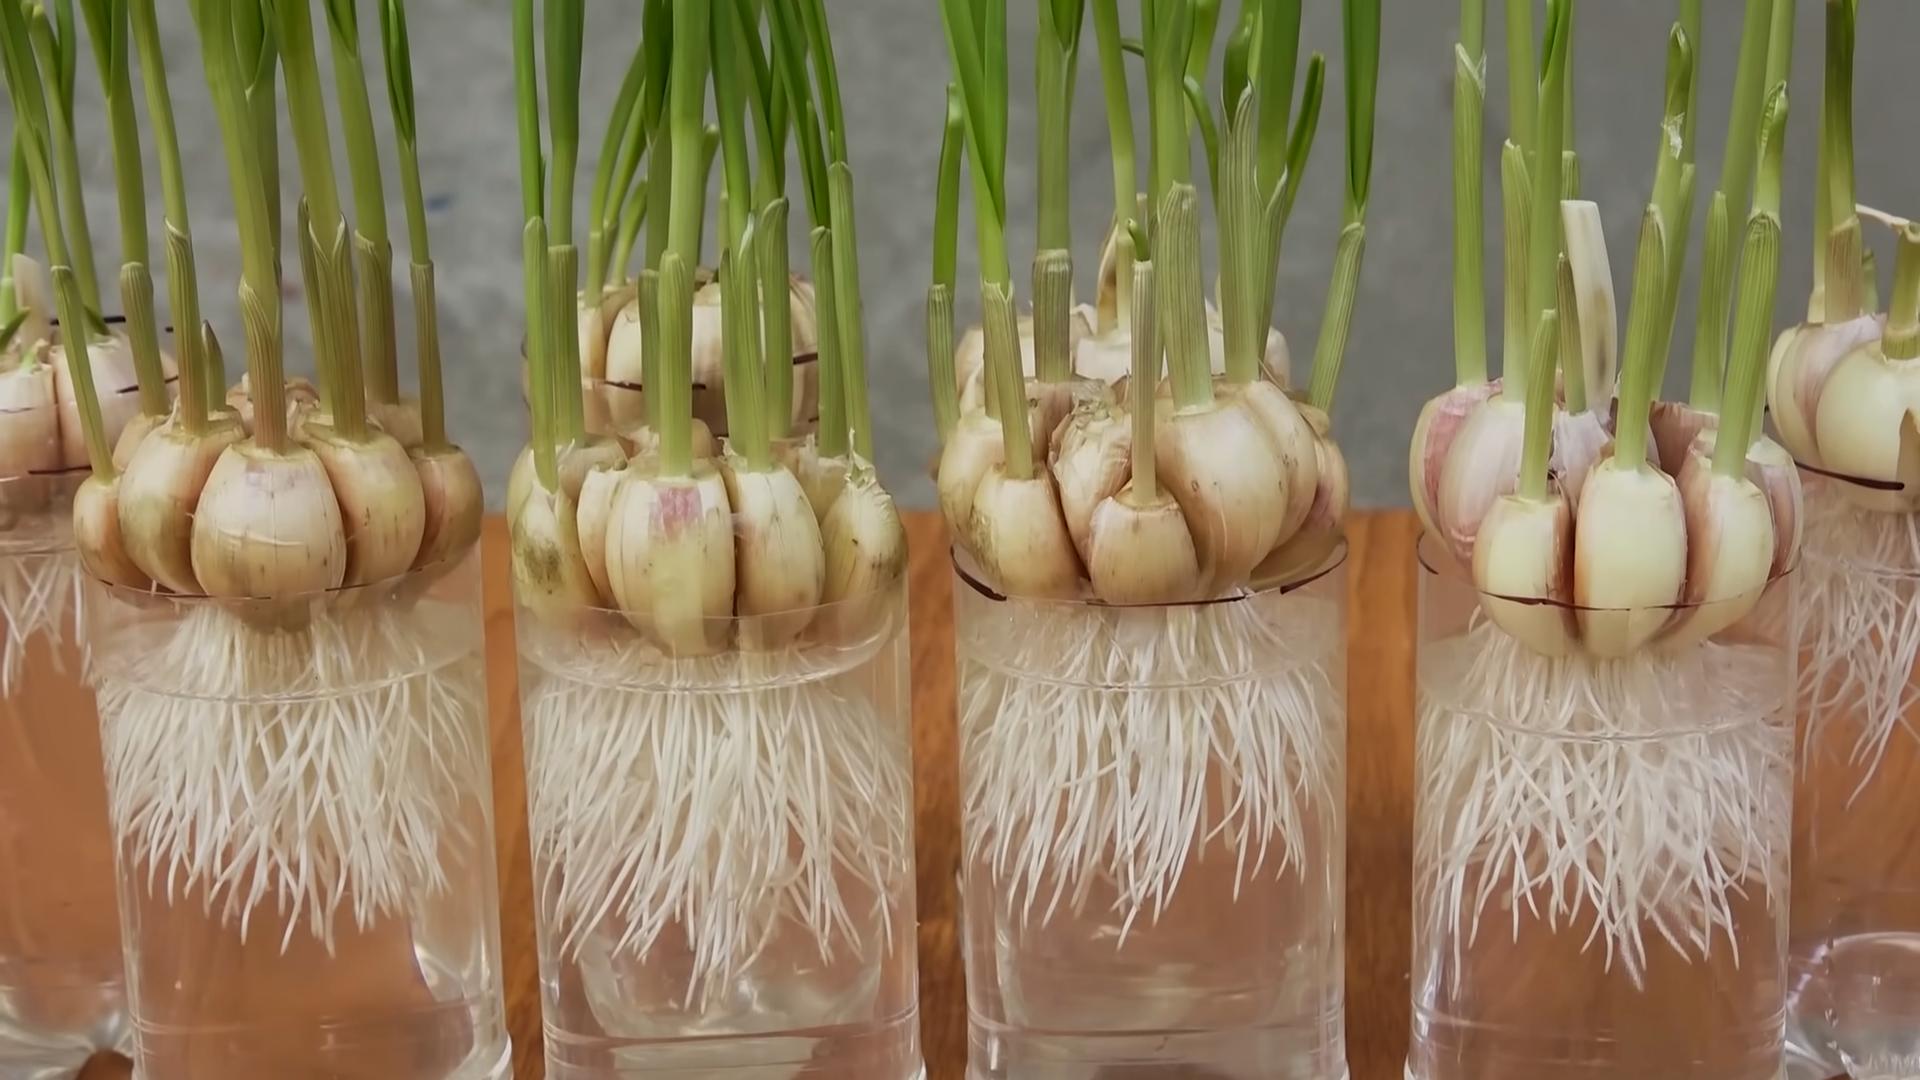
* Plastic Bottles: The star of the show! I prefer using 2-liter soda bottles or larger water bottles. The bigger, the better, as it gives the garlic more room to grow. You’ll need several, depending on how much garlic you want to plant.
* Garlic Cloves: Choose organic garlic from your local farmers market or grocery store. Avoid using garlic from the supermarket that might have been treated to prevent sprouting. Look for firm, healthy cloves.
* Potting Soil: A good quality potting mix is essential for healthy garlic growth. Make sure it’s well-draining to prevent root rot.
* Gravel or Pebbles: For drainage at the bottom of the bottles.
* Scissors or a Utility Knife: For cutting the plastic bottles. Be careful!
* Drill or Nail: To create drainage holes.
* Watering Can: For, well, watering!
* Optional: Plant Labels: To keep track of different garlic varieties (if you’re feeling fancy!).
Preparing the Plastic Bottles
This is where we transform those discarded bottles into mini garlic farms!
1. Clean the Bottles: Thoroughly wash the plastic bottles with soap and water to remove any residue. Rinse them well and let them dry completely. This helps prevent any mold or bacteria from affecting your garlic.
2. Cut the Bottles: There are a couple of ways to do this, depending on the size of your bottles and how you want to arrange them.
* Method 1 (Stacking): Cut the bottles in half horizontally. The top half will be inverted and placed inside the bottom half, creating a self-watering system. This method is great for saving space.
* Method 2 (Individual Pots): Cut off the top third of the bottle. You’ll be left with a container that’s open at the top. This is a simpler method, and it allows for easier access to the soil.
* Method 3 (Horizontal Planting): Cut a large rectangular opening along the side of the bottle, leaving the top and bottom intact. This creates a trough-like planter, perfect for planting multiple cloves in a row.
I personally prefer Method 2 for its simplicity, but feel free to experiment and see what works best for you!
3. Create Drainage Holes: This is crucial! Use a drill or a nail to create several drainage holes at the bottom of each bottle. This prevents water fromlogging the soil and causing root rot. I usually make about 5-6 holes, evenly spaced.
4. Add Gravel or Pebbles: Place a layer of gravel or pebbles at the bottom of each bottle. This further improves drainage and prevents the soil from clogging the drainage holes. A layer of about 1-2 inches is sufficient.
Planting the Garlic
Now for the fun part – getting those garlic cloves into their new homes!
1. Prepare the Garlic Cloves: Gently separate the cloves from the garlic bulb. Leave the papery skin on each clove intact, as it protects them. Choose the largest, healthiest-looking cloves for planting. These will produce the best results.
2. Fill the Bottles with Soil: Fill the prepared plastic bottles with potting soil, leaving about an inch of space at the top. Gently pat down the soil to remove any air pockets.
3. Plant the Cloves: Plant each clove pointy-side up, about 2-3 inches deep. Space the cloves about 4-6 inches apart, depending on the size of your bottles. If you’re using the horizontal planting method, space them evenly along the trough.
4. Water Thoroughly: After planting, water the soil thoroughly until water drains out of the drainage holes. This helps settle the soil and encourages root growth.
Caring for Your Garlic Plants
Growing garlic is relatively easy, but here are a few tips to ensure a bountiful harvest.
1. Sunlight: Garlic needs at least 6 hours of sunlight per day. Place your plastic bottle planters in a sunny location, such as a balcony, patio, or windowsill. If you don’t have enough natural light, you can supplement with grow lights.
2. Watering: Water regularly, especially during dry periods. The soil should be consistently moist, but not waterlogged. Check the soil moisture by sticking your finger into the soil. If it feels dry an inch or two below the surface, it’s time to water.
3. Fertilizing: Garlic is a heavy feeder, so it benefits from regular fertilization. Use a balanced liquid fertilizer every 2-3 weeks during the growing season. Follow the instructions on the fertilizer label. I like to use a fertilizer that’s high in nitrogen during the early stages of growth to promote leafy growth, and then switch to a fertilizer that’s higher in phosphorus and potassium as the bulbs start to form.
4. Weeding: Keep the soil free of weeds, as they can compete with the garlic for nutrients and water. Hand-pull any weeds that appear.
5. Mulching: Adding a layer of mulch, such as straw or wood chips, can help retain moisture, suppress weeds, and regulate soil temperature.
6. Pest and Disease Control: Garlic is generally resistant to pests and diseases, but keep an eye out for any signs of trouble. Common pests include aphids and onion thrips. Diseases include white rot and downy mildew. If you notice any problems, treat them promptly with an appropriate insecticide or fungicide. I prefer to use organic solutions whenever possible.
Harvesting Your Garlic
The moment we’ve all been waiting for! Harvesting your homegrown garlic is incredibly satisfying.
1. When to Harvest: Garlic is typically ready to harvest in late spring or early summer, about 8-9 months after planting. Look for these signs:
* The lower leaves of the plant will start to turn yellow and brown.
* The flower stalk (if present) will start to curl and straighten.
* The bulbs will be plump and well-formed.
2. How to Harvest: Gently loosen the soil around the garlic bulb with a trowel or garden fork. Carefully lift the bulb out of the soil, being careful not to damage it.
3. Curing the Garlic: After harvesting, cure the garlic for 2-3 weeks to allow the bulbs to dry and develop their flavor. Hang the garlic plants in a cool, dry, well-ventilated place, such as a garage or shed. You can braid the leaves together for easy hanging.
4. Storing the Garlic: Once the garlic is cured, trim the roots and leaves. Store the bulbs in a cool, dry, dark place, such as a pantry or cellar. Properly cured and stored garlic can last for several months.
Troubleshooting
Even with the best planning, sometimes things don’t go exactly as expected. Here are a few common issues you might encounter and how to address them:
* Yellowing Leaves: This could be a sign of overwatering, underwatering, nutrient deficiency, or disease. Check the soil moisture, fertilize if necessary, and inspect the plants for any signs of pests or diseases.
* Small Bulbs: This could be due to insufficient sunlight, poor soil, or overcrowding. Make sure your plants are getting enough sunlight, fertilize regularly, and thin out the plants if they are too close together.
* Root Rot: This is caused by waterlogged soil. Ensure that your plastic bottles have adequate drainage holes and avoid overwatering.
Tips and Tricks for Success
Here are a few extra tips I’ve learned along the way that can help you maximize your garlic harvest:
* Choose the Right Garlic Variety: There are many different varieties of garlic, each with its own unique flavor and characteristics. Some varieties are better suited for certain climates than others. Do some research to find a variety that grows well in your area.
* Plant in the Fall: Garlic is typically planted in the fall, about 4-6 weeks before the first frost. This allows the cloves to develop roots over the winter and get a head start in the spring.
* Rotate Your Crops: Avoid planting garlic in the same spot year after year, as this can deplete the soil of nutrients and increase the risk of disease. Rotate your crops to different areas of your garden each year.
*
Conclusion
So, there you have it! Growing garlic in plastic bottles is not just a quirky gardening experiment; it’s a genuinely effective and rewarding way to cultivate your own fresh, flavorful garlic, even if you’re short on space or lack a traditional garden. We’ve walked you through the entire process, from selecting the right garlic cloves to harvesting your bounty. The beauty of this method lies in its simplicity, accessibility, and sustainability. By repurposing plastic bottles, you’re not only reducing waste but also creating a controlled environment that promotes healthy garlic growth.
Why is this DIY garlic growing trick a must-try? Because it offers a multitude of benefits. It’s incredibly space-efficient, allowing you to grow garlic on balconies, patios, or even indoors. It provides excellent drainage, preventing the dreaded root rot that can plague garlic grown in the ground. It’s also a fantastic way to extend your growing season, as you can easily move your bottle gardens indoors during colder months. Plus, there’s the sheer satisfaction of nurturing your own food from start to finish. Imagine the pride you’ll feel when you use your homegrown garlic to elevate your favorite dishes!
But the fun doesn’t stop there! Feel free to experiment with different varieties of garlic to discover your personal favorites. Try using different types of soil mixes to see which one yields the best results. You could even create a tiered system by stacking multiple bottle gardens on top of each other, maximizing your vertical growing space. Consider adding companion plants like marigolds or basil to your bottle gardens to deter pests and enhance the flavor of your garlic.
Don’t be afraid to get creative and personalize your garlic-growing experience. The possibilities are endless!
We wholeheartedly encourage you to give this DIY garlic growing in plastic bottles a try. It’s a fun, educational, and ultimately delicious project that anyone can undertake. Once you’ve harvested your first batch of homegrown garlic, we’d love to hear about your experience! Share your photos, tips, and tricks in the comments section below. Let’s build a community of bottle-garden garlic growers and inspire others to embrace this sustainable and rewarding method. Happy growing!
Frequently Asked Questions (FAQs)
What kind of garlic should I use for growing in plastic bottles?
The best garlic to use is softneck varieties, as they tend to be more adaptable to container growing. However, you can also try hardneck varieties, but they might require a slightly larger bottle. Look for organic garlic from a local farmer’s market or reputable garden center to ensure you’re starting with healthy, disease-free cloves. Avoid using garlic from the grocery store, as it may have been treated to prevent sprouting.
How many cloves can I plant in one plastic bottle?
This depends on the size of your bottle. A good rule of thumb is to plant 3-4 cloves in a 2-liter bottle, ensuring they are spaced evenly apart. Overcrowding can lead to smaller bulbs and increased risk of disease.
What type of soil is best for growing garlic in plastic bottles?
A well-draining potting mix is essential. You can use a commercially available potting mix or create your own by combining equal parts of compost, perlite, and peat moss (or coconut coir). Good drainage is crucial to prevent root rot, which is a common problem with container-grown garlic.
How often should I water my garlic plants in plastic bottles?
Water your garlic plants when the top inch of soil feels dry to the touch. Avoid overwatering, as this can lead to root rot. During hot, dry weather, you may need to water more frequently. Ensure the bottle has drainage holes to allow excess water to escape.
How much sunlight do garlic plants need?
Garlic needs at least 6 hours of direct sunlight per day to thrive. Place your bottle gardens in a sunny location, such as a south-facing balcony or patio. If you’re growing indoors, you may need to supplement with grow lights.
When is the best time to plant garlic in plastic bottles?
The best time to plant garlic is in the fall, about 4-6 weeks before the first frost. This allows the cloves to develop roots before winter sets in. In warmer climates, you can plant garlic in late winter or early spring.
How long does it take to grow garlic in plastic bottles?
Garlic typically takes 6-9 months to mature, depending on the variety and growing conditions. You’ll know your garlic is ready to harvest when the leaves start to turn yellow and brown and begin to fall over.
How do I harvest garlic from plastic bottles?
Gently loosen the soil around the garlic bulbs and carefully pull them out of the bottle. Avoid damaging the bulbs during harvest. Once harvested, cure the garlic by hanging it in a cool, dry, well-ventilated place for 2-3 weeks.
Can I reuse the plastic bottles for growing garlic again?
Yes, you can reuse the plastic bottles for multiple growing seasons. However, it’s important to thoroughly clean and disinfect the bottles before each use to prevent the spread of diseases. Wash the bottles with soap and water, then rinse them with a solution of 1 part bleach to 9 parts water.
What are some common problems when growing garlic in plastic bottles and how can I fix them?
Some common problems include root rot (caused by overwatering), pests (such as aphids or mites), and nutrient deficiencies. To prevent root rot, ensure good drainage and avoid overwatering. To control pests, use insecticidal soap or neem oil. To address nutrient deficiencies, fertilize your garlic plants with a balanced liquid fertilizer every few weeks.
Can I grow other plants in the same plastic bottle as garlic?
While it’s possible to grow companion plants with garlic, it’s generally best to grow garlic on its own in plastic bottles to avoid competition for resources. If you do choose to grow companion plants, select those that have similar growing requirements and won’t overcrowd the garlic. Marigolds and basil are good options.
How do I store my harvested garlic?
Store cured garlic in a cool, dry, well-ventilated place, such as a pantry or basement. Braiding the garlic bulbs together and hanging them is a traditional storage method. Properly stored garlic can last for several months.
What if I don’t have plastic bottles? Can I use other containers?
Yes, you can use other containers, such as pots, buckets, or even grow bags. Just make sure the container is large enough to accommodate the garlic bulbs and has good drainage.
Is growing garlic in plastic bottles organic?
Growing garlic in plastic bottles can be organic if you use organic soil, fertilizer, and pest control methods. Avoid using synthetic fertilizers or pesticides.
How can I improve the flavor of my homegrown garlic?
The flavor of garlic is influenced by several factors, including the variety, growing conditions, and curing process. To improve the flavor, choose a flavorful variety, provide adequate sunlight and water, and cure the garlic properly. You can also try adding compost or other organic matter to the soil to enhance the flavor.

Leave a Comment