

Growing Pumpkins in Tires might sound a little unconventional, right? But trust me, this quirky DIY trick can unlock a bountiful pumpkin harvest, even if you’re short on space or battling less-than-ideal soil. For centuries, pumpkins have been a symbol of autumn, harvest festivals, and, of course, spooky Halloween celebrations. From their humble beginnings in Central America, these vibrant gourds have spread across the globe, becoming a beloved staple in cuisines and traditions worldwide.
But let’s face it, growing pumpkins can be tricky! They’re hungry plants that need plenty of room to sprawl. That’s where the tire trick comes in. I’ve found that using old tires as mini-raised beds offers several advantages. They warm the soil faster in the spring, providing a cozy environment for those pumpkin seedlings. Plus, they help retain moisture and prevent soil erosion, giving your pumpkins the best possible start.
This DIY method is perfect for urban gardeners, those with limited space, or anyone looking for a creative way to recycle old tires. Imagine the satisfaction of carving a jack-o’-lantern from a pumpkin you grew yourself, all thanks to a simple, upcycled tire! So, if you’re ready to try something new and maximize your pumpkin-growing potential, keep reading! I’m going to share all my secrets for growing pumpkins in tires, from prepping the tires to harvesting your prize-winning gourds.
Growing Giant Pumpkins in Tires: My Secret Weapon!
Hey there, fellow pumpkin enthusiasts! I’m so excited to share my favorite trick for growing massive pumpkins – using tires! Yes, you read that right. This method not only helps contain the sprawling vines but also provides excellent drainage and warmth, leading to some seriously impressive gourds. I’ve been doing this for years, and trust me, it works wonders. Let’s dive into how you can grow your own prize-winning pumpkins using this simple DIY hack.
Choosing the Right Tire and Location
Before we get our hands dirty, it’s crucial to select the right tire and location. This is the foundation for your pumpkin-growing success!
* Tire Size: Opt for a large tire, preferably from a truck or tractor. The bigger the tire, the more space your pumpkin roots will have to grow. I’ve found that truck tires work perfectly. Avoid using tires that are too small, as they will restrict root growth and limit the size of your pumpkin.
* Tire Condition: Make sure the tire is in decent condition. Avoid tires with exposed steel belts or significant damage. A clean, relatively intact tire is ideal.
* Location, Location, Location: Choose a sunny spot in your garden that receives at least 6-8 hours of direct sunlight per day. Pumpkins are sun-worshippers! Also, ensure the location has well-draining soil. Pumpkins hate sitting in soggy ground.
* Soil Preparation: Even though the tire will contain the soil, preparing the ground underneath is essential. Dig a hole slightly larger than the tire’s diameter and about 6 inches deep. This will help with drainage and allow the pumpkin roots to extend beyond the tire.
Preparing the Tire for Planting
Now that we’ve got our tire and location sorted, let’s get the tire ready for its pumpkin-growing duties.
* Cleaning the Tire: Give the tire a good scrub with soap and water to remove any dirt, grime, or debris. This will help prevent any potential contaminants from affecting your pumpkin plant.
* Drilling Drainage Holes: This is super important! Drill several drainage holes (about ½ inch in diameter) in the bottom of the tire. This will prevent water from pooling and rotting the roots. I usually drill about 6-8 holes evenly spaced around the tire.
* Optional: Painting the Tire: While not necessary, painting the tire a dark color can help it absorb more heat from the sun, which can benefit your pumpkin plant, especially in cooler climates. Use a non-toxic, outdoor paint. Let the paint dry completely before moving on to the next step. I personally like to paint mine a dark green to blend in with the garden.
Filling the Tire with Soil
This is where the magic happens! The quality of the soil you use will directly impact the health and growth of your pumpkin.
* Layering the Bottom: Start by layering the bottom of the hole with organic material, such as compost, shredded leaves, or grass clippings. This will improve drainage and provide nutrients as it decomposes. I usually put down a 2-3 inch layer.
* Filling with Soil: Fill the tire with a rich, well-draining soil mix. I recommend a combination of topsoil, compost, and aged manure. This will provide the perfect balance of nutrients and drainage for your pumpkin plant. Make sure the soil is loose and airy, not compacted.
* Adding Fertilizer: Mix in a slow-release fertilizer specifically formulated for vegetables or pumpkins. Follow the instructions on the fertilizer package for the correct amount. This will give your pumpkin plant a boost of nutrients throughout the growing season.
* Watering the Soil: Thoroughly water the soil in the tire until it is evenly moist. This will help settle the soil and prepare it for planting.
Planting Your Pumpkin Seedling
Alright, it’s time to get that pumpkin seed in the ground!
* Choosing the Right Variety: Select a pumpkin variety known for its large size, such as Atlantic Giant. These varieties are specifically bred to produce massive pumpkins. Do your research and choose a variety that suits your climate and growing conditions.
* Starting Seeds Indoors (Optional): To get a head start on the growing season, you can start your pumpkin seeds indoors about 2-3 weeks before the last expected frost. Plant the seeds in small pots filled with seed-starting mix. Keep the soil moist and warm, and provide plenty of light.
* Direct Sowing: If you live in a warmer climate, you can directly sow the pumpkin seeds into the tire after the last frost. Plant 2-3 seeds in the center of the tire, about 1 inch deep.
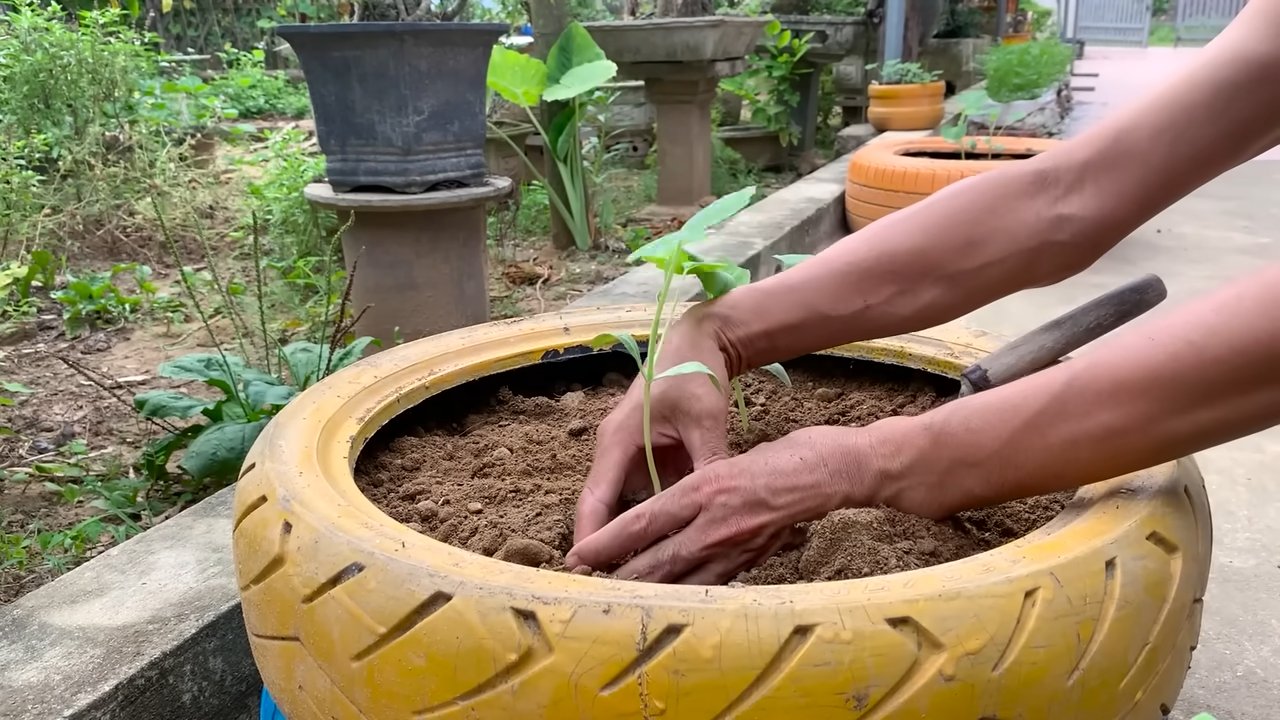
* Transplanting Seedlings: If you started your seeds indoors, gently transplant the seedlings into the tire after the last frost. Dig a small hole in the center of the tire and carefully place the seedling in the hole. Backfill with soil and water thoroughly.
* Protecting Seedlings: Protect your seedlings from pests and harsh weather conditions by covering them with a cloche or row cover. This will help them get established and grow strong.
Caring for Your Growing Pumpkin
Now comes the ongoing care and attention that will transform your little seedling into a giant pumpkin!
* Watering: Water your pumpkin plant deeply and regularly, especially during hot, dry weather. Pumpkins need a lot of water to grow. Aim for at least 1-2 inches of water per week. Water at the base of the plant to avoid wetting the leaves, which can lead to fungal diseases.
* Fertilizing: Continue to fertilize your pumpkin plant every 2-3 weeks with a balanced fertilizer. You can also supplement with liquid seaweed or fish emulsion for added nutrients.
* Pruning: Pruning your pumpkin vines can help direct the plant’s energy into producing fewer, larger pumpkins. Remove any secondary vines that are not producing flowers or fruit. Also, remove any damaged or diseased leaves.
* Pollination: Pumpkins have separate male and female flowers. The female flowers need to be pollinated in order to produce fruit. If you are not seeing many bees or other pollinators in your garden, you may need to hand-pollinate the flowers. To do this, use a small paintbrush to transfer pollen from the male flower to the female flower.
* Choosing the Best Pumpkin: Once your pumpkin plant starts producing fruit, select the most promising pumpkin to focus on. Remove any other pumpkins that are growing on the vine. This will allow the plant to direct all of its energy into growing one giant pumpkin.
* Protecting the Pumpkin: As your pumpkin grows, protect it from pests, diseases, and sunburn. You can cover the pumpkin with a blanket or tarp during hot weather to prevent sunburn. You can also use organic pest control methods to keep pests away.
* Rotating the Pumpkin: Gently rotate the pumpkin every few days to ensure that it grows evenly. This will also prevent it from developing flat spots.
* Supporting the Pumpkin: As your pumpkin gets larger, it may need some support to prevent it from breaking off the vine. You can use a wooden pallet or a bed of straw to support the pumpkin.
Harvesting Your Giant Pumpkin
The moment we’ve all been waiting for!
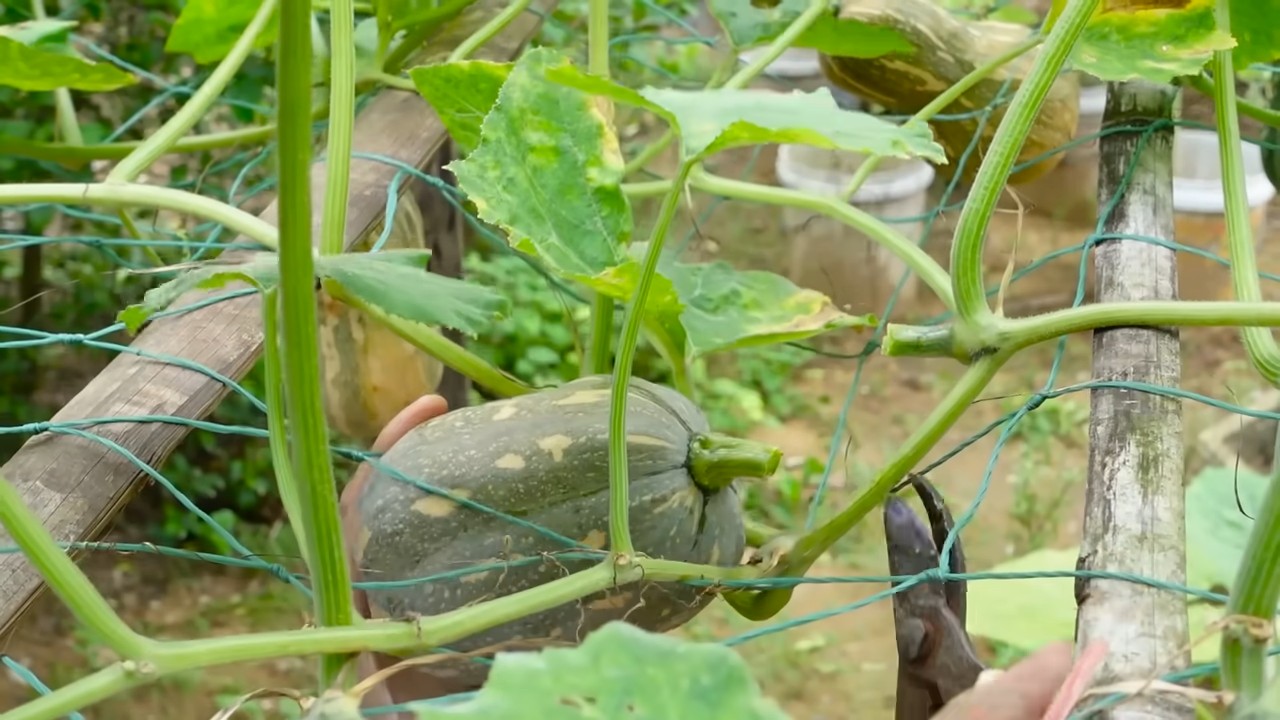
* Knowing When to Harvest: Your pumpkin is ready to harvest when the stem starts to dry out and the skin becomes hard and resistant to scratching. The color of the pumpkin should also be a deep, vibrant orange.
* Harvesting Carefully: Use a sharp knife or pruning shears to cut the pumpkin from the vine, leaving a few inches of stem attached. Be careful not to damage the pumpkin during harvesting.
* Moving Your Pumpkin: Moving a giant pumpkin can be a challenge. You may need to use a forklift, tractor, or a group of strong friends to lift and move the pumpkin. Be sure to handle the pumpkin with care to avoid damaging it.
* Enjoying Your Harvest: Once you’ve harvested your giant pumpkin, you can display it in your garden, enter it in a pumpkin-growing contest, or even carve it into a giant jack-o’-lantern!
Troubleshooting
Even with the best planning, sometimes things don’t go exactly as expected. Here are a few common problems and how to address them:
* Pests: Squash bugs, vine borers, and aphids can be a nuisance. Use organic pest control methods like insecticidal soap or neem oil. Regularly inspect your plants for signs of infestation.
* Diseases: Powdery mildew and other fungal diseases can affect pumpkin plants. Ensure good air circulation, avoid overhead watering, and use a fungicide if necessary.
* Poor Pollination: If you’re not seeing many pumpkins develop, hand-pollination might be necessary.
* Slow Growth: Ensure your pumpkin plant is getting enough sunlight, water, and nutrients. Amend the soil with compost and fertilizer if needed.
Growing giant pumpkins in tires is a rewarding and fun experience. With a little bit of effort and attention, you can grow your own prize-winning pumpkin that will be the envy of your neighborhood. Good luck, and happy
Conclusion
So, there you have it! Growing pumpkins in tires isn’t just a quirky gardening hack; it’s a genuinely effective method for boosting your pumpkin yield and simplifying your gardening efforts. From providing superior drainage and warmth to acting as a natural barrier against pests and weeds, the benefits are undeniable. This method is especially valuable for gardeners with limited space or those looking to maximize their harvest in challenging soil conditions.
Think about it: no more battling waterlogged roots, fewer weeds stealing precious nutrients, and a warmer microclimate that encourages faster, healthier growth. Plus, the tires themselves can be repurposed, contributing to a more sustainable gardening practice. It’s a win-win situation!
But the beauty of this DIY trick lies in its adaptability. Feel free to experiment with different tire sizes to accommodate various pumpkin varieties. Smaller tires are perfect for pie pumpkins or decorative gourds, while larger tires can handle the giants like Atlantic Giants. You can also paint the tires to add a splash of color to your garden or even decorate them with mosaic tiles for a truly unique and eye-catching display. Consider lining the inside of the tire with landscape fabric to further improve drainage and prevent soil erosion.
Another variation to consider is using multiple tires stacked on top of each other to create a raised bed effect. This can be particularly beneficial if you have poor soil quality or drainage issues. Just make sure the stack is stable and secure before planting. You can also add compost or other organic matter to the tire to enrich the soil and provide your pumpkins with the nutrients they need to thrive.
Don’t be afraid to get creative with your tire pumpkin patch! You could even incorporate other companion plants around the base of the tires, such as marigolds to deter pests or nasturtiums to attract beneficial insects. The possibilities are endless.
Ultimately, the success of growing pumpkins in tires hinges on proper soil preparation, consistent watering, and diligent pest control. Remember to choose a sunny location, amend the soil with plenty of organic matter, and monitor your plants regularly for any signs of disease or pests. With a little care and attention, you’ll be rewarded with a bountiful harvest of beautiful, homegrown pumpkins.
We wholeheartedly encourage you to give this DIY trick a try. It’s a fun, affordable, and effective way to grow pumpkins, and we’re confident that you’ll be amazed by the results. Once you’ve tried it, we’d love to hear about your experience! Share your photos, tips, and stories in the comments below. Let’s build a community of tire-pumpkin-growing enthusiasts and inspire others to embrace this innovative gardening technique. Happy growing!
Frequently Asked Questions (FAQ)
What type of tires are best for growing pumpkins?
Ideally, you should use tires that are free of any exposed steel belts or wires. Passenger car tires are generally a good choice, as they are readily available and relatively lightweight. Avoid using tires from heavy machinery or trucks, as they can be difficult to handle and may contain harmful chemicals. Before using any tire, thoroughly clean it with soap and water to remove any dirt, debris, or residue. You can also consider using old tires that are no longer suitable for vehicles, as this is a great way to recycle and repurpose them. Just make sure they are in relatively good condition and free of any major damage.
How do I prepare the tires for planting?
First, thoroughly clean the tires with soap and water to remove any dirt, debris, or residue. Next, drill drainage holes in the bottom of the tire to prevent waterlogging. You can use a drill with a large drill bit to create several holes evenly spaced around the tire. If you’re concerned about soil erosion, you can line the inside of the tire with landscape fabric or burlap. This will help to retain the soil while still allowing for proper drainage. Finally, fill the tire with a high-quality potting mix or garden soil amended with compost or other organic matter. Make sure the soil is well-draining and rich in nutrients to provide your pumpkins with the best possible growing conditions.
What kind of soil should I use?
Pumpkins thrive in well-draining soil that is rich in organic matter. A good mix would be equal parts garden soil, compost, and peat moss or coconut coir. You can also add a slow-release fertilizer to provide your pumpkins with a steady supply of nutrients throughout the growing season. Avoid using heavy clay soil, as it can become waterlogged and suffocate the roots. If your soil is naturally heavy, amend it with plenty of organic matter to improve drainage and aeration. Before planting, test the soil pH to ensure it is within the ideal range of 6.0 to 7.0. You can purchase a soil testing kit at most garden centers or online.
How often should I water my pumpkins growing in tires?
Water your pumpkins regularly, especially during hot, dry weather. The soil should be kept consistently moist but not waterlogged. Check the soil moisture by sticking your finger into the soil about an inch deep. If the soil feels dry, it’s time to water. Water deeply and thoroughly, allowing the water to soak into the soil and reach the roots. Avoid watering the foliage, as this can promote fungal diseases. In general, pumpkins need about 1 inch of water per week. However, this can vary depending on the weather conditions and the size of your plants.
How do I protect my pumpkins from pests and diseases?
Monitor your plants regularly for any signs of pests or diseases. Common pumpkin pests include squash bugs, squash vine borers, and aphids. You can control these pests with insecticidal soap, neem oil, or by handpicking them off the plants. To prevent squash vine borers, wrap the base of the stems with aluminum foil or pantyhose. Common pumpkin diseases include powdery mildew and downy mildew. You can prevent these diseases by providing good air circulation, avoiding overhead watering, and applying a fungicide if necessary. You can also choose disease-resistant pumpkin varieties.
Can I grow other plants in the tires with my pumpkins?
Yes, you can grow companion plants in the tires with your pumpkins. Good companion plants for pumpkins include marigolds, nasturtiums, and basil. Marigolds deter pests, nasturtiums attract beneficial insects, and basil repels aphids. Avoid planting aggressive or invasive plants that could compete with your pumpkins for resources. Also, make sure the companion plants don’t shade the pumpkins, as they need plenty of sunlight to thrive.
How do I know when my pumpkins are ripe?
Pumpkins are typically ripe when they have reached their mature color and the rind is hard and resistant to scratching. The stem should also be dry and brown. To test for ripeness, tap the pumpkin with your knuckles. A ripe pumpkin will sound hollow. If you’re unsure, leave the pumpkin on the vine for a few more days. Once the pumpkin is ripe, cut it from the vine with a sharp knife, leaving a few inches of stem attached. Handle the pumpkin carefully to avoid bruising or damaging the rind.
What do I do with the tires after the growing season?
After the growing season, you can either store the tires for reuse next year or dispose of them properly. If you plan to reuse the tires, clean them thoroughly and store them in a dry place. If you want to dispose of the tires, check with your local waste management facility for recycling options. Many tire retailers also offer tire recycling programs. Avoid burning tires, as this can release harmful pollutants into the air. You can also repurpose the tires for other gardening projects, such as creating raised beds or planters.

Leave a Comment