

Hem Jeans Without Cutting: Are your favorite jeans a tad too long? Don’t despair and definitely don’t reach for the scissors just yet! I’m about to share a game-changing DIY trick that will save you time, money, and potential denim disasters. For generations, tailors have meticulously altered clothing, but this method brings that power directly to your fingertips, no sewing machine required!
Think about it: how many times have you put off wearing a beloved pair of jeans simply because they pooled around your ankles? Or worse, risked tripping and tearing them? This simple hack eliminates those frustrations. Learning how to hem jeans without cutting is a skill that empowers you to customize your wardrobe on the fly. It’s perfect for those of us who aren’t sewing pros, or for those moments when you need a quick fix before heading out the door.
This DIY approach is not only practical but also preserves the original hem of your jeans, maintaining their authentic look and feel. Plus, it’s a fantastic way to embrace sustainable fashion by extending the life of your clothes. So, ditch the expensive tailor visits and let’s dive into this easy, step-by-step guide to perfectly hem your jeans without sacrificing their style!
DIY: Hem Your Jeans Without Cutting – A Beginner’s Guide
Hey there, fellow DIY enthusiasts! Ever bought a pair of jeans that fit perfectly everywhere except the length? Or maybe you love your current jeans but they’re just a tad too long? Don’t despair! You don’t need to chop off precious denim and risk ruining the original hem. I’m going to show you a super easy way to hem your jeans *without* cutting them. This method preserves the original hem, giving you a professional-looking result and keeping the character of your favorite jeans intact. Let’s get started!
What You’ll Need
Before we dive in, let’s gather our supplies. This project is pretty low-tech, so you probably already have most of these things lying around:
* Your jeans (obviously!)
* A sewing machine (a regular one will do just fine)
* Matching thread (or a slightly darker shade for a more authentic look)
* Pins (lots of them!)
* A ruler or measuring tape
* Scissors (for trimming excess fabric *inside* the hem, not the actual jeans length!)
* An iron and ironing board
* A seam ripper (just in case!)
* A marking tool (tailor’s chalk or a fabric marker)
Preparing Your Jeans
This is a crucial step to ensure an accurate and even hem. Take your time and be precise!
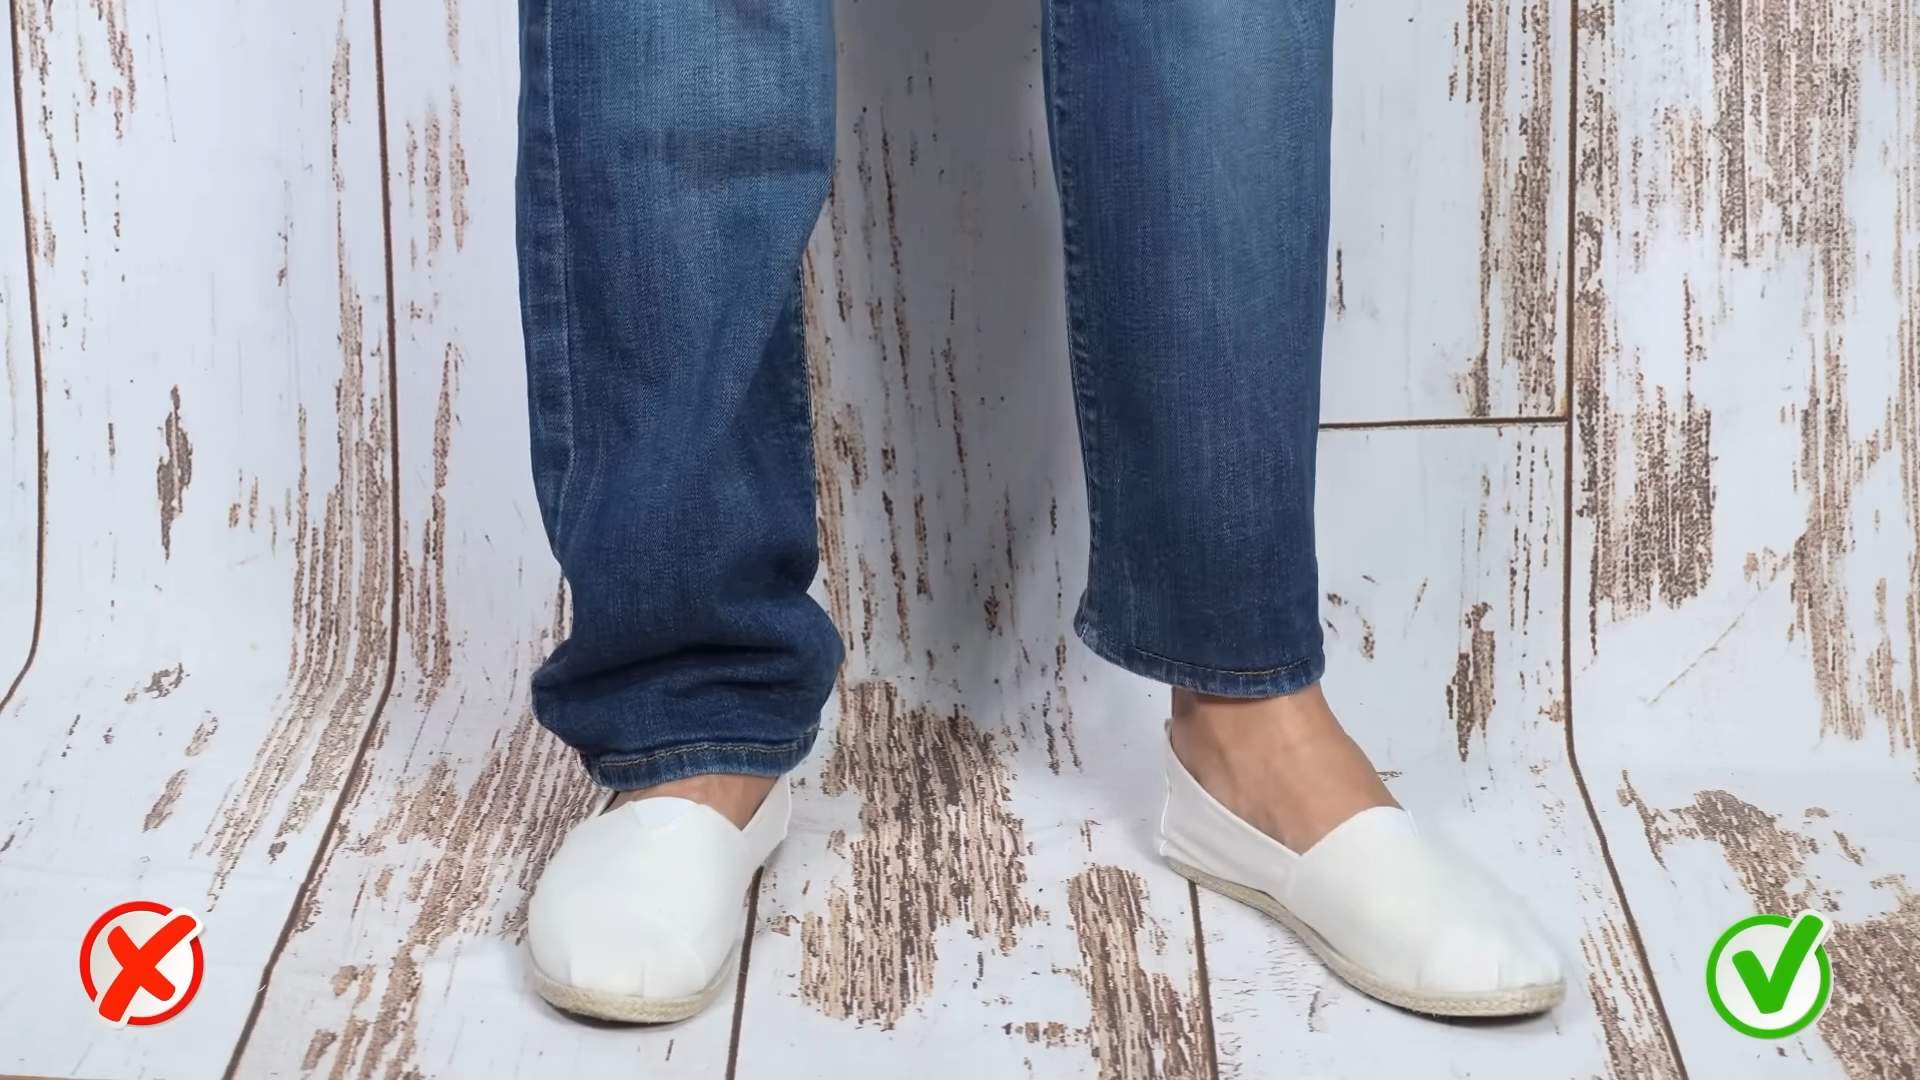
1. Try on your jeans with the shoes you’ll typically wear with them. This is super important! You want to hem them to the correct length for your usual footwear. Have a friend help you if possible, or stand in front of a mirror.
2. Determine your desired hem length. With your shoes on, decide where you want the bottom of your jeans to fall. It should graze the top of your shoe, or have a slight break (a gentle fold) in the front.
3. Mark the desired hem length. Have your friend (or yourself, carefully!) place pins horizontally around the leg of the jeans, marking the new hemline. Make sure the pins are evenly spaced and at the same height all the way around. Repeat for the other leg.
4. Take off the jeans and lay them on a flat surface. I like to use my dining table, but a large cutting mat on the floor works too.
5. Double-check your measurements. Using your ruler or measuring tape, measure the distance from the original hem to the pins you placed. This is the amount of fabric you’ll be folding up. Make sure the measurement is consistent all the way around each leg. If not, adjust your pins until they are.
6. Mark the fold line. Using your tailor’s chalk or fabric marker, draw a line around each leg, following the line of pins. This will be your guide for folding the fabric.
Creating the New Hem
Now for the fun part – creating the new hem! This is where the magic happens.
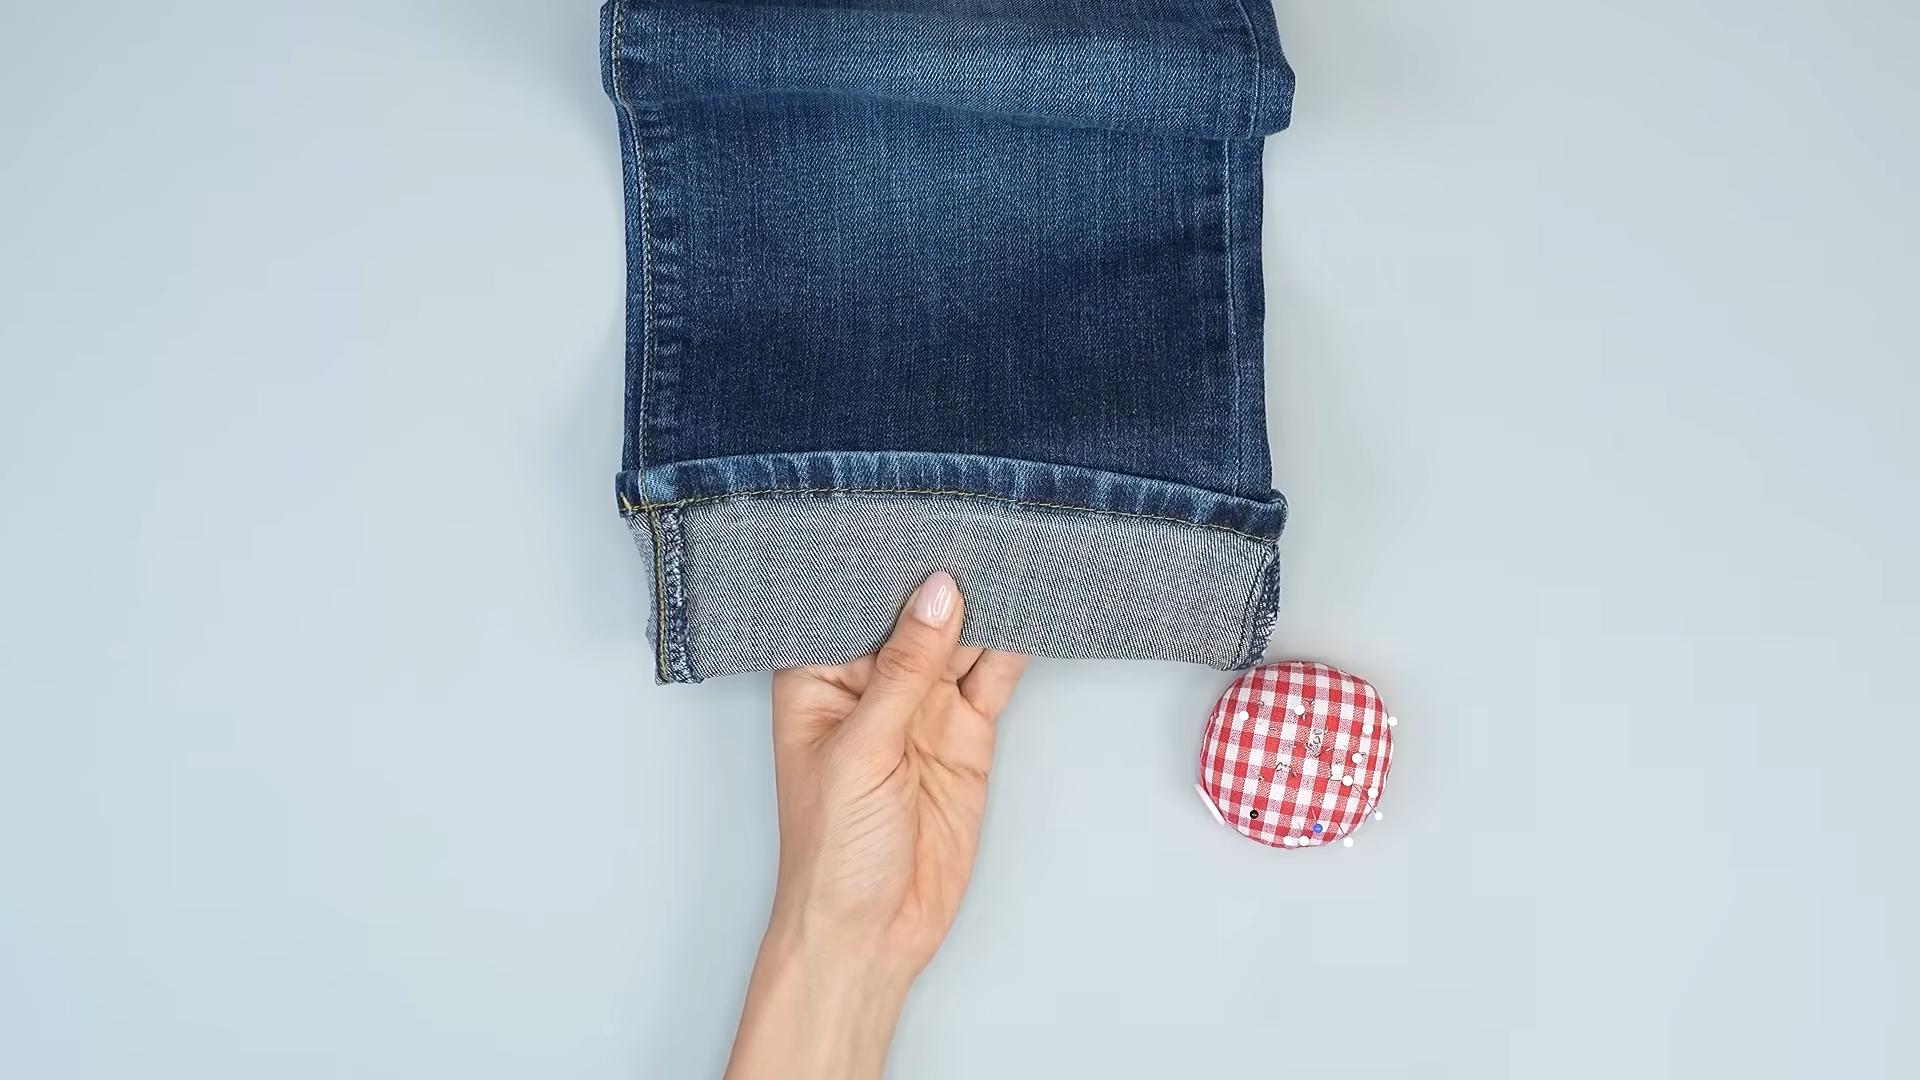
1. Fold the fabric up to the marked line. Carefully fold the bottom of the jeans up to the line you drew, aligning the original hem with the marked line. This creates a cuff on the inside of the jeans.
2. Pin the fold in place. Use plenty of pins to secure the folded fabric. Place the pins perpendicular to the fold, about an inch apart. This will prevent the fabric from shifting while you sew.
3. Iron the fold. This is a really important step! Ironing the fold will create a crisp, clean line and make it much easier to sew. Use a medium heat setting and plenty of steam. Press firmly, but be careful not to scorch the fabric.
4. Try on the jeans again. Before you start sewing, try on the jeans one more time to make sure you’re happy with the length. This is your last chance to make adjustments!
Sewing the Hem
Alright, time to get sewing! This is where your sewing machine skills come into play. Don’t worry if you’re a beginner – this is a pretty straightforward seam.
1. Set up your sewing machine. Thread your sewing machine with the matching thread. Use a regular stitch length (around 2.5mm).
2. Choose your stitch. You have a couple of options here. A straight stitch is the most common and easiest. You can also use a zig-zag stitch for a little extra durability, especially if you’re working with stretchy denim.
3. Start sewing. Begin sewing along the top edge of the folded fabric, close to the original hem. Backstitch at the beginning and end of the seam to secure the thread.
4. Sew all the way around the leg. Keep the seam straight and even, following the edge of the folded fabric. Remove the pins as you go.
5. Repeat for the other leg. Once you’ve finished sewing one leg, repeat the process for the other leg.
Finishing Touches
Almost there! Just a few more steps to make your hem look perfect.
1. Trim excess fabric. Carefully trim away any excess fabric inside the hem, leaving about 1/2 inch of fabric. This will reduce bulk and make the hem more comfortable. Be careful not to cut the jeans themselves!
2. Press the hem again. Give the hem one final press with the iron to flatten the seam and create a professional finish.
3. Optional: Topstitch. For a more decorative look, you can add a topstitch along the original hem. This is a line of stitching that runs along the very edge of the hem, on the outside of the jeans. Use a slightly heavier thread for a more pronounced look.
Dealing with Thick Seams
Sometimes, you’ll encounter thick seams where the side seams of the jeans meet the hem. These can be tricky to sew over. Here are a few tips:
* Use a thicker needle. A denim needle or a universal needle size 14 or 16 will be better equipped to handle the thick fabric.
* Slow down. Sew slowly and carefully over the thick seams.
* Use a hump jumper. A hump jumper is a small piece of folded cardboard or fabric that you place under the presser foot to help it glide over the thick seam. You can buy these at most sewing supply stores, or you can make your own.
* Hand-crank the sewing machine. If you’re really struggling, you can hand-crank the sewing machine over the thick seam. This gives you more control and prevents the needle from breaking.
Troubleshooting
Even with the best instructions, things can sometimes go wrong. Here are a few common problems and how to fix them:
* Uneven hem: If your hem is uneven, use your seam ripper to remove the stitching and start over. Double-check your measurements and pinning before you sew again.
* Puckering: Puckering can be caused by sewing too fast or by using the wrong thread tension. Try slowing down and adjusting the thread tension on your sewing machine.
* Broken needle: A broken needle is usually caused by sewing over thick seams or by using the wrong needle for the fabric. Use a thicker needle and sew slowly over thick seams.
* Skipped stitches: Skipped stitches can be caused by a dull needle or by using the wrong thread. Replace the needle and try a different thread.
Enjoy Your Perfectly Hemmed Jeans!
And there you have it! You’ve successfully hemmed your jeans without cutting them. Now you can enjoy your perfectly fitting jeans without sacrificing the original hem. This method is a great way to save money and preserve the character of your favorite denim. Happy sewing!
Conclusion
So, there you have it! Mastering the art of how to hem jeans without cutting is not just a clever trick; it’s a game-changer for your wardrobe and your wallet. Forget expensive tailoring or the heartbreak of permanently altering your favorite denim. This method offers a reversible, customizable, and frankly, ingenious solution to achieving the perfect jean length.
Why is this a must-try? Because it empowers you to take control of your clothing. It allows you to adapt your jeans to different shoes, different styles, and even different seasons. Imagine wearing your favorite boots with a perfectly hemmed pair of jeans, and then, with a simple adjustment, rocking those same jeans with sneakers. The possibilities are endless!
Beyond the practicality, this technique is incredibly satisfying. There’s a certain pride that comes with knowing you’ve solved a common clothing dilemma with your own two hands. It’s a small act of self-reliance that can boost your confidence and inspire you to tackle other DIY projects.
Looking for variations? Absolutely! Consider using a contrasting thread color for a subtle, yet stylish, detail. Or, if you’re feeling adventurous, experiment with different types of stitches to create a unique hem. You could even add a decorative trim or ribbon to the inside of the hem for a pop of color that’s only visible when the jeans are cuffed. For thicker denim, you might want to use a heavier-duty needle and thread to ensure a secure and durable hem. If you are using a sewing machine, adjust the stitch length to accommodate the fabric thickness.
Don’t be intimidated if you’re new to sewing. This technique is surprisingly beginner-friendly. Start with an old pair of jeans to practice, and don’t be afraid to make mistakes. The beauty of this method is that it’s reversible, so you can always undo your work and try again.
We wholeheartedly encourage you to give this DIY trick a try. It’s a simple, effective, and rewarding way to elevate your denim game. Once you’ve mastered it, you’ll wonder how you ever lived without it.
But the real fun begins when you share your experience! We’d love to hear about your successes, your challenges, and any creative variations you come up with. Share your photos and stories on social media using #NoCutHemming or tag us in your posts. Let’s build a community of denim-loving DIYers who are passionate about making their clothes work for them.
So, grab your jeans, your needle and thread (or sewing machine), and get ready to transform your wardrobe. Happy hemming!
Frequently Asked Questions (FAQ)
What kind of thread should I use?
The best thread to use for hemming jeans without cutting is a sturdy, all-purpose thread made of polyester or a polyester-cotton blend. These threads are strong enough to withstand the wear and tear that jeans typically endure. Choose a color that closely matches the original stitching of your jeans for a seamless look. If you want to add a decorative touch, you can use a contrasting color. For heavier denim, consider using a heavier-duty thread specifically designed for denim or upholstery.
Is it better to hand-sew or use a sewing machine?
Both hand-sewing and using a sewing machine are viable options for hemming jeans without cutting. Hand-sewing is a great choice if you’re new to sewing or if you only need to hem a few pairs of jeans. It allows for more control and precision. However, it can be time-consuming. A sewing machine is faster and more efficient, especially if you have multiple pairs of jeans to hem. It also creates a more durable and professional-looking hem. If you’re using a sewing machine, be sure to use a denim needle and adjust the stitch length accordingly.
How do I measure the correct length?
Accurate measurement is crucial for a successful hem. Put on the shoes you plan to wear with the jeans. Have someone help you measure from the waistband down to the desired length. Mark the desired length with pins or tailor’s chalk. Remember to account for the thickness of the hem when measuring. It’s always better to err on the side of being slightly too long rather than too short. You can always adjust the hem later if needed.
What if my jeans are too thick to easily fold and sew?
Thick denim can be challenging to work with. If you’re having trouble folding and sewing the hem, try using a seam ripper to remove some of the excess fabric from the original hem. This will reduce the bulk and make it easier to create a clean fold. You can also use a hammer or mallet to gently flatten the folded hem before sewing. Using a denim needle and a walking foot on your sewing machine can also help to feed the thick fabric evenly.
Can I use this method on other types of pants?
While this method is primarily designed for jeans, it can also be used on other types of pants with a similar construction, such as chinos or corduroys. However, the results may vary depending on the fabric and the original hem. Thinner fabrics may require a different approach to prevent puckering or distortion. It’s always best to test the technique on a small, inconspicuous area of the fabric before hemming the entire garment.
How do I prevent the hem from unraveling?
To prevent the hem from unraveling, it’s important to secure the stitches properly. When hand-sewing, use a backstitch or a whipstitch to create a strong and durable seam. When using a sewing machine, use a backstitch at the beginning and end of each seam to lock the stitches in place. You can also use a seam sealant or fray check to further prevent unraveling. Trimming any excess fabric close to the seam can also help to prevent fraying.
What if I mess up? Can I undo it?
One of the best things about this method is that it’s reversible! If you make a mistake, you can simply use a seam ripper to remove the stitches and start over. This is why it’s a great option for beginners who are still learning to sew. Don’t be afraid to experiment and try different techniques. The worst that can happen is that you’ll have to undo your work and try again.
How do I care for jeans that have been hemmed using this method?
Caring for jeans that have been hemmed using this method is the same as caring for any other pair of jeans. Wash them inside out in cold water and tumble dry on low heat or hang them to dry. Avoid using harsh detergents or bleach, as these can damage the fabric and the stitching. If you notice any loose threads or unraveling, simply trim them or re-sew the seam. With proper care, your hemmed jeans will last for years to come.
Will this method work on stretch denim?
Yes, this method can work on stretch denim, but you’ll need to take a few extra precautions. Use a stretch needle on your sewing machine to prevent skipped stitches. Also, use a stretch thread, which is designed to move with the fabric and prevent the seams from popping. When folding the hem, be careful not to stretch the fabric too much, as this can distort the shape of the jeans. It’s also a good idea to use a slightly wider seam allowance to provide more support for the stretch fabric.


Leave a Comment