

DIY Cardboard Safe: Ever dreamt of having a secret hiding place, just like in the movies? I know I have! There’s something undeniably thrilling about the idea of safeguarding your treasures, big or small, with a touch of ingenuity. While elaborate vaults might be out of reach, creating your very own DIY cardboard safe is surprisingly simple, fun, and incredibly rewarding.
Throughout history, the concept of secure storage has been paramount. From ancient Egyptians burying their valuables with pharaohs to medieval strongboxes protecting royal jewels, the need to safeguard possessions is deeply ingrained in human culture. While our cardboard creation might not deter a professional thief, it offers a fantastic way to teach kids about responsibility, security, and the magic of crafting something useful from everyday materials.
Let’s be honest, in today’s world, we all have little things we want to keep private – maybe it’s a cherished childhood memento, a secret stash of candy, or even just a place to keep your allowance safe from prying eyes. This DIY cardboard safe project is the perfect solution! It’s a fantastic way to recycle those spare cardboard boxes lying around, unleash your creativity, and build a functional, personalized safe that’s uniquely yours. Plus, it’s a great project to do with kids, fostering their problem-solving skills and sparking their imagination. So, grab your cardboard, scissors, and glue, and let’s get started on building your very own secret fortress!
DIY Cardboard Safe: Protect Your Treasures!
Hey there, fellow DIY enthusiasts! Ever wanted a secret hiding place for your valuables, but didn’t want to break the bank? Well, I’ve got the perfect project for you: a DIY cardboard safe! This project is not only fun and engaging, but it also provides a surprisingly secure spot to stash your precious belongings. Let’s get started!
Materials You’ll Need
Before we dive in, let’s gather all the necessary materials. Trust me, having everything ready beforehand will make the whole process much smoother.
* Cardboard Boxes: You’ll need a few different sizes. A large, sturdy box will serve as the main body of the safe. Then, you’ll need smaller boxes for the inner compartments and the door. Think cereal boxes, shoe boxes, or even shipping boxes. The sturdier, the better!
* Cardboard Sheets: These will be used for reinforcing the structure and creating the locking mechanism. You can salvage these from flattened boxes.
* Craft Knife or Box Cutter: A sharp blade is essential for precise cuts. Please be careful and always use a cutting mat!
* Ruler or Measuring Tape: Accuracy is key for a well-functioning safe.
* Pencil or Marker: For marking measurements and outlines.
* Hot Glue Gun and Glue Sticks: Hot glue is your best friend for this project. It dries quickly and provides a strong bond.
* Wood Glue (Optional): For extra reinforcement, especially on load-bearing parts.
* Hinges (Small): You can find these at most hardware stores. Small metal hinges will work best for the door. Alternatively, you can create cardboard hinges.
* Locking Mechanism Components: This is where you can get creative! I’ll show you a few options, but you’ll need things like:
* A small bolt or latch
* A combination lock (optional, for a more secure safe)
* Cardboard tubes (for a rotating lock mechanism)
* Magnets (for a magnetic lock)
* Paint or Decorative Paper (Optional): To personalize your safe and make it look less like a cardboard box.
* Sandpaper (Optional): To smooth out any rough edges.
* Safety Glasses: Protect your eyes from glue splatter and cardboard dust.
* Cutting Mat: Protect your work surface.
Building the Main Body
This is the foundation of your safe, so take your time and make sure it’s sturdy.
1. Choose Your Main Box: Select the largest and sturdiest cardboard box you have. This will be the outer shell of your safe.
2. Reinforce the Box (Optional): If your box feels flimsy, reinforce the inside corners with extra strips of cardboard glued in place. This will add strength and stability.
3. Cut the Opening: Decide where you want the door to be located (front, top, or side). Using your ruler and pencil, draw a rectangle on the box to mark the door opening.
4. Carefully Cut the Opening: Using your craft knife or box cutter, carefully cut along the lines you drew. Save the piece you cut out – this will become the door!
5. Smooth the Edges: Use sandpaper to smooth out any rough edges around the opening. This will prevent you from getting cut and will make the door fit better.
Creating the Door
Now, let’s transform that piece of cardboard you cut out into a functional door.
1. Reinforce the Door: Just like the main box, reinforce the door with extra cardboard strips glued to the inside. This will prevent it from bending or warping.
2. Attach the Hinges: Decide where you want to place the hinges. Mark the positions on both the door and the main box.
3. Glue or Screw the Hinges: If you’re using metal hinges, you can either glue them in place with hot glue or screw them in. Screws will provide a more secure attachment, but hot glue can work in a pinch. If you’re making cardboard hinges, cut strips of sturdy cardboard and score them down the middle to create a flexible hinge. Glue one side of the hinge to the door and the other side to the main box.
4. Test the Door: Make sure the door opens and closes smoothly. If it sticks, you may need to adjust the hinges or sand down the edges.
Designing the Interior Compartments
This is where you can customize your safe to fit your specific needs.
1. Measure the Interior: Measure the inside dimensions of your safe.
2. Plan Your Compartments: Decide how many compartments you want and what size they should be. Consider what you’ll be storing in the safe when planning the layout.
3. Cut the Cardboard: Cut pieces of cardboard to the appropriate sizes for the compartment walls and shelves.
4. Assemble the Compartments: Use hot glue to assemble the compartment walls and shelves. Make sure everything is securely attached.
5. Install the Compartments: Glue the assembled compartments into the main body of the safe.
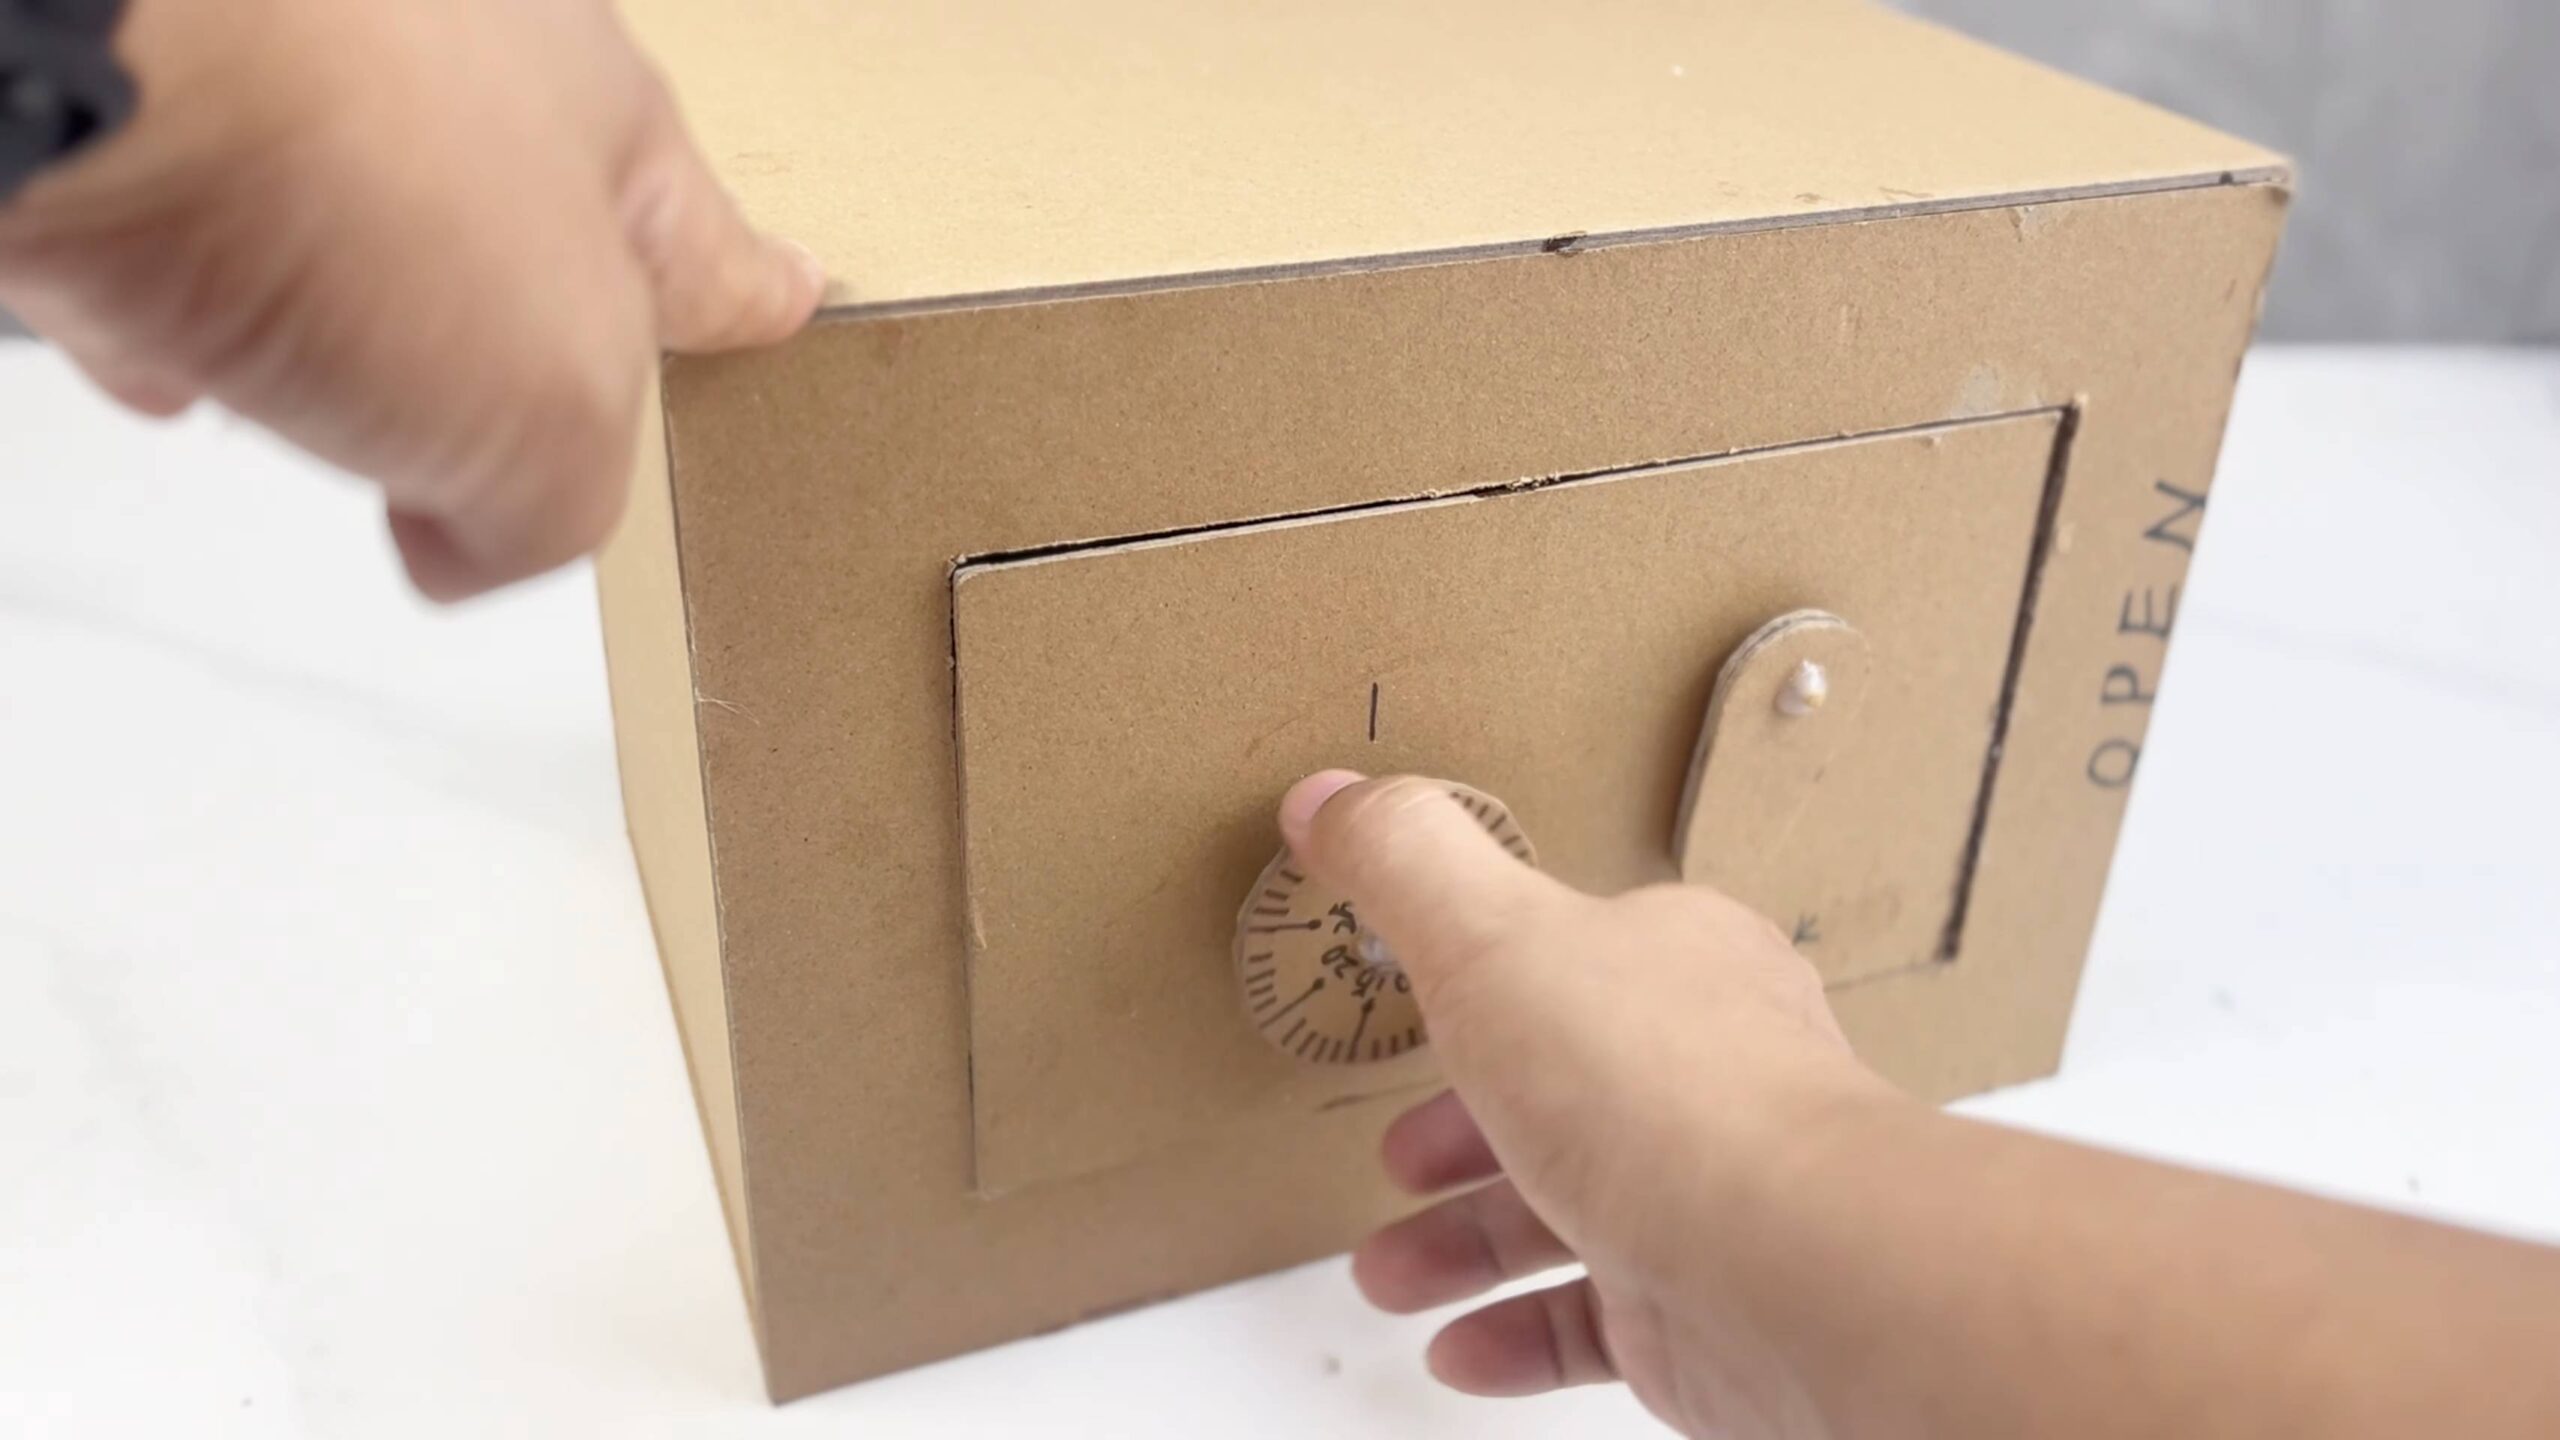
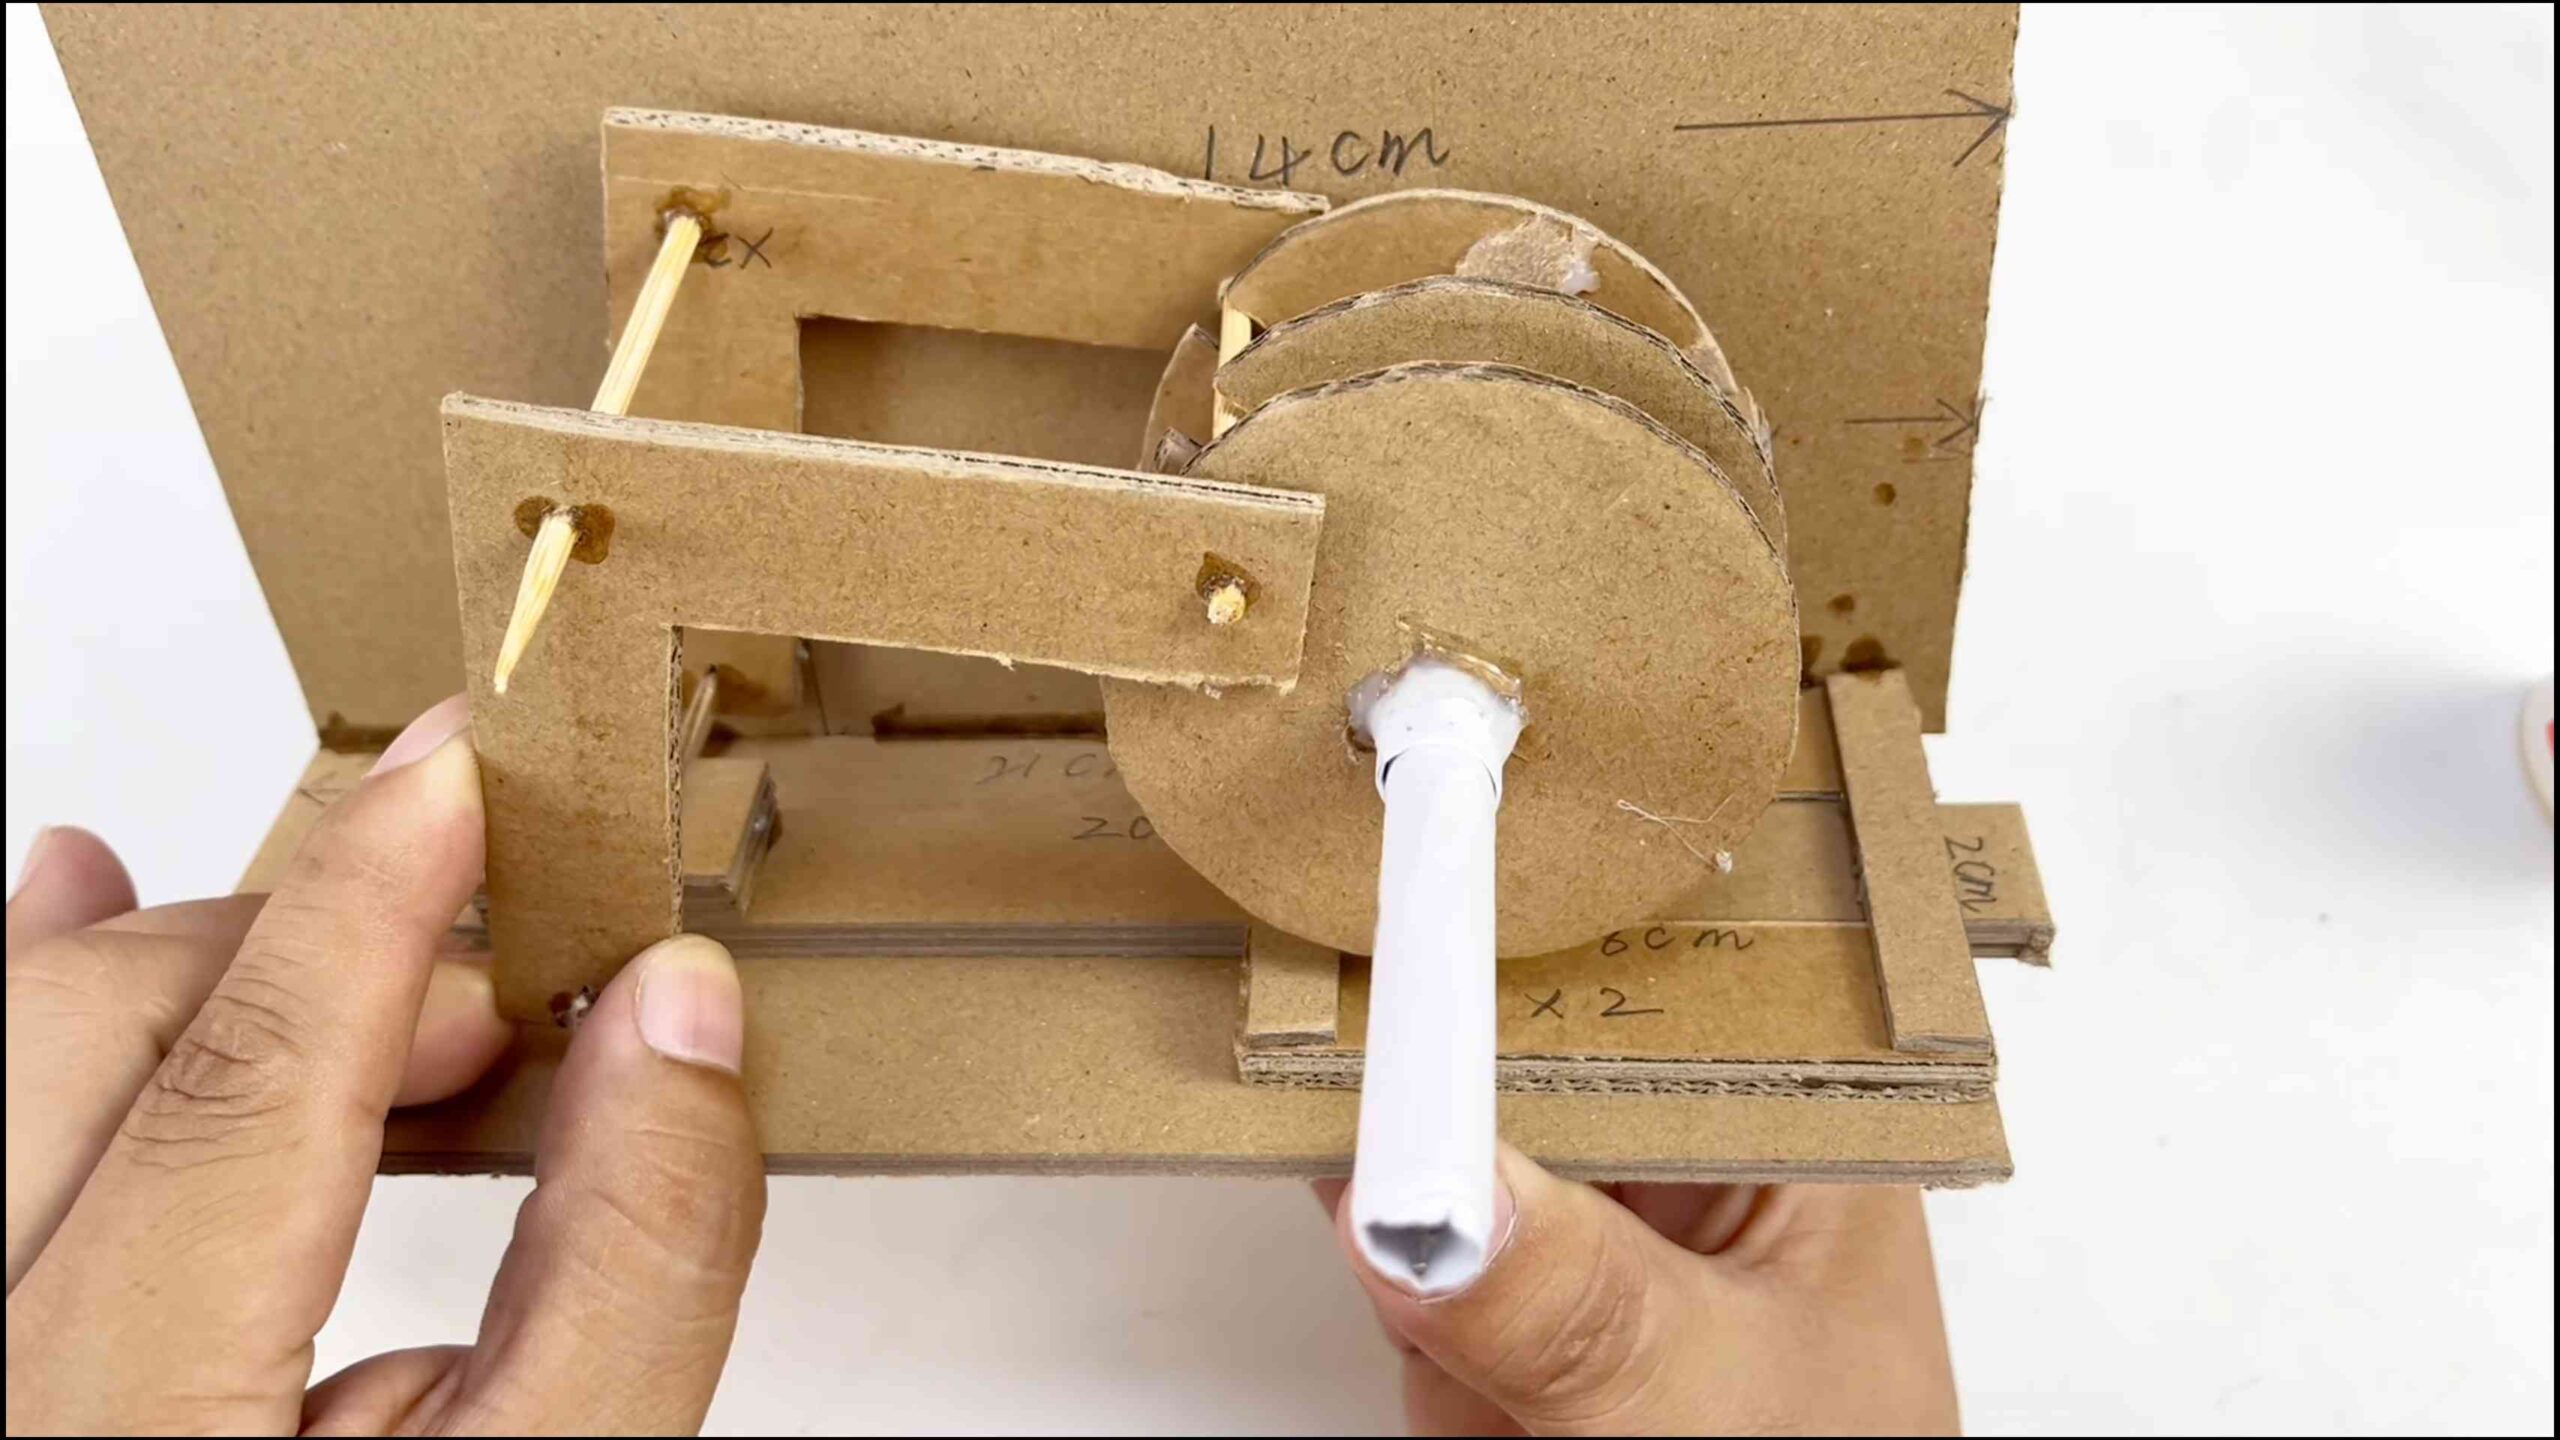
Creating a Locking Mechanism
This is the most crucial part of the project! Here are a few options for creating a locking mechanism:
Simple Latch
1. Cut a Cardboard Latch: Cut a small strip of sturdy cardboard and shape it into a latch.
2. Attach the Latch: Glue one end of the latch to the door.
3. Create a Catch: Cut a small slit in the main box where the latch will hook.
4. Test the Latch: Make sure the latch securely holds the door closed.
Rotating Combination Lock (More Advanced)
1. Gather Cardboard Tubes: You’ll need a few cardboard tubes of different diameters. Toilet paper rolls and paper towel rolls work well.
2. Create Number Rings: Cut the tubes into rings. Write numbers on each ring.
3. Build the Mechanism: Design a system where the rings need to be aligned in a specific order to release a bolt or latch. This will require some experimentation and ingenuity!
4. Install the Mechanism: Securely attach the mechanism to the door and the main box.
Magnetic Lock
1. Attach Magnets: Glue a small magnet to the inside of the door.
2. Create a Magnetic Catch: Glue a metal plate or another magnet to the main box where the magnet on the door will align.
3. Test the Lock: Make sure the magnets securely hold the door closed.
Important Note: For any locking mechanism, ensure it’s properly aligned and functions smoothly. Test it repeatedly before considering your safe complete.
Finishing Touches
Now that your safe is structurally sound and has a locking mechanism, it’s time to add the finishing touches.
1. Sand Any Rough Edges: Use sandpaper to smooth out any remaining rough edges.
2. Paint or Decorate: Paint the safe to camouflage it or decorate it to match your room. You can use acrylic paint, spray paint, or even cover it with decorative paper.
3. Add a Handle (Optional): Attach a small handle to the door for easier opening.
4. Test the Safe: Before you start storing your valuables, test the safe thoroughly to make sure everything is working properly.
Tips and Tricks
* Reinforcement is Key: The more you reinforce the cardboard, the stronger and more durable your safe will be.
* Hot Glue Can Be Messy: Be careful when using hot glue and avoid getting it on your skin.
* Get Creative with the Locking Mechanism: Don’t be afraid to experiment with different locking mechanisms. The more complex the mechanism, the more secure your safe will be.
* Camouflage is Your Friend: The better you camouflage your safe, the less likely it is that someone will find it.
* Consider the Weight: Cardboard can only hold so much weight. Don’t overload your safe with heavy items.
* Safety First: Always use caution when using sharp tools like craft knives and box cutters.
Alternative Ideas for Locking Mechanisms
* Key and Lock System: You can adapt a small padlock and key system to work with your cardboard safe. Create a hasp out of cardboard and attach it to the door and the main body.
* Sliding Bolt: A simple sliding bolt mechanism can be created using cardboard and a small piece of dowel rod or even a sturdy straw.
* Combination Dial: Similar to the rotating combination lock, but using a dial with numbers or symbols that need to be aligned correctly.
Troubleshooting
* Door Won’t Close Properly: Check the alignment of the hinges and the locking mechanism. You may need to adjust the hinges or sand down the edges of the door.
* Lock
Conclusion
So, there you have it! Creating your own DIY cardboard safe isn’t just a fun project; it’s a surprisingly effective way to secure small valuables, teach children about responsibility and security, or simply satisfy your inner maker. We’ve walked you through the steps, highlighting the simplicity and adaptability of this ingenious craft. But why should you actually try it?
Firstly, the sheer satisfaction of building something functional from readily available materials is incredibly rewarding. In a world of mass-produced items, crafting your own safe provides a tangible connection to the creative process. You’re not just consuming; you’re creating.
Secondly, the DIY cardboard safe offers a customizable security solution. Unlike store-bought safes, you can tailor the size, locking mechanism, and even the aesthetic design to perfectly suit your needs. Need a small safe for jewelry? No problem. Want a larger one for important documents? Easily done. The possibilities are limited only by your imagination.
Thirdly, this project is an excellent educational tool. Building a DIY cardboard safe with children teaches them about problem-solving, spatial reasoning, and the importance of protecting valuables. It’s a hands-on lesson in engineering and security, disguised as a fun activity.
But the benefits don’t stop there. Consider these variations to elevate your DIY cardboard safe:
* Camouflage Masterpiece: Decorate your safe to blend seamlessly with its surroundings. Use paint, wallpaper scraps, or even old book covers to disguise it as something ordinary. A safe disguised as a stack of books is far less likely to attract attention.
* Advanced Locking Mechanisms: Experiment with more complex locking systems. Incorporate combination locks, magnetic latches, or even simple electronic components for added security.
* Reinforced Construction: Use multiple layers of cardboard, glue, and even thin sheets of metal or wood to reinforce the safe’s structure. This will make it more resistant to tampering and forced entry.
* Hidden Compartments: Add secret compartments within the safe to conceal particularly valuable items. This adds an extra layer of security and intrigue.
* Personalized Design: Let your creativity shine! Paint it, decoupage it, or add embellishments to make it a unique piece of art.
Ultimately, the DIY cardboard safe is more than just a craft project; it’s a statement. It’s a statement about resourcefulness, creativity, and the power of DIY. It’s a reminder that you don’t need expensive equipment or specialized skills to create something useful and meaningful.
So, we encourage you to give it a try! Gather your cardboard, grab your glue, and unleash your inner engineer. We’re confident that you’ll be surprised by the results. And most importantly, we want to hear about your experience. Share your photos, tips, and variations with us. Let’s build a community of DIY safe builders and inspire others to embrace the joy of creating. What are you waiting for? Start building your DIY cardboard safe today!
Frequently Asked Questions (FAQ)
Is a DIY cardboard safe really secure?
While a DIY cardboard safe won’t replace a professional-grade steel safe, it offers a surprising level of security for small, non-critical valuables. Its effectiveness lies in its ability to deter casual theft and provide a hidden storage solution. Think of it as a first line of defense, not an impenetrable fortress. The security level largely depends on the complexity of the locking mechanism and the overall construction. A simple latch will be less secure than a combination lock or a reinforced design. The key is to make it less appealing and more difficult to access than other readily available items. Remember, the goal is often to deter opportunistic thieves, not professional burglars.
What kind of cardboard should I use?
The best type of cardboard for a DIY cardboard safe is corrugated cardboard, the kind used for shipping boxes. This type of cardboard is strong and durable, providing a solid foundation for your safe. The thicker the cardboard, the better. Avoid using thin cardboard like cereal boxes, as it won’t offer much security. If you have access to double-walled corrugated cardboard, that’s even better. You can often find free cardboard boxes at grocery stores, retail stores, or recycling centers. Just make sure the cardboard is clean and dry before you start building.
What’s the best type of glue to use?
For a strong and durable DIY cardboard safe, use a strong adhesive like hot glue, wood glue, or construction adhesive. Hot glue is quick and easy to use, but it may not be as strong as other options. Wood glue provides a very strong bond but takes longer to dry. Construction adhesive is the strongest option but can be messy to work with. Whichever glue you choose, make sure to apply it liberally and allow it to dry completely before moving on to the next step. Consider using clamps or weights to hold the cardboard pieces together while the glue dries.
How can I make my DIY cardboard safe more fire-resistant?
Cardboard is inherently flammable, so a DIY cardboard safe will not be fireproof. However, you can take steps to make it more fire-resistant. Consider lining the inside of the safe with fire-resistant materials like aluminum foil, drywall, or even a fire-resistant blanket. You can also apply a fire-retardant spray to the cardboard. However, remember that these measures will only provide limited protection in a fire. It’s always best to store important documents and valuables in a fireproof safe or safety deposit box.
Can I add a combination lock to my DIY cardboard safe?
Yes, you can definitely add a combination lock to your DIY cardboard safe for added security. You can purchase small combination locks at most hardware stores or online retailers. To install the lock, you’ll need to cut a hole in the cardboard for the lock’s hasp and secure the lock to the safe using screws or glue. Make sure the lock is properly aligned and that the combination is easy to remember. You can also use a cam lock, which is a type of lock that rotates to secure the door.
How can I camouflage my DIY cardboard safe?
Camouflaging your DIY cardboard safe is a great way to deter thieves. You can disguise it as a book, a box of old papers, or even a piece of furniture. Use paint, wallpaper, or fabric to blend the safe with its surroundings. You can also add details like fake labels or titles to make it look more convincing. The key is to make it look like something ordinary and unremarkable. Think about where you’re going to place the safe and what items are nearby. The more seamlessly it blends in, the less likely it is to attract attention.
How do I reinforce the cardboard to make it stronger?
There are several ways to reinforce your DIY cardboard safe. You can use multiple layers of cardboard, glue, and even thin sheets of metal or wood. Adding extra layers of cardboard to the corners and edges will make the safe more resistant to impact. You can also use metal brackets or corner protectors to reinforce the corners. Another option is to wrap the safe in duct tape or packing tape. This will add an extra layer of protection and make it more difficult to break into.
What if I mess up during construction?
Don’t worry if you make a mistake while building your DIY cardboard safe. Cardboard is a forgiving material, and you can easily fix most errors. If you cut a piece of cardboard too short, you can simply glue another piece to it. If you make a hole in the wrong place, you can patch it with cardboard and glue. The most important thing is to be patient and take your time. Remember, this is a DIY project, so it’s okay if it’s not perfect. The goal is to have fun and create something useful.
How do I share my DIY cardboard safe creation?
We would love to see your DIY cardboard safe creations! Share photos and videos of your finished safe on social media using relevant hashtags like #DIYsafe, #cardboardcraft, #DIYsecurity, and #homemade. You can also share your tips and variations in the comments section of this article. We’re always looking for new ideas and inspiration. By sharing your creations, you can inspire others to embrace the joy of DIY and create their own unique security solutions.

Leave a Comment