

DIY cocoa powder dry shampoo: Tired of greasy hair ruining your day? I know I am! And let’s be honest, constantly washing your hair isn’t exactly the best for its health, or your busy schedule. That’s where the magic of dry shampoo comes in. But have you ever looked at the ingredient list of those store-bought options? Yikes! That’s why I’m so excited to share this super simple, all-natural, and surprisingly effective DIY trick with you.
Dry shampoo has been around for ages, with historical accounts suggesting people used things like clay and starches to absorb oil from their hair centuries ago. Think of it as a beauty secret passed down through generations, now getting a modern, eco-friendly twist. This particular hack, using cocoa powder, not only soaks up excess oil but also adds a subtle, delicious scent and a touch of color, making it perfect for brunettes.
Why do you need this DIY cocoa powder dry shampoo in your life? Because it’s a game-changer! It’s cost-effective, customizable, and avoids harsh chemicals. Plus, it’s incredibly easy to make with ingredients you probably already have in your pantry. Say goodbye to bad hair days and hello to fresh, voluminous locks with this simple, natural solution. Let’s get started!
DIY Cocoa Powder Dry Shampoo: Say Goodbye to Oily Hair!
Hey there, fellow DIY enthusiasts! Are you tired of shelling out big bucks for dry shampoo, only to find it leaves a weird white cast or doesn’t quite do the trick? Well, I’ve got a fantastic solution for you: homemade cocoa powder dry shampoo! It’s cheap, effective, smells amazing, and is perfect for brunettes (and even works for some lighter hair colors with a little tweaking!). Let’s dive in!
Why Cocoa Powder?
You might be thinking, “Cocoa powder? Really?” Trust me on this one! Cocoa powder is a natural absorbent, meaning it soaks up excess oil from your scalp. Plus, the dark color blends seamlessly with brown hair, eliminating that dreaded white residue that plagues so many commercial dry shampoos. And the best part? It smells like chocolate! Who wouldn’t want that?
What You’ll Need
Before we get started, let’s gather our supplies. This is a super simple recipe, so you probably already have most of these items on hand.
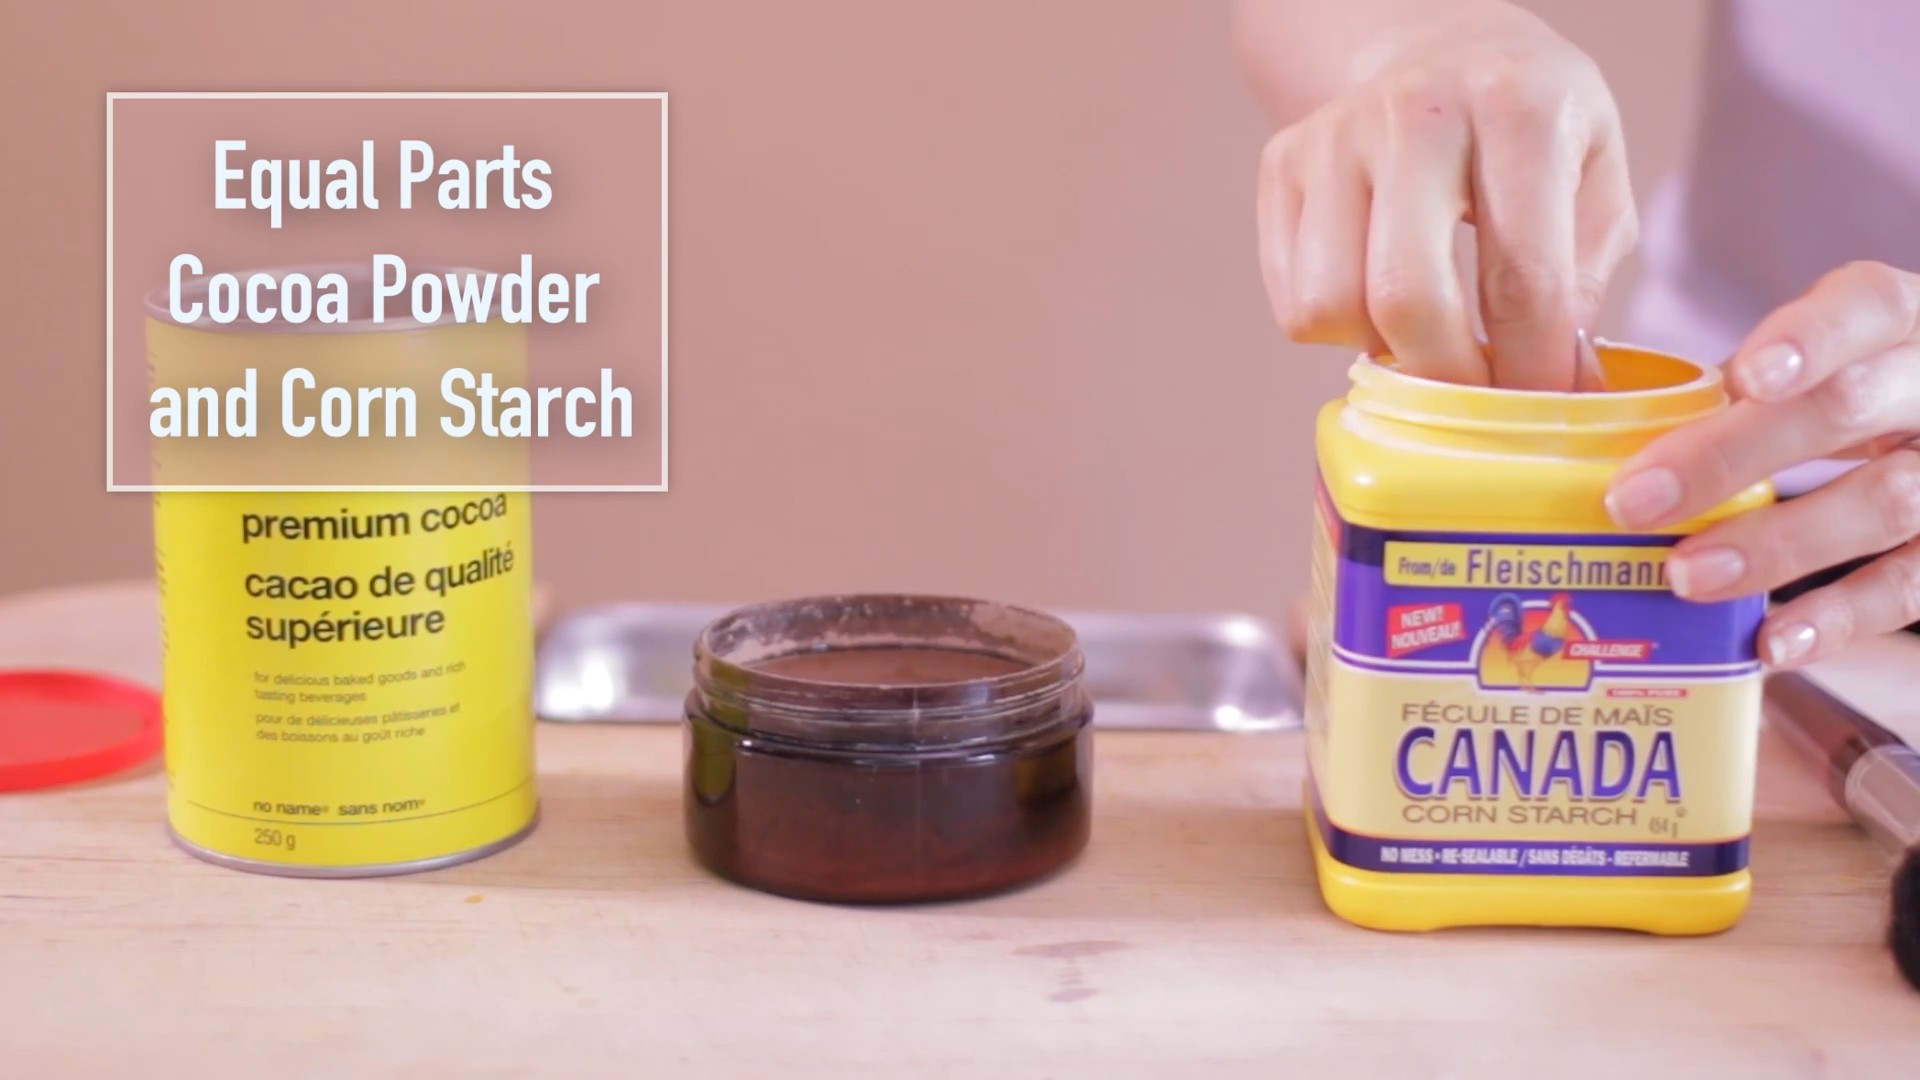
* Cocoa Powder: Unsweetened cocoa powder is the star of the show. Make sure it’s pure cocoa powder and not a hot chocolate mix.
* Cornstarch or Arrowroot Powder (Optional): This helps to further absorb oil and can lighten the mixture if you have lighter brown hair.
* Essential Oil (Optional): A few drops of your favorite essential oil can add a lovely scent and some beneficial properties. Lavender, rosemary, and peppermint are all great choices.
* Small Bowl or Container: For mixing the ingredients.
* Makeup Brush or Powder Brush: A large, fluffy brush is perfect for applying the dry shampoo to your roots.
* Small Container for Storage: An empty spice jar, a small container with a lid, or even a repurposed makeup container will work.
Mixing Your Cocoa Powder Dry Shampoo
This is where the magic happens! The exact ratios will depend on your hair color and how oily your hair tends to get. Don’t be afraid to experiment to find what works best for you.
1. Start with Cocoa Powder: Place 2 tablespoons of cocoa powder in your mixing bowl. This is the base of our dry shampoo.
2. Add Cornstarch/Arrowroot Powder (Optional): If you have lighter brown hair or want extra oil absorption, add 1-2 tablespoons of cornstarch or arrowroot powder. Start with a smaller amount and add more as needed to achieve the desired color. For very dark brown or black hair, you might want to skip this step altogether.
3. Incorporate Essential Oil (Optional): If you’re using essential oil, add 2-3 drops to the mixture. Be careful not to add too much, as it can make your hair greasy. I personally love lavender for its calming scent and rosemary for its potential hair growth benefits.
4. Mix Thoroughly: Use a spoon or whisk to combine all the ingredients until they are evenly distributed. Make sure there are no clumps of cocoa powder or cornstarch.
5. Test the Color: Before applying the dry shampoo to your entire head, test it on a small, inconspicuous section of your hair. This will help you determine if the color is a good match and if you need to adjust the ratio of cocoa powder to cornstarch.
6. Adjust as Needed: If the mixture is too dark, add more cornstarch. If it’s too light, add more cocoa powder. Keep mixing and adjusting until you achieve the perfect shade for your hair.
7. Transfer to Storage Container: Once you’re happy with the mixture, transfer it to your storage container. Make sure the container is airtight to prevent the dry shampoo from clumping or absorbing moisture.
Applying Your Cocoa Powder Dry Shampoo
Now for the fun part: actually using your homemade dry shampoo! This is a super easy process, but it’s important to apply it correctly to avoid any cocoa powder mishaps.
1. Section Your Hair: Use your fingers or a comb to section your hair, focusing on the areas that tend to get the oiliest, usually around your hairline and part.
2. Dip Your Brush: Dip your makeup brush or powder brush into the cocoa powder mixture. Tap off any excess powder to prevent clumps.
3. Apply to Roots: Gently dab the brush onto your roots, focusing on the oiliest areas. You can also use your fingers to apply the dry shampoo directly to your roots.
4. Massage In: Use your fingertips to massage the cocoa powder into your scalp. This will help to distribute the powder evenly and absorb the oil.
5. Brush Through: Once you’ve applied the dry shampoo to all the oily areas, use a clean brush to brush through your hair. This will help to remove any excess powder and blend the dry shampoo with your natural hair color.
6. Style as Usual: Style your hair as you normally would. You should notice that your hair looks and feels cleaner and less oily.
Tips and Tricks for Cocoa Powder Dry Shampoo Success
Here are a few extra tips and tricks to help you get the most out of your homemade cocoa powder dry shampoo:
* Start Small: It’s always better to start with a small amount of dry shampoo and add more as needed. Overdoing it can leave your hair looking dull and weighed down.
* Apply at Night: For best results, apply your dry shampoo before bed. This will give the cocoa powder plenty of time to absorb the oil overnight.
* Use a Dark Pillowcase: If you’re applying dry shampoo at night, consider using a dark pillowcase to avoid any cocoa powder transfer.
* Experiment with Ingredients: Don’t be afraid to experiment with different ingredients to find what works best for your hair. You can try adding a pinch of cinnamon for a warm, spicy scent or a few drops of tea tree oil for its antibacterial properties.
* Clean Your Brush Regularly: To prevent buildup and bacteria, clean your makeup brush or powder brush regularly with soap and water.
* Avoid Overuse: While dry shampoo is a great way to extend the time between washes, it’s important not to overuse it. Overusing dry shampoo can dry out your scalp and lead to buildup. Aim to wash your hair at least once or twice a week.
* For Lighter Hair: If you have blonde or light brown hair, cocoa powder alone might be too dark. Try using a mixture of mostly cornstarch or arrowroot powder with just a touch of cocoa powder for color. You can also try adding a bit of cinnamon or nutmeg for a warmer tone.
* Dealing with Residue: If you notice any cocoa powder residue, try using a hairdryer on a cool setting to blow it away. You can also use a clean, dry towel to gently rub your scalp and remove any excess powder.
* Consider Your Scalp Health: If you have a sensitive scalp, be mindful of the ingredients you use. Avoid essential oils that might irritate your skin and always do a patch test before applying the dry shampoo to your entire head.
* Storage is Key: Make sure your dry shampoo is stored in an airtight container in a cool, dry place. This will help to prevent clumping and keep it fresh for longer.
Troubleshooting
Sometimes, things don’t go exactly as planned. Here are some common issues you might encounter and how to fix them:
* Hair Looks Dull: This usually means you’ve used too much dry shampoo. Try brushing through your hair thoroughly to remove any excess powder. You can also use a hairdryer on a cool setting to blow away any residue.
* Hair Feels Gritty: This could be due to clumping or using too much cornstarch. Make sure your mixture is well combined and that you’re not using too much powder.
* Scalp is Itchy: This could be a sign of irritation from an ingredient. Try switching to a different essential oil or using a gentler base powder like arrowroot powder.
* Dry Shampoo Doesn’t Seem to Work: This could be due to using too little dry shampoo or not applying it correctly. Make sure you’re focusing on the oiliest areas and massaging the powder into your scalp. You might also need to experiment with the ratio of cocoa powder to cornstarch to find what works best for your hair.
Final Thoughts
Making your own cocoa powder dry shampoo is a simple, affordable, and effective way to keep your hair looking fresh and clean between washes. It’s also a great way to reduce your reliance on commercial products and use more natural ingredients. So, give it a try and see for yourself! I’m confident you’ll love the results. Happy DIY-ing!
Conclusion
So, there you have it! Ditching those expensive, chemical-laden dry shampoos and embracing the power of a simple, effective, and all-natural DIY cocoa powder dry shampoo is a game-changer for your hair and your wallet. We’ve walked you through the easy steps, highlighted the benefits, and addressed potential concerns. But why is this DIY trick truly a must-try?
Firstly, it’s incredibly gentle on your scalp. Commercial dry shampoos often contain harsh chemicals that can irritate sensitive skin, leading to dryness, itching, and even dandruff. Our cocoa powder version, on the other hand, uses natural ingredients that are less likely to cause adverse reactions. The cocoa powder itself absorbs excess oil without stripping your hair of its natural moisture.
Secondly, it’s customizable! The beauty of DIY is that you can tailor it to your specific needs and preferences. If you have very light hair, consider adding a touch of cornstarch or arrowroot powder to lighten the mixture. For a more luxurious scent, a few drops of your favorite essential oil (lavender, rosemary, or peppermint are excellent choices) can be incorporated. Experiment and find the perfect blend that works for you.
Thirdly, it’s eco-friendly. By making your own dry shampoo, you’re reducing your reliance on aerosol cans and plastic bottles, contributing to a more sustainable lifestyle. Plus, you know exactly what’s going into your hair, avoiding potentially harmful chemicals that can pollute the environment.
Fourthly, it’s cost-effective. A small container of cocoa powder can last for months, making this DIY solution significantly cheaper than buying commercial dry shampoo regularly. Think of all the money you’ll save!
Finally, and perhaps most importantly, it works! The cocoa powder effectively absorbs excess oil, leaving your hair feeling clean, refreshed, and voluminous. It’s a quick and easy way to extend the time between washes, saving you time and effort in your daily routine.
We encourage you to give this DIY cocoa powder dry shampoo a try. It’s a simple, effective, and affordable way to keep your hair looking its best. Don’t be afraid to experiment with different variations to find the perfect formula for your hair type and color.
Once you’ve tried it, we’d love to hear about your experience! Share your tips, tricks, and variations in the comments below. Let’s build a community of DIY enthusiasts who are passionate about natural hair care. What worked for you? What didn’t? What unique twists did you add? Your feedback is invaluable and can help others discover the magic of this simple yet effective DIY solution. So go ahead, give it a whirl, and let us know what you think! You might just find your new favorite hair care secret.
Frequently Asked Questions (FAQ)
Q: Will cocoa powder dry shampoo work on all hair colors?
A: While cocoa powder dry shampoo works best on dark brown to black hair, it can be adapted for lighter shades. For blonde or light brown hair, mix the cocoa powder with a larger proportion of cornstarch, arrowroot powder, or even a bit of cinnamon. Start with a small amount of cocoa powder and gradually increase it until you achieve the desired color match. Always test a small, inconspicuous area first to ensure it blends well. If you’re still concerned about the color, consider using a tinted dry shampoo powder specifically designed for lighter hair colors, or even a clear dry shampoo alternative.
Q: How often can I use DIY cocoa powder dry shampoo?
A: You can use DIY cocoa powder dry shampoo as often as needed to refresh your hair between washes. However, it’s important not to overuse it, as excessive application can lead to buildup on the scalp. We recommend using it no more than two or three times per week. If you notice any dryness or irritation, reduce the frequency of use. Remember to thoroughly wash your hair with shampoo and water regularly to remove any accumulated product and maintain a healthy scalp.
Q: Can I use any type of cocoa powder?
A: It’s best to use unsweetened, 100% cocoa powder for this DIY recipe. Sweetened cocoa powder may contain added sugars or other ingredients that can make your hair sticky or attract dirt. Unsweetened cocoa powder provides the best oil absorption and a natural, matte finish. Look for high-quality cocoa powder for the best results.
Q: How do I apply the dry shampoo evenly?
A: Even application is key to avoiding dark spots or streaks. Use a makeup brush (a large powder brush or a blush brush works well) to apply the dry shampoo to your roots. Dip the brush lightly into the powder, tap off any excess, and then gently dab it onto your scalp, focusing on the oiliest areas. You can also use a salt shaker or a repurposed spice container to sprinkle the powder onto your roots. After applying, use your fingertips to massage the powder into your scalp and distribute it evenly. Brush your hair thoroughly to remove any excess powder and blend it in.
Q: What if I accidentally use too much cocoa powder?
A: Don’t panic! If you accidentally apply too much cocoa powder, simply use a clean towel or brush to remove the excess. You can also use a hairdryer on a cool setting to blow away any remaining powder. If your hair still looks too dark, try brushing it thoroughly or using a slightly damp towel to wipe away the excess.
Q: How should I store the DIY cocoa powder dry shampoo?
A: Store your DIY cocoa powder dry shampoo in an airtight container in a cool, dry place. This will prevent moisture from getting in and clumping the powder. A small jar, a repurposed spice container, or even a resealable bag will work well. Make sure the container is clean and dry before adding the dry shampoo.
Q: Can I add essential oils to the dry shampoo?
A: Yes, you can definitely add essential oils to your DIY cocoa powder dry shampoo for added fragrance and benefits. Lavender, rosemary, peppermint, and tea tree oil are all excellent choices. Add a few drops of your favorite essential oil to the powder and mix well. Start with a small amount and gradually increase it until you achieve the desired scent. Be sure to use high-quality, pure essential oils and avoid using any oils that you are allergic to.
Q: Is this dry shampoo safe for sensitive scalps?
A: DIY cocoa powder dry shampoo is generally safe for sensitive scalps, as it uses natural ingredients. However, it’s always a good idea to do a patch test before applying it to your entire scalp. Apply a small amount of the dry shampoo to a small area of your skin and wait 24 hours to see if any irritation occurs. If you experience any redness, itching, or burning, discontinue use. If you have a very sensitive scalp, you may want to consider using a fragrance-free version of the dry shampoo or consulting with a dermatologist before using it.
Q: How long does the DIY cocoa powder dry shampoo last?
A: When stored properly in an airtight container, DIY cocoa powder dry shampoo can last for several months. However, it’s best to use it within six months to ensure the ingredients are fresh and effective. Check the powder regularly for any signs of clumping or discoloration. If you notice any changes, discard the dry shampoo and make a fresh batch.
Q: Can I use this dry shampoo on freshly washed hair?
A: While dry shampoo is primarily designed for use on unwashed hair, you can use it on freshly washed hair to add volume and texture. Apply a small amount of the dry shampoo to your roots and massage it in. This will help to absorb any excess oil and create a more voluminous look. However, be careful not to overuse it, as it can make your hair feel stiff or heavy.


Leave a Comment