

Growing Cauliflower Step by Step can seem daunting, but trust me, it’s incredibly rewarding! Imagine harvesting your own crisp, white cauliflower head, knowing you nurtured it from a tiny seedling to a culinary masterpiece. For centuries, cauliflower has graced tables around the world, with evidence suggesting its cultivation dates back to ancient times in the Mediterranean. It’s a testament to human ingenuity that we’ve transformed this humble plant into the versatile vegetable we know and love today.
But let’s be honest, supermarket cauliflower can be expensive and sometimes lacks that fresh, vibrant flavor. That’s where this step-by-step guide comes in! I’m going to walk you through everything you need to know about growing cauliflower step by step, from choosing the right variety to protecting your precious crop from pests. Whether you’re a seasoned gardener or just starting out, these tips and tricks will help you achieve a bountiful harvest. Get ready to impress your friends and family with your homegrown cauliflower – it’s easier than you think!
Growing Cauliflower: A Step-by-Step Guide for the Home Gardener
Hey there, fellow gardening enthusiasts! So, you’re thinking about growing cauliflower? Awesome! It might seem a little intimidating at first, but trust me, with a little planning and patience, you can absolutely grow beautiful, delicious cauliflower right in your own backyard. I’ve been growing cauliflower for a few years now, and I’m excited to share my tips and tricks with you. Let’s get started!
Planning is Key: Choosing the Right Variety and Timing
Before you even think about getting your hands dirty, it’s crucial to do a little planning. Cauliflower can be a bit picky about the weather, so choosing the right variety and planting time is essential for success.
* Variety Selection: There are tons of cauliflower varieties out there, each with its own unique characteristics. Some are better suited for warmer climates, while others thrive in cooler temperatures. Consider your local climate and growing season when making your choice. Some popular varieties include ‘Snowball Y Improved’ (a classic white cauliflower), ‘Graffiti’ (a stunning purple variety), and ‘Cheddar’ (a vibrant orange cauliflower). I personally love ‘Snowball Y Improved’ for its reliability and classic flavor.
* Timing is Everything: Cauliflower prefers cool weather, ideally between 60-70°F (15-21°C). In most regions, this means planting in either the spring or fall. For a spring crop, start your seeds indoors about 4-6 weeks before the last expected frost. For a fall crop, start your seeds indoors in mid-summer. I usually start my fall crop in late July or early August, depending on when the first frost typically hits my area.
* Sunlight Needs: Cauliflower needs at least 6 hours of direct sunlight per day. Choose a location in your garden that gets plenty of sun.
* Soil Preparation: Cauliflower loves rich, well-drained soil with a pH between 6.0 and 7.0. Before planting, amend your soil with plenty of compost or well-rotted manure. This will provide the nutrients your cauliflower needs to thrive. I also like to add a little bit of bone meal to the soil, as it helps promote strong root growth.
Starting Your Cauliflower Seeds (Indoors or Outdoors)
You have two options for starting your cauliflower: indoors or directly in the garden. I usually prefer to start my seeds indoors, as it gives me more control over the growing environment and allows me to get a head start on the season.
* Starting Seeds Indoors:
* Materials: Seed starting trays or pots, seed starting mix, cauliflower seeds, a spray bottle, and a grow light (optional).
* Instructions:
1. Fill your seed starting trays or pots with seed starting mix.
2. Moisten the mix with a spray bottle. You want it to be damp, but not soggy.
3. Sow 2-3 cauliflower seeds per cell or pot, about ¼ inch deep.
4. Gently cover the seeds with more seed starting mix.
5. Water the seeds gently with a spray bottle.
6. Place the trays or pots in a warm location (around 70-75°F or 21-24°C). A heat mat can be helpful for maintaining a consistent temperature.
7. If you’re using a grow light, position it a few inches above the seedlings.
8. Keep the soil consistently moist, but not waterlogged.
9. Once the seedlings emerge (usually within 5-10 days), thin them to one seedling per cell or pot. Choose the strongest, healthiest-looking seedling.
10. Harden off the seedlings before transplanting them outdoors. This means gradually exposing them to outdoor conditions over a period of 7-10 days. Start by placing them in a sheltered location for a few hours each day, gradually increasing the amount of time they spend outdoors.
* Direct Sowing (Outdoors):
* Instructions:
1. Prepare your garden bed by amending the soil with compost or well-rotted manure.
2. Sow the cauliflower seeds directly into the soil, about ¼ inch deep and 18-24 inches apart.
3. Water the seeds gently.
4. Keep the soil consistently moist until the seedlings emerge.
5. Once the seedlings are a few inches tall, thin them to one plant every 18-24 inches.
Transplanting Your Cauliflower Seedlings
Once your seedlings have developed a few sets of true leaves and the weather is right (cool and frost-free), it’s time to transplant them into the garden.
1. Prepare the Planting Area: Choose a sunny location with well-drained soil. Amend the soil with compost or well-rotted manure.
2. Dig Holes: Dig holes that are slightly larger than the root balls of your seedlings, spacing them 18-24 inches apart.
3. Carefully Remove Seedlings: Gently remove the seedlings from their trays or pots, being careful not to damage the roots.
4. Place Seedlings in Holes: Place each seedling in a hole, making sure the top of the root ball is level with the soil surface.
5. Fill Holes and Water: Fill the holes with soil and gently firm the soil around the base of the plants. Water thoroughly.
6. Mulch: Apply a layer of mulch around the plants to help retain moisture, suppress weeds, and regulate soil temperature. I like to use straw or shredded leaves.
Caring for Your Cauliflower Plants
Now that your cauliflower plants are in the ground, it’s important to provide them with the care they need to thrive.
* Watering: Cauliflower needs consistent moisture, especially during head formation. Water deeply and regularly, especially during dry spells. Aim for about 1-1.5 inches of water per week.
* Fertilizing: Cauliflower is a heavy feeder, so it needs plenty of nutrients. Fertilize your plants every 2-3 weeks with a balanced fertilizer or a fertilizer specifically formulated for vegetables. I like to use a liquid fertilizer, as it’s easy to apply and quickly absorbed by the plants.
* Weeding: Keep the area around your cauliflower plants free of weeds. Weeds compete with the cauliflower for water and nutrients.
* Pest Control: Cauliflower can be susceptible to a variety of pests, including cabbage worms, aphids, and flea beetles. Inspect your plants regularly for signs of pests and take action as needed. I prefer to use organic pest control methods whenever possible, such as hand-picking pests, using insecticidal soap, or applying Bacillus thuringiensis (Bt).
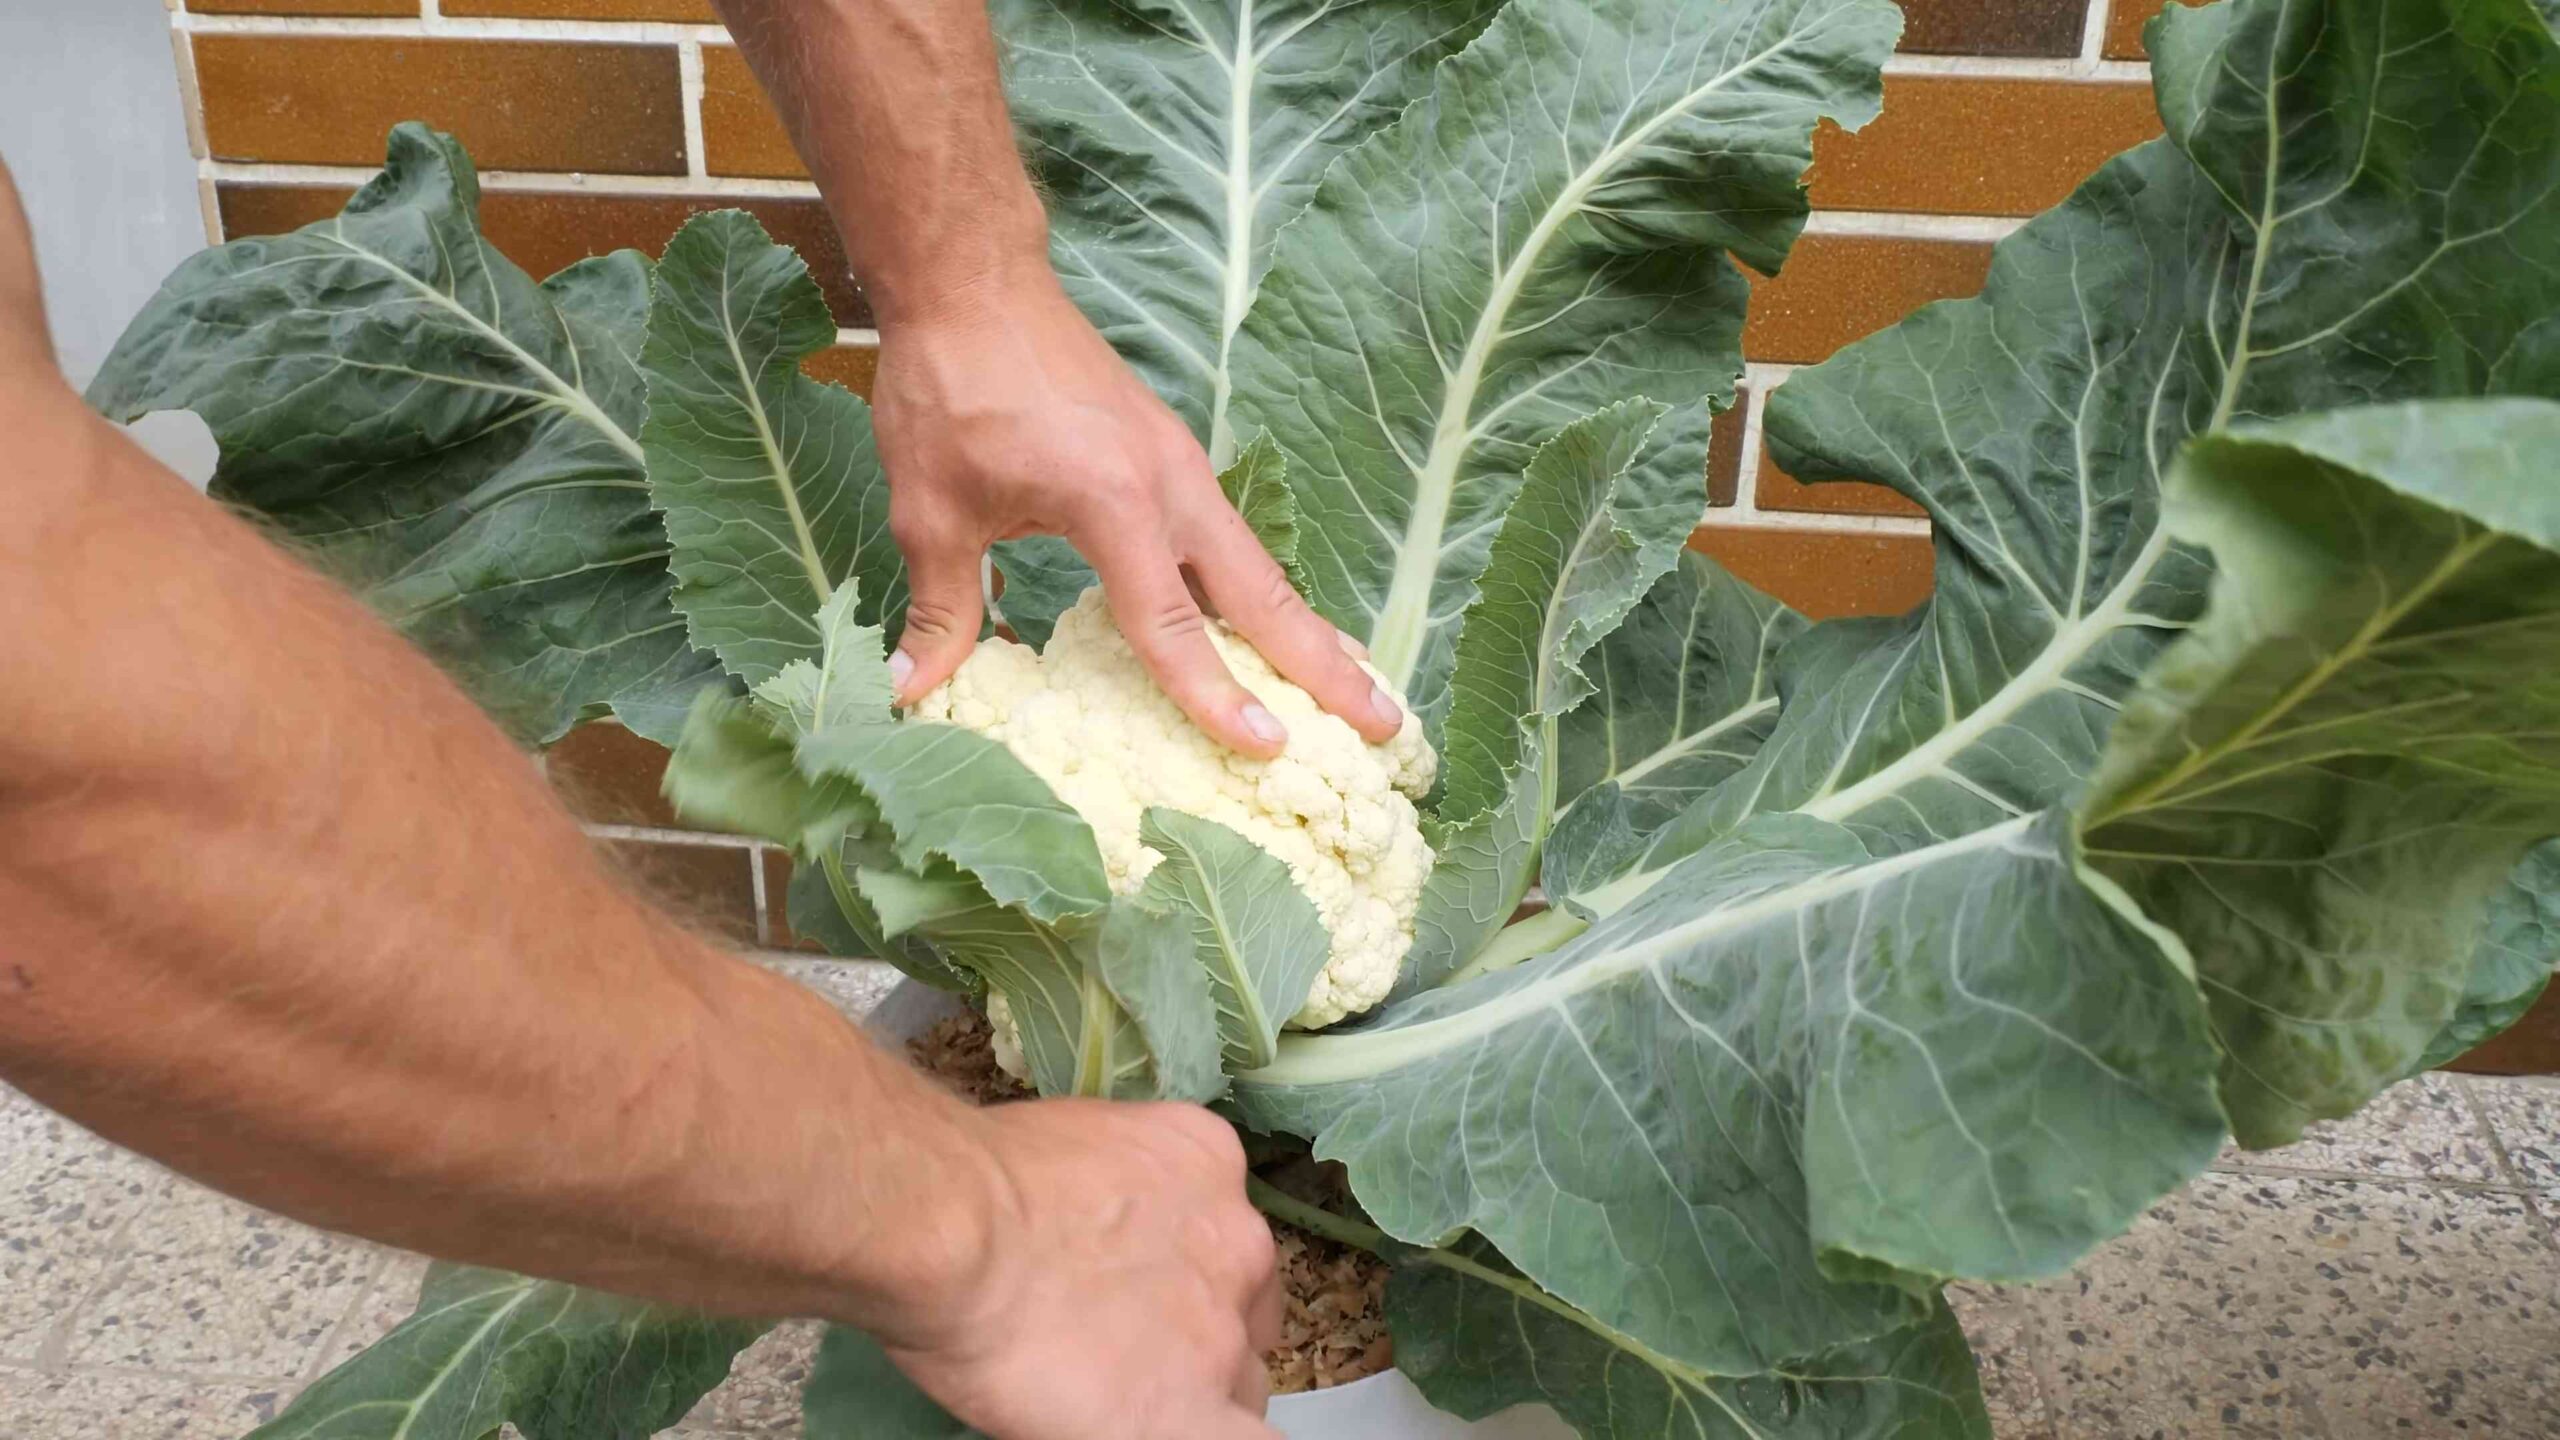
* Blanching (for White Varieties): If you’re growing a white cauliflower variety, you’ll need to blanch the head to keep it white. Blanching involves covering the developing head with the plant’s leaves to protect it from sunlight. When the head is about 2-3 inches in diameter, tie the outer leaves together over the head with twine or rubber bands. Check the head regularly and harvest it when it reaches the desired size.
Harvesting Your Cauliflower
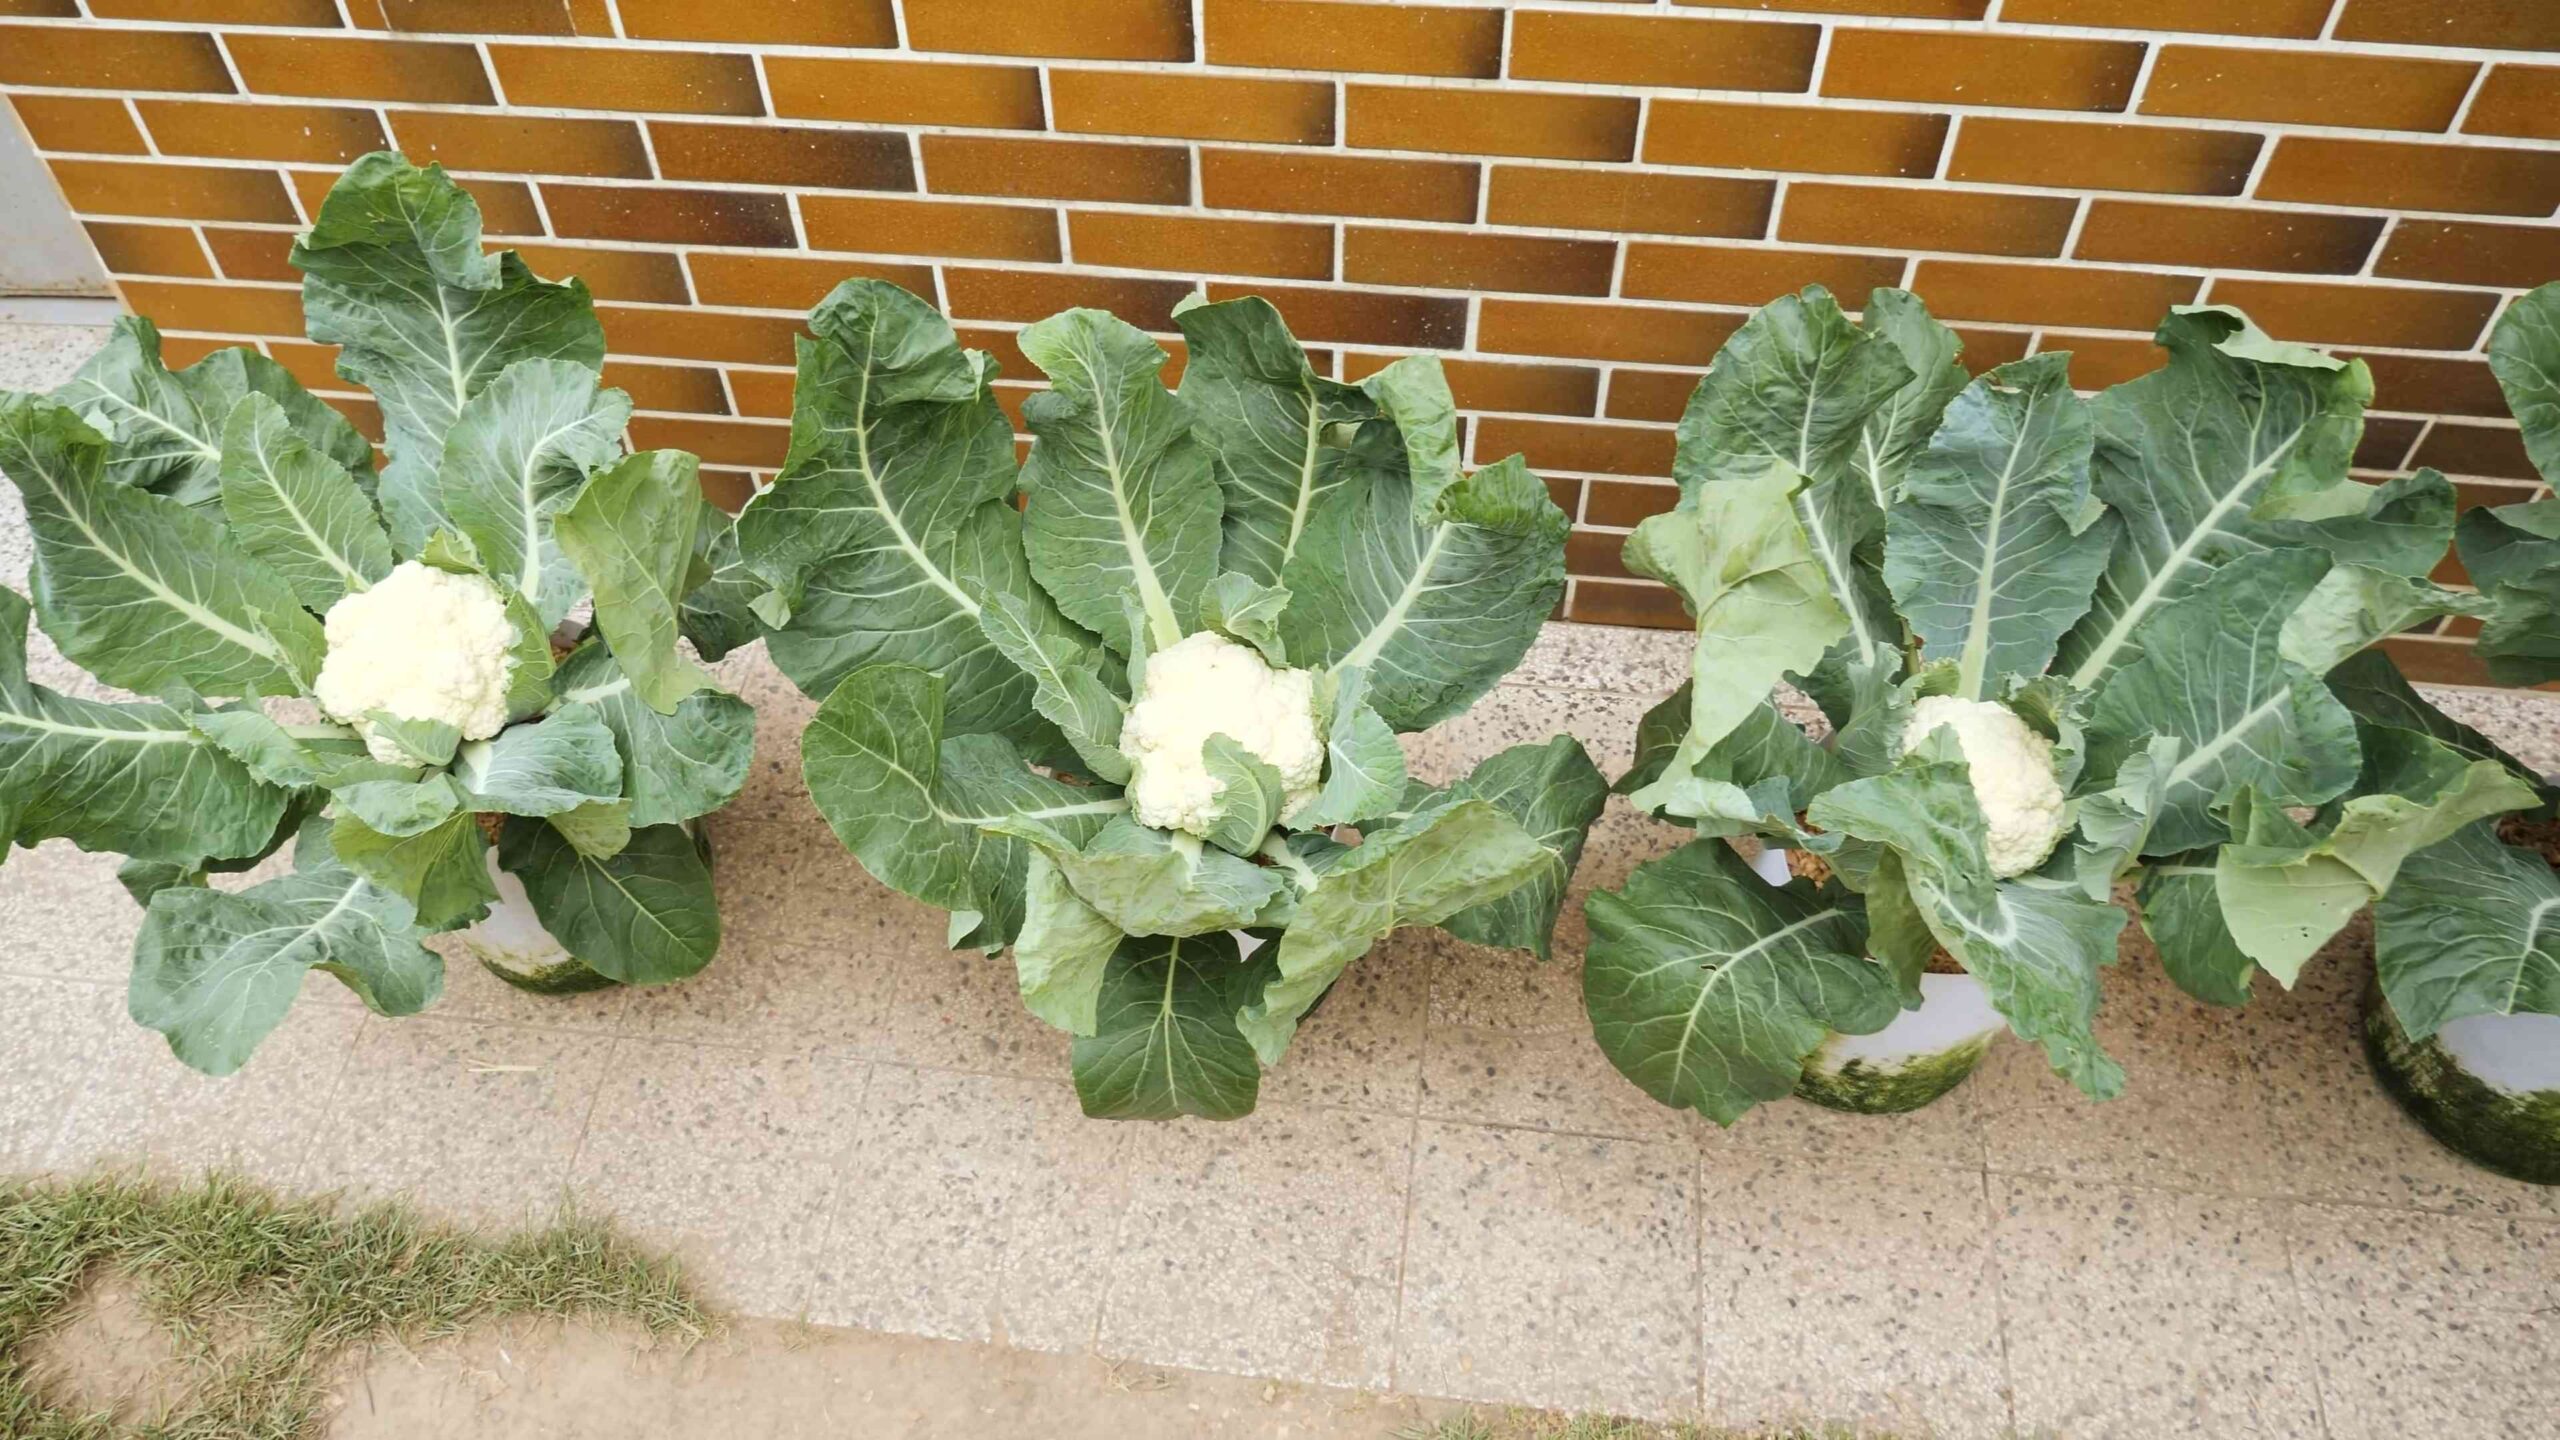
Harvest time is the most rewarding part of growing cauliflower! You’ll know your cauliflower is ready to harvest when the head is firm, compact, and reaches the desired size (usually 6-8 inches in diameter).
1. Cut the Head: Use a sharp knife to cut the head from the plant, leaving a few leaves attached to protect the head.
2. Store Properly: Store your harvested cauliflower in the refrigerator for up to a week.
Troubleshooting Common Cauliflower Problems
Even with the best planning and care, you might encounter some problems while growing cauliflower. Here are a few common issues and how to address them:
* Buttoning: This occurs when the cauliflower head forms prematurely and remains small. It’s often caused by stress, such as temperature fluctuations, lack of water, or nutrient deficiencies. To prevent buttoning, provide your plants with consistent care and avoid stressing them.
* Ricey Heads: This is when the cauliflower head develops a loose, grainy texture. It’s often caused by hot weather or inconsistent watering. To prevent ricey heads, choose heat-tolerant varieties and provide your plants with consistent moisture.
* Pest Infestations: As mentioned earlier, cauliflower can be susceptible to a variety of pests. Inspect your plants regularly and take action as needed.
Enjoying Your Homegrown Cauliflower
Congratulations! You’ve successfully grown your own cauliflower. Now it’s time to enjoy the fruits (or rather, vegetables) of your labor. Cauliflower is incredibly versatile and can be used in a variety of dishes. You can roast it, steam it, boil it, mash it, or even eat it raw. I personally love roasting cauliflower with a little olive oil, salt, and pepper. It’s a simple but delicious way to enjoy this nutritious vegetable.
So, there
Conclusion
So, there you have it! Growing cauliflower at home, while it might seem intimidating at first, is a deeply rewarding experience. From carefully nurturing those tiny seedlings to harvesting a beautiful, creamy head of cauliflower, the entire process connects you to the food you eat in a profound way. This step-by-step guide provides you with the knowledge and confidence to embark on your own cauliflower-growing adventure.
But why is this DIY trick a must-try? Beyond the satisfaction of growing your own food, consider the superior flavor and freshness you’ll enjoy. Store-bought cauliflower simply can’t compare to the vibrant taste of a head harvested straight from your garden. Plus, you have complete control over the growing process, ensuring that your cauliflower is free from unwanted pesticides and chemicals. You’re not just growing cauliflower; you’re cultivating a healthier, more sustainable lifestyle.
And the possibilities don’t end there! Once you’ve mastered the basics, you can experiment with different cauliflower varieties. Try growing purple cauliflower for a visually stunning addition to your meals, or Romanesco cauliflower with its unique fractal pattern. You can also explore different planting times to extend your harvest season. Consider companion planting with herbs like rosemary and thyme to deter pests and enhance the flavor of your cauliflower.
Don’t be afraid to get your hands dirty and embrace the challenges that come with gardening. Every mistake is a learning opportunity, and every successful harvest is a triumph. Growing your own cauliflower is not just about the end product; it’s about the journey, the connection to nature, and the satisfaction of creating something beautiful and delicious with your own two hands.
We wholeheartedly encourage you to try this DIY trick and experience the joy of growing your own cauliflower. Share your experiences with us! Let us know what varieties you’ve tried, what challenges you’ve faced, and what successes you’ve celebrated. Your insights can help other aspiring gardeners on their own cauliflower-growing journeys. Post pictures of your cauliflower creations on social media and tag us! We can’t wait to see what you grow. Remember, the best cauliflower is the cauliflower you grow yourself!
Frequently Asked Questions (FAQ)
What is the best time of year to plant cauliflower?
The best time to plant cauliflower depends on your climate. Cauliflower thrives in cool weather, so it’s generally best to plant it in the spring or fall. For a spring crop, start seeds indoors 6-8 weeks before the last expected frost. Transplant seedlings outdoors 2-3 weeks before the last frost. For a fall crop, start seeds indoors in mid-summer and transplant seedlings outdoors in late summer or early fall. The goal is to have the cauliflower mature during cool weather, as high temperatures can cause the heads to become loose and bitter.
How much sunlight does cauliflower need?
Cauliflower needs at least 6 hours of direct sunlight per day to thrive. Choose a planting location that receives plenty of sunlight throughout the day. If you live in a particularly hot climate, some afternoon shade can be beneficial to prevent the plants from overheating.
What kind of soil is best for growing cauliflower?
Cauliflower prefers well-drained, fertile soil that is rich in organic matter. The ideal soil pH is between 6.0 and 7.0. Before planting, amend the soil with compost or well-rotted manure to improve its fertility and drainage. You can also add a slow-release fertilizer to provide the plants with the nutrients they need.
How often should I water cauliflower?
Cauliflower needs consistent moisture to grow properly. Water deeply and regularly, especially during dry periods. Aim to keep the soil consistently moist but not waterlogged. A good rule of thumb is to water when the top inch of soil feels dry to the touch. Mulching around the plants can help to retain moisture and suppress weeds.
What are some common pests and diseases that affect cauliflower?
Cauliflower is susceptible to a variety of pests and diseases, including cabbage worms, aphids, flea beetles, clubroot, and black rot. Regularly inspect your plants for signs of pests or diseases. If you find any problems, take action immediately to prevent them from spreading. Organic pest control methods, such as using insecticidal soap or neem oil, can be effective for controlling many common pests. Crop rotation and choosing disease-resistant varieties can help to prevent diseases.
How do I know when my cauliflower is ready to harvest?
Cauliflower is ready to harvest when the head is firm, compact, and about 6-8 inches in diameter. The exact size will depend on the variety. The head should be white or the color specified for the variety you are growing. If the head starts to separate or become loose, it’s past its prime and should be harvested immediately. To harvest, cut the stem just below the head, leaving a few leaves attached to protect the head.
Can I grow cauliflower in containers?
Yes, you can grow cauliflower in containers, but you’ll need to choose a large container that is at least 12 inches in diameter and 12 inches deep. Use a high-quality potting mix and make sure the container has good drainage. Container-grown cauliflower will need to be watered more frequently than cauliflower grown in the ground.
Why is my cauliflower head turning yellow or brown?
There are several reasons why your cauliflower head might be turning yellow or brown. One common cause is sunscald, which occurs when the head is exposed to too much direct sunlight. To prevent sunscald, you can blanch the head by tying the outer leaves together over the head when it is about 2-3 inches in diameter. Another possible cause is disease, such as downy mildew or bacterial soft rot. If you suspect a disease, take action immediately to prevent it from spreading. Overwatering or underwatering can also cause the head to discolor.
My cauliflower plant is growing but not forming a head. What could be the problem?
There are several reasons why your cauliflower plant might not be forming a head. One common cause is insufficient sunlight. Cauliflower needs at least 6 hours of direct sunlight per day to form a head. Another possible cause is nutrient deficiency. Make sure your plants are getting enough nitrogen, phosphorus, and potassium. You can also try adding a fertilizer that is specifically formulated for vegetables. High temperatures can also prevent head formation. If the weather is consistently hot, try providing some afternoon shade for your plants. Finally, make sure you are growing a variety that is suited to your climate and growing season.
Can I freeze cauliflower?
Yes, you can freeze cauliflower, but it’s best to blanch it first to preserve its flavor and texture. To blanch cauliflower, cut it into florets and steam or boil them for 3-5 minutes. Then, immediately plunge the florets into ice water to stop the cooking process. Drain the florets thoroughly and spread them out on a baking sheet to freeze. Once they are frozen, transfer them to a freezer bag or container. Frozen cauliflower can be stored in the freezer for up to 12 months.
Leave a Comment