

DIY Fruit Crate Closet: Tired of staring at that overflowing pile of clothes, wishing for a stylish and affordable storage solution? I know the feeling! We’ve all been there, battling closet chaos and dreaming of a Pinterest-worthy organized space. But what if I told you the answer was hiding in plain sight, perhaps even stacked up at your local farmer’s market?
Fruit crates, those humble wooden containers that once cradled juicy apples and ripe peaches, are experiencing a serious upcycling renaissance. While their origins are rooted in the practical needs of agriculture, dating back centuries as a reliable method for transporting produce, they’ve now blossomed into a darling of the DIY world. Think of them as the building blocks of a charming, rustic, and utterly unique closet system.
Why a DIY fruit crate closet, you ask? Well, beyond the undeniable aesthetic appeal, it’s about reclaiming control over your space and your budget. Store-bought closet organizers can be expensive and often lack personality. This project allows you to customize your storage to perfectly fit your needs and style, all while giving discarded materials a new lease on life. Plus, it’s incredibly satisfying to create something beautiful and functional with your own two hands. So, ditch the clutter and embrace the charm – let’s transform those humble fruit crates into the closet of your dreams!
DIY Fruit Crate Closet: Rustic Charm Meets Organized Bliss
Okay, so you’re tired of clothes overflowing from your dresser drawers and your closet looking like a tornado hit it? I get it! I was there too. That’s why I decided to tackle this super fun and surprisingly practical DIY project: a fruit crate closet! It’s a fantastic way to add some rustic charm to your space while getting seriously organized. Plus, it’s budget-friendly, which is always a win in my book. Let’s dive in!
Gathering Your Supplies: The Treasure Hunt Begins
Before we start building our masterpiece, we need to gather our materials. Here’s what you’ll need:
* Fruit Crates: This is the star of the show! You can often find these at farmers’ markets, orchards, or even online. Look for sturdy crates in good condition. The number of crates you need will depend on the size of your closet and how much storage you want. I used 8 for my project, creating a decent-sized closet system.
* Sandpaper: We’ll need this to smooth out any rough edges and splinters on the crates. Trust me, you don’t want to snag your favorite sweater! I recommend a medium-grit sandpaper (around 120-grit) and a fine-grit sandpaper (around 220-grit).
* Wood Stain or Paint (Optional): If you want to customize the look of your crates, grab some wood stain or paint in your desired color. I went with a light stain to enhance the natural wood grain, but the possibilities are endless!
* Paintbrushes or Rags (If Staining/Painting): For applying your chosen finish. I prefer using rags for staining, as it gives a more even and natural look.
* Wood Screws: These will be used to securely attach the crates together. I recommend using screws that are about 1 1/4 inches long.
* Drill: A drill is essential for pre-drilling holes and driving in the screws.
* Drill Bits: You’ll need a drill bit slightly smaller than the diameter of your wood screws for pre-drilling.
* Measuring Tape: To ensure your crates are aligned and your closet is the right size.
* Level: This is crucial for making sure your closet is straight and stable.
* Safety Glasses: Protect your eyes from dust and debris while sanding and drilling.
* Work Gloves: To protect your hands.
* Optional:
* Polyurethane or Varnish: To seal and protect the stained or painted crates.
* Casters (Wheels): If you want to make your closet mobile.
* Shelf Liners: To protect the bottom of the crates and prevent items from slipping.
* Decorative Knobs or Pulls: To add a touch of personality to your closet.
* Wood Glue: For extra stability when attaching the crates.
Prepping the Crates: Sanding and Smoothing
This step is all about making sure your crates are ready for their transformation.
1. Inspect the Crates: Before you start sanding, take a good look at each crate. Check for any loose nails, staples, or broken pieces. Remove any loose hardware and repair any damage.
2. Sand the Crates: Using your medium-grit sandpaper, sand all surfaces of the crates, paying special attention to any rough edges or splinters. Sand with the grain of the wood.
3. Smooth it Out: Switch to your fine-grit sandpaper and give the crates a final sanding to create a smooth and even surface.
4. Clean the Crates: Use a damp cloth to wipe away any sanding dust. Let the crates dry completely before moving on to the next step.
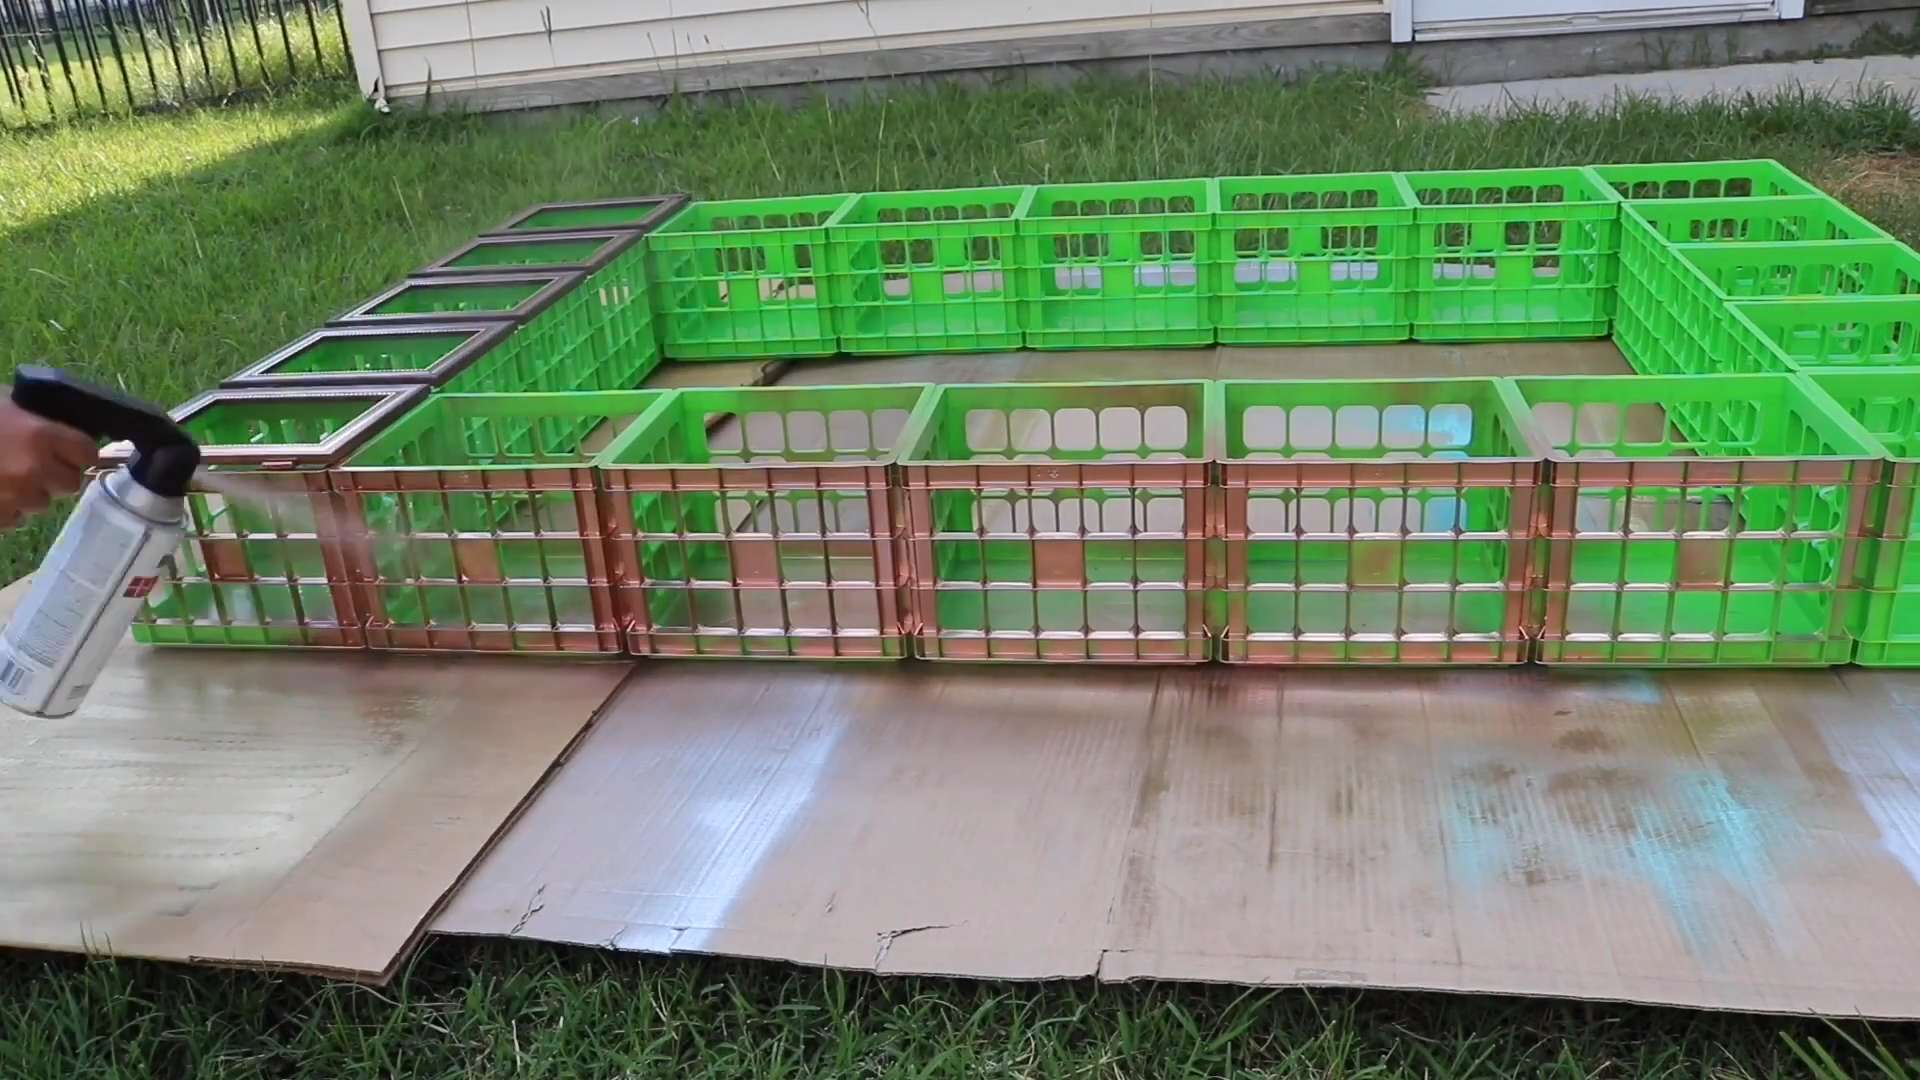
Finishing the Crates: Staining or Painting (Optional)
This is where you can really get creative and personalize your fruit crate closet!
1. Prepare Your Workspace: Lay down a drop cloth or some old newspapers to protect your work surface.
2. Apply the Stain or Paint: If you’re staining, use a rag or brush to apply the stain evenly to the crates. Wipe off any excess stain with a clean rag. If you’re painting, use a brush or roller to apply the paint in thin, even coats. Let each coat dry completely before applying another. I usually do two coats for good coverage.
3. Let it Dry: Allow the stain or paint to dry completely according to the manufacturer’s instructions. This is crucial to avoid any stickiness or smudging later on.
4. Apply a Sealant (Optional): If you want to protect your stained or painted crates from scratches and wear, apply a coat of polyurethane or varnish. This will also give them a nice sheen. Let the sealant dry completely before moving on.
Assembling the Closet: Building Your Dream Storage
Now for the fun part – putting it all together! This is where your vision starts to take shape.
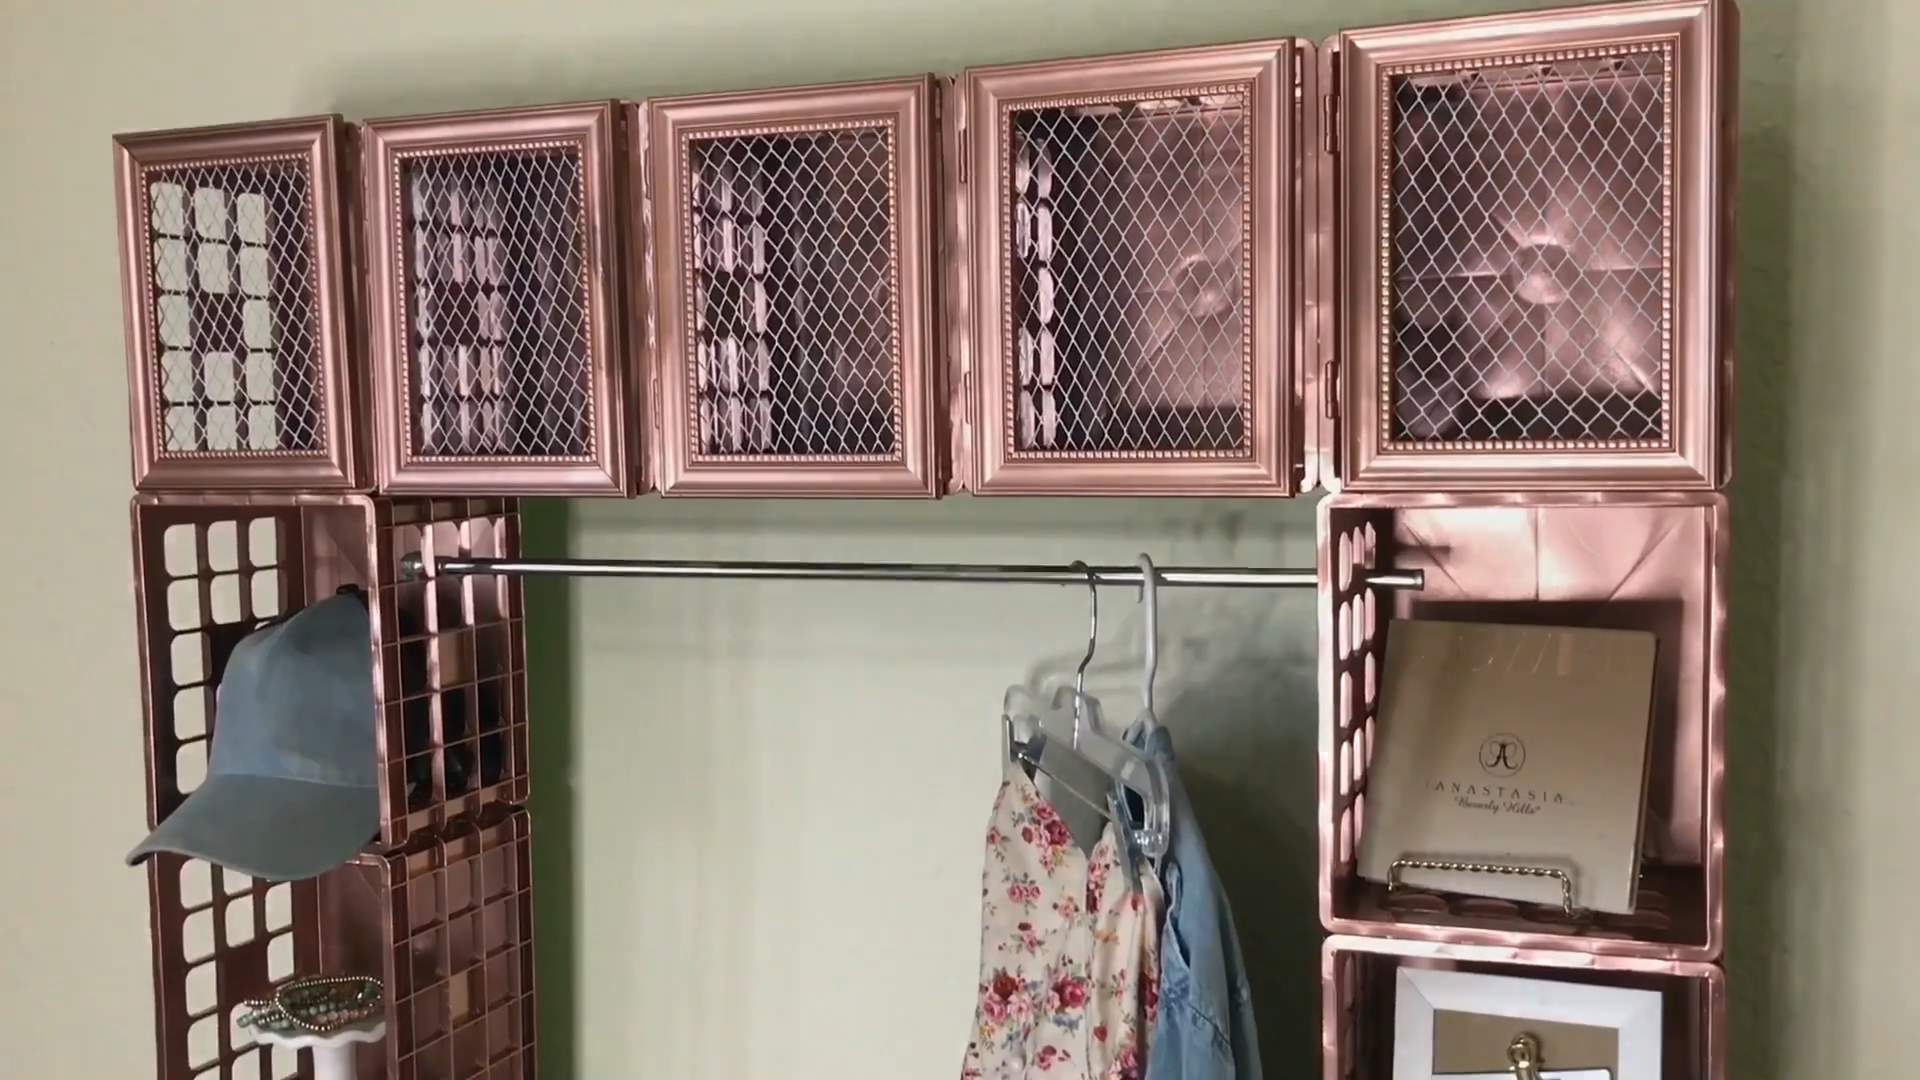
1. Plan Your Layout: Before you start screwing anything together, arrange the crates in the desired configuration. Consider the size of your space and the types of items you’ll be storing. I wanted a combination of vertical and horizontal storage, so I stacked some crates on top of each other and laid others on their sides.
2. Pre-Drill Holes: This is a crucial step to prevent the wood from splitting when you drive in the screws. Use a drill bit slightly smaller than the diameter of your wood screws to pre-drill holes at the corners of each crate where they will be joined together.
3. Attach the Crates: Using your drill and wood screws, carefully attach the crates together. Make sure the screws are driven in straight and flush with the surface of the wood. I also added a dab of wood glue between the crates for extra stability.
4. Check for Level: As you’re assembling the closet, use a level to make sure everything is straight and even. This will prevent your clothes from sliding off the shelves!
5. Add Casters (Optional): If you want to make your closet mobile, attach casters to the bottom of the bottom crates. This will make it easy to move the closet around as needed.
6. Reinforce (Optional): For added stability, especially if you’re stacking the crates high, consider adding some L-brackets to the back of the closet where the crates join.
Finishing Touches: Making it Your Own
Now that your fruit crate closet is assembled, it’s time to add the finishing touches and make it your own!
1. Add Shelf Liners (Optional): To protect the bottom of the crates and prevent items from slipping, add shelf liners. You can use contact paper, fabric, or even corkboard.
2. Install Decorative Knobs or Pulls (Optional): If you want to add a touch of personality to your closet, install decorative knobs or pulls on the front of the crates. This is a great way to customize the look and feel of your closet.
3. Organize Your Clothes: Now for the best part – filling your new closet with your clothes! Sort your clothes by type, color, or season, and arrange them neatly in the crates.
4. Add Accessories: Don’t forget to add some accessories to your closet, such as baskets, bins, or hangers. These will help you keep your clothes organized and easily accessible.
5. Step Back and Admire: Take a step back and admire your handiwork! You’ve just created a beautiful and functional fruit crate closet that will help you stay organized and add some rustic charm to your space.
Tips and Tricks for a Perfect Fruit Crate Closet
* Source Quality Crates: The sturdier the crates, the more durable your closet will be. Don’t be afraid to shop around and inspect the crates carefully before you buy them.
* Consider the Weight: Keep in mind that wood crates can be heavy, especially when filled with clothes. If you’re planning on stacking the crates high, make sure the bottom crates are strong enough to support the weight.
* Customize the Size: Don’t be afraid to cut down the crates to create custom-sized shelves or drawers. A circular saw or jigsaw can be used for this purpose.
* Add a Backing: For a more finished look, consider adding a backing to your closet. You can use plywood, beadboard, or even fabric.
* Get Creative with the Design: There are endless possibilities when it comes to designing your fruit crate closet. Experiment with different layouts, colors, and accessories to create a closet that reflects your personal style.
* Safety First: Always wear safety glasses and work gloves when sanding, drilling, and assembling the crates.
* Don’t Rush: Take your time and enjoy the process. Building a fruit crate closet is a fun and rewarding DIY project that you can be proud of.
* Think About Lighting
Conclusion
So, there you have it! Transforming humble fruit crates into a stylish and functional closet is not just a budget-friendly solution; it’s a statement. It’s a declaration that you value creativity, sustainability, and personalized design. This DIY fruit crate closet project is more than just storage; it’s about crafting a space that reflects your unique personality and meets your specific needs.
Why is this a must-try? Because it’s incredibly versatile. Whether you’re dealing with a tiny apartment, a sprawling walk-in closet, or simply need extra storage in a bedroom, fruit crates can be adapted to fit. The modular nature of the crates allows you to build up, out, or even create unique configurations like corner units or tiered displays.
But the benefits extend beyond mere functionality. This project is also incredibly rewarding. There’s a deep satisfaction that comes from taking something discarded and transforming it into something beautiful and useful. It’s a chance to unleash your inner artist, experiment with different finishes, and create a truly one-of-a-kind piece of furniture.
Looking for variations? Consider painting the crates in vibrant colors to add a pop of personality to your space. Stencil designs onto the sides for a bohemian vibe. Line the inside of the crates with fabric for a softer, more luxurious feel. Add casters to the bottom for easy mobility. Attach doors to some of the crates for concealed storage. The possibilities are truly endless! You could even incorporate lighting, such as LED strip lights, to illuminate your closet and make it even more functional and visually appealing. Think about adding decorative knobs or pulls to any doors you might install.
Don’t be afraid to experiment with different crate sizes and arrangements. Mix and match different wood finishes for a rustic, eclectic look. Consider adding shelves inside the crates to maximize storage space. You can even use the top of the closet as a display surface for plants, books, or decorative items.
This project is also a fantastic way to teach children about recycling and upcycling. Involve them in the process of sanding, painting, and assembling the crates. It’s a fun and educational activity that will instill in them a sense of creativity and resourcefulness.
Ultimately, the success of your DIY fruit crate closet hinges on your willingness to embrace the creative process and personalize it to your own taste. So, gather your materials, unleash your imagination, and get ready to transform your space with this simple yet impactful project.
We are confident that you’ll love the results. But don’t just take our word for it. We encourage you to try this DIY trick for yourself and share your experience with us. Post photos of your finished closet on social media using #FruitCrateClosetDIY. We can’t wait to see what you create! Let us know what challenges you faced and what creative solutions you came up with. Your feedback will help inspire others and make this DIY project even better.
Ready to get started?
Don’t delay! The sooner you start, the sooner you’ll have a stylish and functional closet that you can be proud of. This is a project that you can complete in a weekend, and the results will last for years to come. So, what are you waiting for? Grab some fruit crates and let’s get started!
FAQ
What kind of fruit crates should I use?
The best fruit crates to use are sturdy, wooden crates that are free of splinters and major damage. You can often find these at farmers’ markets, produce distributors, or even online marketplaces. Look for crates that are made from solid wood, rather than thin plywood, as they will be more durable and able to support more weight. Avoid crates that are heavily damaged or have signs of rot or mold. If you’re buying used crates, be sure to clean them thoroughly before using them in your closet. You can use a mild soap and water solution to remove any dirt or debris. Let the crates dry completely before painting or assembling them. You can also sand the crates to smooth out any rough edges or splinters.
How do I clean and prepare the fruit crates?
Cleaning and preparing the fruit crates is a crucial step in ensuring the longevity and aesthetic appeal of your DIY closet. Start by thoroughly inspecting each crate for any loose nails, staples, or splinters. Remove these carefully to prevent injury. Next, use a stiff brush or vacuum cleaner to remove any dirt, dust, or debris from the inside and outside of the crates. For stubborn stains or grime, use a mild soap and water solution. Scrub the crates gently with a sponge or cloth, and then rinse them thoroughly with clean water. Allow the crates to dry completely before proceeding to the next step. Once the crates are dry, sand them lightly with fine-grit sandpaper to smooth out any rough edges or splinters. This will also help the paint or stain adhere better. Wipe away any sanding dust with a clean cloth before applying your chosen finish.
What type of paint or finish should I use?
The type of paint or finish you use will depend on the overall look you’re trying to achieve. For a rustic, farmhouse-style closet, consider using a stain or a chalk paint. Stain will enhance the natural wood grain and give the crates a warm, weathered look. Chalk paint is easy to apply and distress, creating a vintage-inspired finish. If you prefer a more modern or contemporary look, opt for a latex paint in a solid color. Choose a paint with a satin or semi-gloss finish for durability and easy cleaning. Before painting or staining, apply a primer to the crates to help the finish adhere better and prevent the wood from absorbing too much paint. When choosing a paint or stain, be sure to select a product that is low-VOC (volatile organic compounds) to minimize harmful emissions.
How do I assemble the fruit crate closet?
There are several ways to assemble your fruit crate closet, depending on your desired configuration and level of stability. For a simple, freestanding closet, you can stack the crates on top of each other, securing them together with wood screws or construction adhesive. Be sure to pre-drill pilot holes before inserting the screws to prevent the wood from splitting. For a more secure and stable closet, consider attaching the crates to a wall using wall anchors and screws. This will prevent the closet from tipping over, especially if you’re storing heavy items inside. You can also use metal brackets or corner braces to reinforce the joints between the crates. If you’re creating a larger closet, consider building a simple frame out of lumber to support the crates. This will provide additional stability and allow you to customize the size and shape of your closet.
How do I customize the interior of the crates?
Customizing the interior of the crates is a great way to maximize storage space and create a more organized closet. You can add shelves inside the crates by cutting pieces of wood or plywood to fit and attaching them with wood screws or nails. Consider using adjustable shelf supports to allow you to change the shelf height as needed. You can also add drawers to the crates by building simple boxes out of wood and attaching them to drawer slides. This is a great way to store smaller items like socks, underwear, or accessories. Another option is to line the inside of the crates with fabric or wallpaper to create a softer, more luxurious feel. This is especially useful for storing delicate items like sweaters or scarves. You can also add hooks or rods to the inside of the crates to hang clothes or accessories.
How do I make the closet mobile?
Adding casters to the bottom of your fruit crate closet is a great way to make it mobile and easy to move around. Choose casters that are appropriate for the weight of the closet and the type of flooring you have. Swivel casters will allow you to move the closet in any direction, while fixed casters will only allow you to move it forward and backward. Attach the casters to the bottom of the crates using screws or bolts. Be sure to use washers to prevent the screws or bolts from pulling through the wood. If you’re using heavy-duty casters, consider reinforcing the bottom of the crates with plywood or metal plates to prevent them from collapsing under the weight.
How do I maintain my fruit crate closet?
Maintaining your fruit crate closet is relatively simple. Regularly dust the crates with a soft cloth to remove any dirt or debris. If you’ve painted or stained the crates, you can wipe them down with a damp cloth to remove any spills or stains. Avoid using harsh chemicals or abrasive cleaners, as these can damage the finish. If you notice any loose screws or nails, tighten them immediately to prevent the closet from becoming unstable. Periodically inspect the crates for any signs of rot or mold, especially if you live in a humid environment. If you find any, treat the affected areas with a wood preservative or fungicide.


Leave a Comment