

Murphy’s Oil Soap Home Cleaning: Unlock the secrets to a sparkling home with a surprising, time-tested ingredient! Have you ever wondered if there’s a single product that could tackle grime on your wood furniture, floors, and even leather, all while leaving behind a delightful, clean scent? Well, you’re in for a treat! This DIY guide dives deep into the world of Murphy’s Oil Soap home cleaning, revealing how this classic cleaner can become your go-to solution for a naturally fresh and beautifully maintained home.
For generations, Murphy’s Oil Soap has been a staple in households, passed down from grandmothers who swore by its gentle yet effective cleaning power. Its history is rooted in a desire for a natural, plant-based alternative to harsh chemical cleaners, a philosophy that resonates even more strongly today. But why should you, in our modern world of countless cleaning products, consider embracing this old-school remedy?
The answer is simple: it works! Many of us are searching for ways to reduce our exposure to harsh chemicals, save money, and simplify our cleaning routines. Murphy’s Oil Soap home cleaning offers a fantastic solution to all these needs. It’s a versatile, cost-effective, and environmentally conscious choice that can help you achieve a spotless home without compromising your health or the planet. So, let’s explore the amazing ways you can use Murphy’s Oil Soap to transform your cleaning routine and bring a natural shine back to your living spaces!
DIY All-Purpose Cleaner with Murphy’s Oil Soap
Hey there, fellow DIY enthusiasts! I’m excited to share my go-to recipe for an all-purpose cleaner using Murphy’s Oil Soap. This stuff is fantastic – it’s gentle, smells amazing, and leaves surfaces sparkling. Plus, making your own cleaner is super satisfying and saves you money! Let’s dive in!
Why Murphy’s Oil Soap?
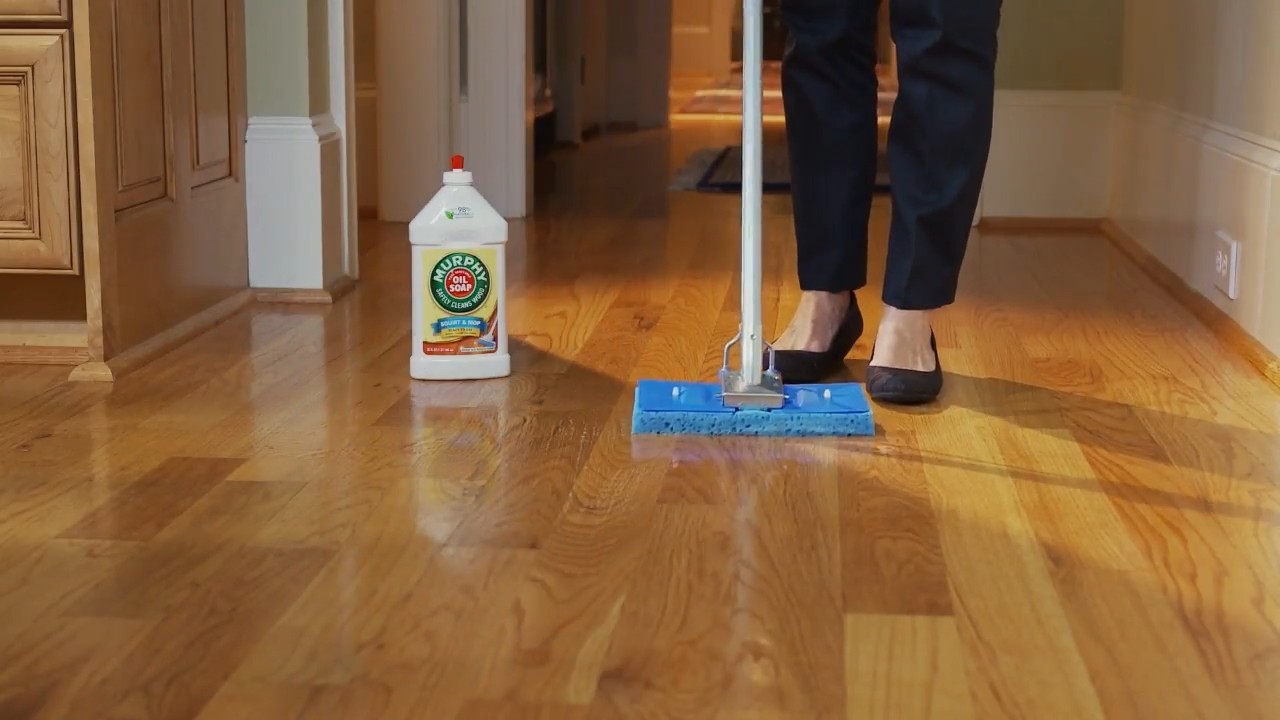
Before we get started, you might be wondering why I chose Murphy’s Oil Soap. Well, it’s a classic for a reason! It’s designed to clean wood without drying it out, but it’s also surprisingly effective on other surfaces like tile, linoleum, and even some plastics. The key is to dilute it properly. Using it full strength can leave a residue, so we’re going to create a balanced formula that cleans beautifully without any sticky surprises.
What You’ll Need
Here’s a list of everything you’ll need to whip up your own batch of all-purpose cleaner:
* Murphy’s Oil Soap: The star of the show! You can find this at most grocery stores or online.
* Distilled Water: Using distilled water helps prevent mineral buildup in your spray bottle and on your surfaces. Tap water is okay in a pinch, but distilled is best.
* White Vinegar: Vinegar is a natural disinfectant and helps cut through grease and grime. Don’t worry, the smell dissipates quickly!
* Essential Oil (Optional): This is where you can customize your cleaner! Lavender, lemon, tea tree, and eucalyptus are all great choices for their cleaning properties and pleasant scents.
* Spray Bottle: A clean, empty spray bottle is essential. I prefer a sturdy one that will last.
* Measuring Cups and Spoons: For accurate measurements.
* Funnel (Optional): Makes pouring liquids into the spray bottle much easier.
The Recipe
This recipe is for a standard 16-ounce spray bottle. You can easily adjust the amounts if you’re using a different size bottle.
* Murphy’s Oil Soap: 1 tablespoon
* Distilled Water: 1 1/2 cups (12 ounces)
* White Vinegar: 1/4 cup (4 ounces)
* Essential Oil (Optional): 10-15 drops
Step-by-Step Instructions
Alright, let’s get mixing!
1. Prepare Your Spray Bottle: Make sure your spray bottle is clean and dry. This will prevent any unwanted contamination.
2. Add Murphy’s Oil Soap: Using your measuring spoon, carefully pour 1 tablespoon of Murphy’s Oil Soap into the spray bottle.
3. Add Distilled Water: Measure out 1 1/2 cups (12 ounces) of distilled water and pour it into the spray bottle. If you’re using a funnel, now’s the time to use it!
4. Add White Vinegar: Measure out 1/4 cup (4 ounces) of white vinegar and add it to the spray bottle.
5. Add Essential Oil (Optional): If you’re using essential oils, add 10-15 drops to the mixture. Remember to choose oils that are safe for the surfaces you’ll be cleaning.
6. Close and Shake: Secure the spray bottle lid tightly and shake well to combine all the ingredients. You’ll notice some bubbles, but they’ll settle down quickly.
7. Label Your Bottle: This is important! Label your spray bottle with the name of the cleaner and the date you made it. This will help you keep track of what’s inside and when it was made.
Using Your All-Purpose Cleaner
Now that you’ve made your cleaner, let’s put it to work!
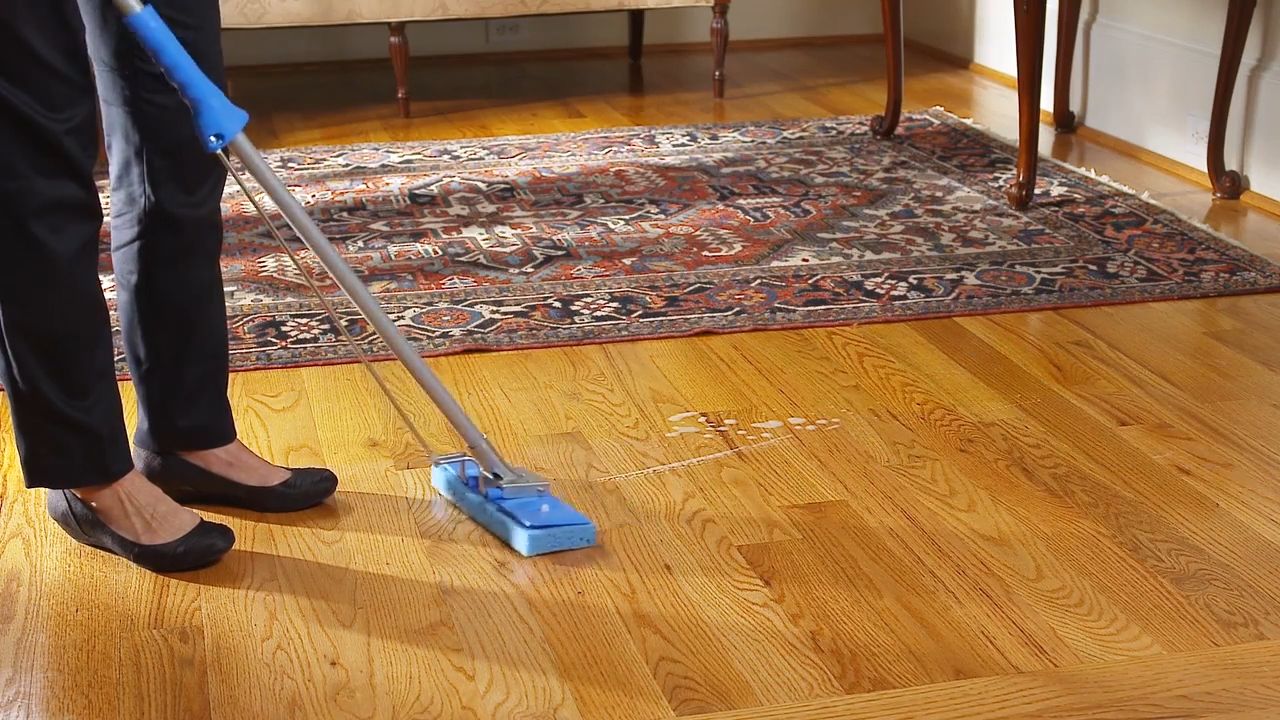
1. Spray: Spray the cleaner directly onto the surface you want to clean.
2. Wipe: Use a clean cloth or sponge to wipe the surface. For tougher messes, let the cleaner sit for a minute or two before wiping.
3. Dry (Optional): If desired, you can dry the surface with a clean, dry cloth. This will help prevent water spots.
Where to Use Your Cleaner
This all-purpose cleaner is great for a variety of surfaces, including:
* Wood Floors: This is where Murphy’s Oil Soap really shines! Just be sure to use a damp mop, not a soaking wet one.
* Tile Floors: Works wonders on tile floors in kitchens and bathrooms.
* Linoleum Floors: Another great option for linoleum floors.
* Countertops: Safe for most countertops, but always test in an inconspicuous area first.
* Cabinets: Cleans cabinets without stripping the finish.
* Baseboards: Perfect for wiping down dusty baseboards.
* Walls: Can be used to spot clean walls, but test in an inconspicuous area first.
* Appliances: Great for cleaning the exterior of appliances like refrigerators and ovens.
Surfaces to Avoid
While this cleaner is versatile, there are some surfaces you should avoid:
* Marble: Vinegar can etch marble, so it’s best to avoid using this cleaner on marble surfaces.
* Granite: While some people use vinegar on granite, it’s best to err on the side of caution and avoid it.
* Waxed Surfaces: The vinegar can strip the wax from waxed surfaces.
* Electronics: Never spray cleaner directly onto electronics. Instead, spray a cloth and then wipe the surface.
Troubleshooting
Sometimes things don’t go exactly as planned. Here are a few common issues and how to fix them:
* Streaky Surfaces: If you’re getting streaks, you might be using too much cleaner. Try using less cleaner or diluting it further with water.
* Sticky Residue: If you’re getting a sticky residue, you might not be diluting the Murphy’s Oil Soap enough. Make sure you’re using the correct ratio of soap to water.
* Strong Vinegar Smell: The vinegar smell should dissipate quickly. If it’s lingering, try adding a few more drops of essential oil.
* Clogged Sprayer: If your sprayer is clogged, try running warm water through it to clear any blockages.
Customizing Your Cleaner
One of the best things about making your own cleaner is that you can customize it to your liking! Here are a few ideas:
* Different Essential Oils: Experiment with different essential oils to find your favorite scent. Lemon and orange are great for a fresh, citrusy scent, while lavender and chamomile are calming and relaxing. Tea tree oil is a natural antiseptic and can be helpful for cleaning bathrooms.
* Add Borax: For extra cleaning power, you can add 1 tablespoon of borax to the mixture. Borax is a natural mineral that helps to boost the cleaning power of the soap and vinegar. However, be careful when using borax, as it can be irritating to the skin and eyes.
* Add Baking Soda: For extra scrubbing power, you can add 1 tablespoon of baking soda to the mixture. Baking soda is a mild abrasive that can help to remove stubborn stains and grime.
* Adjust the Vinegar Ratio: If you need a stronger cleaner, you can increase the amount of vinegar. However, be careful not to use too much vinegar, as it can damage some surfaces.
Safety Precautions
While this cleaner is made with natural ingredients, it’s still important to take some safety precautions:
* Keep out of reach of children and pets.
* Avoid contact with eyes. If contact occurs, rinse thoroughly with water.
* Test in an inconspicuous area before using on delicate surfaces.
* Do not mix with bleach or other harsh chemicals.
* Store in a cool, dry place.
Storage
Your homemade all-purpose cleaner should last for several months if stored properly. Keep it in a cool, dry place away from direct sunlight. Over time, you might notice some separation of the ingredients. This is normal, just shake the bottle well before each use.
Why I Love This DIY Cleaner
Honestly, I’ve tried so many different cleaning products over the years, and this homemade version is one of my favorites. It’s effective, affordable, and I love knowing exactly what’s in it. Plus, the scent of Murphy’s Oil Soap is just so comforting and nostalgic! I hope you enjoy making and using this cleaner as much as I do. Happy cleaning!
Conclusion
So, there you have it! Transforming your cleaning routine with this simple, yet incredibly effective, DIY Murphy’s Oil Soap solution is more than just a cost-saving measure; it’s about embracing a gentler, more natural approach to maintaining your home. We’ve explored how you can harness the power of Murphy’s Oil Soap, a trusted name for generations, and tailor it to your specific cleaning needs.
Why is this DIY trick a must-try? Because it offers a trifecta of benefits: it’s economical, environmentally conscious, and exceptionally versatile. Store-bought cleaners often come with a hefty price tag and a list of ingredients that can be harsh on your surfaces and your health. This homemade version allows you to control exactly what goes into your cleaning solution, ensuring a safer and more sustainable approach. Plus, the concentrated nature of Murphy’s Oil Soap means a little goes a long way, making this DIY solution incredibly budget-friendly.
But the advantages don’t stop there. The gentle cleaning power of Murphy’s Oil Soap is particularly beneficial for delicate surfaces like wood furniture, hardwood floors, and even leather. Unlike harsh chemicals that can strip away natural oils and leave behind a dull residue, this DIY solution cleanses and conditions, leaving your surfaces looking refreshed and revitalized. It’s a fantastic way to preserve the beauty and longevity of your cherished belongings.
Variations and Suggestions:
Don’t be afraid to experiment with different essential oils to customize the scent of your cleaning solution. Lavender, lemon, and eucalyptus are all excellent choices that offer both a pleasant aroma and added cleaning benefits. For a deeper clean on heavily soiled areas, consider adding a small amount of white vinegar to your solution. However, always test a small, inconspicuous area first to ensure compatibility.
Another great tip is to use a microfiber cloth when cleaning with your DIY Murphy’s Oil Soap solution. Microfiber cloths are incredibly absorbent and effective at lifting dirt and grime without scratching surfaces. They also require less cleaning solution, further enhancing the eco-friendliness of this DIY approach.
For those with particularly sensitive skin, consider wearing gloves when cleaning with any cleaning solution, including this DIY version. While Murphy’s Oil Soap is generally considered gentle, prolonged exposure can sometimes cause irritation.
A Final Word:
We wholeheartedly encourage you to give this DIY Murphy’s Oil Soap cleaning solution a try. It’s a simple, effective, and affordable way to keep your home clean and beautiful without compromising on your health or the environment. The versatility of this solution makes it a true all-purpose cleaner, capable of tackling a wide range of cleaning tasks throughout your home.
Once you’ve experienced the benefits of this DIY approach, we’d love to hear about your results! Share your experiences, tips, and variations in the comments below. Let’s build a community of DIY enthusiasts who are committed to creating a cleaner, healthier, and more sustainable world, one homemade cleaning solution at a time. Embrace the power of Murphy’s Oil Soap home cleaning and discover the difference it can make in your home!
Frequently Asked Questions (FAQ)
What exactly is Murphy’s Oil Soap, and why is it good for cleaning?
Murphy’s Oil Soap is a cleaning product formulated with a blend of water, coconut and vegetable oils, and other ingredients. It’s known for its gentle yet effective cleaning properties, particularly on wood and other delicate surfaces. Unlike harsh chemical cleaners, Murphy’s Oil Soap cleans without stripping away natural oils, helping to preserve the beauty and integrity of your furniture and floors. Its plant-based formula makes it a more environmentally friendly option compared to many conventional cleaners.
Can I use this DIY Murphy’s Oil Soap solution on all types of wood?
While Murphy’s Oil Soap is generally safe for most types of wood, it’s always a good idea to test a small, inconspicuous area first, especially on antique or delicate wood finishes. Avoid using it on unfinished wood, as the moisture can cause damage. For waxed wood, use sparingly and buff well after cleaning. If you’re unsure about the type of wood you have, consult a professional before using any cleaning product.
How much Murphy’s Oil Soap should I use in my DIY cleaning solution?
The recommended ratio is typically 1/4 cup of Murphy’s Oil Soap per gallon of water. However, you can adjust this ratio depending on the level of cleaning needed. For light cleaning, you can use less Murphy’s Oil Soap. For heavily soiled areas, you can increase the concentration slightly, but be careful not to overdo it, as too much soap can leave a residue.
Will this DIY solution leave a residue on my floors or furniture?
If used correctly, this DIY solution should not leave a noticeable residue. The key is to use the correct dilution ratio and to wipe the surface thoroughly with a clean, damp cloth after cleaning. If you do notice a residue, simply wipe the area again with a clean, damp cloth. Avoid using excessive amounts of the solution, as this can increase the likelihood of residue buildup.
Can I use this DIY solution on surfaces other than wood?
Yes, this DIY solution can be used on a variety of surfaces, including tile, linoleum, and even leather. However, it’s always best to test a small, inconspicuous area first to ensure compatibility. Avoid using it on porous surfaces like unsealed grout, as it can be difficult to remove. For leather, use sparingly and follow up with a leather conditioner to prevent drying.
How often should I clean my floors and furniture with this DIY solution?
The frequency of cleaning depends on the amount of traffic and use the surfaces receive. For floors, weekly cleaning is generally sufficient. For furniture, cleaning every few weeks or months is usually adequate. Avoid over-cleaning, as this can strip away natural oils and damage the finish.
Can I add essential oils to this DIY cleaning solution?
Yes, adding essential oils is a great way to customize the scent and enhance the cleaning power of your DIY solution. Lavender, lemon, eucalyptus, and tea tree oil are all excellent choices. Add a few drops of your favorite essential oil to the solution before using. Be sure to use pure essential oils and avoid synthetic fragrances, as these can be irritating.
Is this DIY solution safe for pets and children?
While Murphy’s Oil Soap is generally considered safe, it’s always best to keep pets and children away from the area while you’re cleaning. Once the surface is dry, it should be safe for them to return. If you’re concerned about potential allergies or sensitivities, consider using a milder concentration of Murphy’s Oil Soap or choosing a different cleaning product altogether.
Where can I buy Murphy’s Oil Soap?
Murphy’s Oil Soap is widely available at most grocery stores, drugstores, and home improvement stores. You can also purchase it online from various retailers. Look for the original formula, which is specifically designed for cleaning wood and other delicate surfaces.
How should I store my DIY Murphy’s Oil Soap cleaning solution?
Store your DIY cleaning solution in a clean, airtight container in a cool, dry place. Be sure to label the container clearly to avoid confusion. The solution should last for several months if stored properly. If you notice any changes in color or odor, discard the solution and make a fresh batch.
Leave a Comment