

Grow cantaloupe at home? Absolutely! Imagine biting into a juicy, sun-ripened cantaloupe that you nurtured from seed to fruit, right in your own backyard. Forget those bland, store-bought melons – we’re talking about a flavor explosion that only comes from homegrown goodness. For centuries, cantaloupe has been cherished for its sweetness and refreshing qualities, gracing tables from ancient Egypt to modern-day picnics.
But let’s be honest, the thought of cultivating this summery treat can seem a little daunting. That’s where these DIY tricks and hacks come in! I’m here to demystify the process and show you that even with limited space or gardening experience, you can successfully grow cantaloupe at home.
Why do you need these DIY tricks? Because store-bought cantaloupe often lacks the intense flavor and sweetness of homegrown varieties. Plus, you’ll know exactly what went into growing your melon, avoiding harmful pesticides and ensuring a healthy, delicious harvest. So, ditch the grocery store and get ready to embark on a rewarding gardening adventure. Let’s unlock the secrets to growing cantaloupe that will have your neighbors green with envy!
Growing Cantaloupe at Home: A Sweet and Simple Guide
Hey there, fellow gardening enthusiasts! I’m so excited to share my experience growing cantaloupe at home. It’s surprisingly easier than you might think, and the taste of a homegrown cantaloupe is simply unbeatable. Get ready to enjoy juicy, sweet cantaloupe straight from your backyard!
Choosing the Right Cantaloupe Variety
Before we dive into the nitty-gritty, let’s talk about choosing the right cantaloupe variety. This is crucial for success, especially if you have a shorter growing season.
* Consider your climate: Some varieties are better suited for warmer climates, while others can tolerate cooler temperatures.
* Check the growing season: Look for varieties that mature quickly if you have a short summer.
* Popular choices: ‘Athena’, ‘Honey Dew’, ‘Ambrosia’, and ‘Sugar Cube’ are all excellent choices. I personally love ‘Athena’ for its disease resistance and delicious flavor.
Getting Started: Planting Your Cantaloupe
Now, let’s get our hands dirty! You can either start your cantaloupe seeds indoors or directly sow them in your garden. I prefer starting them indoors to get a head start, especially in my region with unpredictable spring weather.
Starting Seeds Indoors (Recommended)
1. Gather your supplies: You’ll need cantaloupe seeds, seed starting trays or small pots, seed starting mix, a spray bottle, and a warm, sunny location (or a grow light).
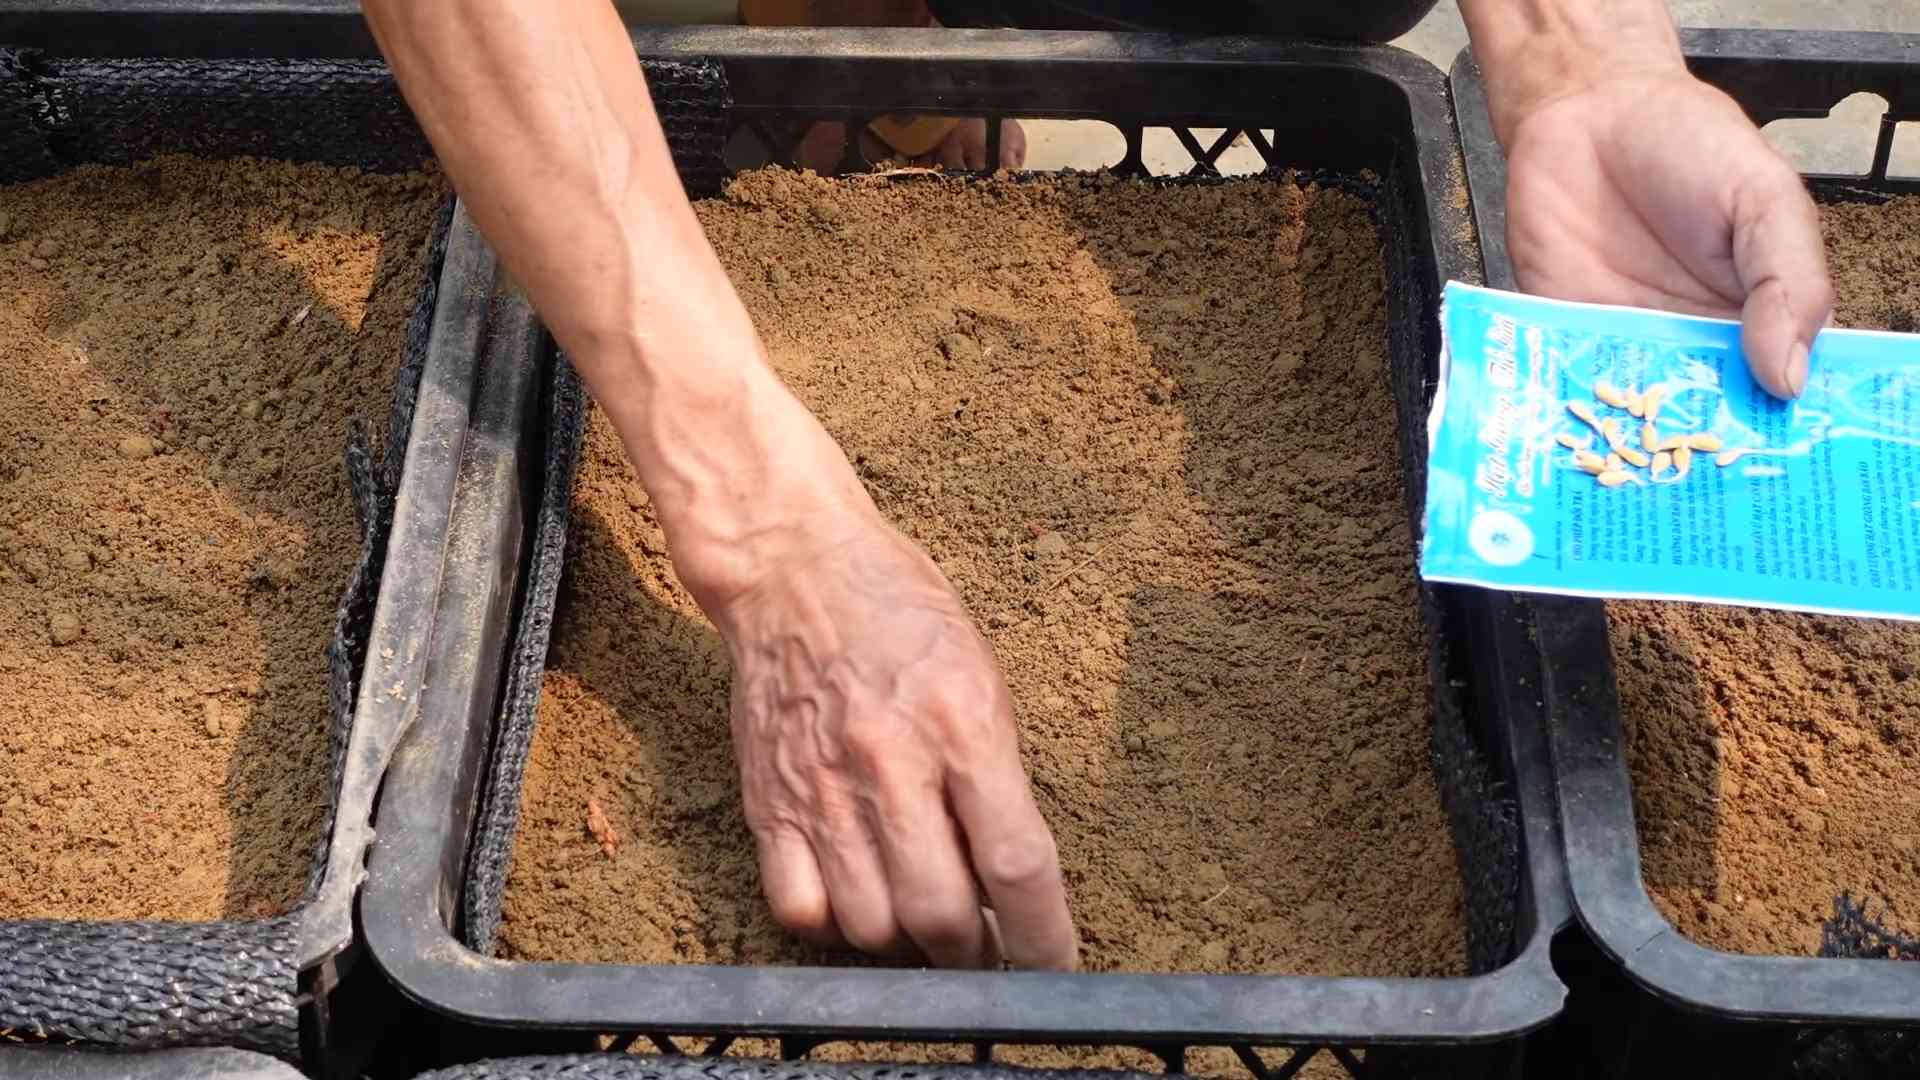
2. Sow the seeds: Fill your seed starting trays or pots with seed starting mix. Make a small indentation (about ½ inch deep) in the center of each cell or pot. Place 2-3 seeds in each indentation. This increases your chances of germination.
3. Cover and water: Gently cover the seeds with seed starting mix and lightly water with a spray bottle. You want the soil to be moist, but not soggy.
4. Provide warmth and light: Cantaloupe seeds need warmth to germinate. Place your seed starting trays in a warm location (around 70-80°F). A heat mat can be very helpful. If you don’t have a sunny window, use a grow light.
5. Keep the soil moist: Check the soil daily and water as needed to keep it consistently moist.
6. Thin the seedlings: Once the seedlings emerge (usually within 7-10 days) and have their first true leaves (the second set of leaves), thin them to one strong seedling per cell or pot. Simply snip off the weaker seedlings at the soil line with scissors.
Direct Sowing (If Your Climate Allows)
1. Wait for warm weather: Direct sowing is only recommended if your soil temperature is consistently above 65°F. Cantaloupe seeds won’t germinate in cold soil.
2. Prepare the soil: Choose a sunny spot in your garden with well-drained soil. Amend the soil with compost or well-rotted manure to improve fertility and drainage.
3. Sow the seeds: Sow the seeds directly into the soil, about ½ inch deep and 18-24 inches apart. Plant 2-3 seeds per hill.
4. Water gently: Water the area gently after planting.
5. Thin the seedlings: Once the seedlings emerge and have their first true leaves, thin them to one strong seedling per hill.
Transplanting Your Cantaloupe Seedlings
Whether you started your seeds indoors or direct sowed, you’ll eventually need to transplant your cantaloupe seedlings to their final growing location.
1. Harden off the seedlings: If you started your seeds indoors, you’ll need to harden them off before transplanting. This means gradually exposing them to outdoor conditions over a period of 7-10 days. Start by placing them outside in a sheltered location for a few hours each day, gradually increasing the amount of time they spend outdoors.
2. Prepare the planting site: Choose a sunny location with well-drained soil. Cantaloupe plants need at least 6-8 hours of sunlight per day. Amend the soil with compost or well-rotted manure to improve fertility and drainage.
3. Dig the holes: Dig holes that are slightly larger than the root balls of your seedlings. Space the holes 18-24 inches apart.
4. Transplant the seedlings: Gently remove the seedlings from their pots or trays and place them in the holes. Make sure the top of the root ball is level with the surrounding soil.
5. Fill the holes: Fill the holes with soil and gently pat down around the base of the plants.
6. Water thoroughly: Water the plants thoroughly after transplanting.
Caring for Your Cantaloupe Plants
Now that your cantaloupe plants are in the ground, it’s time to provide them with the care they need to thrive.
* Watering: Cantaloupe plants need consistent watering, especially during hot, dry weather. Water deeply and regularly, aiming for about 1-2 inches of water per week. Avoid overhead watering, as this can lead to fungal diseases. Drip irrigation or soaker hoses are ideal.
* Fertilizing: Cantaloupe plants are heavy feeders. Fertilize them every 2-3 weeks with a balanced fertilizer. You can also side-dress them with compost or well-rotted manure.
* Weeding: Keep the area around your cantaloupe plants free of weeds. Weeds compete with the plants for water and nutrients.
* Mulching: Mulch around your cantaloupe plants with straw, wood chips, or black plastic. Mulch helps to retain moisture, suppress weeds, and regulate soil temperature. Black plastic mulch can also help to warm the soil, which is beneficial in cooler climates.
* Pest and disease control: Keep an eye out for pests and diseases. Common pests include aphids, squash bugs, and cucumber beetles. Common diseases include powdery mildew and fusarium wilt. Treat any problems promptly with appropriate organic or chemical controls. I personally prefer using neem oil for pest control.
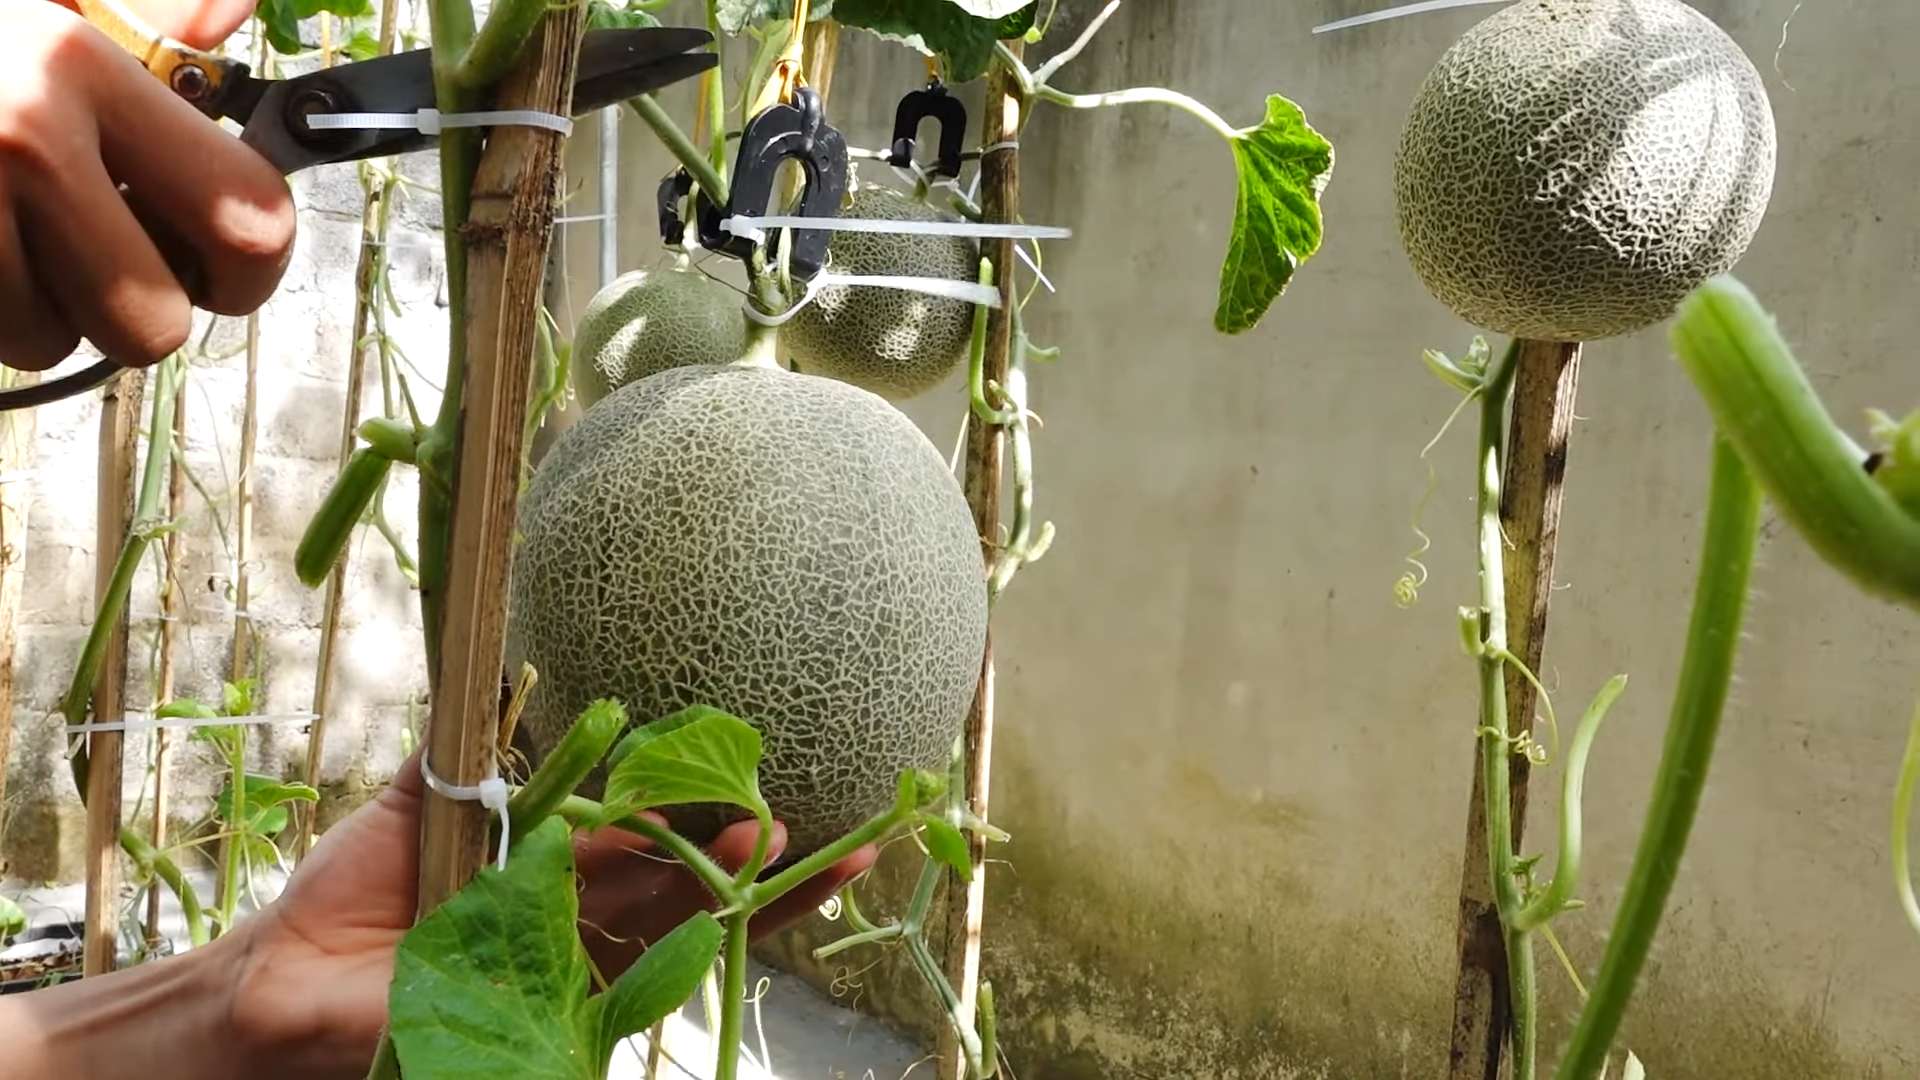
* Support: As the cantaloupe fruits develop, they can become quite heavy. You may need to provide support for the vines to prevent them from breaking. You can use trellises, stakes, or even old pantyhose to support the fruits.
Pollination: Helping Your Cantaloupe Set Fruit
Cantaloupe plants have separate male and female flowers. They rely on bees and other pollinators to transfer pollen from the male flowers to the female flowers. Without pollination, the female flowers will not develop into fruit.
* Attract pollinators: Plant flowers that attract bees and other pollinators near your cantaloupe plants. Some good choices include sunflowers, zinnias, and lavender.
* Hand pollination: If you’re not seeing a lot of bees in your garden, you can hand-pollinate your cantaloupe flowers. Use a small paintbrush to transfer pollen from the male flowers to the female flowers. The female flowers have a small fruit-like structure at the base of the flower.
Harvesting Your Cantaloupe
The moment we’ve all been waiting for! Knowing when to harvest your cantaloupe is key to enjoying its sweet, juicy flavor.
* Check the color: The skin of a ripe cantaloupe will turn from green to a tan or yellowish color.
* Smell the aroma: A ripe cantaloupe will have a sweet, musky aroma.
* Feel the stem: The stem of a ripe cantaloupe will easily slip from the vine with a gentle tug. This is called the “slip stage.”
* Tap the melon: A ripe cantaloupe will have a hollow sound when tapped.
Once your cantaloupe is ripe, cut it from the vine with a sharp knife. Store it in the refrigerator for up to a week.
Troubleshooting Common Problems
Even with the best care, you might encounter some problems while growing cantaloupe. Here are a few common issues and how to address them:
* Poor germination: Make sure your soil is warm enough and that you’re not overwatering. Use fresh seeds for best results.
* Yellowing leaves: This could be a sign of overwatering, nutrient deficiency, or disease. Check the soil moisture and fertilize if needed.
* Lack of fruit: This could be due to poor pollination or insufficient sunlight. Attract pollinators and make sure your plants are getting at least 6-8 hours of sunlight per day.
* Powdery mildew: This fungal disease can cause white, powdery spots on the leaves. Improve air circulation and treat with a fungicide.
Enjoying Your Homegrown Cantaloupe
Congratulations! You’ve successfully grown cantaloupe at home. Now it’s time to enjoy the fruits (or melons!) of your labor.
* Eat it fresh: Simply slice the cantaloupe and enjoy it as is.
* Make a smoothie:
Conclusion
So, there you have it! Growing cantaloupe at home, while it might seem daunting at first, is entirely achievable and incredibly rewarding. We’ve walked you through the essential steps, from selecting the right seeds and preparing your garden to nurturing your burgeoning vines and harvesting those sweet, juicy melons. But why should you bother with all this effort when you can simply buy cantaloupe at the store? The answer lies in the unparalleled flavor and satisfaction that comes from enjoying a cantaloupe you’ve grown yourself. Store-bought cantaloupes often lack the intense sweetness and aroma of homegrown varieties, and you have no control over the growing practices used.
Imagine biting into a sun-ripened cantaloupe, its flesh bursting with flavor, knowing that you nurtured it from a tiny seed to a delicious fruit. That’s the magic of home gardening! Plus, you’ll be reducing your carbon footprint by avoiding the transportation and packaging associated with store-bought produce.
But the benefits don’t stop there. Growing your own cantaloupe allows you to experiment with different varieties, each with its unique flavor profile and characteristics. Why not try growing a ‘Hales Best Jumbo’ for its classic cantaloupe flavor, or a ‘Honey Rock’ for its exceptionally sweet and aromatic flesh? You could even explore heirloom varieties like ‘Jenny Lind’ for a truly unique and historical cantaloupe experience.
Don’t be afraid to get creative with your growing methods, too. If you’re short on space, consider growing your cantaloupe vertically on a trellis. This not only saves space but also improves air circulation, reducing the risk of fungal diseases. You can also experiment with different mulching techniques to conserve moisture and suppress weeds. Using black plastic mulch can help warm the soil early in the season, giving your cantaloupe plants a head start. Or, try using organic mulches like straw or wood chips to improve soil health and retain moisture.
Remember, gardening is a journey of learning and experimentation. Don’t be discouraged if you encounter challenges along the way. Every mistake is an opportunity to learn and improve your skills. The key is to be patient, observant, and willing to adapt your approach as needed.
We strongly encourage you to give growing cantaloupe at home a try. It’s a rewarding experience that will connect you with nature, provide you with delicious and nutritious food, and give you a sense of accomplishment. And who knows, you might just discover a new passion for gardening!
Once you’ve harvested your first homegrown cantaloupe, we’d love to hear about your experience. Share your photos, tips, and challenges in the comments section below. Let’s create a community of cantaloupe growers and learn from each other! What variety did you grow? What challenges did you face? What tips would you share with other aspiring cantaloupe growers? Your insights could be invaluable to someone just starting out.
So, grab some seeds, prepare your garden, and get ready to enjoy the sweet taste of success. Happy growing!
Frequently Asked Questions (FAQ)
1. What is the best time to start cantaloupe seeds?
The ideal time to start cantaloupe seeds depends on your local climate and growing season. Generally, you should start seeds indoors about 3-4 weeks before the last expected frost. Cantaloupe plants are sensitive to cold temperatures, so it’s crucial to wait until the soil has warmed up to at least 60°F (15°C) before transplanting them outdoors. If you live in a warmer climate with a longer growing season, you can direct sow the seeds into the garden once the soil has warmed up. Check your local weather forecasts and gardening resources to determine the best planting time for your region.
2. How much space do cantaloupe plants need?
Cantaloupe plants are sprawling vines that require a significant amount of space to grow. As a general rule, allow at least 2-3 feet between plants in a row and 4-6 feet between rows. If you’re growing cantaloupe on a trellis, you can space the plants closer together, about 18-24 inches apart. Proper spacing is essential for good air circulation, which helps prevent fungal diseases. It also allows the plants to receive adequate sunlight, which is crucial for fruit production.
3. What kind of soil is best for growing cantaloupe?
Cantaloupe plants thrive in well-drained, fertile soil that is rich in organic matter. The ideal soil pH is between 6.0 and 6.8. Before planting, amend your soil with compost, aged manure, or other organic materials to improve its fertility and drainage. If your soil is heavy clay, consider adding sand or perlite to improve drainage. Cantaloupe plants also benefit from a soil that warms up quickly in the spring, so consider planting them in raised beds or mounds to improve soil temperature.
4. How often should I water cantaloupe plants?
Cantaloupe plants need consistent moisture, especially during fruit development. Water deeply and regularly, aiming to keep the soil consistently moist but not waterlogged. Avoid overhead watering, as this can promote fungal diseases. Instead, use a soaker hose or drip irrigation to water the plants at the base. During hot, dry weather, you may need to water more frequently. Check the soil moisture regularly and adjust your watering schedule accordingly.
5. What are some common pests and diseases that affect cantaloupe plants?
Cantaloupe plants are susceptible to several pests and diseases, including aphids, squash bugs, cucumber beetles, powdery mildew, and fusarium wilt. To prevent pest and disease problems, practice good garden hygiene, such as removing weeds and debris from around the plants. Inspect your plants regularly for signs of pests or diseases and take action promptly. You can use organic pest control methods, such as insecticidal soap or neem oil, to control aphids and other pests. To prevent fungal diseases, ensure good air circulation around the plants and avoid overhead watering. Choose disease-resistant varieties whenever possible.
6. How do I know when a cantaloupe is ripe?
Knowing when a cantaloupe is ripe can be tricky, but there are several telltale signs to look for. First, the skin of the cantaloupe should change color from green to a tan or yellowish hue. The netting on the skin should also become more prominent and raised. Second, the stem should easily slip from the fruit with a gentle tug. This is known as the “full slip” stage. Third, the cantaloupe should have a sweet, musky aroma. Finally, the blossom end of the cantaloupe should be slightly soft to the touch. Once you’ve observed these signs, your cantaloupe is likely ripe and ready to harvest.
7. Can I grow cantaloupe in containers?
Yes, you can grow cantaloupe in containers, but you’ll need to choose a large container, at least 20 gallons in size. Select a dwarf or bush variety of cantaloupe that is better suited for container growing. Use a high-quality potting mix that is well-draining and rich in organic matter. Provide the plants with plenty of sunlight, at least 6-8 hours per day. Water regularly and fertilize every 2-3 weeks with a balanced fertilizer. You may also need to provide support for the vines, such as a trellis or stake.
8. How can I improve the sweetness of my cantaloupe?
Several factors can influence the sweetness of your cantaloupe. First, choose a variety that is known for its sweetness. Second, ensure that the plants receive plenty of sunlight, at least 6-8 hours per day. Third, provide the plants with adequate water and nutrients, especially potassium. Fourth, allow the cantaloupe to ripen fully on the vine before harvesting. Finally, avoid overwatering the plants as the fruit approaches maturity, as this can dilute the sugars.
9. What are some good companion plants for cantaloupe?
Companion planting can help improve the growth and health of your cantaloupe plants. Some good companion plants for cantaloupe include marigolds, nasturtiums, and radishes, which can help deter pests. Basil can also help repel insects and improve the flavor of the cantaloupe. Beans and peas can fix nitrogen in the soil, which can benefit the cantaloupe plants. Avoid planting cantaloupe near potatoes, as they can compete for nutrients.
10. How do I store cantaloupe after harvesting?
Once you’ve harvested your cantaloupe, you can store it at room temperature for a few days. To extend its shelf life, store it in the refrigerator. Whole cantaloupes can be stored in the refrigerator for up to a week. Cut cantaloupe should be stored in an airtight container in the refrigerator and consumed within 3-4 days. You can also freeze cantaloupe for longer storage. To freeze cantaloupe, cut it into cubes or balls and spread them out on a baking sheet. Freeze for several hours, then transfer the frozen cantaloupe to a freezer bag or container. Frozen cantaloupe can be stored for up to 6 months.


Leave a Comment