

Grow corn in sacks? Absolutely! Forget sprawling fields and back-breaking labor. I’m about to let you in on a little secret that will revolutionize your home gardening game. Imagine harvesting plump, juicy ears of corn right from your patio, balcony, or even a sunny corner of your kitchen. Sounds too good to be true? Trust me, it’s not!
For centuries, indigenous cultures around the world have cleverly adapted their farming techniques to suit their environments. From terrace farming in the Andes to ingenious irrigation systems in arid regions, the spirit of innovation has always been at the heart of agriculture. This “grow corn in sacks” method taps into that same spirit, offering a modern twist on resourceful gardening.
Let’s face it, not everyone has access to acres of farmland. Space is a premium, and time is even more so. That’s where this DIY trick comes in. It’s perfect for urban dwellers, apartment residents, or anyone who wants to enjoy the taste of homegrown corn without the hassle of traditional gardening. Plus, it’s a fantastic way to teach kids about where their food comes from and get them involved in a fun, hands-on project. So, are you ready to learn how to grow corn in sacks and enjoy a bountiful harvest? Let’s get started!
Grow Corn in Sacks: A Bumper Harvest in Small Spaces!
Hey there, fellow gardening enthusiasts! Ever dreamed of enjoying fresh, homegrown corn but thought you didn’t have the space? Well, I’m here to tell you that you absolutely can! Growing corn in sacks is a fantastic way to maximize your yield, even if you only have a balcony, patio, or small yard. It’s surprisingly easy, and the results are incredibly rewarding. Let’s dive into how you can get started!
What You’ll Need
Before we get our hands dirty, let’s gather all the necessary supplies. This will make the whole process smoother and more enjoyable.
* Large, sturdy sacks: Think burlap sacks, heavy-duty plastic grow bags (at least 20 gallons), or even repurposed feed sacks. The bigger, the better, as corn needs room for its roots to spread.
* High-quality potting mix: Don’t skimp on this! A well-draining, nutrient-rich potting mix is crucial for healthy corn growth. I recommend a mix specifically formulated for vegetables.
* Compost or aged manure: This will provide an extra boost of nutrients and improve the soil structure.
* Corn seeds: Choose a variety that’s well-suited to your climate and growing season. Shorter varieties tend to do better in sacks.
* Slow-release fertilizer: This will provide a steady supply of nutrients throughout the growing season. Look for a fertilizer with a balanced NPK ratio (nitrogen, phosphorus, potassium).
* Watering can or hose: Essential for keeping your corn plants hydrated.
* Stakes or bamboo poles (optional): For providing extra support as the corn plants grow tall, especially in windy areas.
* Twine or plant ties (optional): To secure the corn stalks to the stakes.
* Gardening gloves: To keep your hands clean and protected.
* Trowel or small shovel: For filling the sacks with soil.
Preparing the Sacks
This step is all about getting your sacks ready to be filled with the good stuff – the soil that will nourish your corn plants.
1. Choose your location: Select a spot that receives at least 6-8 hours of direct sunlight per day. Corn needs plenty of sunshine to thrive. Make sure the location is also relatively sheltered from strong winds.
2. Prepare the sacks: If you’re using burlap sacks, you might want to line them with a plastic bag (with drainage holes) to help retain moisture. For plastic grow bags, ensure they have adequate drainage holes at the bottom. If you are repurposing feed sacks, make sure they are thoroughly cleaned.
3. Position the sacks: Place the empty sacks in their final location before filling them with soil. Once they’re full, they’ll be heavy and difficult to move.
Planting the Corn
Now for the fun part – planting the corn seeds! This is where your future corn harvest begins.
1. Mix the soil: In a large container or on a tarp, combine the potting mix, compost or aged manure, and slow-release fertilizer. Mix everything thoroughly to ensure the nutrients are evenly distributed. I usually go for a ratio of 2 parts potting mix, 1 part compost.
2. Fill the sacks: Carefully fill the sacks with the soil mixture, leaving about 4-6 inches of space at the top. This will make watering easier and prevent soil from spilling out.
3. Plant the seeds: Sow the corn seeds about 1-2 inches deep and 4-6 inches apart. I usually plant 4-5 seeds per sack to ensure good pollination. Corn is wind-pollinated, so planting in a cluster helps with fertilization.
4. Water gently: Water the soil thoroughly after planting, making sure to moisten the entire sack. Be careful not to overwater, as this can cause the seeds to rot.
5. Label the sacks: Use a permanent marker to label each sack with the variety of corn you planted and the date. This will help you keep track of your progress.
Caring for Your Corn Plants
This is where the real work begins – nurturing your corn plants and ensuring they have everything they need to grow strong and healthy.
1. Watering: Water regularly, especially during hot, dry weather. Corn needs consistent moisture to thrive. Check the soil moisture by sticking your finger about an inch deep. If it feels dry, it’s time to water. Avoid overwatering, as this can lead to root rot.
2. Fertilizing: Corn is a heavy feeder, so it needs regular fertilization. In addition to the slow-release fertilizer you added at planting, you can supplement with a liquid fertilizer every 2-3 weeks. Choose a fertilizer that’s high in nitrogen during the early stages of growth and then switch to a fertilizer that’s higher in phosphorus and potassium as the corn plants begin to tassel.
3. Weeding: Keep the sacks free of weeds, as they can compete with the corn plants for nutrients and water. Hand-pull any weeds that appear.
4. Pest control: Keep an eye out for common corn pests, such as corn earworms, aphids, and spider mites. If you notice any pests, take action immediately. You can use insecticidal soap, neem oil, or other organic pest control methods.
5. Supporting the plants: As the corn plants grow tall, they may need support, especially in windy areas. Insert stakes or bamboo poles into the sacks and tie the corn stalks to the stakes with twine or plant ties. This will help prevent the plants from falling over.
6. Pollination: Corn is wind-pollinated, so it’s important to ensure good air circulation around the plants. You can also help with pollination by gently shaking the tassels (the male flowers at the top of the plant) to release pollen.
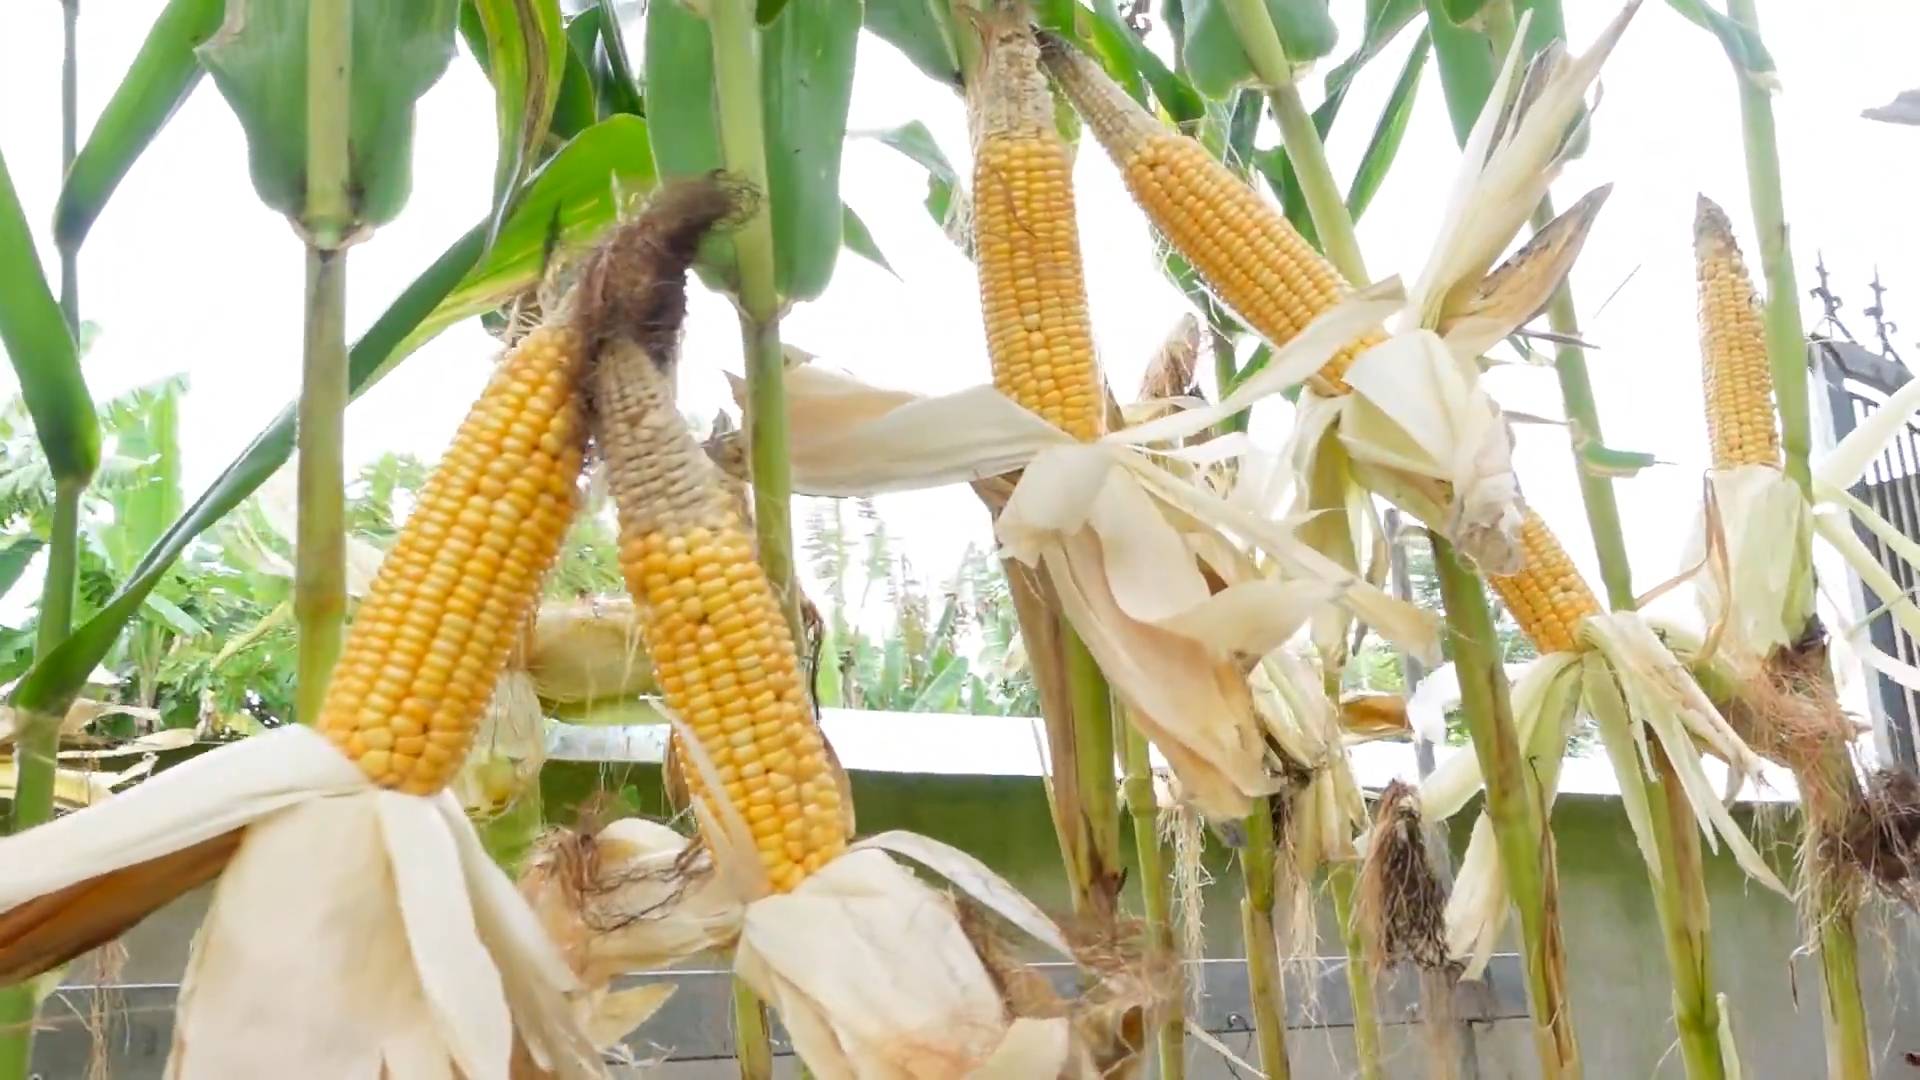
Harvesting Your Corn
The moment you’ve been waiting for – harvesting your homegrown corn! This is the culmination of all your hard work and dedication.
1. Check for ripeness: Corn is typically ready to harvest about 60-100 days after planting, depending on the variety. The silks (the strands that emerge from the end of the ear) will turn brown and dry. The ear should feel plump and full when you squeeze it gently.
2. Harvest the ears: To harvest the ears, grasp the ear firmly and twist it downward. The ear should snap off easily from the stalk.
3. Enjoy your harvest: Enjoy your fresh, homegrown corn! You can eat it right off the cob, grill it, boil it, or use it in your favorite recipes.
Troubleshooting
Even with the best planning, sometimes things don’t go exactly as expected. Here are a few common problems you might encounter and how to deal with them.
* Poor germination: If your corn seeds aren’t germinating, it could be due to several factors, such as cold soil, overwatering, or poor-quality seeds. Make sure the soil temperature is at least 60°F (15°C) before planting. Avoid overwatering and use fresh, high-quality seeds.
* Yellowing leaves: Yellowing leaves can be a sign of nutrient deficiency, especially nitrogen. Fertilize with a nitrogen-rich fertilizer.
* Stunted growth: Stunted growth can be caused by a variety of factors, such as poor soil, lack of sunlight, or pest infestation. Make sure your corn plants have access to plenty of sunlight and are growing in well-draining, nutrient-rich soil. Check for pests and take action if necessary.
* Poor pollination: If your corn ears are not filling out properly, it could be due to poor pollination. Ensure good air circulation around the plants and help with pollination by gently shaking the tassels.
Choosing the Right Corn Variety
Selecting the right corn variety is crucial for success, especially when growing in sacks. Here’s what to consider:
* Days to maturity: Choose a variety that matures within your growing season. Shorter-season varieties are generally better suited for sack gardening.
* Plant height: Opt for shorter varieties that won’t become too top-heavy in the sacks.
* Sweetness: Decide whether you prefer sweet corn, super sweet corn, or other types.
* Disease resistance: Look for varieties that are resistant to common corn diseases in your area.
Some popular varieties for sack gardening include:
* ‘Golden Bantam’: A classic sweet corn variety with a relatively short growing season.
* ‘Early Sunglow’: An early-maturing sweet corn variety that’s well-suited for cooler climates.
* ‘On Deck’: A very early maturing variety that produces good sized ears.
* ‘Trinity’: A super sweet variety that holds its sweetness well after harvest.
Tips for Success
Here are a few extra tips to help you grow a bumper crop of corn in sacks:
* Use a dark-

Conclusion
So, there you have it! Growing corn in sacks isn’t just a quirky gardening experiment; it’s a game-changer for anyone with limited space, challenging soil, or a burning desire for a bountiful harvest of sweet, homegrown corn. This method offers a surprising number of advantages, from improved drainage and nutrient control to easier pest management and the sheer portability of your corn patch.
Think about it: no more back-breaking tilling of rocky ground, no more battling relentless weeds in a sprawling field, and no more worrying about poor soil quality hindering your corn’s growth. With sack gardening, you’re in complete control of the environment, providing your corn plants with the perfect conditions to thrive.
But the benefits don’t stop there. Imagine the satisfaction of harvesting plump, juicy ears of corn right from your patio, balcony, or even your driveway. Picture the look on your neighbors’ faces when they see your thriving corn patch in a sack! It’s a conversation starter, a source of pride, and a delicious way to enjoy the fruits (or rather, vegetables) of your labor.
Why is this a must-try? Because it democratizes corn growing. It makes it accessible to everyone, regardless of their living situation or gardening experience. It’s a sustainable, space-saving, and incredibly rewarding way to connect with nature and enjoy fresh, homegrown food.
Ready to take your sack gardening to the next level? Consider these variations:
* Succession Planting: Plant new sacks of corn every few weeks to ensure a continuous harvest throughout the growing season.
* Companion Planting: Interplant your corn with beans or squash in the same sack. This classic “Three Sisters” method provides mutual benefits, with the beans fixing nitrogen in the soil and the squash providing ground cover to suppress weeds.
* Vertical Gardening: Use taller sacks or create a tiered system to maximize space and create a stunning vertical display.
* Organic Amendments: Experiment with different organic amendments like compost tea, worm castings, or bone meal to boost your corn’s growth and flavor.
* Different Corn Varieties: Don’t limit yourself to sweet corn! Try growing popcorn, flint corn, or even ornamental corn in sacks for a unique and colorful display.
The possibilities are endless! The key is to experiment, have fun, and learn from your experiences.
We wholeheartedly encourage you to give this DIY trick a try. Growing corn in sacks is an incredibly rewarding experience, and we’re confident that you’ll be amazed by the results. Don’t be afraid to get your hands dirty, embrace the learning process, and enjoy the delicious rewards of your labor.
And most importantly, we want to hear about your experiences! Share your photos, tips, and stories with us in the comments below. Let’s create a community of sack gardening enthusiasts and inspire others to discover the joys of growing their own corn, no matter where they live. What variety did you choose? What challenges did you face? What successes did you celebrate? Your insights will help others learn and grow, and together, we can revolutionize the way people think about corn growing. So go ahead, grab a sack, some soil, and some corn seeds, and get ready to embark on a gardening adventure!
Frequently Asked Questions (FAQ)
What kind of sacks should I use?
The best sacks for growing corn are durable, breathable, and large enough to accommodate the root system of mature corn plants. Woven polypropylene sacks (like those used for animal feed or grain) are a popular choice because they are strong, inexpensive, and allow for good drainage. Burlap sacks are another option, offering a more natural and biodegradable alternative. Avoid using plastic sacks, as they can trap moisture and lead to root rot. The ideal size is typically around 20-25 gallons, but larger sacks will provide even more room for root growth and nutrient uptake. Make sure the sacks are clean and free of any harmful chemicals before using them.
What type of soil is best for growing corn in sacks?
Corn thrives in well-draining, nutrient-rich soil. A good potting mix specifically formulated for vegetables is an excellent choice. You can also create your own mix by combining equal parts of compost, topsoil, and perlite or vermiculite. The compost provides essential nutrients, the topsoil provides structure, and the perlite or vermiculite improves drainage and aeration. Avoid using heavy clay soil, as it can become waterlogged and suffocate the roots. Before planting, amend the soil with a slow-release fertilizer or organic amendments like bone meal or blood meal to provide a steady supply of nutrients throughout the growing season.
How many corn plants can I grow in one sack?
For optimal growth and yield, it’s best to limit the number of corn plants to 2-3 per 20-25 gallon sack. Overcrowding can lead to competition for resources, resulting in smaller ears of corn and reduced overall productivity. If you’re using larger sacks, you can increase the number of plants accordingly, but be sure to provide adequate spacing between them to allow for proper air circulation and sunlight penetration. Remember that corn is wind-pollinated, so planting multiple plants together increases the chances of successful pollination.
How often should I water my corn plants in sacks?
Corn plants in sacks require regular watering, especially during hot and dry weather. The frequency of watering will depend on the climate, the type of soil, and the size of the sack. As a general rule, water deeply whenever the top inch of soil feels dry to the touch. Avoid overwatering, as this can lead to root rot. A good way to check the moisture level is to insert your finger into the soil near the base of the plants. If the soil feels dry, it’s time to water. Consider using a soaker hose or drip irrigation system to provide a slow and steady supply of water directly to the roots.
How much sunlight do corn plants need?
Corn plants need at least 6-8 hours of direct sunlight per day to thrive. Choose a location that receives plenty of sunlight throughout the day. If you’re growing corn in sacks on a balcony or patio, make sure the area is not shaded by buildings or trees. If you live in a particularly hot climate, you may need to provide some afternoon shade to prevent the plants from overheating. Insufficient sunlight can lead to stunted growth, poor pollination, and reduced yields.
How do I pollinate corn plants in sacks?
Corn is wind-pollinated, meaning that the pollen from the tassels (the male flowers at the top of the plant) needs to be transferred to the silks (the female flowers on the ears of corn) by the wind. In a sack gardening environment, you may need to assist with pollination to ensure a good harvest. You can do this by gently shaking the tassels to release the pollen or by using a small paintbrush to collect pollen from the tassels and apply it to the silks. Repeat this process every day for several days to ensure that all of the silks are pollinated.
What are some common pests and diseases that affect corn plants in sacks?
Common pests that can affect corn plants include corn earworms, aphids, and spider mites. Diseases include corn smut, rust, and leaf blight. Regularly inspect your plants for signs of pests or diseases and take appropriate action if necessary. Organic pest control methods, such as insecticidal soap or neem oil, can be effective for controlling many common pests. Proper watering and ventilation can help prevent fungal diseases.
How long does it take to grow corn in sacks?
The time it takes to grow corn in sacks depends on the variety of corn, the climate, and the growing conditions. Generally, it takes about 60-100 days from planting to harvest. Sweet corn typically matures faster than other varieties. You’ll know your corn is ready to harvest when the silks turn brown and dry, and the ears feel plump and full.
Can I reuse the soil in the sacks for future plantings?
Yes, you can reuse the soil in the sacks for future plantings, but it’s important to replenish the nutrients that have been depleted by the corn plants. Amend the soil with compost, aged manure, or a slow-release fertilizer before planting new crops. You may also want to consider rotating crops to prevent the buildup of soilborne diseases.
Leave a Comment