

Kitchen cleaning hacks – who doesn’t need a few of those up their sleeve? Let’s be honest, the kitchen is the heart of the home, but it’s also a magnet for mess! From splattered sauces to greasy countertops, keeping it sparkling can feel like a never-ending battle. But what if I told you that you could reclaim your weekends and spend less time scrubbing?
For generations, resourceful homemakers have passed down clever cleaning tips, often born out of necessity and a desire to keep their families healthy and happy. Think about it – before fancy cleaning products lined supermarket shelves, people relied on natural ingredients and ingenious methods to tackle grime. These time-tested techniques are just as relevant today, offering eco-friendly and budget-friendly alternatives to harsh chemicals.
In today’s busy world, time is precious. Nobody wants to spend hours scrubbing away at stubborn stains. That’s where these kitchen cleaning hacks come in! I’m going to share some of my favorite DIY tricks that will not only save you time and effort but also help you create a healthier and more inviting kitchen space. Get ready to discover simple solutions to common kitchen cleaning challenges, using items you probably already have in your pantry. Let’s dive in and make your kitchen shine!

DIY Kitchen Cleaning Hacks: Sparkling Clean Without Breaking a Sweat!
Okay, let’s face it, cleaning the kitchen is nobody’s favorite chore. But a clean kitchen is a happy kitchen (and a healthier one!), so I’ve compiled some of my absolute favorite DIY cleaning hacks to make the process faster, easier, and even a little bit fun! Get ready to say goodbye to stubborn grease, grime, and mystery stains with these simple tricks using ingredients you probably already have in your pantry.
Hack #1: The Microwave Miracle – Steam Cleaning Power!
This is seriously one of the easiest and most effective ways to clean your microwave. No more scrubbing for hours!
* The Problem: Splattered food, dried-on messes, and that lingering “microwave smell.”
* The Solution: Steam cleaning with lemon (or vinegar).
* Why it Works: The steam loosens the grime, making it easy to wipe away. The lemon (or vinegar) helps to deodorize and disinfect.
Step-by-Step Instructions:
1. Gather Your Supplies: You’ll need a microwave-safe bowl, 1 cup of water, and either half a lemon (sliced) or 2 tablespoons of white vinegar.
2. Mix the Solution: Pour the water into the bowl and add the lemon slices or vinegar.
3. Microwave Magic: Place the bowl in the microwave and heat on high for 3-5 minutes, or until the water is boiling and the microwave is filled with steam.
4. Let it Sit: Leave the microwave door closed for another 5 minutes to allow the steam to work its magic. Don’t open it yet!
5. Wipe it Clean: Carefully remove the bowl (it will be hot!). Use a clean cloth or sponge to wipe down the inside of the microwave. The grime should come off easily. For stubborn spots, you might need a little extra elbow grease, but it will be significantly easier than scrubbing without steam.
6. Final Touches: Wipe down the microwave turntable and the outside of the microwave.
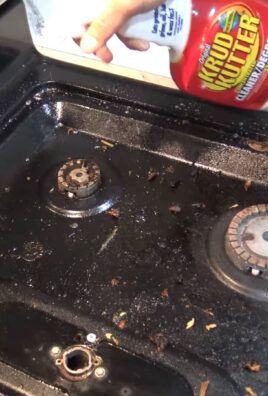
Hack #2: Degreasing the Stovetop – Baking Soda to the Rescue!
Greasy stovetops are a common kitchen woe. But don’t despair! Baking soda is a natural degreaser that can tackle even the toughest messes.
* The Problem: Baked-on grease and food splatters on your stovetop.
* The Solution: A baking soda paste.
* Why it Works: Baking soda is a mild abrasive that helps to lift grease and grime without scratching the surface.
Step-by-Step Instructions:
1. Gather Your Supplies: You’ll need baking soda, water, a sponge or cloth, and a scrub brush (optional, for really stubborn areas).
2. Make the Paste: In a small bowl, mix baking soda with enough water to form a thick paste. The consistency should be similar to toothpaste.
3. Apply the Paste: Spread the baking soda paste generously over the greasy areas of your stovetop.
4. Let it Sit: Allow the paste to sit for at least 15-20 minutes. For really tough grease, you can let it sit for up to an hour.
5. Scrub and Wipe: Use a sponge or cloth to scrub the stovetop. For stubborn areas, use a scrub brush. You’ll be amazed at how easily the grease comes off!
6. Rinse Thoroughly: Rinse the stovetop with clean water to remove any remaining baking soda residue.
7. Dry and Shine: Dry the stovetop with a clean cloth. For extra shine, you can use a glass cleaner.
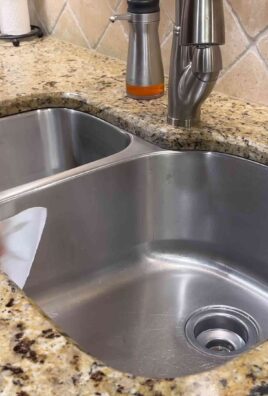
Hack #3: Sparkling Sink – Vinegar and Baking Soda Combo!
A clean sink is essential for a hygienic kitchen. This simple hack uses the power of vinegar and baking soda to clean, deodorize, and unclog your sink drain.
* The Problem: Stained sink, unpleasant odors, and slow-draining drain.
* The Solution: A vinegar and baking soda flush.
* Why it Works: The baking soda helps to absorb odors and loosen grime, while the vinegar reacts with the baking soda to create a fizzing action that helps to unclog the drain.
Step-by-Step Instructions:
1. Clear the Sink: Remove any dishes or debris from the sink.
2. Baking Soda Blast: Sprinkle a generous amount of baking soda (about 1 cup) into the sink drain.
3. Vinegar Power: Pour 1 cup of white vinegar down the drain after the baking soda.
4. Fizzing Fun: Let the mixture fizz for about 30 minutes. You might hear some gurgling sounds – that’s a good sign!
5. Flush with Hot Water: After 30 minutes, flush the drain with hot water for several minutes to clear any remaining residue.
6. Clean the Sink Basin: While the drain is clearing, use a sponge or cloth to clean the sink basin with a mixture of dish soap and water.
7. Rinse and Dry: Rinse the sink thoroughly with clean water and dry with a clean cloth.
Hack #4: Reviving Cutting Boards – Lemon and Salt Scrub!
Cutting boards can harbor bacteria and stains, especially wooden ones. This natural scrub will disinfect, deodorize, and remove stains.
* The Problem: Stained, smelly, and potentially bacteria-laden cutting boards.
* The Solution: A lemon and salt scrub.
* Why it Works: The lemon juice is a natural disinfectant and deodorizer, while the salt acts as a mild abrasive to scrub away stains and grime.
Step-by-Step Instructions:
1. Gather Your Supplies: You’ll need half a lemon and coarse salt (like sea salt or kosher salt).
2. Salt the Board: Sprinkle a generous amount of salt over the surface of the cutting board.
3. Lemon Scrub: Use the cut side of the lemon to scrub the salt into the cutting board. Squeeze the lemon gently to release the juice.
4. Scrub Vigorously: Scrub the entire surface of the cutting board, paying extra attention to stained or smelly areas.
5. Let it Sit: Allow the lemon juice and salt to sit on the cutting board for about 5-10 minutes.
6. Rinse Thoroughly: Rinse the cutting board thoroughly with hot water.
7. Dry Completely: Dry the cutting board completely with a clean cloth. To prevent warping, especially with wooden boards, dry them standing up.
Hack #5: Garbage Disposal Refresh – Citrus Power!
Garbage disposals can get pretty stinky. This simple trick will freshen it up and help to break down any lingering food particles.
* The Problem: A smelly garbage disposal.
* The Solution: Citrus peels and ice cubes.
* Why it Works: The citrus peels contain natural oils that help to deodorize the disposal, while the ice cubes help to scrub the blades and dislodge any stuck-on food particles.
Step-by-Step Instructions:
1. Gather Your Supplies: You’ll need citrus peels (lemon, lime, orange, or grapefruit) and ice cubes.
2. Ice Cube Grind: Turn on the cold water and run the garbage disposal.
3. Drop the Ice: Drop a handful of ice cubes into the running disposal.
4. Citrus Power: Add the citrus peels to the disposal while it’s running.
5. Grind Away: Let the disposal run for about 30 seconds to a minute, or until all the ice and citrus peels have been ground up.
6. Flush with Water: Turn off the disposal and continue running the cold water for another minute to flush out any remaining debris.
Hack #6: Sparkling Glassware – Vinegar Rinse!
Cloudy glassware is a common problem, especially if you have hard water. This simple vinegar rinse will restore the shine.
* The Problem: Cloudy or spotty glassware.
* The Solution: A vinegar rinse.
* Why it Works: Vinegar is a natural acid that helps to dissolve mineral deposits that cause cloudiness.
Step-by-Step Instructions:
1. Wash as Usual: Wash your glassware as you normally would, using dish soap and water.
2. Vinegar Rinse: Fill a clean sink or bowl with a solution of equal parts white vinegar and water.
3. Submerge and Rinse: Submerge the washed glassware in the vinegar solution and rinse thoroughly.
4. Air Dry: Allow the glassware to air dry on a drying rack. The vinegar smell will dissipate as it dries.
5. Admire the Shine: Enjoy your sparkling clean glassware!
Hack #7:
Conclusion
So, there you have it! These simple yet incredibly effective kitchen cleaning hacks are game-changers for anyone who wants a sparkling clean kitchen without spending hours scrubbing or relying on harsh chemicals. We’ve covered everything from banishing stubborn grease to revitalizing your dishwasher, all using ingredients you likely already have in your pantry.
Why is this a must-try? Because these hacks are not just about cleaning; they’re about reclaiming your time and creating a healthier environment. Imagine spending less time battling grime and more time enjoying your beautifully clean kitchen. Think of the peace of mind knowing you’re using natural, non-toxic solutions around your food preparation areas. These kitchen cleaning hacks offer a sustainable and cost-effective way to maintain a pristine kitchen.
But don’t just take our word for it. The beauty of these DIY solutions lies in their adaptability. Feel free to experiment and find what works best for you. For instance, if you’re dealing with particularly stubborn oven stains, try adding a bit of baking soda to your vinegar paste and letting it sit overnight. Or, if you prefer a different scent, infuse your lemon-infused vinegar with herbs like rosemary or lavender for an extra touch of freshness. You can even use orange peels instead of lemon peels for a different citrusy aroma.
These kitchen cleaning hacks are a gateway to a cleaner, healthier, and more enjoyable cooking space. They empower you to take control of your cleaning routine and customize it to your specific needs and preferences.
We wholeheartedly encourage you to try these kitchen cleaning hacks. Start with one or two that resonate with you and see the difference they make. We’re confident that you’ll be amazed by the results.
And most importantly, we want to hear about your experience! Share your before-and-after photos, your favorite variations, and any tips or tricks you discover along the way. Let’s create a community of clean kitchen enthusiasts who are passionate about sharing their knowledge and inspiring others. Use the hashtag #DIYKitchenClean on social media so we can all see your amazing results. Your insights could be invaluable to someone else who’s struggling with a particular cleaning challenge. Together, we can make kitchen cleaning less of a chore and more of a rewarding experience. So go ahead, give these hacks a try, and let us know what you think!
Frequently Asked Questions (FAQs)
Q: Are these kitchen cleaning hacks safe for all kitchen surfaces?
A: Generally, yes, these hacks are safe for most common kitchen surfaces. However, it’s always a good idea to test any cleaning solution in an inconspicuous area first, especially on delicate surfaces like natural stone countertops or antique wood furniture. Vinegar, while a fantastic cleaner, can be acidic and may etch some surfaces if left on for too long. Baking soda is mildly abrasive, so avoid using it on easily scratched surfaces. When in doubt, dilute the solution or use a gentler alternative. For example, for granite countertops, a mixture of mild dish soap and warm water is often the best choice. Always read the manufacturer’s instructions for your specific appliances and surfaces.
Q: How often should I use these kitchen cleaning hacks?
A: The frequency depends on your cooking habits and how often you use your kitchen. For high-traffic areas like the stovetop and sink, daily or every-other-day cleaning is recommended to prevent buildup. Deeper cleaning tasks, such as oven cleaning or dishwasher maintenance, can be done monthly or as needed. Regular maintenance will prevent grime from accumulating and make cleaning easier in the long run. A quick wipe-down after each meal can go a long way in keeping your kitchen sparkling.
Q: Can I use these kitchen cleaning hacks if I have allergies or sensitivities?
A: These hacks are generally considered safer than commercial cleaners, which often contain harsh chemicals and fragrances that can trigger allergies or sensitivities. However, if you have known allergies to any of the ingredients (e.g., citrus fruits), avoid using them or wear gloves and a mask while cleaning. If you experience any irritation or allergic reaction, discontinue use immediately and consult a doctor. You can also explore alternative natural cleaning agents that are less likely to cause a reaction, such as castile soap or essential oils (used with caution and proper dilution).
Q: What if I don’t have lemons or vinegar? Are there any substitutes?
A: Absolutely! The beauty of DIY cleaning is its flexibility. If you don’t have lemons, you can use other citrus fruits like limes or oranges. The citric acid is the key ingredient for its cleaning and deodorizing properties. If you don’t have vinegar, you can try using baking soda paste or a solution of mild dish soap and water. For some tasks, like descaling a kettle, citric acid powder can be a good substitute for lemon juice or vinegar. Experiment and see what works best for you.
Q: My oven is really dirty. Will these kitchen cleaning hacks be enough to clean it?
A: For heavily soiled ovens, you may need to repeat the baking soda and vinegar paste treatment several times or let it sit overnight for maximum effectiveness. You can also try adding a bit of dish soap to the paste for extra cleaning power. If the grime is extremely stubborn, you might consider using a commercial oven cleaner as a last resort, but always follow the manufacturer’s instructions carefully and ensure proper ventilation. Prevention is key – try to wipe up spills as soon as they happen to prevent buildup.
Q: How do I get rid of stubborn odors in my kitchen?
A: These kitchen cleaning hacks can help with odors too! For lingering smells, try simmering a pot of water with lemon peels, cinnamon sticks, or cloves. You can also place a bowl of baking soda in the refrigerator or pantry to absorb odors. Regularly cleaning your garbage disposal with lemon peels and ice cubes can also help prevent unpleasant smells. Proper ventilation is also crucial – open windows or use your range hood while cooking to prevent odors from lingering.
Q: Can I use these hacks to clean my microwave?
A: Yes, absolutely! Cleaning your microwave is easy with these hacks. Simply microwave a bowl of water with lemon slices or vinegar for a few minutes until the water boils and the microwave is steamy. Then, carefully wipe down the interior with a cloth. The steam will loosen any splatters and make them easy to remove. This is a quick and effective way to keep your microwave clean and fresh.
Q: Are these cleaning solutions safe for septic systems?
A: Yes, these cleaning solutions are generally safe for septic systems. Unlike harsh chemicals found in many commercial cleaners, vinegar, baking soda, and lemon juice are biodegradable and won’t harm the beneficial bacteria in your septic tank. However, it’s always a good idea to use these solutions in moderation and avoid flushing large amounts of baking soda down the drain at once.
Q: Where can I find more information about natural cleaning methods?
A: There are many resources available online and in libraries about natural cleaning methods. Look for books and articles on DIY cleaning, green cleaning, and eco-friendly cleaning. You can also find helpful tips and recipes on websites and blogs dedicated to sustainable living and natural home care. Remember to always do your research and choose methods that are safe and effective for your specific needs.

Leave a Comment