

Bathroom cleaning hacks – who doesn’t need them? Let’s be honest, tackling the bathroom is nobody’s favorite chore. It’s a space that sees a lot of action, and unfortunately, that action often leaves behind soap scum, mildew, and a general feeling of “ugh.” But what if I told you that keeping your bathroom sparkling clean doesn’t have to be a dreaded weekend activity?
For centuries, people have been searching for easier, more effective ways to maintain cleanliness. From ancient Roman bathhouses meticulously scrubbed by slaves to the modern-day obsession with spotless surfaces, the desire for a clean bathroom is deeply ingrained in our history. While we’ve thankfully moved past the slave labor part, the struggle remains real!
That’s where these DIY bathroom cleaning hacks come in. I’m going to share some simple, affordable, and surprisingly effective tricks that will transform your cleaning routine. Forget spending hours scrubbing with harsh chemicals. These hacks utilize everyday items you probably already have in your pantry, making bathroom cleaning less of a chore and more of a breeze. Get ready to reclaim your weekends and enjoy a sparkling clean bathroom with minimal effort!
DIY Bathroom Cleaning Hacks: Sparkling Clean Without Breaking a Sweat!
Okay, let’s face it: cleaning the bathroom is nobody’s favorite chore. But a sparkling clean bathroom is a happy bathroom, right? I’m going to share some of my favorite DIY bathroom cleaning hacks that will save you time, money, and a whole lot of elbow grease. Get ready to transform your bathroom into a pristine oasis!
Tackling Soap Scum and Grime
Soap scum and grime are the bane of every bathroom cleaner’s existence. But don’t worry, I’ve got some tricks up my sleeve!
* The Power of Vinegar and Baking Soda: This dynamic duo is a natural cleaning powerhouse. Vinegar’s acidity cuts through soap scum, while baking soda acts as a gentle abrasive.
* Lemon Power: Lemons aren’t just for lemonade! Their citric acid is a natural degreaser and disinfectant. Plus, they leave a fresh, clean scent.
* Dish Soap to the Rescue: Good old dish soap is surprisingly effective at breaking down grease and grime.
Cleaning Shower Doors and Walls
This is where the real battle against soap scum begins.
1. Vinegar Solution: Heat up a cup of white vinegar in the microwave (be careful, don’t let it boil!). Pour the warm vinegar into a spray bottle and add an equal amount of dish soap. Gently swirl to combine.
2. Spray and Soak: Generously spray the vinegar solution onto your shower doors and walls. Let it sit for at least 30 minutes, or even longer for stubborn buildup. The longer it sits, the easier the grime will lift.
3. Scrub-a-dub-dub: Use a non-abrasive sponge, microfiber cloth, or even an old toothbrush to scrub away the loosened soap scum. For tough spots, you might need to apply a little extra pressure.
4. Rinse Thoroughly: Rinse the shower doors and walls with clean water. You can use the showerhead or a bucket of water.
5. Squeegee Time: After rinsing, use a squeegee to remove excess water. This will help prevent water spots and keep your shower looking cleaner for longer.
6. Lemon Alternative: Cut a lemon in half and rub it directly onto the shower doors and walls. Let the lemon juice sit for about 30 minutes, then rinse with water. The lemon will help dissolve soap scum and leave a refreshing scent.
Cleaning the Bathtub
The bathtub can be a breeding ground for grime, especially if you enjoy bubble baths!
1. Baking Soda Paste: Make a paste of baking soda and water. The consistency should be thick enough to spread easily.
2. Apply and Wait: Apply the baking soda paste to the bathtub, focusing on areas with soap scum or stains. Let it sit for at least 15-20 minutes.
3. Scrub and Rinse: Use a sponge or scrub brush to scrub the bathtub. The baking soda will act as a gentle abrasive to remove grime. Rinse thoroughly with water.
4. Vinegar Boost: For extra cleaning power, spray the baking soda paste with white vinegar before scrubbing. The vinegar will react with the baking soda, creating a fizzing action that helps lift dirt and grime.
5. Dish Soap Option: If you don’t have baking soda, you can use dish soap instead. Apply dish soap to a sponge or scrub brush and scrub the bathtub. Rinse thoroughly with water.
Conquering Toilet Troubles
Let’s be honest, cleaning the toilet is the least glamorous part of bathroom cleaning. But it’s essential for hygiene and a pleasant bathroom experience.
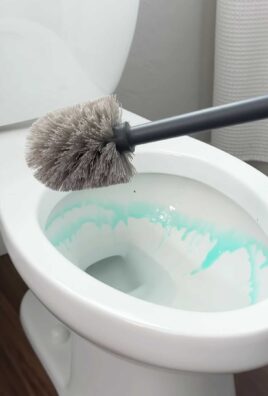
* Baking Soda and Vinegar Flush: This is a simple and effective way to clean and deodorize your toilet bowl.
* Toilet Bowl Cleaner Bombs: These homemade bombs are a fun and effective way to keep your toilet bowl clean and fresh.
* Cleaning the Toilet Exterior: Don’t forget to clean the outside of the toilet, including the base, tank, and seat.
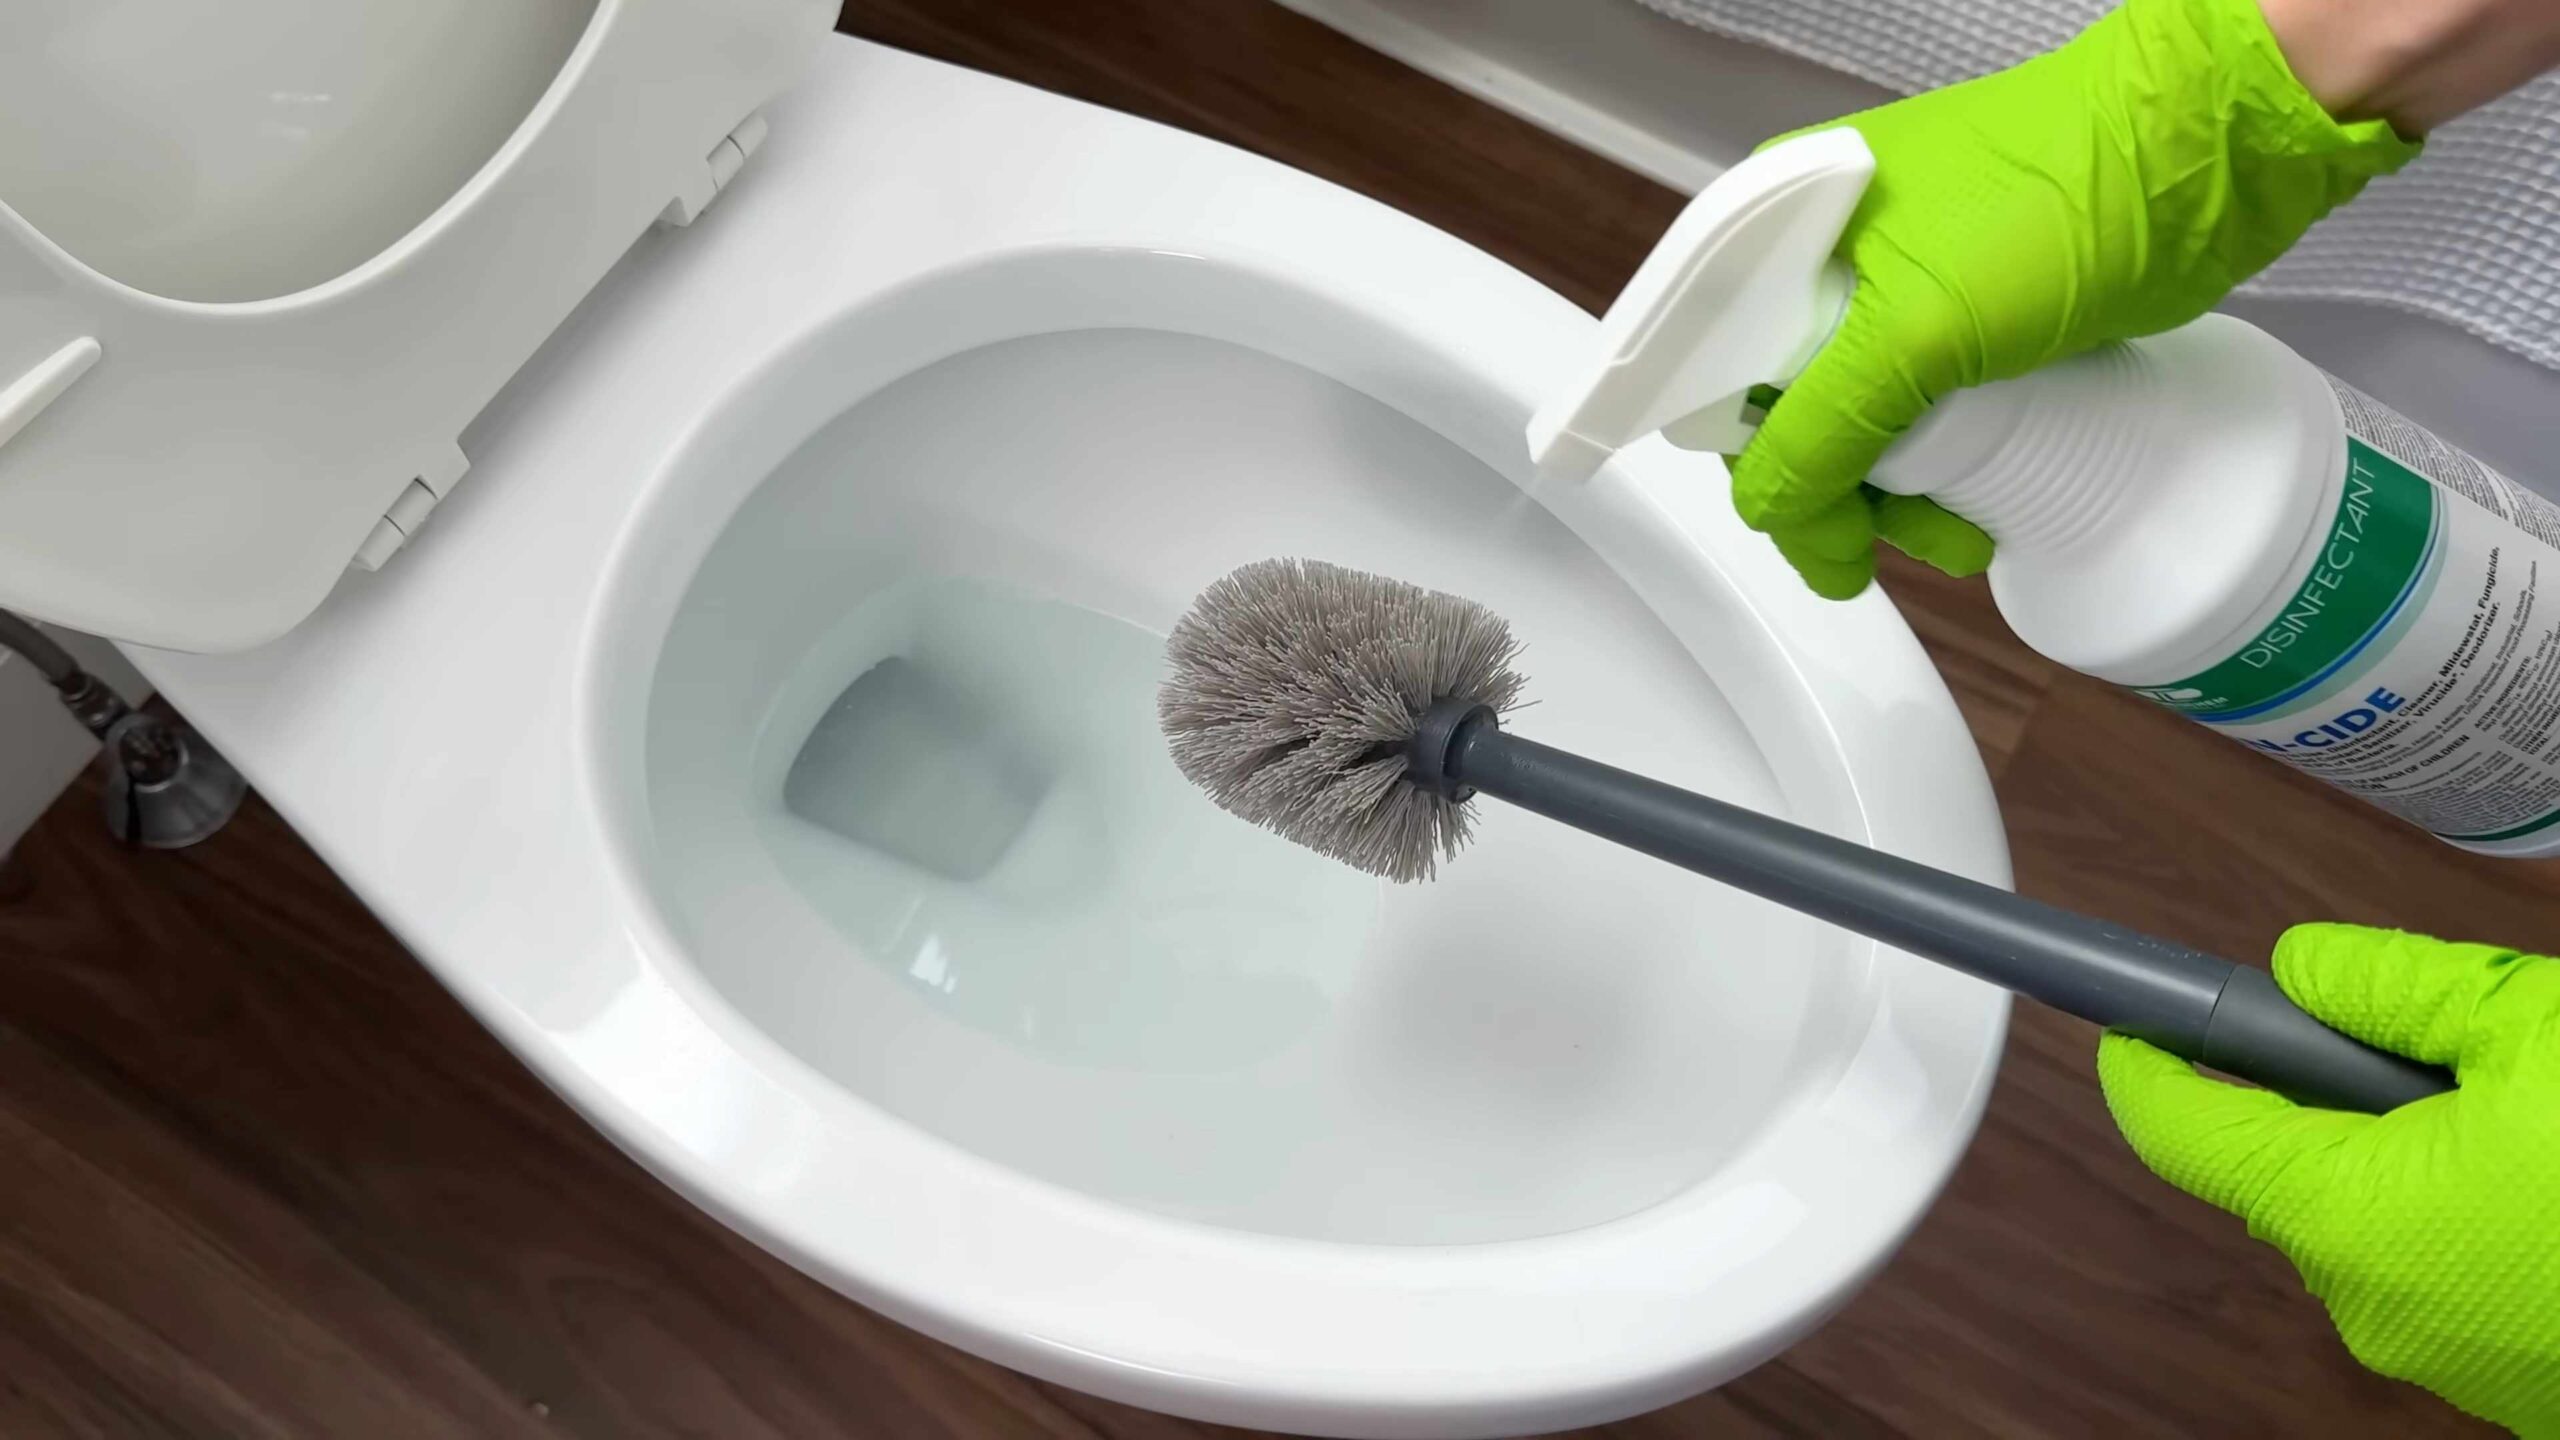
Cleaning the Toilet Bowl
Here’s how to get that toilet bowl sparkling clean:
1. Baking Soda and Vinegar: Pour one cup of baking soda into the toilet bowl. Then, slowly pour two cups of white vinegar into the bowl. The mixture will fizz, which helps to loosen dirt and grime.
2. Let it Fizz: Let the baking soda and vinegar mixture sit for at least 30 minutes, or even overnight for tough stains.
3. Scrub-a-dub-dub: Use a toilet brush to scrub the inside of the toilet bowl, paying attention to any stains or buildup.
4. Flush Away: Flush the toilet to rinse away the baking soda and vinegar mixture.
5. Toilet Bowl Cleaner Bombs (Optional): For a deeper clean and a fresh scent, drop a toilet bowl cleaner bomb into the bowl after flushing. Let it fizz and dissolve, then scrub with a toilet brush and flush again.
Making Toilet Bowl Cleaner Bombs
These are super easy and fun to make!
1. Gather Your Supplies: You’ll need 1 ½ cups of baking soda, ½ cup of citric acid (you can find this online or at some health food stores), ½ cup of cornstarch, a few tablespoons of water, 15-20 drops of essential oil (like tea tree, lavender, or lemon), and a silicone mold (like a muffin tin or ice cube tray).
2. Mix the Dry Ingredients: In a large bowl, combine the baking soda, citric acid, and cornstarch. Whisk them together until they are well combined.
3. Add the Wet Ingredients: Slowly add the water, one tablespoon at a time, mixing well after each addition. Be careful not to add too much water at once, as this will cause the mixture to fizz prematurely. Add the essential oil and mix well.
4. Mold the Bombs: Press the mixture firmly into the silicone mold.
5. Let Them Dry: Let the bombs dry for at least 24 hours, or until they are completely hardened.
6. Store and Use: Once the bombs are dry, remove them from the mold and store them in an airtight container. To use, simply drop a bomb into the toilet bowl, let it fizz and dissolve, then scrub with a toilet brush and flush.
Cleaning the Toilet Exterior
Don’t forget the outside!
1. Vinegar Solution: Mix equal parts white vinegar and water in a spray bottle.
2. Spray and Wipe: Spray the vinegar solution onto the exterior of the toilet, including the base, tank, and seat.
3. Wipe Clean: Use a microfiber cloth to wipe the toilet clean. Pay attention to any areas with dirt or grime.
4. Disinfectant Wipe (Optional): For extra disinfecting power, you can use a disinfectant wipe after wiping with the vinegar solution.
Shining Up Sinks and Faucets
A sparkling sink and faucet can instantly brighten up your bathroom.
* Baking Soda and Vinegar Scrub: This is a great way to remove water spots and grime from your sink and faucet.
* Lemon Polish: Lemon juice can help remove water spots and leave your faucet looking shiny.
* Toothpaste Trick: Believe it or not, toothpaste can be used to polish chrome faucets.
Cleaning the Sink and Faucet
Here’s how to get them gleaming:
1. Baking Soda Paste: Make a paste of baking soda and water.
2. Apply and Scrub: Apply the baking soda paste to the sink and faucet. Use a sponge or scrub brush to scrub away any water spots, grime, or stains.
3. Rinse Thoroughly: Rinse the sink and faucet with water.
4. Lemon Polish (Optional): Cut a lemon in half and rub it onto the faucet. Let the lemon juice sit for a few minutes, then rinse with water.
5. Toothpaste Trick (Optional): Apply a small amount of toothpaste to a soft cloth and rub it onto the chrome faucet. Rinse with water and buff with a clean cloth.
Mirror, Mirror on the Wall
Streaky mirrors can make your whole bathroom look dingy.
* Vinegar Solution: A simple vinegar and water solution is all you need for streak-free mirrors.
* Microfiber Cloth Magic: Using a microfiber cloth is key to achieving a streak-free shine.
Cleaning Mirrors
Here’s the secret to sparkling mirrors:
1. Vinegar Solution: Mix equal parts white vinegar and water in a spray bottle.
2. Spray Lightly: Lightly spray the vinegar solution onto the mirror. Avoid spraying too much, as this can cause streaks.
3. Wipe with Microfiber Cloth: Use a clean, dry microfiber cloth to wipe the mirror. Wipe in a circular motion, then finish with vertical strokes.
4. Buff to Shine:

Conclusion
So, there you have it! These DIY bathroom cleaning hacks are more than just quick fixes; they’re a pathway to a sparkling clean bathroom without the harsh chemicals and exorbitant costs of commercial cleaners. We’ve explored simple yet effective methods using ingredients you likely already have in your pantry. From banishing stubborn soap scum with the power of vinegar and baking soda to effortlessly shining your showerhead with a simple bag and vinegar soak, these tricks are designed to save you time, money, and effort.
But why are these DIY bathroom cleaning hacks a must-try? Firstly, they’re incredibly budget-friendly. Forget shelling out a fortune on specialized cleaning products; these methods utilize inexpensive, readily available ingredients. Secondly, they’re eco-friendly. By reducing your reliance on chemical-laden cleaners, you’re contributing to a healthier environment for yourself and your family. Thirdly, they’re surprisingly effective. You’ll be amazed at the cleaning power of these simple solutions.
Beyond the Basics: Variations and Enhancements
Don’t be afraid to experiment and customize these hacks to suit your specific needs and preferences. Here are a few variations to consider:
* Essential Oil Infusion: Add a few drops of your favorite essential oils, such as lavender, tea tree, or eucalyptus, to your cleaning solutions for a refreshing and aromatic boost. Tea tree oil, in particular, has natural antibacterial properties, making it a great addition to your bathroom cleaner.
* Lemon Power: For extra cleaning power and a fresh scent, add lemon juice to your vinegar solutions. The citric acid in lemon juice helps to break down grime and disinfect surfaces.
* Borax Boost: For particularly stubborn stains or mildew, consider adding a small amount of borax to your cleaning solutions. Borax is a natural mineral with powerful cleaning and disinfecting properties. Use with caution and always wear gloves.
* DIY Cleaning Paste: Create a thick paste of baking soda and water (or vinegar) to tackle tough stains on grout or tiles. Apply the paste, let it sit for a few minutes, and then scrub with a brush.
* Preventative Measures: After cleaning, improve ventilation in your bathroom by opening a window or running the exhaust fan. This will help to prevent moisture buildup and reduce the risk of mold and mildew growth.
We encourage you to embrace these DIY bathroom cleaning hacks and experience the satisfaction of a clean and healthy bathroom without breaking the bank or harming the environment. The beauty of these methods lies in their simplicity and adaptability. Feel free to tweak them, combine them, and discover what works best for your bathroom and your cleaning style.
Now it’s your turn! Give these DIY bathroom cleaning hacks a try and share your experiences with us. Let us know which tricks worked best for you, any variations you discovered, and any tips you have to share. Your feedback will help us refine these methods and empower others to embrace the power of DIY cleaning. Share your before and after photos on social media using #DIYBathroomClean and inspire others to join the movement towards a cleaner, greener, and more affordable way to maintain their bathrooms. We can’t wait to hear your success stories!
Frequently Asked Questions (FAQ)
Q: Are these DIY bathroom cleaning hacks safe for all bathroom surfaces?
A: While most of these hacks are generally safe, it’s always a good idea to test them on a small, inconspicuous area first, especially on delicate surfaces like marble or natural stone. Vinegar, in particular, can etch some surfaces if left on for too long. Avoid using abrasive scrubbers on easily scratched surfaces. For sensitive materials, dilute the cleaning solutions further or opt for gentler alternatives like baking soda paste. Always read the labels of any commercial products you might be combining with DIY solutions to ensure compatibility.
Q: How often should I use these DIY bathroom cleaning hacks?
A: The frequency depends on your bathroom usage and personal preferences. For general cleaning, aim to use these hacks once a week. For areas prone to mildew or soap scum buildup, such as the shower or bathtub, you may need to clean them more frequently, perhaps every few days. Regular maintenance will prevent grime from accumulating and make cleaning easier in the long run. Consider incorporating a quick daily wipe-down of surfaces to minimize the need for deep cleaning.
Q: Can I use these DIY bathroom cleaning hacks if I have allergies or sensitivities?
A: If you have allergies or sensitivities, it’s crucial to be cautious when using any cleaning products, including DIY solutions. Always wear gloves and consider wearing a mask to avoid inhaling fumes. If you’re sensitive to vinegar, you can try using lemon juice as an alternative. If you experience any adverse reactions, such as skin irritation or respiratory problems, discontinue use immediately and consult a doctor. It’s also wise to introduce new cleaning solutions gradually to monitor your body’s response.
Q: How do I get rid of stubborn mold and mildew in my bathroom?
A: Mold and mildew thrive in damp environments, making bathrooms a prime breeding ground. To tackle stubborn mold and mildew, create a paste of baking soda and water or use a solution of equal parts vinegar and water. Apply the paste or solution to the affected area, let it sit for at least 30 minutes, and then scrub with a stiff brush. For particularly stubborn mold, you can try using a solution of diluted bleach (always wear gloves and eye protection when using bleach). Ensure proper ventilation while cleaning and after to prevent moisture buildup. Consider using a dehumidifier in your bathroom to reduce humidity levels and prevent mold growth.
Q: What’s the best way to clean a showerhead with vinegar?
A: Cleaning your showerhead with vinegar is a simple and effective way to remove mineral deposits and restore water flow. Fill a plastic bag with white vinegar and secure it around the showerhead with a rubber band or twist tie, ensuring the showerhead is fully submerged in the vinegar. Let it soak for at least an hour, or preferably overnight. Remove the bag and run the shower for a few minutes to flush out any remaining vinegar and loosened deposits. For showerheads with removable nozzles, you can detach them and soak them directly in a bowl of vinegar.
Q: Are these DIY bathroom cleaning hacks septic-safe?
A: Generally, these DIY bathroom cleaning hacks are considered septic-safe, as they primarily use natural ingredients like vinegar, baking soda, and lemon juice. However, it’s essential to use these solutions in moderation. Excessive amounts of any cleaning product, even natural ones, can disrupt the balance of bacteria in your septic system. Avoid pouring large quantities of grease or oil down the drain, as these can clog your septic system. If you have any concerns, consult with a septic system professional.
Q: Can I mix different DIY cleaning solutions together?
A: It’s generally not recommended to mix different DIY cleaning solutions together, as some combinations can create harmful or even toxic fumes. For example, never mix bleach with vinegar or ammonia, as this can produce chlorine gas, which is extremely dangerous. Stick to using one cleaning solution at a time and rinse thoroughly before applying another. If you’re unsure about the compatibility of two solutions, it’s best to err on the side of caution and avoid mixing them.
Q: How can I prevent my bathroom from getting dirty in the first place?
A: Prevention is key to keeping your bathroom clean and minimizing the need for deep cleaning. Here are a few tips:
* Wipe down surfaces after each use: Quickly wipe down the shower walls, sink, and countertops after each use to prevent soap scum and water spots from building up.
* Use a squeegee: Use a squeegee after each shower to remove excess water from the shower walls and door.
* Improve ventilation: Ensure proper ventilation in your bathroom by opening a window or running the exhaust fan after showering.
* Use a shower curtain liner: A shower curtain liner will help to prevent water from splashing onto the floor and walls.
* Clean regularly: Establish a regular cleaning routine to prevent grime from accumulating.
Leave a Comment