

Clean Sterling Silver with Baking Soda: Are your cherished sterling silver pieces losing their luster? Don’t despair! I’m here to share a simple, yet incredibly effective DIY trick that will restore their shine using a common household ingredient: baking soda. For generations, silver has been a symbol of elegance and refinement, adorning our tables and homes with its timeless beauty. From ancient civilizations to modern-day celebrations, silver has held a special place in our hearts and traditions.
However, silver’s tendency to tarnish can be frustrating. That dull, dark film can make even the most exquisite pieces look neglected. But fear not! You don’t need harsh chemicals or expensive cleaning solutions to bring back that brilliant gleam. This DIY method to clean sterling silver with baking soda is gentle, affordable, and surprisingly easy. I’ll guide you through each step, ensuring you achieve professional-looking results without any fuss.
Why is this DIY trick so essential? Because maintaining your sterling silver doesn’t have to be a chore. It should be a rewarding experience that preserves the beauty and value of your treasured possessions. Plus, avoiding harsh chemicals is always a win for both your silver and the environment. So, let’s dive in and discover the magic of baking soda for sparkling sterling silver!
DIY: Sparkling Sterling Silver with Baking Soda – A Simple Guide
Hey there, fellow DIY enthusiasts! Is your beautiful sterling silver looking a little dull and tarnished? Don’t worry, you don’t need harsh chemicals or expensive cleaners to bring back its shine. I’m going to show you a super easy and effective way to clean your sterling silver using baking soda – a common household ingredient that’s gentle, affordable, and surprisingly powerful. Let’s get started!
What You’ll Need
Before we dive in, let’s gather our supplies. This is a pretty straightforward process, so you probably already have most of these items on hand.
* Baking Soda: The star of the show!
* Aluminum Foil: This creates a chemical reaction that helps remove tarnish.
* Boiling Water: Hot water speeds up the cleaning process.
* A Glass or Ceramic Bowl: Avoid using metal bowls, as they can interfere with the cleaning process.
* Soft Cloth or Microfiber Cloth: For polishing your silver after cleaning.
* Tongs or a Fork: To safely remove your silver from the hot water.
* Dish Soap (Optional): For pre-cleaning heavily soiled items.
Understanding the Science Behind It
Okay, so how does this baking soda trick actually work? Well, tarnish on silver is primarily silver sulfide, which forms when silver reacts with sulfur compounds in the air. The aluminum foil, baking soda, and hot water create an electrolytic reaction. The aluminum is more reactive than silver, so it attracts the sulfur atoms away from the silver, effectively reversing the tarnishing process. Pretty neat, huh?
Step-by-Step Instructions: Cleaning Your Sterling Silver
Alright, let’s get down to business! Follow these steps carefully to achieve the best results.
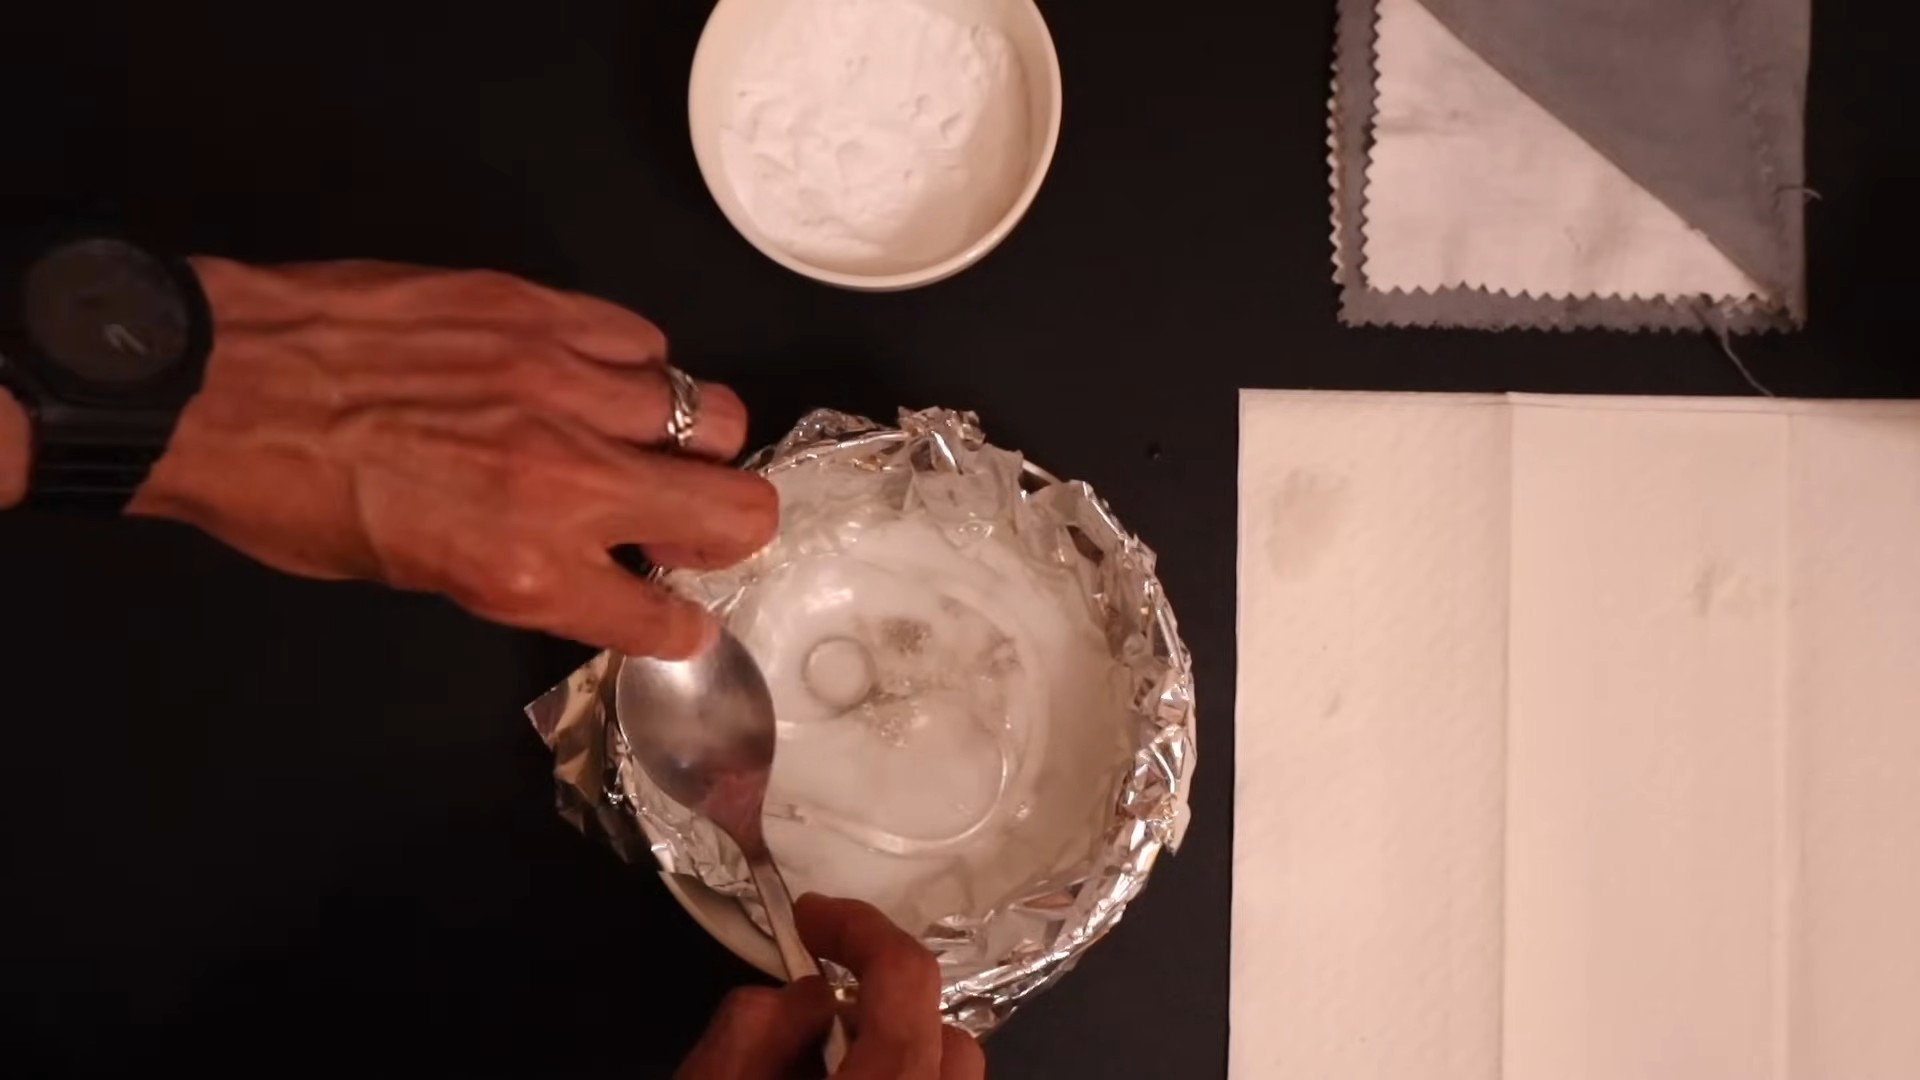
1. Prepare Your Bowl: Line your glass or ceramic bowl completely with aluminum foil. Make sure the shiny side of the foil is facing up, as this is the side that will be in contact with the water and silver. The foil needs to cover the entire inside surface of the bowl to ensure proper contact with the silver.
2. Add Baking Soda: Pour about 1-2 tablespoons of baking soda into the bowl. The amount you need will depend on the size of your bowl and the amount of silver you’re cleaning. A good rule of thumb is to use enough baking soda to create a noticeable concentration in the water.
3. Pour in the Boiling Water: Carefully pour boiling water into the bowl. The water should be hot enough to activate the chemical reaction, so freshly boiled water is ideal. Be cautious when handling boiling water to avoid burns. Fill the bowl enough to completely submerge the silver items you’ll be cleaning.
4. Submerge Your Silver: Gently place your tarnished sterling silver items into the bowl, making sure they are touching the aluminum foil. This is crucial for the electrolytic reaction to occur. If you have a lot of silver, you might need to do this in batches to ensure everything makes good contact with the foil. Avoid overcrowding the bowl.
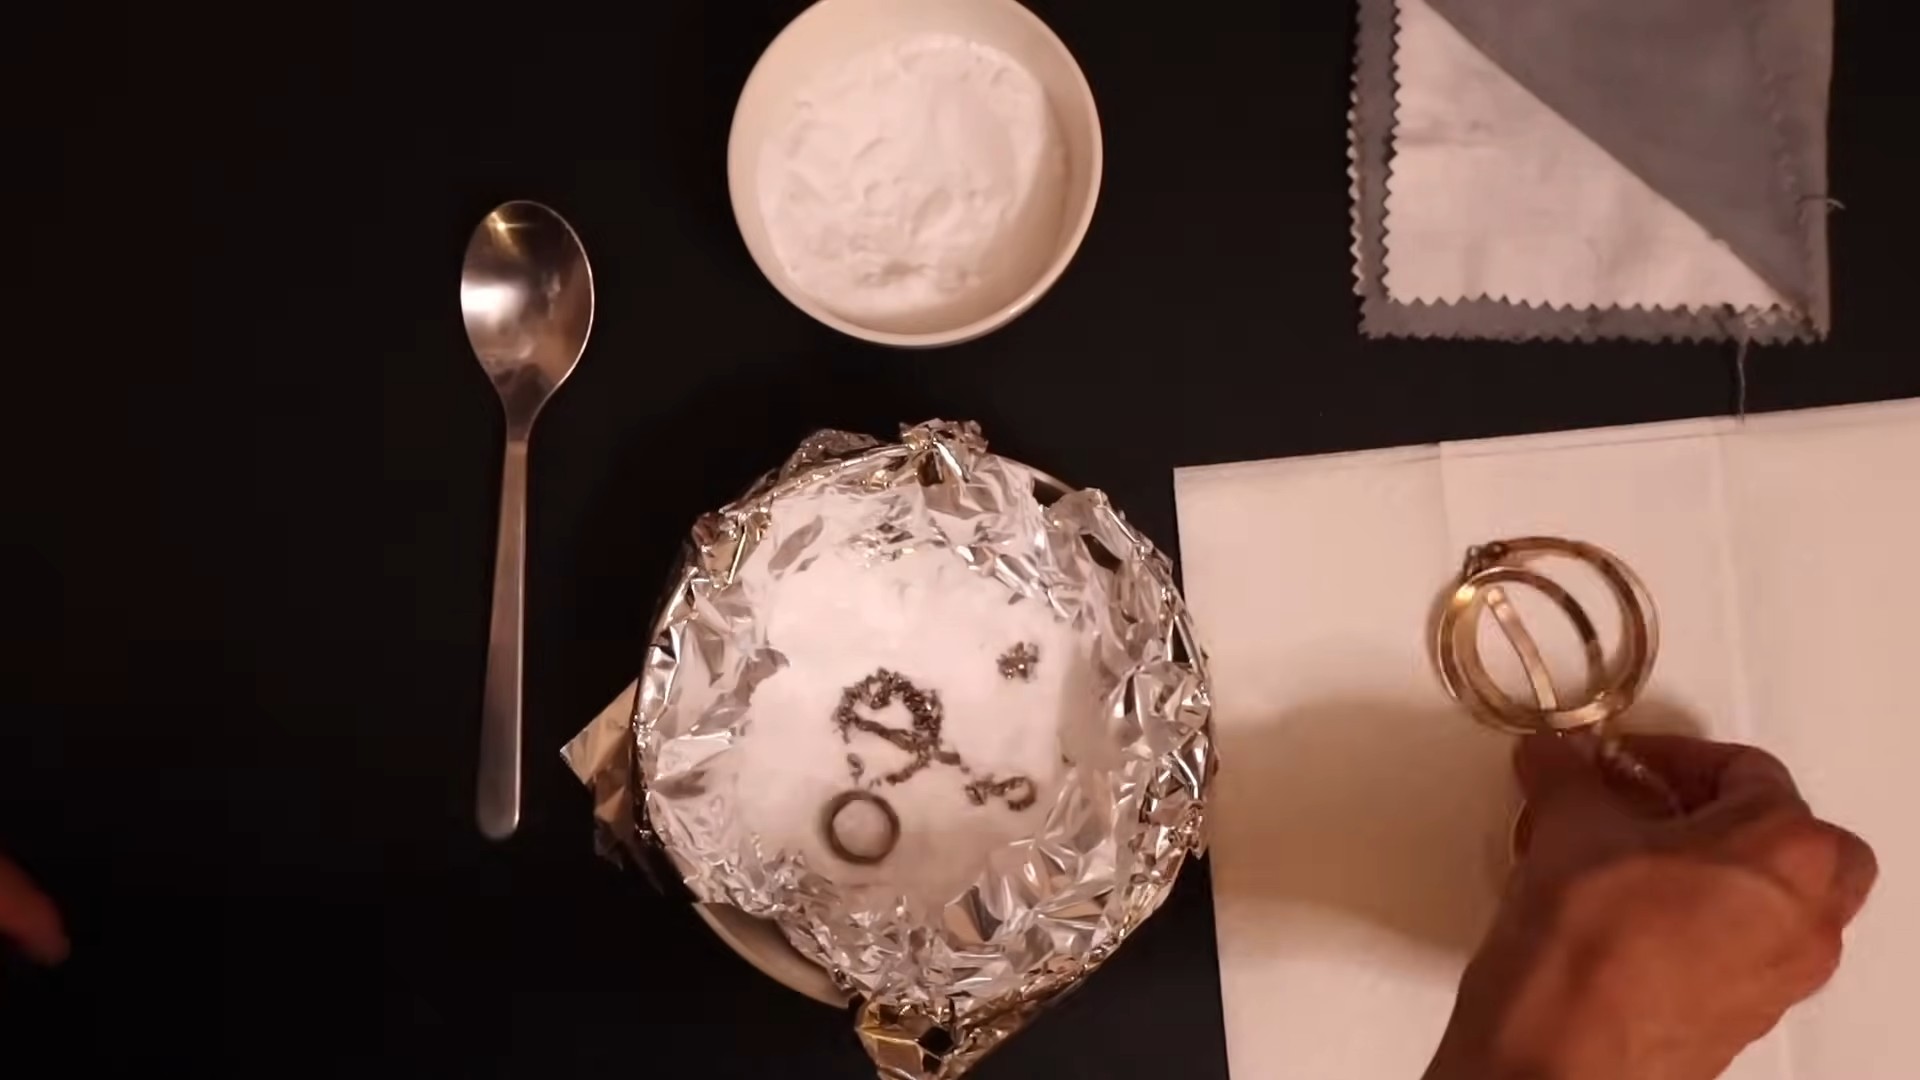
5. Observe the Magic: Now, this is where the fun begins! You should start to see the tarnish disappearing from your silver. The length of time it takes will depend on the severity of the tarnish. Lightly tarnished items might only need a few minutes, while heavily tarnished pieces could take up to 30 minutes. Keep an eye on the process and check the silver periodically. You might notice a sulfurous smell – that’s perfectly normal and means the reaction is working!
6. Remove and Rinse: Once the tarnish is gone (or significantly reduced), carefully remove the silver items from the bowl using tongs or a fork. Rinse them thoroughly under warm running water to remove any remaining baking soda residue.
7. Dry and Polish: Use a soft cloth or microfiber cloth to dry the silver completely. As you dry it, you’ll also be polishing it, bringing out its natural shine. For extra shine, you can use a dedicated silver polishing cloth.
Dealing with Stubborn Tarnish
Sometimes, you might encounter pieces with particularly stubborn tarnish. Here are a few tips for tackling those tricky spots:
* Repeat the Process: If the tarnish isn’t completely gone after the first attempt, simply repeat the process. You might need to use fresh aluminum foil and baking soda for the best results.
* Increase Baking Soda Concentration: For heavily tarnished items, try using a higher concentration of baking soda in the water.
* Extend the Soaking Time: Allow the silver to soak in the solution for a longer period, up to an hour, checking it periodically.
* Gentle Scrubbing (Use with Caution): For very stubborn spots, you can try gently scrubbing the silver with a soft toothbrush and a paste made of baking soda and water. However, be extremely careful, as abrasive scrubbing can scratch the silver. Test this method on an inconspicuous area first.
Pre-Cleaning Heavily Soiled Silver
If your silver is not only tarnished but also heavily soiled with food residue or grime, it’s a good idea to pre-clean it before using the baking soda method.
1. Wash with Dish Soap: Wash the silver items with warm water and a mild dish soap. Use a soft sponge or cloth to gently remove any dirt or debris.
2. Rinse Thoroughly: Rinse the silver thoroughly under warm running water to remove all traces of soap.
3. Proceed with Baking Soda Cleaning: Once the silver is clean and rinsed, you can proceed with the baking soda cleaning method as described above.
Important Considerations and Precautions
While this baking soda method is generally safe and effective, there are a few things to keep in mind:
* Not Suitable for All Silver Items: This method is best suited for solid sterling silver. It’s not recommended for silver-plated items, as it can potentially damage the plating. Also, avoid using this method on items with delicate stones or other embellishments, as the hot water and baking soda could harm them.
* Avoid Abrasive Scrubbing: As mentioned earlier, avoid using abrasive scrubbing pads or harsh chemicals, as they can scratch or damage the silver.
* Handle Boiling Water with Care: Always exercise caution when handling boiling water to prevent burns.
* Test on an Inconspicuous Area: If you’re unsure about using this method on a particular item, test it on a small, inconspicuous area first to ensure it doesn’t cause any damage.
* Proper Storage: To prevent tarnish from forming quickly, store your clean silver in airtight containers or pouches. You can also place anti-tarnish strips or cloths in the storage containers to absorb sulfur compounds in the air.
Maintaining Your Sparkling Silver
Once you’ve cleaned your sterling silver, you’ll want to keep it looking its best. Here are a few tips for maintaining its shine:
* Regular Cleaning: Clean your silver regularly, even if it doesn’t appear to be tarnished. This will help prevent tarnish from building up in the first place.
* Avoid Contact with Harsh Chemicals: Keep your silver away from harsh chemicals, such as chlorine bleach, hairspray, and perfumes, as these can accelerate tarnishing.
* Handle with Clean Hands: When handling your silver, make sure your hands are clean and dry. Oils and dirt from your skin can contribute to tarnishing.
* Polish Regularly: Use a silver polishing cloth to polish your silver regularly. This will help remove any light tarnish and keep it looking shiny.
Troubleshooting
* Why isn’t the tarnish disappearing? Make sure the silver is touching the aluminum foil. The reaction won’t work if there’s no contact. Also, ensure the water is hot enough and that you’re using enough baking soda.
* My silver has a white film after cleaning. This is likely baking soda residue. Simply rinse the silver thoroughly under warm running water and dry it with a soft cloth.
* Can I use this method on jewelry with gemstones? It’s generally not recommended, as the hot water and baking soda could damage the gemstones. Consult a professional jeweler for cleaning advice.
I hope this guide has been helpful! With a little baking soda, aluminum foil, and hot water, you can easily restore the shine to your sterling silver and keep it looking beautiful for years to come. Happy cleaning!
Conclusion
So, there you have it! A simple, effective, and surprisingly satisfying way to bring back the shine to your sterling silver using the power of baking soda. Forget harsh chemicals and expensive silver polishes filled with questionable ingredients. This DIY trick is a game-changer for anyone looking to maintain their precious silver pieces without breaking the bank or exposing themselves to potentially harmful substances.
Why is this a must-try? Because it’s gentle, readily available, and incredibly effective. The baking soda and aluminum foil create a chemical reaction that lifts the tarnish right off your silver, leaving it sparkling like new. It’s a truly remarkable transformation that you have to witness to believe. Plus, it’s a fantastic way to teach kids about basic chemistry in a safe and engaging environment.
But the beauty of this method lies in its adaptability. While the basic recipe of baking soda, hot water, and aluminum foil works wonders, feel free to experiment with slight variations to suit your specific needs. For heavily tarnished items, you might want to increase the amount of baking soda or extend the soaking time. For delicate pieces, ensure the water isn’t scalding hot to avoid any potential damage.
Consider adding a small amount of salt to the solution for an extra boost in cleaning power. Some people also swear by using distilled water instead of tap water to prevent mineral deposits from interfering with the cleaning process. And if you’re dealing with intricate designs or hard-to-reach areas, a soft-bristled toothbrush can be your best friend for gently scrubbing away stubborn tarnish.
Remember to always test a small, inconspicuous area first, especially if you’re working with antique or particularly valuable silver items. While this method is generally safe, it’s always better to err on the side of caution.
The key to success with this clean sterling silver baking soda method is patience. Don’t expect instant miracles, especially with heavily tarnished pieces. Let the chemical reaction do its work, and you’ll be amazed at the results.
We’re confident that once you try this DIY trick, you’ll be hooked. It’s a cost-effective, eco-friendly, and incredibly satisfying way to keep your sterling silver looking its best. So, gather your supplies, put on some music, and get ready to witness the magic of baking soda in action.
Don’t just take our word for it, though! We encourage you to try this method yourself and share your experiences with us. Let us know what variations you tried, what worked best for you, and any tips or tricks you discovered along the way. Your feedback will help us refine this method and make it even better for everyone. Share your before-and-after photos on social media using #BakingSodaSilverClean and inspire others to ditch the harsh chemicals and embrace the power of DIY cleaning. We can’t wait to see your sparkling silver!
Frequently Asked Questions (FAQ)
What kind of baking soda should I use?
Plain, ordinary baking soda (sodium bicarbonate) is all you need. There’s no need to buy anything fancy or specialized. The baking soda you use for baking cakes and cookies will work perfectly fine for cleaning your sterling silver. Make sure it’s fresh and hasn’t absorbed any odors from your pantry.
What kind of aluminum foil is best?
Regular aluminum foil, the kind you use for cooking, is perfectly suitable. It doesn’t matter if it’s heavy-duty or not. The important thing is that the aluminum foil is in direct contact with the silver and the baking soda solution to facilitate the chemical reaction.
How hot should the water be?
The water should be hot, but not boiling. Ideally, it should be hot enough to activate the baking soda and aluminum foil, but not so hot that it could damage delicate silver pieces or burn you. Think of it as comfortably hot tap water – around 140-160°F (60-70°C).
How long should I soak the silver?
The soaking time will depend on the level of tarnish. For lightly tarnished items, a few minutes might be sufficient. For heavily tarnished pieces, you might need to soak them for up to 30 minutes or even longer. Check the silver periodically and remove it when the tarnish has visibly lifted. If the tarnish is particularly stubborn, you can try gently scrubbing the silver with a soft-bristled toothbrush while it’s still submerged in the solution.
Can I use this method on all types of silver?
This method is generally safe for sterling silver, which is typically marked with “925.” However, it’s not recommended for silver-plated items, as the process can potentially damage the thin layer of silver plating. Always check the markings on your silver before attempting this cleaning method. If you’re unsure, it’s best to consult with a professional jeweler or silversmith.
Will this method remove scratches?
No, this method will not remove scratches. It only removes tarnish, which is a surface discoloration caused by oxidation. Scratches are physical imperfections in the silver and require professional polishing to remove.
Can I reuse the baking soda solution?
It’s best to use a fresh batch of baking soda solution for each cleaning session. The effectiveness of the solution decreases as it’s used, so you’ll get better results with a new batch.
Is this method safe for gemstones or other embellishments?
If your silver item has gemstones or other embellishments, it’s important to exercise caution. Some gemstones can be damaged by hot water or baking soda. If you’re unsure, it’s best to avoid submerging the entire item in the solution. Instead, you can try using a cotton swab dipped in the baking soda solution to gently clean the silver around the gemstones.
What if the tarnish doesn’t come off completely?
If the tarnish is particularly stubborn, you can try increasing the amount of baking soda, extending the soaking time, or gently scrubbing the silver with a soft-bristled toothbrush while it’s still submerged in the solution. You can also try making a paste of baking soda and water and applying it directly to the tarnished areas. Let the paste sit for a few minutes, then rinse thoroughly with water and dry with a soft cloth.
How can I prevent my silver from tarnishing in the future?
To prevent your silver from tarnishing, store it in a cool, dry place, preferably in a tarnish-resistant bag or cloth. Avoid exposing your silver to humidity, sunlight, and chemicals, such as perfumes, hairsprays, and cleaning products. Regularly polishing your silver with a soft cloth can also help prevent tarnish from forming. You can also place a piece of chalk or activated charcoal in your silver storage container to absorb moisture and prevent tarnish.

Leave a Comment