

DIY Canvas Art: Unleash your inner artist and transform your living space without breaking the bank! Have you ever stared at a blank wall, yearning for a splash of personality but dreading the hefty price tag of original artwork? I know I have! That’s why I’m so excited to share some incredibly easy and fun DIY canvas art ideas that will have your friends saying, “Wow, did you paint that?!”
Creating art on canvas has a rich history, dating back centuries when artists used stretched canvases as a durable and versatile surface for their masterpieces. While we might not all be aspiring Rembrandts, the beauty of DIY canvas art is that it’s accessible to everyone, regardless of skill level. It’s a fantastic way to express your creativity, personalize your home, and even de-stress after a long day.
In today’s world, where mass-produced decor often lacks character, adding a personal touch to your surroundings is more important than ever. These DIY canvas art projects are perfect for anyone looking to inject some unique style into their home. Whether you’re a seasoned crafter or a complete beginner, I’m confident you’ll find inspiration and techniques that you can easily adapt to your own taste. So, grab your brushes, gather your supplies, and let’s get ready to create some stunning artwork that you’ll be proud to display!
DIY Canvas Art: Unleash Your Inner Artist (Even if You Think You Don’t Have One!)
Okay, so you’re staring at a blank wall, feeling uninspired, and thinking, “I wish I had some cool art, but I’m not exactly Picasso.” Don’t worry, friend! You don’t need to be a master painter to create stunning canvas art. This guide will walk you through several easy and fun DIY canvas art techniques that will transform your space and impress your friends (and yourself!). I promise, it’s easier than you think!
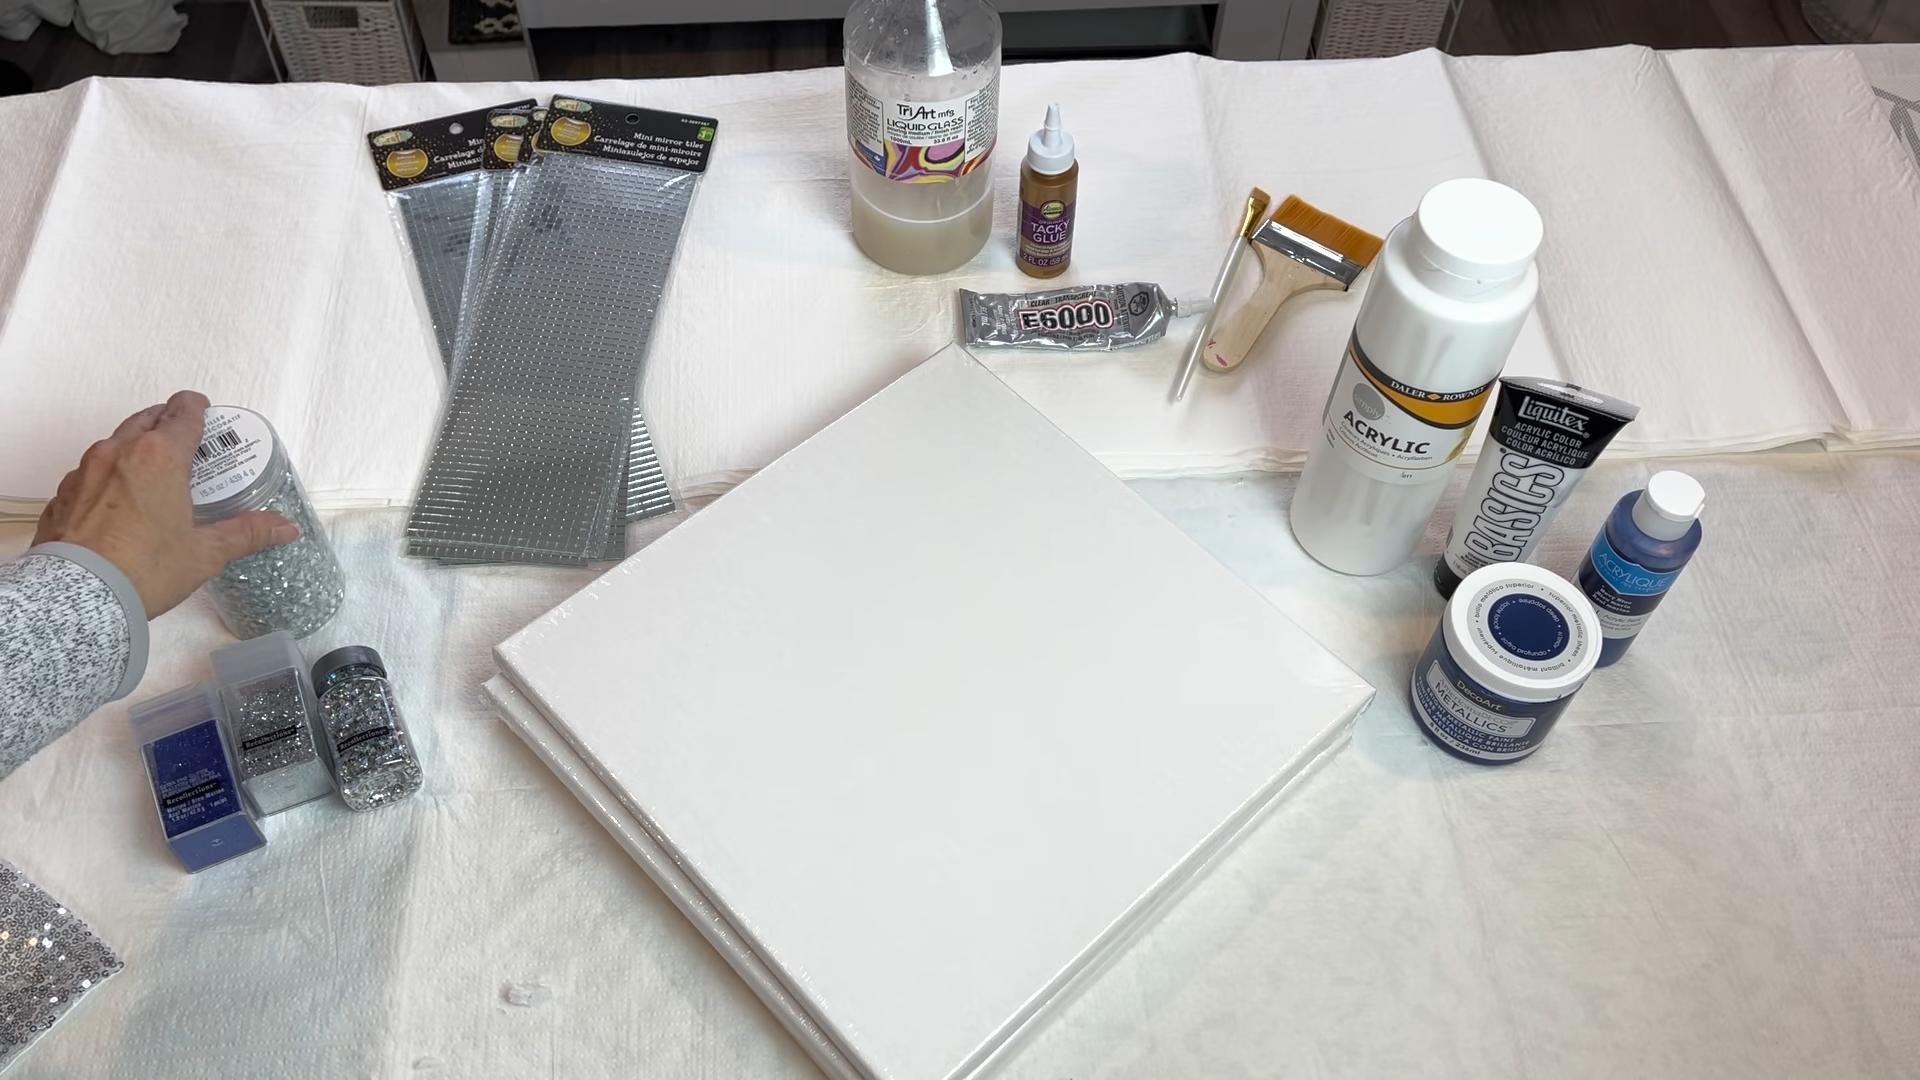
Materials You’ll Need (For Most Techniques)
Before we dive into the specific techniques, let’s gather our supplies. Having everything ready beforehand will make the process much smoother and more enjoyable.
* Blank Canvas: Choose the size that fits your space. You can find these at any craft store or online. I recommend starting with a smaller canvas (like 12×16 inches) if you’re a beginner.
* Acrylic Paints: Acrylics are versatile, affordable, and easy to work with. Get a variety of colors you love! A basic set with primary colors, black, and white is a great starting point. You can always mix colors to create custom shades.
* Paintbrushes: A variety of sizes is helpful. You’ll want a large brush for covering large areas, a medium brush for details, and a small, fine-tipped brush for intricate work.
* Palette: A palette is where you’ll mix your paints. You can use a plastic palette, a paper plate, or even a piece of cardboard covered in aluminum foil.
* Water Container: For rinsing your brushes.
* Paper Towels or Rags: For cleaning up spills and wiping your brushes.
* Painter’s Tape: This is essential for creating clean lines and geometric designs.
* Optional:
* Gesso: This is a primer that helps the paint adhere to the canvas better. It’s not always necessary, but it can improve the overall look and longevity of your artwork.
* Palette Knife: For applying paint in thick, textured layers.
* Sponges: For creating interesting textures and effects.
* Stencils: For adding patterns and designs.
* Sealant: To protect your finished artwork.
Technique 1: Abstract Acrylic Pouring
Acrylic pouring is a super fun and unpredictable technique that creates stunning abstract art. It’s perfect for beginners because there’s no “right” or “wrong” way to do it!
What You’ll Need (In Addition to the Basic Supplies):
* Pouring Medium: This thins the acrylic paint and helps it flow smoothly. You can find pouring medium at most craft stores.
* Silicone Oil (Optional): Adding a few drops of silicone oil to your paint can create cells, which are those cool, circular patterns you often see in acrylic pours.
* Cups or Containers: For mixing your paints.
* Drop Cloth or Newspaper: This gets messy! Protect your work surface.
* Level: To ensure your canvas is level while the paint dries.
Step-by-Step Instructions:
1. Prepare Your Paints: In separate cups, mix your acrylic paints with the pouring medium. The ratio is usually 1 part paint to 2 parts pouring medium, but you can adjust this to your liking. The consistency should be similar to warm honey. If you’re using silicone oil, add a few drops to each cup and gently stir. Don’t over-stir, or you’ll lose the cell effect.
2. Prepare Your Canvas: Place your canvas on a level surface covered with a drop cloth or newspaper.
3. Choose Your Pouring Method: There are several different pouring methods you can try:
* Dirty Pour: Pour all of your paints into one cup, layering them as you go. Then, flip the cup onto the canvas and let the paint flow out.
* Puddle Pour: Pour each color onto the canvas in separate puddles, overlapping them slightly.
* Flip Cup: Pour each color into a separate cup. Flip each cup onto the canvas and let it sit for a few seconds. Then, lift the cups and let the paint flow.
* Swipe: Pour your paints onto the canvas in lines or puddles. Then, use a piece of cardboard, a palette knife, or even a paper towel to swipe across the paint, creating interesting patterns.
4. Pour Your Paint: Carefully pour your paint onto the canvas using your chosen method.
5. Tilt and Manipulate: Tilt the canvas to spread the paint and create the desired effect. You can also use a palette knife or other tools to manipulate the paint.
6. Pop Bubbles: If you see any bubbles in the paint, you can pop them with a toothpick or a heat gun.
7. Let it Dry: Let the painting dry completely. This can take several days, depending on the thickness of the paint. Make sure the canvas remains level during the drying process.
8. Seal (Optional): Once the painting is dry, you can seal it with a clear acrylic sealant to protect it.
Technique 2: Geometric Tape Resist Art
This technique is perfect for creating clean, modern designs. It’s also a great way to experiment with color blocking.
What You’ll Need (In Addition to the Basic Supplies):
* Painter’s Tape: Make sure it’s good quality painter’s tape to prevent paint bleed.
* Ruler or Measuring Tape: For creating precise lines.
* Pencil: For marking your design.
Step-by-Step Instructions:
1. Plan Your Design: Before you start taping, sketch out your design on a piece of paper. Consider the colors you want to use and the overall look you’re going for.
2. Tape Off Your Design: Use the painter’s tape to create your geometric shapes. Make sure the tape is firmly pressed down to prevent paint from seeping underneath. Use a ruler or measuring tape to ensure your lines are straight and your angles are accurate.
3. Paint: Paint the exposed areas of the canvas with your chosen colors. You can use multiple colors or stick to a single color for a more minimalist look.
4. Let the Paint Dry: Let the paint dry completely before removing the tape.
5. Remove the Tape: Carefully peel off the painter’s tape to reveal your geometric design.
6. Touch Up (Optional): If you notice any paint bleed, you can touch it up with a small brush and the corresponding paint color.
7. Seal (Optional): Seal your artwork with a clear acrylic sealant to protect it.
Technique 3: Sponge Painting for Texture
Sponge painting is a fantastic way to add texture and depth to your canvas art. It’s incredibly easy and forgiving, making it perfect for beginners.
What You’ll Need (In Addition to the Basic Supplies):
* Sponges: Natural sea sponges or synthetic sponges work well. Cut them into different shapes and sizes for varied textures.
* Paper Plate or Palette: For dabbing the sponge in paint.
Step-by-Step Instructions:
1. Choose Your Colors: Select the colors you want to use for your sponge painting. You can use a single color for a subtle effect or multiple colors for a more vibrant look.
2. Apply a Base Coat (Optional): If you want a solid background color, apply a base coat of acrylic paint to the canvas and let it dry completely.
3. Dab the Sponge in Paint: Dip the sponge lightly into the paint on your palette. Be careful not to overload the sponge with paint, as this can result in a muddy or uneven texture.
4. Apply the Paint to the Canvas: Gently dab the sponge onto the canvas, creating a textured effect. Experiment with different pressures and angles to achieve different results.
5. Layer Colors (Optional): If you’re using multiple colors, you can layer them on top of each other to create depth and dimension. Let each layer dry slightly before applying the next.
6. Let it Dry: Let the painting dry completely.
7. Seal (Optional): Seal your artwork with a clear acrylic sealant to protect it.
Technique 4: Impasto with a Palette Knife
Impasto is a painting technique where paint is applied thickly to the canvas, creating a textured, three-dimensional effect. Using a palette knife is a great way to achieve this look.
What You’ll Need (In Addition to the Basic Supplies):
* Palette Knife: Choose a palette knife with a flexible blade. Different shapes and sizes will create different effects.
* Thick Acrylic Paint: You may need to use
Conclusion
So, there you have it! Creating your own DIY canvas art isn’t just a fun afternoon project; it’s a gateway to expressing your unique personality and transforming your living space without breaking the bank. We’ve walked you through the steps, offered tips for success, and hopefully, inspired you to unleash your inner artist.
Why is this DIY trick a must-try? Because it’s incredibly versatile, budget-friendly, and deeply personal. Forget mass-produced prints that everyone else has. With DIY canvas art, you control every aspect of the design, from the colors and textures to the overall aesthetic. You can perfectly match your existing décor, create a statement piece that reflects your passions, or even craft personalized gifts for loved ones.
Beyond the sheer creative freedom, this project is also incredibly therapeutic. The act of painting, collaging, or even simply applying textures to a canvas can be incredibly relaxing and meditative. It’s a chance to disconnect from the digital world and reconnect with your own creativity.
Looking for variations? Absolutely! Consider these ideas to take your DIY canvas art to the next level:
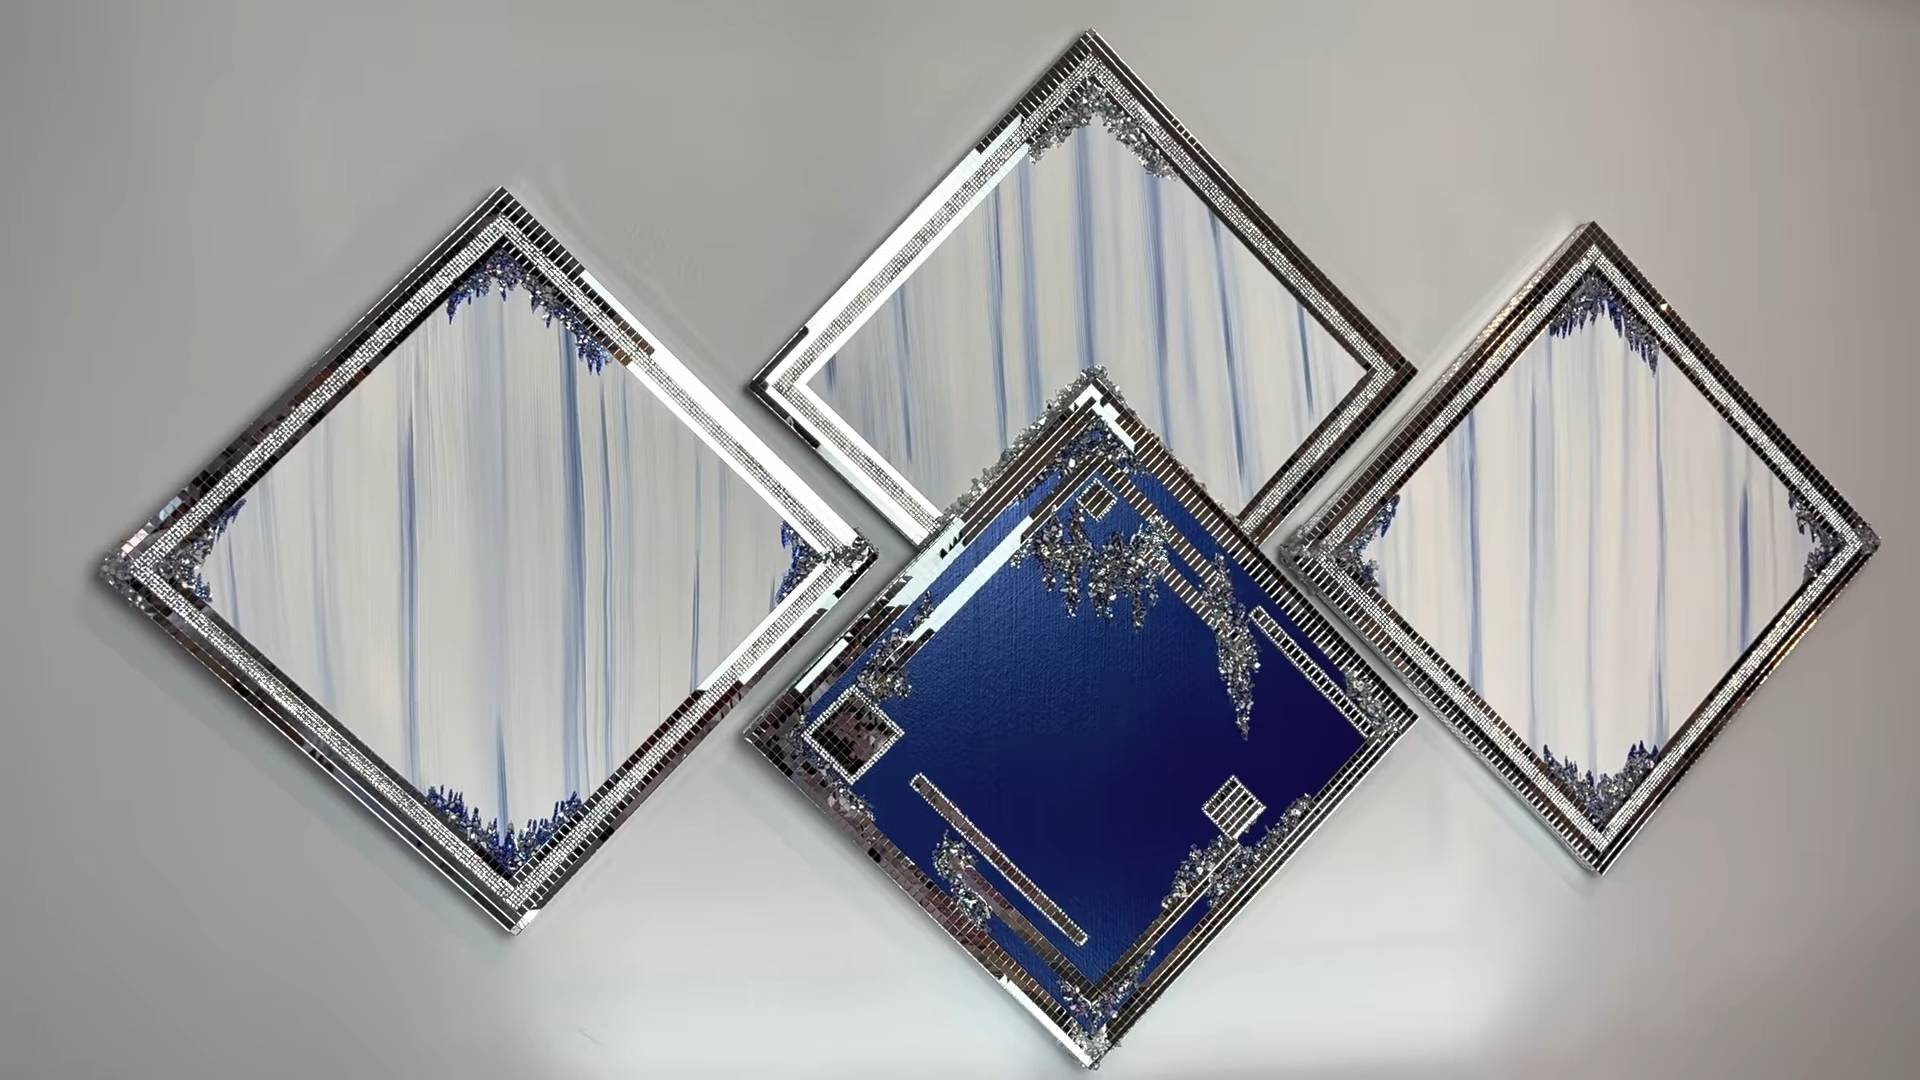
* **Mixed Media Magic:** Incorporate different materials like fabric scraps, dried flowers, beads, or even small found objects to add texture and dimension to your artwork.
* **Abstract Adventures:** Don’t be afraid to experiment with abstract designs. Use bold colors, geometric shapes, or fluid art techniques to create a visually stunning piece.
* **Stenciled Sensations:** Use stencils to create intricate patterns or add lettering to your canvas. This is a great way to personalize your art with quotes, names, or meaningful symbols.
* **Photo Transfers:** Transfer your favorite photos onto canvas for a unique and personalized piece of art. This is a wonderful way to display cherished memories.
* **Textured Techniques:** Explore different texture mediums like gesso, modeling paste, or even sand to create interesting surfaces on your canvas.
The possibilities are truly endless! The key is to experiment, have fun, and let your creativity guide you. Don’t be afraid to make mistakes – they can often lead to unexpected and beautiful results.
We wholeheartedly encourage you to try this DIY canvas art project. It’s a rewarding experience that will not only enhance your home décor but also boost your confidence and unleash your artistic potential.
Once you’ve created your masterpiece, we’d love to see it! Share your creations with us on social media using [Your Hashtag Here]. We can’t wait to see what you come up with! Let’s inspire each other and spread the joy of DIY art. So grab your canvas, gather your supplies, and get ready to create something amazing. Happy crafting!
Frequently Asked Questions (FAQ)
What kind of canvas should I use for DIY canvas art?
The type of canvas you choose depends on your budget and the type of art you plan to create. Pre-stretched canvases are readily available at most art supply stores and are a great option for beginners. They come in various sizes and thicknesses. For heavier applications like mixed media or textured art, consider a thicker canvas with a higher GSM (grams per square meter). You can also buy canvas rolls and stretch them yourself, which can be more cost-effective for larger projects or if you prefer a specific size. Consider the profile (depth) of the canvas as well. A deeper profile canvas will stand out more from the wall.
What kind of paint is best for canvas art?
Acrylic paint is the most popular choice for canvas art due to its versatility, affordability, and quick drying time. It’s also water-based, making it easy to clean up. However, oil paints offer richer colors and a longer drying time, allowing for more blending and layering. If you’re using oil paints, be sure to use appropriate mediums and solvents for thinning and cleaning. Watercolors can also be used on canvas, but you’ll need to prepare the surface with gesso first to prevent the paint from soaking into the canvas. Consider using paint markers for fine details and outlining.
How do I prepare the canvas before painting?
Most pre-stretched canvases are already primed with gesso, a white acrylic primer that creates a smooth, even surface for painting. However, if you’re using an unprimed canvas or want to add extra texture, you can apply a layer or two of gesso yourself. Apply the gesso in thin, even coats, allowing each coat to dry completely before applying the next. Lightly sand the surface between coats for an even smoother finish. Tinting the gesso with a small amount of acrylic paint can also create a colored ground for your artwork.
How do I protect my finished canvas art?
Once your painting is completely dry, you can protect it with a varnish. Varnish protects the paint from dust, dirt, and UV damage, and it can also enhance the colors and sheen of your artwork. Choose a varnish that is compatible with the type of paint you used. Acrylic varnishes are available in matte, satin, and gloss finishes. Apply the varnish in thin, even coats, following the manufacturer’s instructions. Allow the varnish to dry completely before hanging your artwork.
Can I use other materials besides paint for DIY canvas art?
Absolutely! One of the best things about DIY canvas art is the freedom to experiment with different materials. You can use fabric scraps, paper, beads, buttons, dried flowers, leaves, sand, and even found objects to create mixed media artwork. Adhere these materials to the canvas using glue, gel medium, or other appropriate adhesives. Consider the weight and texture of the materials you’re using and how they will interact with the paint and varnish.
How do I create texture on my canvas art?
There are many ways to create texture on your canvas art. You can use texture mediums like gesso, modeling paste, or impasto gel to build up layers of texture. Apply these mediums with a palette knife, brush, or even your fingers. You can also use stencils to create raised patterns or add texture with found objects like bubble wrap or sponges. Experiment with different techniques to find the textures that you like best.
What if I make a mistake?
Don’t worry, mistakes happen! If you’re using acrylic paint, you can often wipe away mistakes with a damp cloth while the paint is still wet. If the paint has dried, you can paint over it with gesso or another layer of paint. With oil paints, you can use a solvent to remove the paint. Remember, mistakes can often lead to unexpected and beautiful results, so don’t be afraid to embrace them.
How do I hang my DIY canvas art?
There are several ways to hang your DIY canvas art. You can use picture hanging hooks, D-rings, or wire. The best method depends on the size and weight of your canvas. For smaller canvases, picture hanging hooks are a simple and easy option. For larger canvases, D-rings and wire provide more support. Attach the D-rings to the back of the canvas frame, and then thread the wire through the D-rings. Adjust the wire so that the canvas hangs straight. Use a level to ensure that your artwork is hanging evenly.
Where can I find inspiration for my DIY canvas art?
Inspiration is everywhere! Look to nature, art books, magazines, and online resources for ideas. Browse art galleries and museums to see what other artists are creating. Experiment with different colors, textures, and techniques to find your own unique style. Don’t be afraid to try new things and push your creative boundaries. Pinterest and Instagram are excellent sources for visual inspiration.
How can I make my DIY canvas art look more professional?
To make your DIY canvas art look more professional, pay attention to detail. Use high-quality materials, prepare your canvas properly, and apply the paint and varnish in thin, even coats. Consider the composition and color palette of your artwork. Frame your finished piece to give it a polished look. Practice makes perfect, so don’t be discouraged if your first few attempts aren’t perfect. Keep experimenting and learning, and you’ll be amazed at what you can create.
Leave a Comment