

DIY Cardboard Table Fan: Beat the heat this summer without breaking the bank! Are you tired of sweltering in the summer heat, but dread the thought of a hefty electricity bill from running your air conditioner all day? I know I am! Well, get ready to unleash your inner maker because this article is packed with a super cool, budget-friendly solution: a DIY cardboard table fan!
The concept of using simple materials to create cooling devices isn’t new. In many cultures, resourcefulness has always been key. Think of ancient Egyptians using wet cloths to cool the air or the ingenious punkah fans of colonial India, manually operated to provide a refreshing breeze. We’re tapping into that same spirit of ingenuity, but with a modern, eco-conscious twist.
Why do you need this DIY cardboard table fan trick? Because it’s not just about saving money; it’s about sustainability and empowerment. Imagine creating a functional and effective cooling device from materials you likely already have lying around your home. It’s a fantastic project for kids, a fun way to reduce waste, and a satisfying feeling of accomplishment all rolled into one. Plus, in times of power outages, this little fan could be a lifesaver! So, let’s dive in and learn how to build your own personal breeze machine!
DIY Cardboard Table Fan: Stay Cool on a Budget!
Hey everyone! Feeling the heat but don’t want to break the bank on a fancy fan? I’ve got you covered! This DIY cardboard table fan is a super fun, budget-friendly project that’s surprisingly effective. It’s perfect for a desk, bedside table, or anywhere you need a little extra breeze. Let’s get started!
What You’ll Need:
Before we dive in, let’s gather our supplies. Don’t worry, most of these are probably lying around your house already!
* Cardboard: You’ll need a few pieces of sturdy cardboard. Think old boxes from deliveries – the thicker, the better.
* Small DC Motor: This is the heart of our fan! You can find these online or salvage one from an old toy. A 3-6V motor works great.
* 9V Battery: To power our motor.
* 9V Battery Connector: This makes connecting the battery to the motor super easy.
* Switch (Optional): If you want an on/off switch, grab a small toggle or slide switch.
* Hot Glue Gun and Glue Sticks: For assembling everything.
* Craft Knife or Scissors: For cutting the cardboard. Be careful!
* Ruler: For accurate measurements.
* Pencil or Marker: For marking the cardboard.
* Wire Strippers (If using a switch): To strip the ends of the wires.
* Electrical Tape (If using a switch): To insulate the connections.
* Compass or Circular Object: To draw circles.
* Safety Glasses: Protect your eyes from flying cardboard bits!
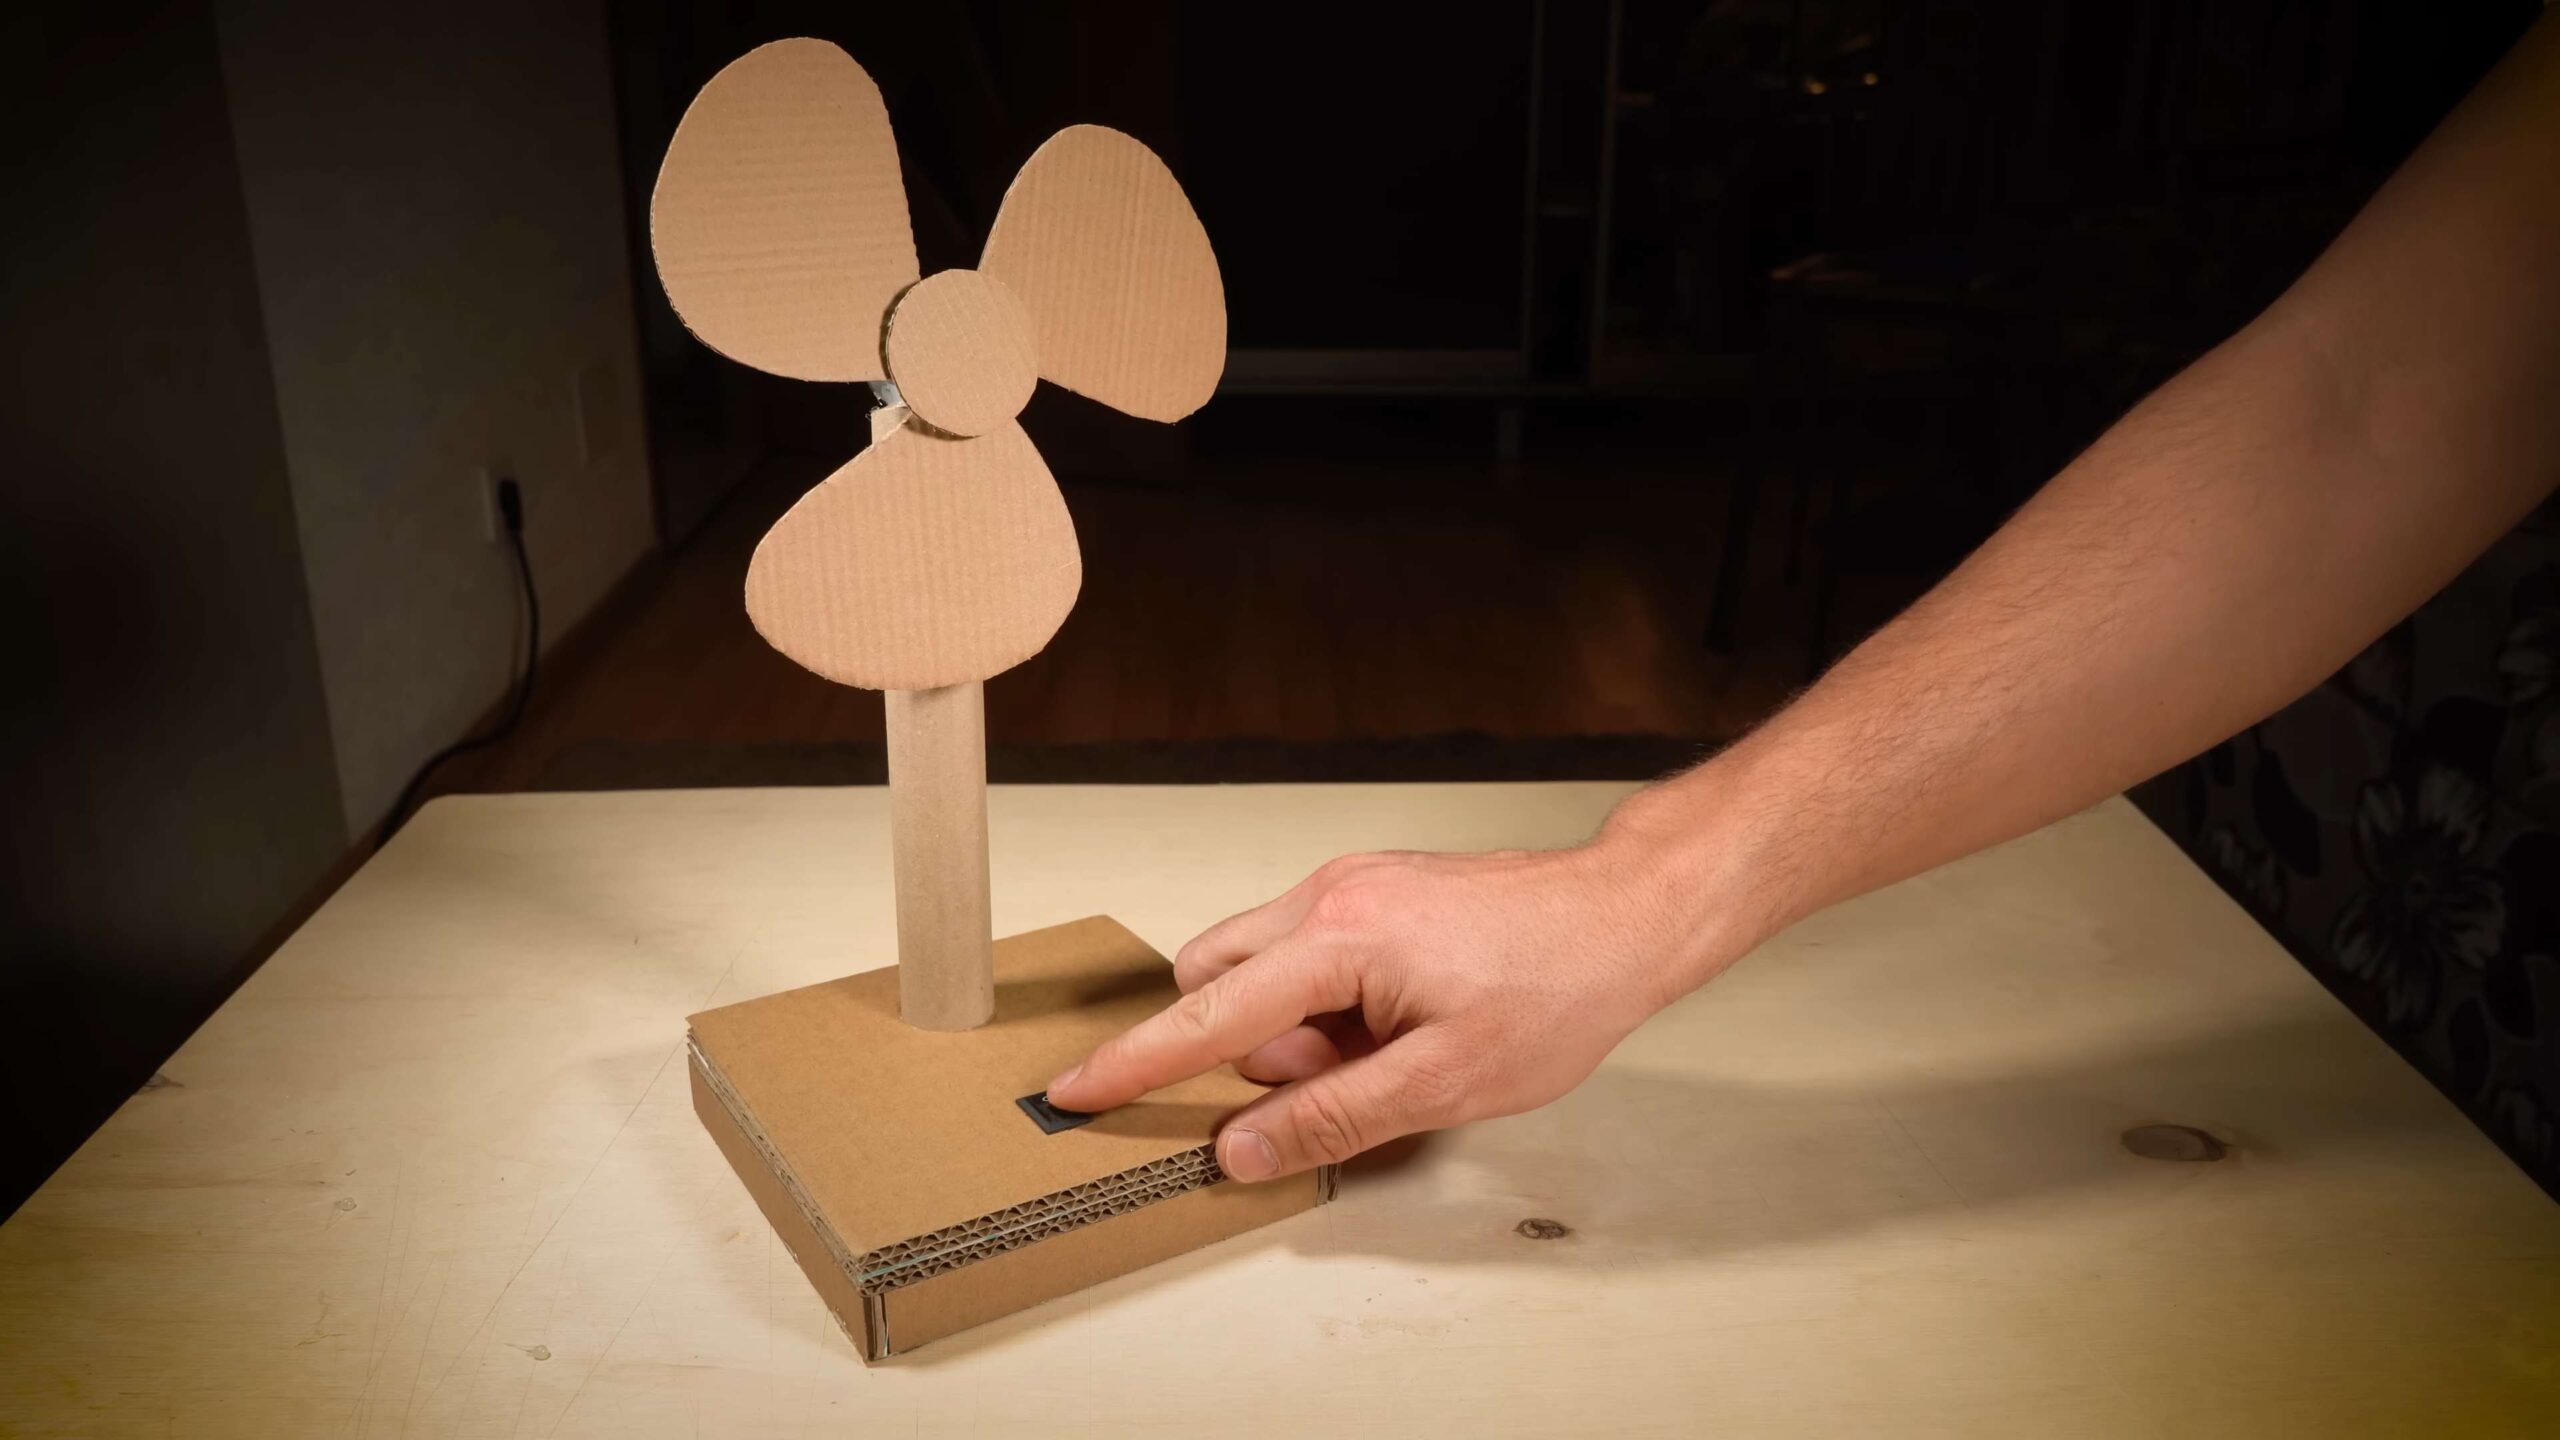
Building the Fan Base
The base is what will keep our fan upright and stable. We’ll create a simple, sturdy design.
1. Cut the Base Pieces:
* Cut two rectangular pieces of cardboard. I recommend around 6 inches wide and 8 inches long for each. This size provides a good balance.
* Cut two smaller rectangular pieces for the sides of the base. These should be about 2 inches wide and 6 inches long.
2. Assemble the Base:
* Using your hot glue gun, attach the two smaller rectangular pieces to the longer edges of one of the larger rectangular pieces. This will form a U-shape.
* Now, glue the second large rectangular piece on top of the U-shape, creating a closed box. Make sure all the edges are securely glued.
3. Create a Motor Mount:
* Cut a small square or rectangle of cardboard, about 2 inches by 2 inches.
* In the center of this piece, carefully cut a hole just large enough for the shaft of your DC motor to fit through.
* Glue this motor mount to the top of the base, towards one end. Make sure the hole is facing upwards.
Crafting the Fan Blades
The blades are what will actually move the air. We’ll create a simple, effective design.
1. Draw the Blade Shape:
* On a piece of cardboard, use your compass or a circular object to draw a circle. I suggest a diameter of around 6-8 inches.
* Divide the circle into four equal sections using a ruler and pencil.
* Cut out the circle.
2. Cut and Shape the Blades:
* Cut along the lines you drew, dividing the circle into four equal pieces. These will be our blades.
* Now, we need to add a slight twist to each blade to create airflow. Gently bend each blade along its length, creating a slight curve. The curve should be in the same direction for all blades. This is important!
3. Attach the Blades to the Motor Shaft:
* This is the trickiest part. Carefully glue the center of each blade to the motor shaft, spacing them evenly around the shaft.
* Make sure the blades are securely attached and that they don’t wobble too much. You might need to use a generous amount of hot glue.
* Let the glue dry completely before moving on. This is crucial!
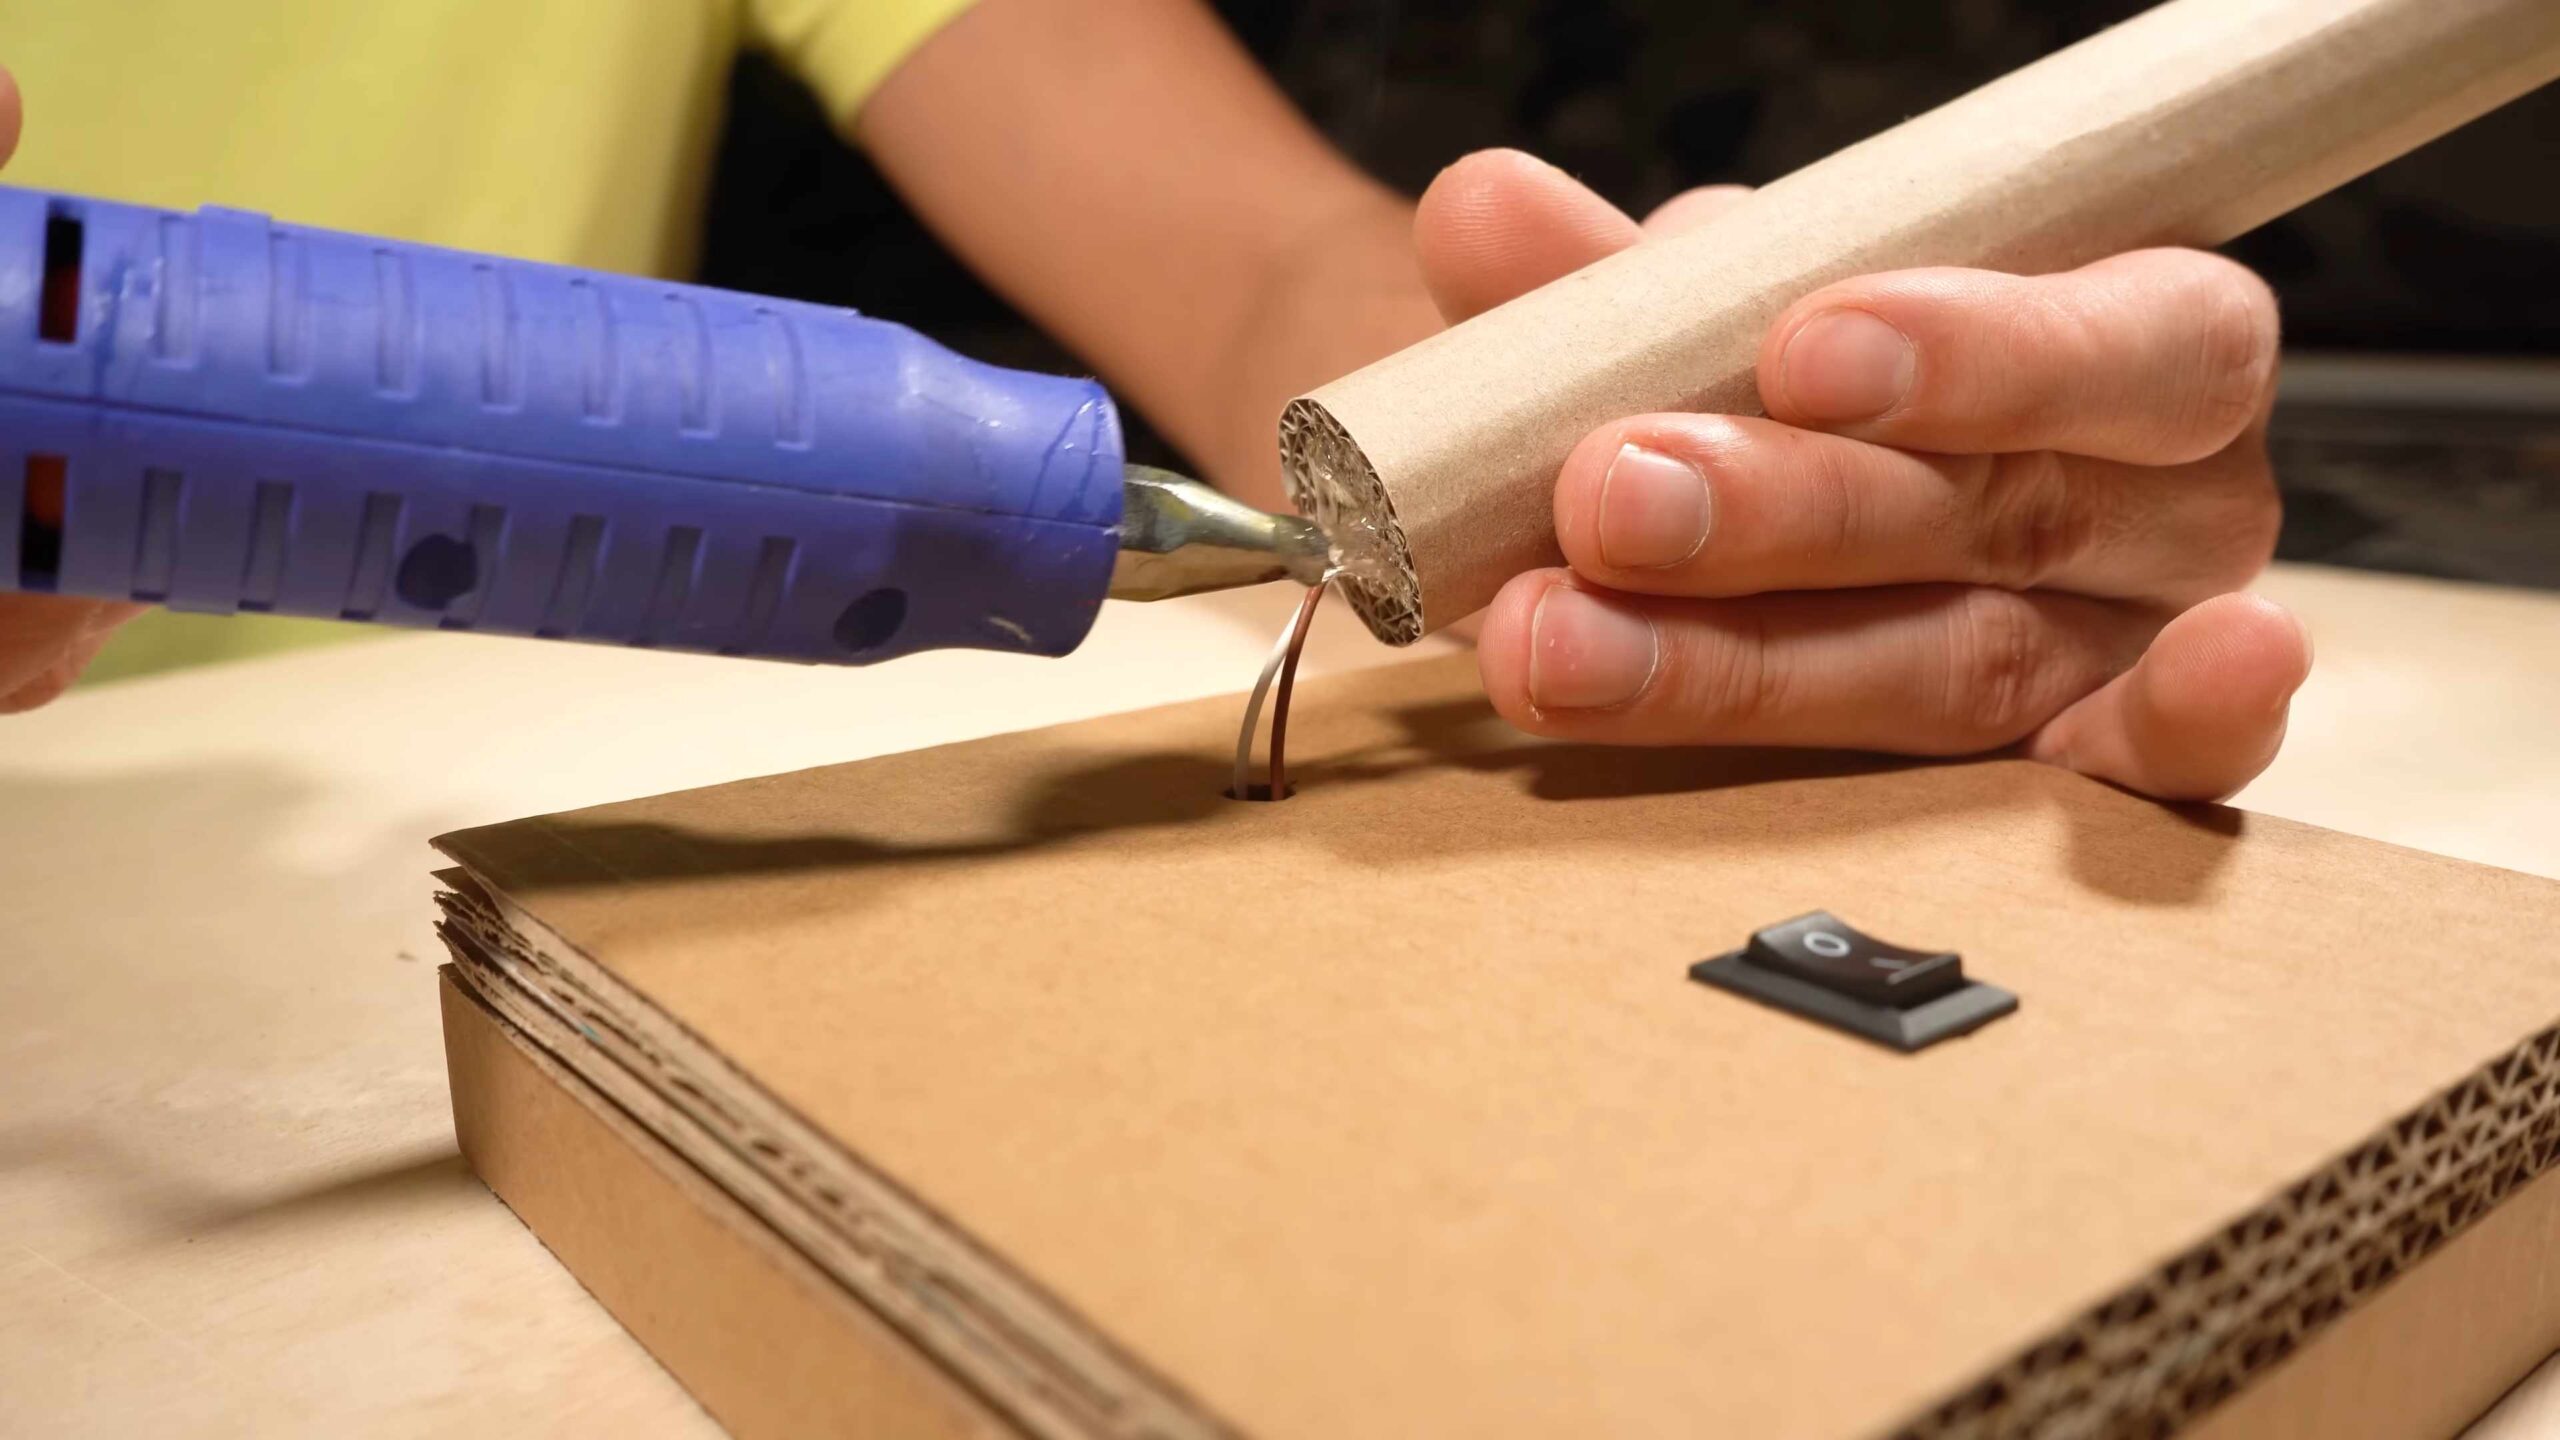
Wiring the Motor and Battery
Now, let’s get the motor powered up!
1. Connect the Battery Connector:
* Attach the red wire of the 9V battery connector to the positive (+) terminal of the DC motor.
* Attach the black wire of the 9V battery connector to the negative (-) terminal of the DC motor.
* You can use hot glue to secure the wires to the motor terminals for a more secure connection.
2. (Optional) Adding a Switch:
* If you want to add a switch, cut one of the wires (either the red or black) in half.
* Strip the ends of the cut wire using wire strippers.
* Connect one end of the cut wire to one terminal of the switch.
* Connect the other end of the cut wire to the other terminal of the switch.
* Use electrical tape to insulate all exposed wire connections.
3. Test the Connection:
* Plug the 9V battery into the battery connector.
* If you added a switch, flip it to the “on” position.
* The motor should start spinning, and the blades should start moving air. If not, double-check your wiring connections.
Final Assembly and Testing
Almost there! Let’s put everything together and make sure our fan is working properly.
1. Mount the Motor:
* Carefully insert the motor into the hole in the motor mount on the base.
* Use hot glue to secure the motor to the mount. Make sure the motor is firmly attached and doesn’t wobble.
2. Secure the Battery:
* You can use a rubber band or some tape to secure the 9V battery to the base of the fan. This will prevent it from falling off.
3. Test and Adjust:
* Plug in the battery and turn on the fan (if you added a switch).
* Observe the fan’s performance. If the blades are wobbling excessively, you might need to adjust their position or add more glue.
* If the fan isn’t moving enough air, try adjusting the angle of the blades slightly.
Troubleshooting Tips
Sometimes things don’t go exactly as planned. Here are a few common issues and how to fix them:
* Fan Doesn’t Spin:
* Check the battery connection. Make sure the battery is fully charged and properly connected to the motor.
* Check the wiring. Make sure all the wires are securely connected to the motor and battery connector.
* If you added a switch, make sure it’s in the “on” position and that the switch is working properly.
* The motor might be faulty. Try using a different motor if you have one.
* Fan Spins Slowly:
* The battery might be low. Try using a fresh battery.
* The motor might be underpowered. Try using a motor with a higher voltage rating.
* The blades might be too heavy. Try using thinner cardboard for the blades.
* Fan Wobbles Excessively:
* The blades might not be evenly spaced or securely attached to the motor shaft. Adjust the position of the blades and add more glue.
* The motor might not be properly mounted to the base. Make sure the motor is firmly attached and doesn’t wobble.
* Motor Gets Hot:
* The motor might be overloaded. Try using a smaller battery or reducing the size of the blades.
* The motor might be faulty. Stop using the fan and replace the motor.
Optional Enhancements
Want to take your cardboard fan to the next level? Here are a few ideas:
* Paint and Decorate: Get creative and paint your fan with your favorite colors and designs.
* Add a Fan Guard: Cut out a piece of cardboard with a circular hole in the center and glue it to the front of the fan to protect your fingers.
* Adjustable Speed: Use a potentiometer (variable resistor) to control the speed of the motor. You’ll need to add this to the circuit between the battery and the motor.
* Solar Power: Replace the battery with a small solar panel to make your fan even more eco-friendly.
Safety First!
Remember to always be careful when working with sharp objects and electrical components.
* Always wear safety glasses when cutting cardboard.
* Be careful when using the hot glue gun. The glue can be very hot and can cause burns.
* Never leave the fan unattended while it’s running.
* If you’re not comfortable working with electrical components, ask for help from someone who is
Conclusion
So, there you have it! Transforming a simple cardboard box into a functional and surprisingly effective table fan is not just a fun project; it’s a testament to the power of resourcefulness and a fantastic way to beat the heat on a budget. This DIY cardboard table fan project is more than just a craft; it’s a practical solution that reduces waste, encourages creativity, and provides a refreshing breeze.
Why is this a must-try? Firstly, it’s incredibly cost-effective. You’re likely to have all the materials lying around your house already – a cardboard box, a few basic tools, and maybe an old USB cable. Secondly, it’s a fantastic learning experience, especially for kids. It introduces basic concepts of engineering, electricity, and aerodynamics in a hands-on, engaging way. Thirdly, it’s eco-friendly. By repurposing cardboard, you’re contributing to waste reduction and promoting sustainable practices. Finally, it’s surprisingly effective! While it won’t replace a high-powered electric fan, it provides a gentle, localized breeze that’s perfect for a desk or bedside table.
Looking to personalize your fan? Consider these variations:
* **Aromatic Breeze:** Add a few drops of your favorite essential oil to a cotton ball and place it near the fan blades for a subtly scented breeze. Lavender for relaxation, peppermint for alertness – the possibilities are endless!
* **Color and Design:** Don’t be afraid to get creative with the aesthetics. Paint the cardboard box with vibrant colors, add decorative paper, or even decoupage it with your favorite images. Make it a true reflection of your personality!
* **Adjustable Speed:** For a more advanced project, you could incorporate a potentiometer to control the speed of the motor. This will give you greater control over the airflow.
* **Portable Power:** Instead of relying on a USB connection, consider using a small battery pack to make your fan truly portable. This is perfect for camping trips or outdoor events.
* Safety First: Always ensure the fan blades are securely attached and that all electrical connections are properly insulated. Adult supervision is recommended, especially for younger children.
We wholeheartedly encourage you to give this DIY cardboard table fan project a try. It’s a rewarding experience that combines creativity, practicality, and sustainability. Once you’ve built your fan, we’d love to hear about your experience! Share your photos, tips, and variations in the comments below. Let’s build a community of resourceful makers and inspire others to embrace the power of DIY! What are you waiting for? Grab that cardboard box and start building your own personal breeze today!
FAQ
Q: What kind of cardboard box is best for this project?
A: A medium-sized cardboard box, like one that held a case of water bottles or a small appliance, works best. The size should be manageable and sturdy enough to support the motor and fan blades. Avoid using very thin or flimsy cardboard, as it may not provide adequate support. Corrugated cardboard is ideal due to its strength and durability.
Q: What type of motor should I use?
A: A small DC motor, typically a hobby motor or one salvaged from an old toy, is perfect for this project. A motor that operates on 5V to 12V is recommended. You can often find these motors online or at electronics stores. Ensure the motor has enough torque to spin the fan blades effectively. A motor with a higher RPM (revolutions per minute) will generally provide a stronger breeze.
Q: How do I attach the fan blades to the motor?
A: The most common method is to use a small piece of plastic or cardboard as a hub. Cut a circle slightly larger than the motor shaft and create a hole in the center that fits snugly onto the shaft. Secure the hub to the shaft with glue or tape. Then, attach the fan blades to the hub, ensuring they are evenly spaced and securely fastened. Hot glue or strong adhesive tape works well for this purpose. Make sure the blades are balanced to prevent wobbling.
Q: What if my fan blades are unbalanced and the fan wobbles?
A: An unbalanced fan can be noisy and inefficient. To fix this, try adding small pieces of tape to the lighter blades until the fan spins smoothly. Experiment with different placements of the tape until you achieve balance. You can also try trimming the heavier blades slightly. The goal is to distribute the weight evenly around the hub.
Q: How do I power the motor?
A: The easiest way to power the motor is with a USB cable. Cut the end off a USB cable and strip the wires to expose the positive and negative leads. Connect these leads to the corresponding terminals on the motor. You can then plug the USB cable into a computer, phone charger, or power bank. Alternatively, you can use a battery pack with the appropriate voltage for your motor.
Q: Is this DIY cardboard table fan safe to use?
A: While this project is generally safe, it’s important to take precautions. Ensure all electrical connections are properly insulated to prevent shocks. Keep the fan away from water and flammable materials. Supervise children closely when they are building or using the fan. Make sure the fan blades are securely attached to prevent them from flying off. If you are unsure about any aspect of the project, seek guidance from someone with experience in electronics.
Q: Can I use different materials for the fan blades?
A: Yes, you can experiment with different materials for the fan blades. Thin plastic sheets, foam board, or even sturdy paper can be used. However, cardboard is a readily available and lightweight option that works well. Consider the weight and flexibility of the material when making your choice. Heavier materials may require a more powerful motor.
Q: How can I make the fan more powerful?
A: To increase the fan’s power, you can try several things:
* Use a more powerful motor with a higher RPM.
* Increase the size of the fan blades.
* Adjust the angle of the fan blades to optimize airflow.
* Ensure the fan blades are balanced to minimize wobbling.
* Use a more efficient power source to provide adequate voltage and current to the motor.
Q: How long will this DIY cardboard table fan last?
A: The lifespan of your fan will depend on the quality of the materials used and how frequently it is used. With proper care, it should last for several weeks or even months. The motor is the most likely component to fail over time. If the motor stops working, you can easily replace it with a new one.
Q: Can I add a switch to turn the fan on and off easily?
A: Absolutely! Adding a switch is a great way to control the fan without having to unplug it. You can purchase a small toggle switch or slide switch from an electronics store. Simply cut one of the wires leading to the motor and connect the two ends to the switch terminals. Now you can easily turn the fan on and off with the flick of a switch.
Q: What if I don’t have a USB cable to use?
A: If you don’t have a spare USB cable, you can use any DC power supply that matches the voltage requirements of your motor. A battery pack with the appropriate voltage is a good alternative. You can also use a wall adapter with a DC output. Just make sure to check the voltage and polarity before connecting it to the motor.
Q: My motor is spinning in the wrong direction. How do I fix it?
A: If the motor is spinning in the wrong direction, simply reverse the polarity of the wires connected to the motor terminals. Swap the positive and negative wires, and the motor should start spinning in the correct direction.


Leave a Comment