

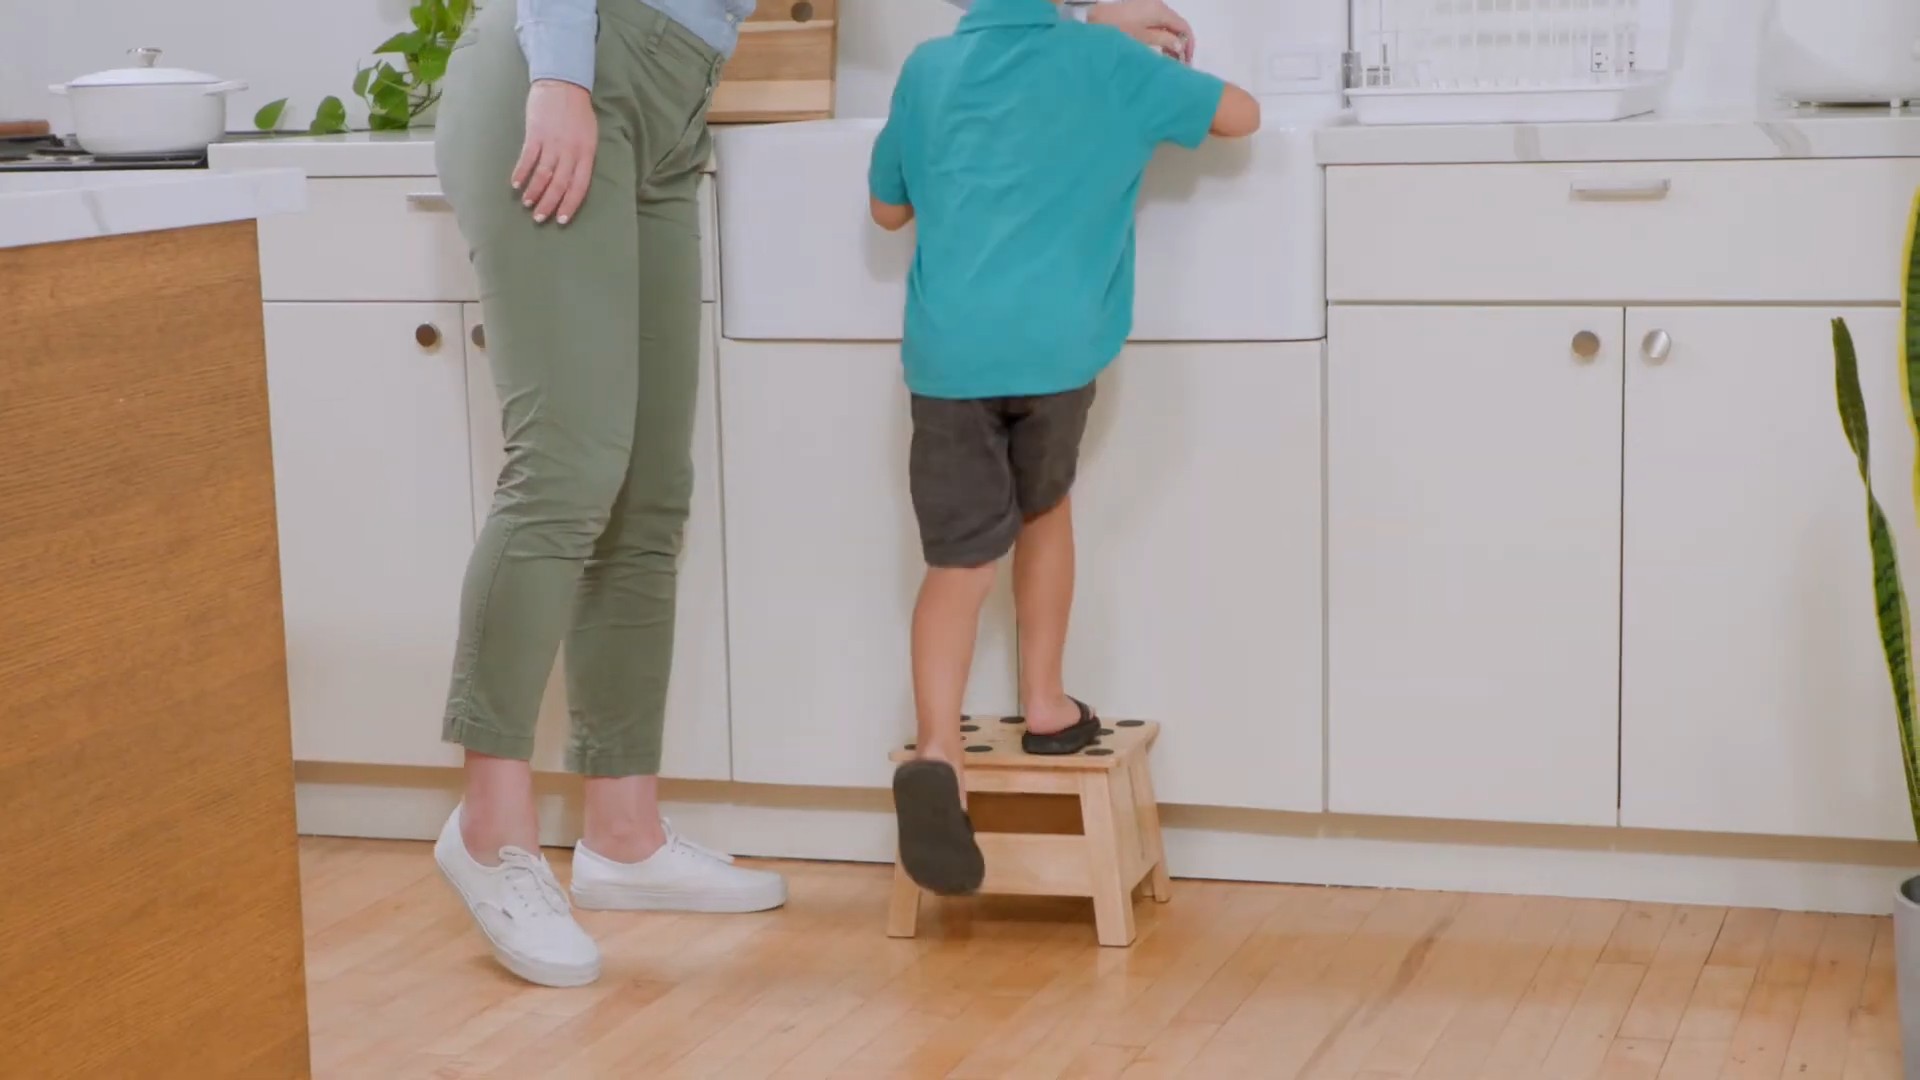
DIY Kids Step Stool: Ever feel like your little ones are constantly asking for help reaching things? I know I do! From grabbing a snack from the top shelf to washing their hands at the sink, it seems like they’re always needing a boost. That’s where a DIY kids step stool comes in handy, and trust me, it’s a project that’s both rewarding and surprisingly simple.
Step stools have been around for ages, evolving from simple wooden blocks to more elaborate designs. Historically, they’ve been essential tools in homes, allowing children and adults alike to access higher spaces. But beyond their practical function, a handmade step stool carries a special charm. It’s a tangible expression of love and care, a piece crafted with your own hands specifically for your child.
In today’s world, where convenience often trumps craftsmanship, taking the time to build something yourself is a powerful statement. Not only will you save money compared to buying a pre-made stool, but you’ll also gain the satisfaction of creating a durable and personalized item. Plus, involving your kids in the process can be a fantastic learning experience, teaching them valuable skills and fostering a sense of accomplishment. This DIY kids step stool project is more than just building furniture; it’s about creating memories and empowering your children to reach new heights, both literally and figuratively!
DIY Kids Step Stool: A Weekend Project for Little Helpers
Okay, let’s get started! I’m so excited to share this super simple and rewarding DIY project with you: building a sturdy and adorable step stool for your little ones. This step stool is perfect for helping them reach the sink to wash their hands, grab a book from a high shelf, or even “help” you in the kitchen (with supervision, of course!). It’s a great way to foster their independence and give them a sense of accomplishment. Plus, it’s way cheaper and more customizable than buying one from the store.
Materials You’ll Need
Before we dive in, let’s gather all the necessary materials. Trust me, having everything ready beforehand will make the process so much smoother.
* Wood:
* One 1″ x 12″ x 8′ pine board (This will give you enough wood for the top, sides, and supports. You can adjust the dimensions depending on how big you want the stool to be).
* Fasteners:
* 1 1/4″ wood screws (For assembling the stool).
* Wood glue (For extra strength and a professional finish).
* Finishing:
* Sandpaper (Various grits, from 80 to 220).
* Primer (Optional, but recommended for a smoother paint finish).
* Paint or stain (Choose a color that matches your decor or your child’s preferences!).
* Polyurethane or varnish (To protect the finish and make it easy to clean).
* Safety Gear:
* Safety glasses (Always protect your eyes!).
* Dust mask (Especially when sanding).
* Tools:
* Measuring tape
* Pencil
* Saw (Circular saw, miter saw, or hand saw – whatever you’re comfortable with).
* Drill with drill bits and screwdriver bits
* Clamps (Very helpful for holding pieces together while the glue dries).
* Sander (Optional, but makes sanding much faster).
* Paintbrushes or foam rollers
Cutting the Wood
This is where we transform the long board into the individual pieces for our step stool. Accuracy is key here, so take your time and double-check your measurements.
1. Measure and Mark: Using your measuring tape and pencil, carefully measure and mark the following pieces on your 1″ x 12″ board:
* Top: One piece, 12″ long.
* Sides: Two pieces, 10″ long.
* Supports: Two pieces, 9″ long.
2. Cut the Pieces: Using your saw, carefully cut along the marked lines. Remember to wear your safety glasses! If you’re using a power saw, make sure you’re familiar with its operation and safety features. If you’re using a hand saw, take your time and use smooth, even strokes.
3. Double-Check: Once you’ve cut all the pieces, double-check the measurements to make sure they’re accurate. A slight discrepancy won’t ruin the project, but it’s best to catch any errors now.
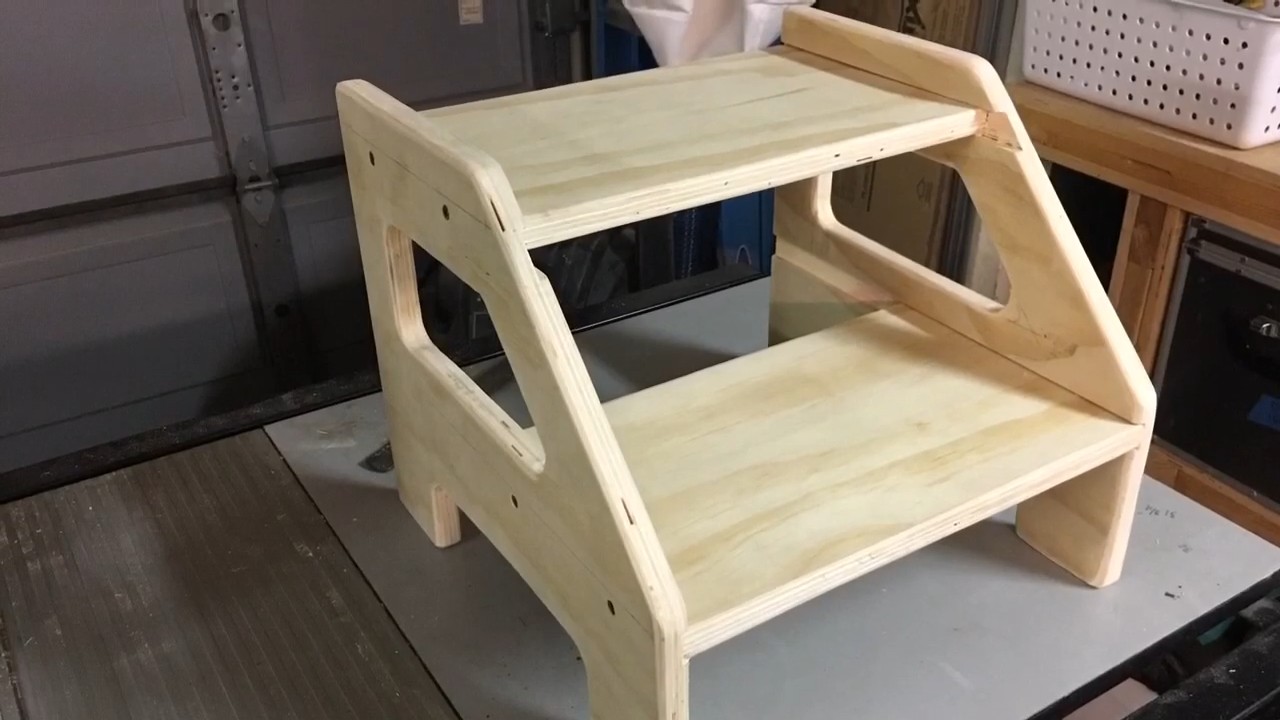
Assembling the Step Stool
Now comes the fun part – putting all the pieces together! We’ll be using wood glue and screws to create a strong and durable step stool.
1. Prepare the Sides: On the inside face of each side piece (the 10″ pieces), measure and mark a line 1″ from the bottom edge. This line will guide you when attaching the supports.
2. Attach the Supports: Apply a generous amount of wood glue to the top edge of one of the support pieces (the 9″ pieces). Position the support piece along the marked line on one of the side pieces, making sure it’s flush with the front and back edges. Clamp the pieces together and pre-drill pilot holes through the side piece into the support piece. This will prevent the wood from splitting when you drive in the screws.
3. Secure with Screws: Drive two screws through the side piece into the support piece. Repeat this process for the other side piece and the remaining support piece.
4. Attach the Top: Apply a generous amount of wood glue to the top edges of the side pieces and the support pieces. Position the top piece (the 12″ piece) on top of the sides and supports, making sure it’s centered and flush with all edges. Clamp the pieces together.
5. Secure with Screws: Pre-drill pilot holes through the top piece into the side pieces and the support pieces. Drive two or three screws through the top piece into each side piece and support piece.
6. Let it Dry: Allow the glue to dry completely according to the manufacturer’s instructions. This usually takes at least 24 hours. This is crucial for a strong and lasting bond.
Sanding and Finishing
This is where we transform the rough-looking stool into a smooth and beautiful piece of furniture. Sanding is essential for creating a smooth surface for painting or staining.
1. Sanding: Once the glue is completely dry, remove the clamps and start sanding the entire step stool. Start with a coarser grit sandpaper (like 80 grit) to remove any imperfections or rough edges. Then, gradually move to finer grits (like 120 grit and then 220 grit) to create a smooth, even surface. Pay special attention to the edges and corners, rounding them slightly for safety.
2. Dust Removal: After sanding, thoroughly remove all the dust with a tack cloth or a damp cloth. This will ensure a clean surface for painting or staining.
3. Priming (Optional): If you’re planning to paint the step stool, I highly recommend applying a coat of primer first. Primer helps the paint adhere better and provides a more even finish. Let the primer dry completely according to the manufacturer’s instructions.
4. Painting or Staining: Now comes the fun part – adding color! Choose a paint or stain that you love and apply it according to the manufacturer’s instructions. You may need to apply multiple coats for full coverage. Let each coat dry completely before applying the next.
5. Protective Finish: Once the paint or stain is completely dry, apply a coat of polyurethane or varnish to protect the finish and make it easy to clean. This will also help the step stool withstand wear and tear. Let the protective finish dry completely according to the manufacturer’s instructions.
Adding Extra Touches (Optional)
Want to personalize your step stool even more? Here are a few ideas:
* Non-Slip Pads: Attach non-slip pads to the bottom of the legs to prevent the stool from sliding on hard floors. This is especially important for safety.
* Personalized Design: Paint your child’s name or a fun design on the top of the stool. You can use stencils or freehand it.
* Decorative Hardware: Replace the standard screws with decorative screws or bolts for a more unique look.
* Rounded Edges: Use a router with a rounding-over bit to create even more rounded edges for added safety and a softer look.
Safety Considerations
Before letting your child use the step stool, please keep these safety tips in mind:
* Supervision: Always supervise your child when they’re using the step stool.
* Stable Surface: Make sure the step stool is placed on a stable and level surface.
* Weight Limit: Be aware of the weight limit of the step stool and don’t exceed it.
* No Jumping: Teach your child not to jump or play on the step stool.
* Regular Inspection: Regularly inspect the step stool for any signs of damage or wear and tear. Repair or replace it as needed.
And there you have it! A beautiful and functional step stool that your child will love. I hope you enjoyed this DIY project as much as I did. Happy building!
Conclusion
So, there you have it! Creating your own DIY Kids Step Stool isn’t just about saving money; it’s about crafting a piece of furniture that’s perfectly tailored to your child’s needs and your home’s aesthetic. It’s about the satisfaction of building something with your own hands, knowing you’ve created a safe and functional tool for your little one.
This project offers a fantastic opportunity to personalize every aspect, from the height and width to the color and finish. Imagine a step stool painted to match your child’s bedroom, adorned with their favorite cartoon characters, or even personalized with their name. The possibilities are truly endless!
But the benefits extend beyond aesthetics. A well-built, sturdy step stool provides a safe and reliable platform for your child to reach those out-of-reach places, fostering independence and confidence. No more precarious balancing acts on chairs or relying solely on adult assistance. This simple tool empowers them to participate more fully in everyday activities, from washing their hands to helping with cooking.
Don’t be afraid to experiment with variations! Consider adding non-slip treads to the steps for extra safety, especially if you have hardwood floors. You could also incorporate a small storage compartment beneath the top step for toys or art supplies. For older children, a taller step stool with a handle might be more appropriate. If you are feeling extra creative, try using reclaimed wood for a rustic, eco-friendly look.
We understand that embarking on a DIY project can sometimes feel daunting, but we promise that this DIY Kids Step Stool is achievable for even beginner woodworkers. The sense of accomplishment you’ll feel upon completion is well worth the effort. Plus, you’ll have a unique, handcrafted piece that will be cherished for years to come.
We wholeheartedly encourage you to give this project a try. Gather your materials, follow our instructions, and unleash your creativity. And most importantly, we want to hear about your experience! Share your photos, tips, and variations in the comments below. Let’s build a community of DIY enthusiasts and inspire each other to create beautiful and functional pieces for our homes. We are confident that you will find this project rewarding and that your child will love their new, custom-made step stool. So, what are you waiting for? Get building!
Frequently Asked Questions (FAQ)
What tools do I absolutely need for this DIY Kids Step Stool project?
The essential tools include a saw (circular saw, jigsaw, or hand saw), a drill with various drill bits, a sander (or sandpaper and a sanding block), a measuring tape, a pencil, safety glasses, and clamps. While other tools can be helpful, these are the bare minimum to get the job done safely and effectively. Investing in quality tools will not only make the project easier but also ensure a more professional finish. Remember to always prioritize safety and wear appropriate protective gear.
What type of wood is best for a kids step stool?
For a DIY Kids Step Stool, consider using hardwoods like maple, oak, or birch. These woods are durable, strong, and can withstand the wear and tear of daily use. Softwoods like pine are also an option, but they are more prone to dents and scratches. Plywood is another cost-effective choice, especially for the sides and base, but ensure it’s a high-quality plywood with no voids or splinters. Ultimately, the best wood depends on your budget, desired aesthetic, and the level of durability you require.
How can I make the step stool extra safe for my child?
Safety is paramount when building anything for children. First, ensure all edges and corners are rounded and smooth to prevent injuries. Apply a non-toxic finish that is safe for children and won’t chip or peel easily. Add non-slip treads to the steps to prevent slipping, especially on smooth surfaces. Regularly inspect the step stool for any loose screws or signs of damage. Finally, supervise your child when they are using the step stool, especially when they are first getting used to it.
What type of finish should I use on the step stool?
Choose a non-toxic, child-safe finish that is durable and easy to clean. Water-based paints and varnishes are excellent options as they have low VOCs (volatile organic compounds) and are less harmful to breathe in. Milk paint is another natural and eco-friendly choice. Avoid finishes that contain lead or other harmful chemicals. Always follow the manufacturer’s instructions for application and drying times. Consider applying multiple coats for added protection and durability.
Can I customize the height and width of the step stool?
Absolutely! Customizing the dimensions is one of the biggest advantages of building your own step stool. Measure the height your child needs to reach and adjust the step stool’s height accordingly. Consider the width of the steps to ensure they are comfortable and safe for your child to stand on. When adjusting the dimensions, be sure to maintain the overall stability and structural integrity of the step stool. You may need to adjust the thickness of the wood or add additional supports to compensate for larger dimensions.
How do I prevent the step stool from wobbling?
A wobbly step stool is a safety hazard. To prevent wobbling, ensure all the legs are the same length and that the base is perfectly level. Use a level to check the alignment of all the components during assembly. If you notice any wobbling after assembly, try shimming the legs with small pieces of cardboard or wood. You can also use adjustable feet to compensate for uneven floors. Double-check all the screws and joints to ensure they are tight and secure.
How can I involve my child in the building process?
Involving your child in the building process can be a fun and educational experience. However, it’s important to prioritize safety and choose age-appropriate tasks. Children can help with sanding, painting, or decorating the step stool. They can also assist with measuring and marking the wood (under close supervision). Let them choose the colors and designs for the step stool to make it truly their own. Remember to always supervise children closely and provide clear instructions.
What if I don’t have access to power tools?
While power tools can make the project faster and easier, you can still build a DIY Kids Step Stool with hand tools. A hand saw, hand drill, and sandpaper will suffice. The process will take longer and require more effort, but it’s definitely achievable. Consider using pre-cut lumber from a hardware store to minimize the amount of cutting required. Take your time and be patient, and you’ll be rewarded with a beautiful and functional step stool.
How much will this project cost?
The cost of this project will vary depending on the type of wood you choose, the finish you use, and the tools you already have on hand. However, you can typically build a DIY Kids Step Stool for significantly less than buying a pre-made one. Shop around for the best prices on lumber and hardware. Consider using reclaimed wood or repurposing materials to save even more money.
Where can I find inspiration for decorating my step stool?
The internet is a treasure trove of inspiration! Browse Pinterest, Instagram, and DIY blogs for ideas on decorating your step stool. Consider your child’s interests and hobbies when choosing a theme. You can paint it with their favorite colors, add stencils, or even decoupage it with pictures. Let your creativity run wild and create a step stool that is as unique as your child.


Leave a Comment