

DIY Mango Body Butter: Who doesn’t dream of having luxuriously soft, glowing skin? I know I do! And what if I told you that achieving that dream could be as simple as whipping up something amazing in your own kitchen? Forget those expensive, store-bought lotions filled with questionable ingredients. We’re diving into the world of homemade skincare with a recipe that’s not only incredibly effective but also smells absolutely divine.
The use of natural butters and oils for skin nourishment has a rich history, dating back centuries. Ancient civilizations, from Egyptians to Romans, recognized the power of ingredients like shea butter and mango butter to protect and hydrate the skin. Mango butter, in particular, is derived from the kernels of the mango fruit, a fruit revered in many cultures for its delicious flavor and health benefits. Now, we’re harnessing its moisturizing properties for our skin!
In today’s world, where we’re increasingly conscious of what we put on our bodies, creating your own skincare products is more important than ever. This DIY Mango Body Butter recipe is perfect for anyone looking to avoid harsh chemicals, save money, and enjoy a truly personalized skincare experience. Dry skin got you down? Sensitive skin needs some TLC? This recipe is easily customizable to suit your specific needs. Plus, the process of making it is surprisingly therapeutic and rewarding. So, let’s get started and create a batch of this amazing DIY Mango Body Butter that will leave your skin feeling pampered and radiant!

DIY Luscious Mango Body Butter: A Step-by-Step Guide
Hey there, fellow DIY enthusiasts! Today, I’m super excited to share my favorite recipe for homemade mango body butter. It’s incredibly moisturizing, smells divine, and is surprisingly easy to make. Plus, you know exactly what’s going into it – no hidden chemicals or questionable ingredients! Get ready to pamper your skin with this luxurious treat.
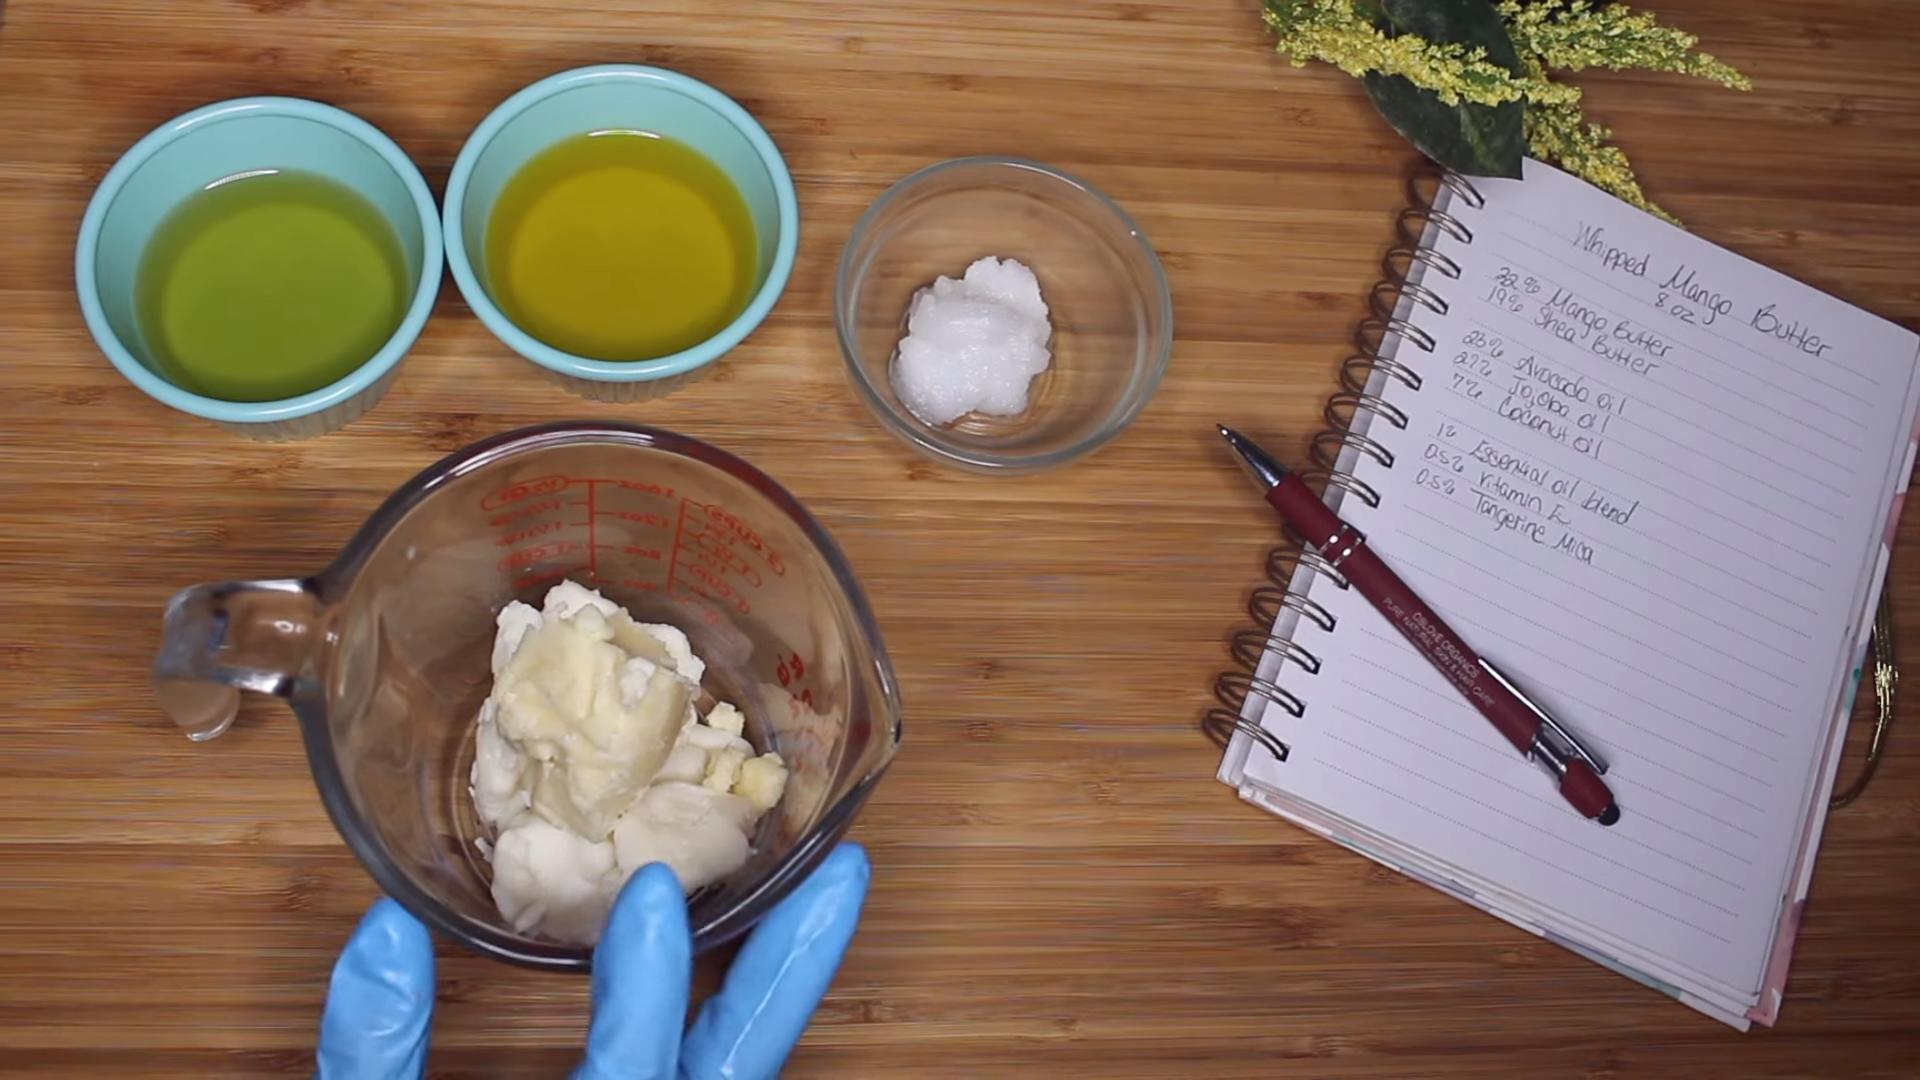
What You’ll Need: Gathering Your Ingredients and Supplies
Before we dive in, let’s make sure you have everything you need. This recipe is pretty flexible, so feel free to adjust the amounts to your liking. I’ll give you my go-to measurements, but don’t be afraid to experiment!
* Mango Butter (4 oz): This is the star of the show! Mango butter is incredibly rich and moisturizing, and it has a lovely, subtle scent. Make sure you get pure, unrefined mango butter for the best results.
* Shea Butter (2 oz): Shea butter adds extra creaminess and helps to protect your skin’s natural barrier. Again, opt for unrefined shea butter.
* Coconut Oil (2 oz): Coconut oil contributes to the body butter’s smooth texture and adds a touch of tropical fragrance. You can use refined or unrefined coconut oil, depending on your preference. Refined coconut oil has less of a coconut scent.
* Sweet Almond Oil (1 oz): Sweet almond oil is a lightweight oil that absorbs quickly into the skin, leaving it feeling soft and supple. You can substitute this with other carrier oils like jojoba oil, apricot kernel oil, or avocado oil.
* Vitamin E Oil (1 teaspoon): Vitamin E oil is a powerful antioxidant that helps to protect your skin from damage and extend the shelf life of your body butter.
* Essential Oils (Optional): If you want to add a little extra fragrance, you can add a few drops of your favorite essential oils. I love using a blend of sweet orange and vanilla essential oils for a warm, comforting scent. Lavender or chamomile are great for a calming effect. Be sure to use skin-safe essential oils and follow proper dilution guidelines (usually around 1-2% of the total volume).
* Double Boiler or Heat-Safe Bowl and Saucepan: We’ll be melting the butters and oils using a double boiler method.
* Hand Mixer or Stand Mixer: This is essential for whipping the body butter into a light and fluffy consistency.
* Spatula: For scraping down the sides of the bowl.
* Clean Jars or Containers: To store your finished body butter. I recommend using glass jars with airtight lids.
* Scale: For accurately measuring the ingredients.
* Thermometer (Optional): To monitor the temperature of the butters and oils.
Phase 1: Melting the Butters and Oils
This is where we combine all the solid ingredients and melt them down into a smooth, liquid mixture.
1. Prepare Your Double Boiler: Fill a saucepan with about an inch or two of water and bring it to a simmer over medium heat. Place a heat-safe bowl on top of the saucepan, making sure the bottom of the bowl doesn’t touch the water. This creates a gentle, indirect heat that will melt the butters and oils without overheating them.
2. Combine the Butters and Coconut Oil: In the heat-safe bowl, combine the mango butter, shea butter, and coconut oil.
3. Melt the Ingredients: Allow the butters and oil to melt slowly, stirring occasionally with a spatula. Be patient – it may take 10-15 minutes for everything to melt completely.
4. Check the Temperature (Optional): If you’re using a thermometer, aim for a temperature between 120-130°F (49-54°C). This will ensure that the butters and oils melt evenly without burning.
5. Remove from Heat: Once everything is melted and smooth, carefully remove the bowl from the double boiler and set it aside to cool slightly.
Phase 2: Adding the Liquid Oils and Cooling
Now, we’ll incorporate the liquid oils and allow the mixture to cool down before whipping. This is crucial for achieving the perfect fluffy texture.
1. Add the Sweet Almond Oil and Vitamin E Oil: Stir in the sweet almond oil and vitamin E oil until well combined.
2. Add Essential Oils (Optional): If you’re using essential oils, add them now and stir gently. Remember to use skin-safe essential oils and follow proper dilution guidelines.
3. Cooling Process: This is the most important step! Cover the bowl with plastic wrap, pressing it directly onto the surface of the mixture to prevent a skin from forming. Place the bowl in the refrigerator for 1-2 hours, or until the mixture is solid but still slightly soft. You want it to be firm enough to hold its shape, but not rock hard. Think of the consistency of softened butter.
Important Note: Don’t let the mixture get too hard! If it does, simply let it sit at room temperature for a while to soften up slightly.
Phase 3: Whipping to Perfection
This is where the magic happens! Whipping the cooled mixture incorporates air, creating a light, fluffy, and luxurious body butter.
1. Prepare Your Mixer: Remove the bowl from the refrigerator and remove the plastic wrap.
2. Whip the Mixture: Using a hand mixer or stand mixer fitted with the whisk attachment, begin whipping the mixture on medium speed.
3. Increase Speed Gradually: Gradually increase the speed to high and continue whipping for 5-10 minutes, or until the body butter is light, fluffy, and has doubled in volume. You’ll notice the color will lighten as air is incorporated.
4. Scrape Down the Sides: Stop the mixer occasionally and scrape down the sides of the bowl with a spatula to ensure that everything is evenly whipped.
5. Check the Consistency: The body butter should be light and airy, similar to whipped cream. If it’s still too soft, you can chill it in the refrigerator for another 15-20 minutes and then whip it again.
6. Adjust Consistency (Optional): If your body butter is too thick, you can add a teaspoon of sweet almond oil or another carrier oil and whip it again until you reach your desired consistency.
Phase 4: Storing Your Homemade Goodness
Now that you’ve created your amazing mango body butter, it’s time to store it properly to maintain its quality and freshness.
1. Transfer to Jars: Using a clean spatula, transfer the whipped body butter to clean, airtight jars or containers.
2. Fill Jars Completely: Fill the jars completely to minimize air exposure.
3. Label Your Jars: Label each jar with the date you made the body butter.
4. Storage: Store your mango body butter in a cool, dark place away from direct sunlight and heat. It should last for 6-12 months, depending on the ingredients you used and how well you store it.
5. Check for Changes: Keep an eye on your body butter for any changes in color, texture, or smell. If you notice anything unusual, it’s best to discard it.
Tips and Tricks for the Best Mango Body Butter
* Use High-Quality Ingredients: The quality of your ingredients will directly impact the quality of your body butter. Opt for pure, unrefined butters and oils whenever possible.
* Don’t Overheat the Butters and Oils: Overheating can damage the beneficial properties of the butters and oils. Use a double boiler and monitor the temperature carefully.
* Cool the Mixture Properly: Cooling the mixture to the right consistency is crucial for achieving the perfect fluffy texture.
* Whip Thoroughly: Whip the mixture for at least 5-10 minutes to incorporate enough air and create a light, airy body butter.
* Experiment with Different Scents: Don’t be afraid to experiment with different essential oil blends to create your own signature scent.
* Customize Your Recipe: You can customize this recipe to suit your skin type and preferences. For example, if you have dry skin, you can add more shea butter or a heavier oil like avocado oil. If you have oily skin, you can use a lighter oil like grapeseed oil.
* Consider Adding Other Ingredients: You can also add other beneficial ingredients to your body butter, such as honey, aloe vera gel, or colloidal oatmeal.
* Patch Test: Before using your body butter all over your body, it’s always a good idea to do a patch test on a small area of skin to check for any allergic reactions.
* Gift Giving: This mango body butter makes a wonderful homemade gift! Package it in pretty jars and add a personalized label for a thoughtful and luxurious present.
Troubleshooting Common Issues
* Body Butter is Grainy: This can happen if
Conclusion
So there you have it! Crafting your own DIY Mango Body Butter is not just a fun project; it’s a gateway to luxuriously soft, deeply nourished skin, all while knowing exactly what ingredients you’re putting on your body. In a world saturated with commercially produced lotions filled with synthetic chemicals and questionable additives, this homemade alternative offers a refreshing and empowering experience.
Why is this a must-try? Because it’s customizable, cost-effective, and incredibly rewarding. You control the ingredients, ensuring that only the purest, most beneficial components touch your skin. The rich, emollient properties of mango butter, combined with the hydrating power of your chosen oils, create a synergistic blend that combats dryness, soothes irritation, and leaves your skin feeling supple and radiant. Plus, the subtle, natural fragrance of mango is simply divine!
But the beauty of this DIY project lies in its versatility. Feel free to experiment with different carrier oils to tailor the body butter to your specific skin type. For drier skin, consider adding avocado oil or shea butter for extra moisture. If you have oily skin, grapeseed oil or jojoba oil are lighter options that won’t clog pores. You can also incorporate essential oils for added therapeutic benefits and fragrance. A few drops of lavender oil can promote relaxation, while tea tree oil can help with acne-prone skin. Peppermint oil can provide a cooling sensation, perfect for summer months.
Don’t be afraid to get creative with your additions! A teaspoon of honey can act as a natural humectant, drawing moisture to the skin. A pinch of turmeric powder can add antioxidant benefits and a subtle golden hue. Just remember to research the properties of any new ingredients before adding them to your recipe to ensure they are safe and suitable for your skin.
The process of making your own body butter is also incredibly therapeutic. It’s a chance to slow down, connect with nature, and create something beautiful and beneficial with your own hands. The satisfaction of knowing you’ve crafted a luxurious skincare product from scratch is truly unparalleled.
We wholeheartedly encourage you to give this DIY Mango Body Butter recipe a try. It’s a simple, rewarding, and effective way to pamper your skin and embrace a more natural approach to skincare. Once you experience the difference, you’ll never want to go back to store-bought lotions again!
And most importantly, we want to hear about your experience! Share your photos, tips, and variations in the comments below. Let us know what oils you used, what essential oils you added, and how your skin responded. Your feedback will not only help other readers but also inspire us to create even more amazing DIY skincare recipes. So go ahead, unleash your inner alchemist and create your own personalized batch of mango body butter. Your skin will thank you for it!
Frequently Asked Questions (FAQ)
What exactly is mango butter, and why is it good for my skin?
Mango butter is a natural fat extracted from the seed of the mango fruit. It’s rich in antioxidants, vitamins A, C, and E, and essential fatty acids. These components work together to deeply moisturize the skin, promote cell regeneration, reduce inflammation, and protect against environmental damage. Mango butter is also non-comedogenic, meaning it won’t clog pores, making it suitable for most skin types. Its emollient properties help to soften and smooth the skin, leaving it feeling supple and hydrated. It’s particularly beneficial for dry, sensitive, or irritated skin.
Can I use a different type of butter if I don’t have mango butter?
While mango butter is the star of this recipe, you can substitute it with other natural butters like shea butter, cocoa butter, or kokum butter. However, keep in mind that each butter has its own unique properties and consistency. Shea butter is known for its moisturizing and anti-inflammatory benefits, while cocoa butter has a richer, more decadent scent and is excellent for very dry skin. Kokum butter is a harder butter with a high melting point, so it might require a slightly different blending technique. If you substitute, start with the same amount as the mango butter in the recipe and adjust as needed to achieve the desired consistency.
What kind of carrier oils are best to use in this DIY Mango Body Butter?
The best carrier oils depend on your skin type and preferences. Some popular options include:
* **Jojoba Oil:** Mimics the skin’s natural sebum, making it suitable for all skin types, including oily and acne-prone skin.
* **Sweet Almond Oil:** A lightweight and versatile oil that’s easily absorbed and provides excellent hydration.
* **Grapeseed Oil:** A light and non-greasy oil that’s rich in antioxidants and suitable for oily or sensitive skin.
* **Avocado Oil:** A rich and deeply moisturizing oil that’s ideal for dry or mature skin.
* **Coconut Oil:** A highly moisturizing oil with antimicrobial properties, but it can be comedogenic for some people. Use fractionated coconut oil to minimize this risk.
* **Olive Oil:** A classic and readily available oil that’s rich in antioxidants and provides excellent hydration, but it can be heavy for some skin types.
Experiment with different oils to find the ones that work best for your skin.
How do I store my homemade Mango Body Butter, and how long will it last?
Store your DIY Mango Body Butter in an airtight container in a cool, dark place. Avoid storing it in direct sunlight or in a warm environment, as this can cause it to melt and lose its consistency. When stored properly, your body butter should last for approximately 6-12 months. The shelf life will depend on the freshness of your ingredients and the presence of any preservatives. If you notice any changes in color, smell, or texture, it’s best to discard the body butter.
Can I add essential oils to my Mango Body Butter? If so, which ones are recommended?
Yes, adding essential oils can enhance the therapeutic benefits and fragrance of your body butter. However, it’s important to use essential oils safely and in moderation. A general guideline is to use a concentration of 1-3% essential oils in your body butter. Some recommended essential oils include:
* **Lavender Oil:** Known for its calming and relaxing properties, it’s great for promoting sleep and reducing stress.
* **Tea Tree Oil:** Has antibacterial and anti-inflammatory properties, making it beneficial for acne-prone skin.
* **Peppermint Oil:** Provides a cooling and refreshing sensation, perfect for summer months.
* **Rosemary Oil:** Can improve circulation and promote hair growth (if using on the scalp).
* **Chamomile Oil:** Soothes irritated skin and reduces inflammation.
* **Frankincense Oil:** Has anti-aging properties and can help to improve skin tone and elasticity.
Always perform a patch test before using essential oils on your entire body to check for any allergic reactions.
My body butter turned out too greasy. What did I do wrong, and how can I fix it?
If your body butter is too greasy, it could be due to a few factors:
* **Too much oil:** You may have used too much carrier oil in relation to the butter.
* **Heavy oils:** You may have used oils that are too heavy for your skin type.
* **Incorrect whipping:** Insufficient whipping can prevent the oils and butter from emulsifying properly.
To fix it, you can try re-whipping the body butter for a longer period of time. If that doesn’t work, you can melt it down again and add more mango butter or a thickening agent like arrowroot powder or cornstarch. Start with a small amount (about a teaspoon) and add more until you reach the desired consistency.
My body butter is too hard. How can I soften it?
If your body butter is too hard, it could be due to:
* **Too much butter:** You may have used too much mango butter in relation to the oils.
* **Cold temperature:** The body butter may have been stored in a very cold environment.
To soften it, you can try warming it up slightly by placing the container in a warm water bath for a few minutes. You can also melt it down again and add more carrier oil to soften the consistency. Start with a small amount (about a teaspoon) and add more until you reach the desired consistency.
Can I add color to my DIY Mango Body Butter?
Yes, you can add natural colorants to your body butter. Some options include:
* **Turmeric Powder:** Adds a golden yellow hue and antioxidant benefits.
* **Beetroot Powder:** Adds a pink or reddish hue.
* **Spirulina Powder:** Adds a green hue.
* **Mica Powders:** These are natural mineral pigments that come in a variety of colors and add a shimmer to the body butter.
Start with a small amount of colorant and add more until you achieve the desired shade. Be careful not to add too much, as it could stain your skin.
Is this DIY Mango Body Butter safe for children and babies?
While the ingredients in this recipe are generally considered safe, it’s always best to consult with a pediatrician before using any homemade skincare products on children or babies. Some essential oils are not safe for young children, so it’s important to avoid them or

Leave a Comment