

DIY Pallet Wood Mirror: Transform your space with rustic charm! Have you ever looked at a plain, boring mirror and thought, “This needs some serious personality”? I know I have! That’s why I’m so excited to share this fantastic DIY project that not only adds character to your home but also repurposes materials in a sustainable way.
Pallet wood, once the unsung hero of shipping and logistics, has found new life in the world of DIY. Its rugged texture and weathered appearance bring a touch of the outdoors inside, evoking a sense of warmth and authenticity. The use of reclaimed wood in home decor has roots in the “make do and mend” ethos of past generations, where resourcefulness was a necessity. Today, it’s a stylish way to embrace sustainability and create unique, one-of-a-kind pieces.
Why do you need this DIY Pallet Wood Mirror in your life? Well, beyond its aesthetic appeal, it’s a budget-friendly way to elevate your home decor. Store-bought mirrors can be expensive, and finding one with the perfect rustic vibe can be a challenge. With this project, you’re in control of the size, shape, and finish, allowing you to create a mirror that perfectly complements your personal style. Plus, it’s incredibly satisfying to say, “I made that!” when guests admire your handiwork. Let’s get started and turn those discarded pallets into a stunning focal point for your home!
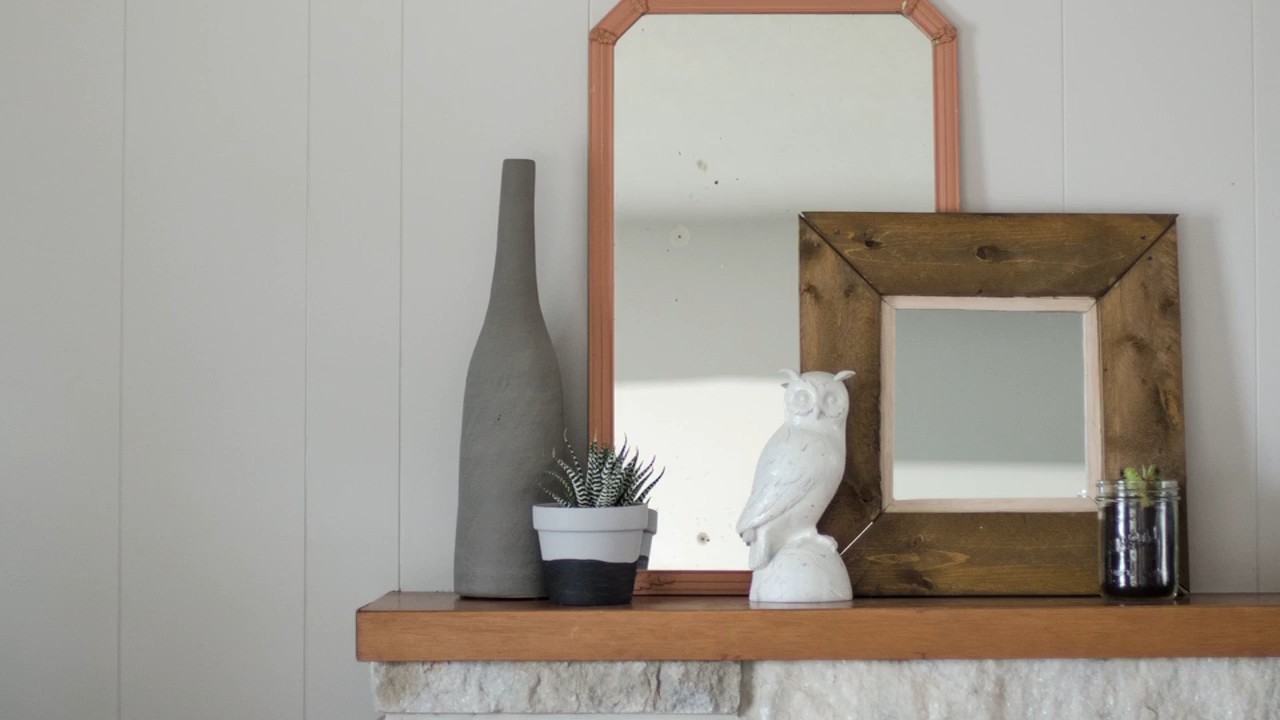
DIY Pallet Wood Mirror: Rustic Charm for Your Home
Okay, let’s get started on this fun project! I’m going to show you how to create a beautiful and unique mirror using reclaimed pallet wood. This is a great way to add some rustic charm to your home decor and it’s surprisingly easy to do. Plus, you’re giving old pallets a new life!
Materials You’ll Need:
* A pallet (look for heat-treated pallets marked “HT” to avoid chemically treated ones)
* A mirror (size depends on your preference and the size of your pallet)
* Safety glasses
* Work gloves
* Pry bar or pallet buster
* Hammer
* Nails or screws
* Wood saw (circular saw, miter saw, or hand saw)
* Measuring tape
* Pencil
* Sandpaper (various grits, like 80, 120, and 220)
* Wood filler (optional, for filling nail holes and imperfections)
* Wood stain or paint (your choice of color)
* Paintbrushes or rags
* Wood sealant or varnish (optional, for added protection)
* Construction adhesive or mirror mastic
* D-rings or picture hanging wire
* Screws for D-rings (if using)
* Drill (if using screws for D-rings)
* Clamps (optional, but helpful for gluing)
Section 1: Pallet Disassembly and Preparation
This is probably the most physically demanding part, but don’t worry, we’ll get through it!
1. Safety First! Before you even touch the pallet, put on your safety glasses and work gloves. Pallets can be rough and splintery, and you definitely don’t want to get hurt.
2. Inspect the Pallet: Take a good look at your pallet. Check for any loose nails, broken boards, or signs of rot. If a board is severely damaged, it’s best to discard it.
3. Disassemble the Pallet: This is where the pry bar or pallet buster comes in handy. Carefully wedge the tool between the boards and the frame of the pallet. Gently pry the boards loose, working your way around the pallet. Be patient and avoid forcing anything too much, as you don’t want to split the wood. If you’re using a hammer and pry bar, tap the pry bar gently with the hammer to help loosen the nails.
4. Remove Nails and Staples: Once you’ve removed the boards, you’ll need to remove any remaining nails or staples. You can use a hammer and nail punch to drive the nails through the back of the boards, or use pliers to pull them out. Be careful not to damage the wood in the process.
5. Select Your Boards: Choose the boards that you want to use for your mirror frame. Consider the grain pattern, color, and overall appearance of the wood. Set aside any boards that are too damaged or warped.
Section 2: Cutting and Sanding the Wood
Now we’re going to shape the wood and make it smooth.
1. Measure Your Mirror: Carefully measure the dimensions of your mirror. You’ll need these measurements to determine the size of your frame.
2. Determine Frame Dimensions: Decide how wide you want your frame to be. A common width is between 2 and 4 inches, but it’s really up to your personal preference. Add twice the frame width to both the length and width of your mirror to determine the overall dimensions of your frame. For example, if your mirror is 12 inches by 16 inches and you want a 2-inch frame, your frame will be 16 inches by 20 inches.
3. Cut the Boards: Using your wood saw, cut the pallet boards to the appropriate lengths for your frame. You’ll need two boards for the top and bottom of the frame, and two boards for the sides. Make sure your cuts are straight and accurate. I like to use a miter saw for this, but a circular saw or even a hand saw will work just fine.
4. Sand the Boards: Sanding is crucial for a smooth and professional-looking finish. Start with a coarser grit sandpaper (like 80 grit) to remove any rough edges, splinters, or imperfections. Then, move on to a medium grit sandpaper (like 120 grit) to further smooth the surface. Finally, finish with a fine grit sandpaper (like 220 grit) for a super smooth finish. Sand all sides of the boards, including the edges.
5. Fill Nail Holes (Optional): If you want a more polished look, you can fill any nail holes or imperfections with wood filler. Apply the wood filler according to the manufacturer’s instructions. Once the filler is dry, sand it smooth with fine-grit sandpaper.
Section 3: Assembling the Frame
Time to put the pieces together!
1. Arrange the Boards: Lay the cut and sanded boards on a flat surface, arranging them in the shape of a frame. Make sure the corners are aligned and that the frame is square.
2. Attach the Boards: There are several ways to attach the boards together. You can use nails, screws, or a combination of both. If you’re using nails, pre-drill pilot holes to prevent the wood from splitting. If you’re using screws, make sure they are long enough to securely hold the boards together. Apply wood glue to the edges of the boards before attaching them for added strength.
3. Clamp the Frame (Optional): If you have clamps, use them to hold the frame together while the glue dries. This will ensure a strong and secure bond.
4. Check for Square: After attaching the boards, double-check that the frame is square. You can use a square or a measuring tape to verify that the corners are 90 degrees. If the frame is not square, gently adjust it until it is.
Section 4: Staining or Painting the Frame
Let’s add some color and personality!
1. Prepare the Surface: Before staining or painting, make sure the frame is clean and dry. Wipe it down with a tack cloth to remove any dust or debris.
2. Apply Stain or Paint: Choose your favorite wood stain or paint color. I personally love the look of a dark stain on pallet wood, but you can choose any color that complements your decor. Apply the stain or paint according to the manufacturer’s instructions. Use a paintbrush or rag to apply the stain, working it into the grain of the wood. For paint, you may need to apply multiple coats for full coverage.
3. Let it Dry: Allow the stain or paint to dry completely before moving on to the next step. The drying time will vary depending on the type of stain or paint you use.
4. Apply a Second Coat (Optional): If you want a richer color or more coverage, apply a second coat of stain or paint. Let it dry completely.
5. Distress the Frame (Optional): If you want a more rustic or weathered look, you can distress the frame. Use sandpaper to lightly sand the edges and corners of the frame, revealing the wood underneath. You can also use a hammer or other tools to create dents and scratches.
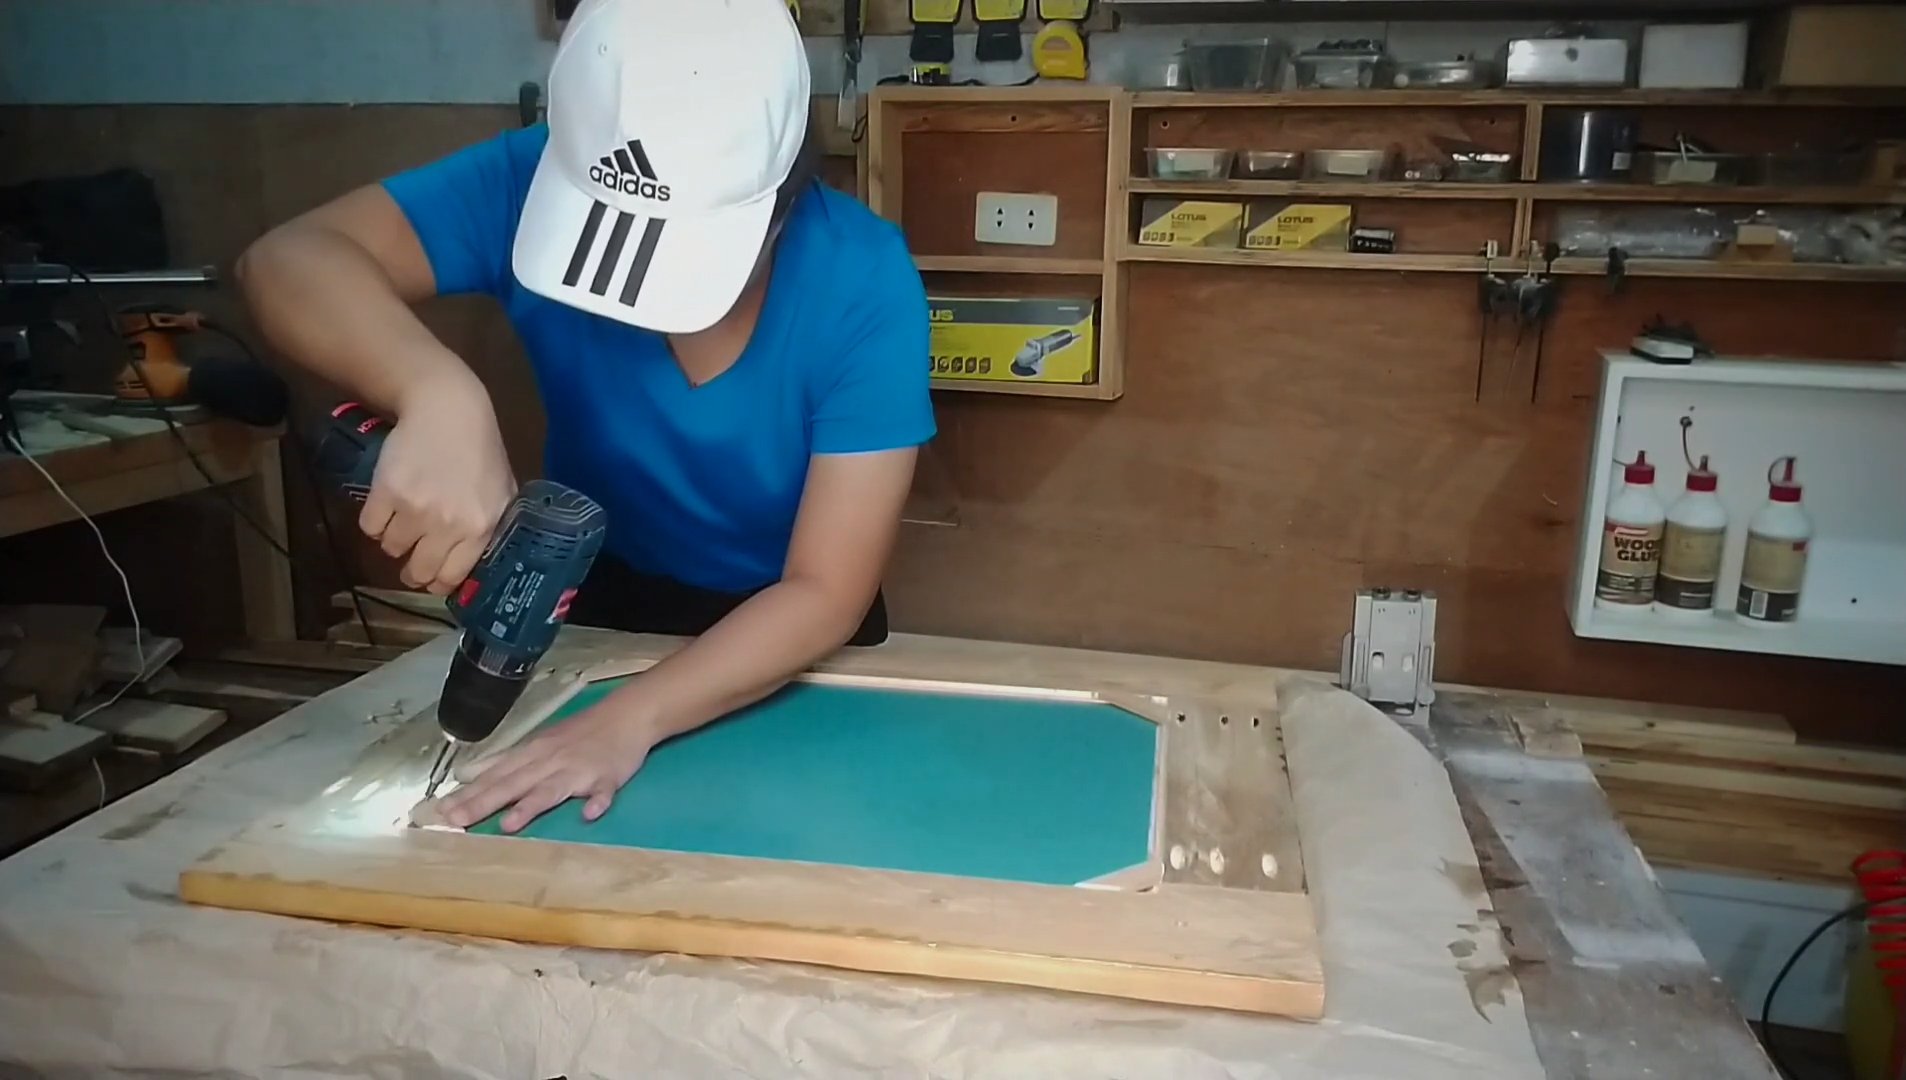
Section 5: Attaching the Mirror
Almost there!
1. Clean the Mirror: Clean the mirror thoroughly with glass cleaner to remove any fingerprints or smudges.
2. Apply Construction Adhesive or Mirror Mastic: Apply a generous amount of construction adhesive or mirror mastic to the back of the mirror. Follow the manufacturer’s instructions for application.
3. Position the Mirror: Carefully position the mirror inside the frame, centering it as best as you can. Press the mirror firmly against the frame to ensure a good bond.
4. Secure the Mirror (Optional): For added security, you can use small pieces of wood or cardboard to hold the mirror in place while the adhesive dries. Place these pieces around the edges of the mirror, pressing them against the frame.
5. Let it Dry: Allow the adhesive to dry completely before moving on to the next step. The drying time will vary depending on the type of adhesive you use.
Section 6: Adding Hanging Hardware
The final touches!
1. Determine Hanging Method: Decide how you want to hang your mirror. You can use D-rings and picture hanging wire, or you can use sawtooth hangers.
2. Attach D-Rings (If Using): If you’re using D-rings, mark the locations for the D-rings on the back of the frame. Pre-drill pilot holes if necessary, and then screw the D-rings into place. Attach picture hanging wire to the D-rings.
3. Attach Sawtooth Hangers (If Using): If you’re using sawtooth hangers, simply hammer them into the back of the frame at the desired location.
4. Apply Sealant or Varnish (Optional): For added protection, you
Conclusion
So, there you have it! Transforming reclaimed pallet wood into a stunning, rustic mirror is not only achievable but also incredibly rewarding. This DIY pallet wood mirror project is more than just a craft; it’s an opportunity to inject personality and sustainable style into your home decor. Forget mass-produced, cookie-cutter mirrors – this is about creating something unique, something that tells a story, and something that reflects your own individual taste.
Why is this a must-try? Because it’s budget-friendly, eco-conscious, and allows for complete creative control. You’re rescuing discarded materials, giving them a new lease on life, and saving money in the process. Plus, the satisfaction of crafting something beautiful with your own hands is unparalleled. The natural imperfections of the pallet wood – the knots, the grain variations, the subtle color differences – all contribute to the mirror’s character and charm. It’s a piece that will undoubtedly spark conversation and become a focal point in any room.
But the beauty of this project lies in its adaptability. Feel free to experiment with different stains and finishes. A dark walnut stain will lend a more sophisticated, traditional feel, while a whitewash will create a light and airy coastal vibe. Consider adding decorative elements like rope, metal accents, or even small succulents to further personalize your creation. You could also play with the shape and size of the mirror itself. A long, rectangular mirror is perfect for a hallway or entryway, while a round mirror adds a touch of whimsy to a bedroom or bathroom. Think about distressing the wood further for a more weathered, antique look. The possibilities are truly endless!
Don’t be intimidated if you’re new to woodworking. This project is surprisingly beginner-friendly, especially if you start with a pre-cut mirror. The key is to take your time, measure carefully, and don’t be afraid to embrace imperfections. After all, it’s the imperfections that make it unique!
We wholeheartedly encourage you to give this DIY pallet wood mirror project a try. It’s a fantastic way to unleash your creativity, add a touch of rustic charm to your home, and contribute to a more sustainable lifestyle. Once you’ve completed your masterpiece, we’d love to see it! Share your photos and experiences with us in the comments below or on social media using #DIYPalletMirror. We can’t wait to see what you create! Let’s transform those discarded pallets into stunning reflections of your personal style.
Frequently Asked Questions (FAQ)
What kind of pallet wood should I use?
The best pallet wood for this project is heat-treated (HT) pallet wood. Avoid pallets marked with “MB” as they have been treated with methyl bromide, a harmful pesticide. Look for pallets that are clean, dry, and free of excessive damage or rot. Hardwood pallets are generally more durable and aesthetically pleasing than softwood pallets. Also, be sure to check for any protruding nails or staples before you begin working with the wood. Safety first!
How do I safely disassemble a pallet?
Disassembling a pallet can be tricky, but there are a few methods you can use. A reciprocating saw with a metal-cutting blade is often the most efficient way to cut through the nails or screws holding the pallet together. You can also use a pry bar and hammer to carefully separate the boards, but this method can be more time-consuming and may result in splitting the wood. Wear safety glasses and gloves to protect yourself from flying debris and sharp edges. There are also specialized pallet buster tools available that make disassembly easier and safer.
What tools do I need for this project?
The essential tools for this project include:
* A saw (circular saw, jigsaw, or hand saw)
* A drill with various drill bits
* A sander (orbital sander or sanding block)
* A measuring tape
* A level
* A hammer
* Safety glasses
* Gloves
* Wood glue
* Screws or nails
* Stain or paint (optional)
* A mirror
* A method for disassembling the pallet (reciprocating saw, pry bar, pallet buster)
Depending on the complexity of your design, you may also need additional tools like a router or a miter saw.
How do I prepare the pallet wood for use?
Once you’ve disassembled the pallet, you’ll need to prepare the wood for use. This involves removing any remaining nails or staples, sanding the wood to smooth out rough edges and surfaces, and cleaning the wood to remove any dirt or debris. You can use a wire brush to remove stubborn dirt. If you plan to stain or paint the wood, now is the time to do it. Apply the stain or paint in thin, even coats, allowing each coat to dry completely before applying the next.
How do I attach the mirror to the pallet wood frame?
There are several ways to attach the mirror to the pallet wood frame. One common method is to use mirror adhesive, which is a special type of adhesive designed to bond mirrors to various surfaces. Apply the adhesive to the back of the mirror and carefully press it onto the frame. You can also use mirror clips or brackets to secure the mirror in place. If you’re using clips or brackets, make sure they are properly sized for the thickness of the mirror. For added security, you can also apply a bead of caulk around the edges of the mirror to seal it to the frame.
What if my pallet wood is warped or uneven?
Warped or uneven pallet wood can be challenging to work with, but there are a few things you can do to mitigate the problem. You can try clamping the wood to a flat surface and applying heat to help straighten it out. You can also use a planer to remove material from the high spots and create a more even surface. If the warping is severe, you may need to discard the affected pieces of wood and use only the straightest pieces for your project. Remember that some imperfections add to the rustic charm!
How can I protect the finished mirror from moisture?
If you plan to hang your DIY pallet wood mirror in a bathroom or other humid environment, it’s important to protect the wood from moisture. You can apply a sealant or varnish to the wood to create a waterproof barrier. Be sure to choose a sealant or varnish that is specifically designed for use on wood and that is compatible with the stain or paint you used. Apply the sealant or varnish in thin, even coats, allowing each coat to dry completely before applying the next.
Can I use this technique to make other types of mirrors?
Absolutely! The basic principles of this project can be applied to create a variety of different types of mirrors. You can use different types of wood, different shapes and sizes of mirrors, and different decorative elements to create a mirror that perfectly matches your style and decor. Consider using reclaimed barn wood for a more rustic look, or metal sheeting for a more industrial feel. Let your imagination run wild!

Leave a Comment