

DIY Pen Holder: Tired of your desk looking like a tornado hit a stationery store? I know the feeling! Pens scattered everywhere, highlighters playing hide-and-seek, and sticky notes clinging to dear life – it’s a universal struggle for anyone who works from home or just loves to keep things organized.
But fear not, fellow clutter conquerors! This isn’t just another article about tidying up. We’re diving into the wonderful world of DIY, where creativity meets practicality, and where you can transform everyday objects into something beautiful and functional. Think of it as a mini-makeover for your workspace, one pen at a time.
Humans have been devising clever ways to store writing implements for centuries. From ancient Egyptians using reed containers to hold their styluses to the ornate pen holders gracing Victorian desks, the need for organized writing tools is deeply ingrained in our history. Today, with the rise of remote work and the desire for personalized spaces, the DIY pen holder is experiencing a major resurgence.
Why should you embark on this DIY adventure? Because a well-organized desk is a happy desk, and a happy desk leads to a happy you! A custom-made pen holder not only declutters your space but also adds a touch of personality and flair. Plus, it’s a fantastic way to recycle materials, unleash your inner artist, and impress your colleagues (or yourself!) with your crafting skills. So, grab your glue gun, gather your supplies, and let’s get crafting!
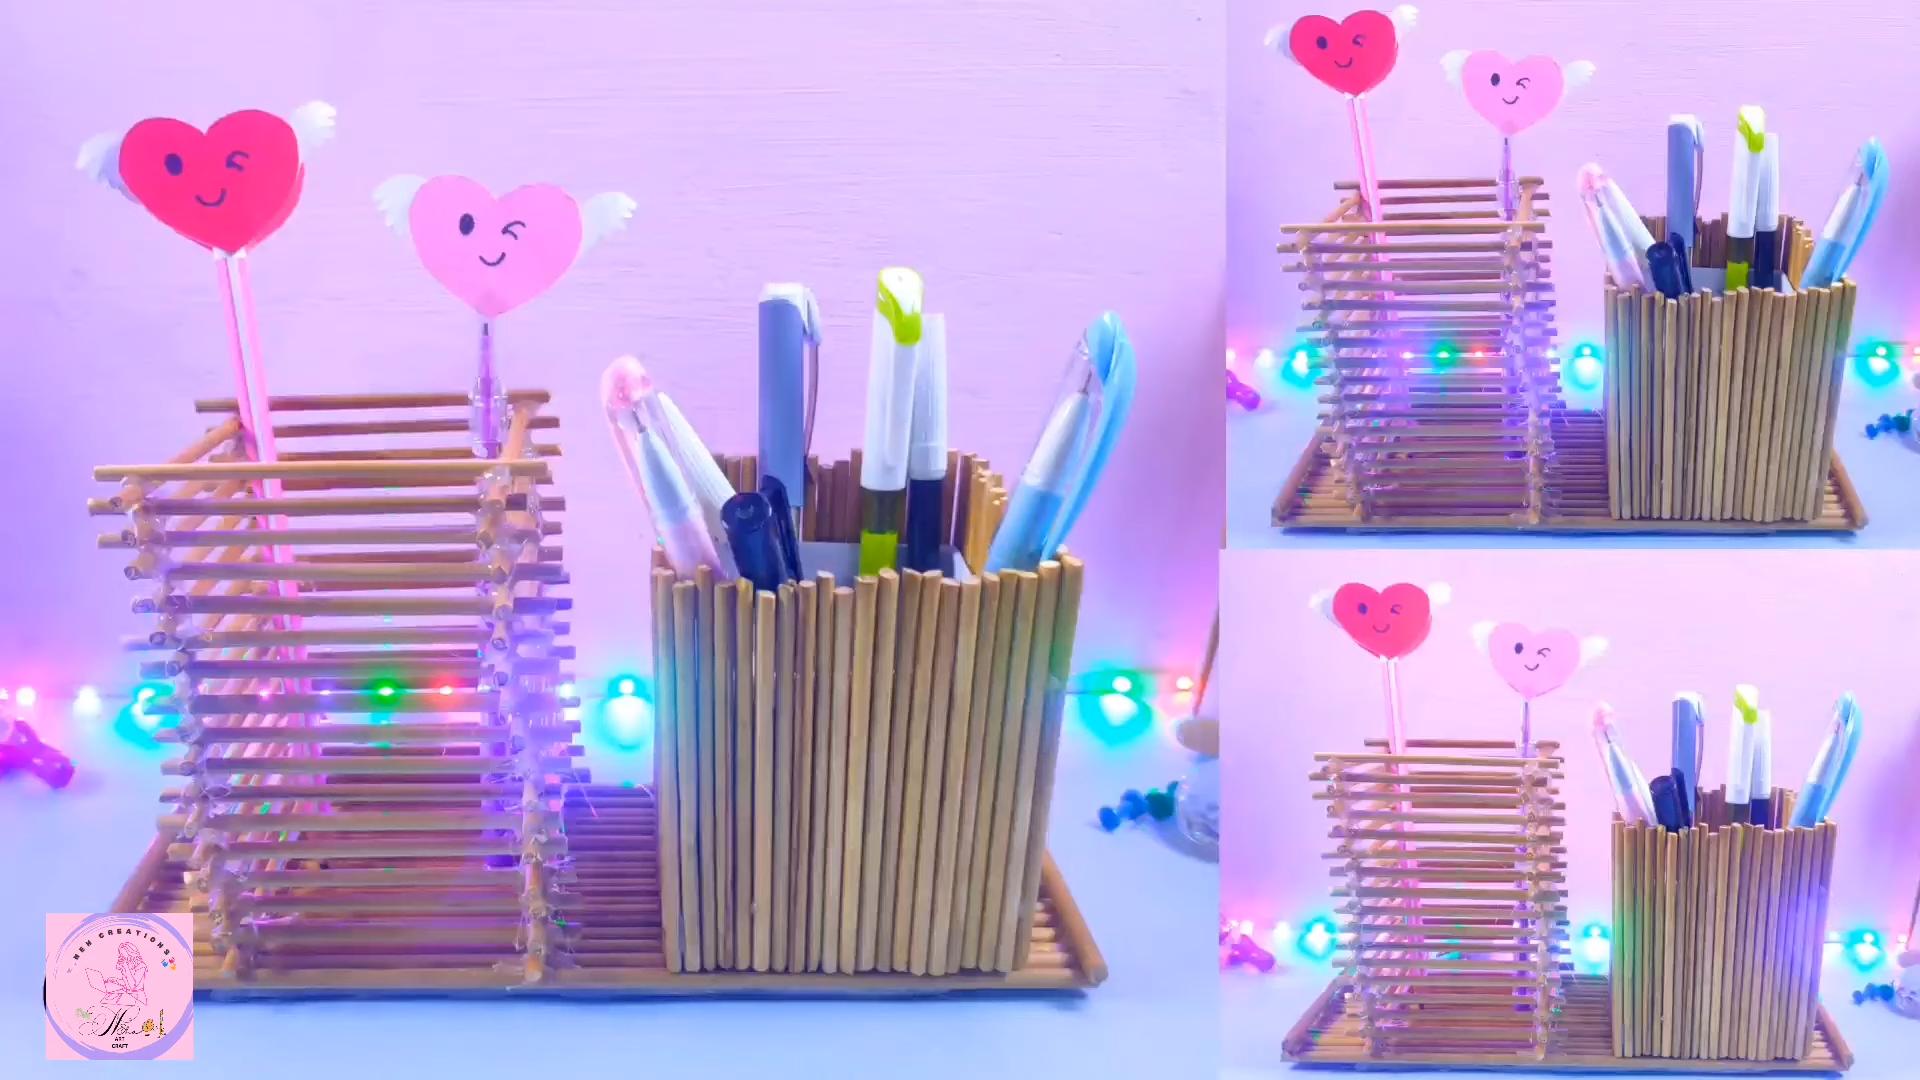
DIY Upcycled Denim Pen Holder: A Stylish and Sustainable Desk Organizer
Hey there, fellow crafters! Are you drowning in pens, pencils, and markers? Do you have a pair of old jeans that are just taking up space in your closet? Well, I have the perfect solution: a super cute and incredibly functional denim pen holder! This project is not only a fantastic way to declutter your desk but also a brilliant way to give those old jeans a new lease on life. Plus, it’s surprisingly easy to make, even if you’re a beginner. Let’s dive in!
Materials You’ll Need
Before we get started, let’s gather all the necessary materials. Trust me, having everything ready beforehand will make the whole process much smoother.
* **Old Jeans:** The star of the show! Choose a pair that you don’t wear anymore but still has some good denim left. The thicker the denim, the sturdier your pen holder will be.
* **Scissors:** A good pair of fabric scissors is essential for clean cuts.
* **Ruler or Measuring Tape:** For accurate measurements.
* **Pencil or Fabric Marker:** To mark your cutting lines.
* **Sewing Machine (Optional):** While you can hand-sew this project, a sewing machine will make it much faster and more durable.
* **Thread:** Choose a thread color that complements your denim. I personally love using a contrasting color for a pop of visual interest.
* **Sewing Needles:** If you’re hand-sewing, make sure you have a sturdy needle suitable for denim.
* **Hot Glue Gun and Glue Sticks (Optional):** For extra reinforcement or embellishments.
* **Cardboard or Plastic Container:** This will serve as the base of your pen holder. Think empty tin cans, plastic food containers, or even a sturdy cardboard tube from paper towels.
* **Fabric Glue (Optional):** For adhering the denim to the base container.
* **Embellishments (Optional):** Buttons, beads, patches, lace – anything you want to use to personalize your pen holder!
Preparing the Denim
This is a crucial step, so pay close attention! We need to cut the denim into strips that will form the body of our pen holder.
1. **Cut off the Legs:** Lay your jeans flat and carefully cut off both legs. Try to cut as straight as possible.
2. **Open the Seams:** Use your scissors or a seam ripper to open up the inner seams of each leg. This will give you two large pieces of denim to work with.
3. **Cut into Strips:** Now, using your ruler and pencil, mark strips of denim that are approximately 1.5 to 2 inches wide. The exact width isn’t critical, but consistency will give you a neater finished product. I usually aim for 1.75 inches.
4. **Cut Along the Lines:** Carefully cut along the marked lines to create your denim strips. You’ll need quite a few strips, so keep cutting until you have a good pile. I usually cut around 20-25 strips depending on the size of my base container.
5. **Iron the Strips (Optional):** If your denim strips are wrinkled, you can iron them to make them easier to work with. This is especially helpful if you’re using a sewing machine.
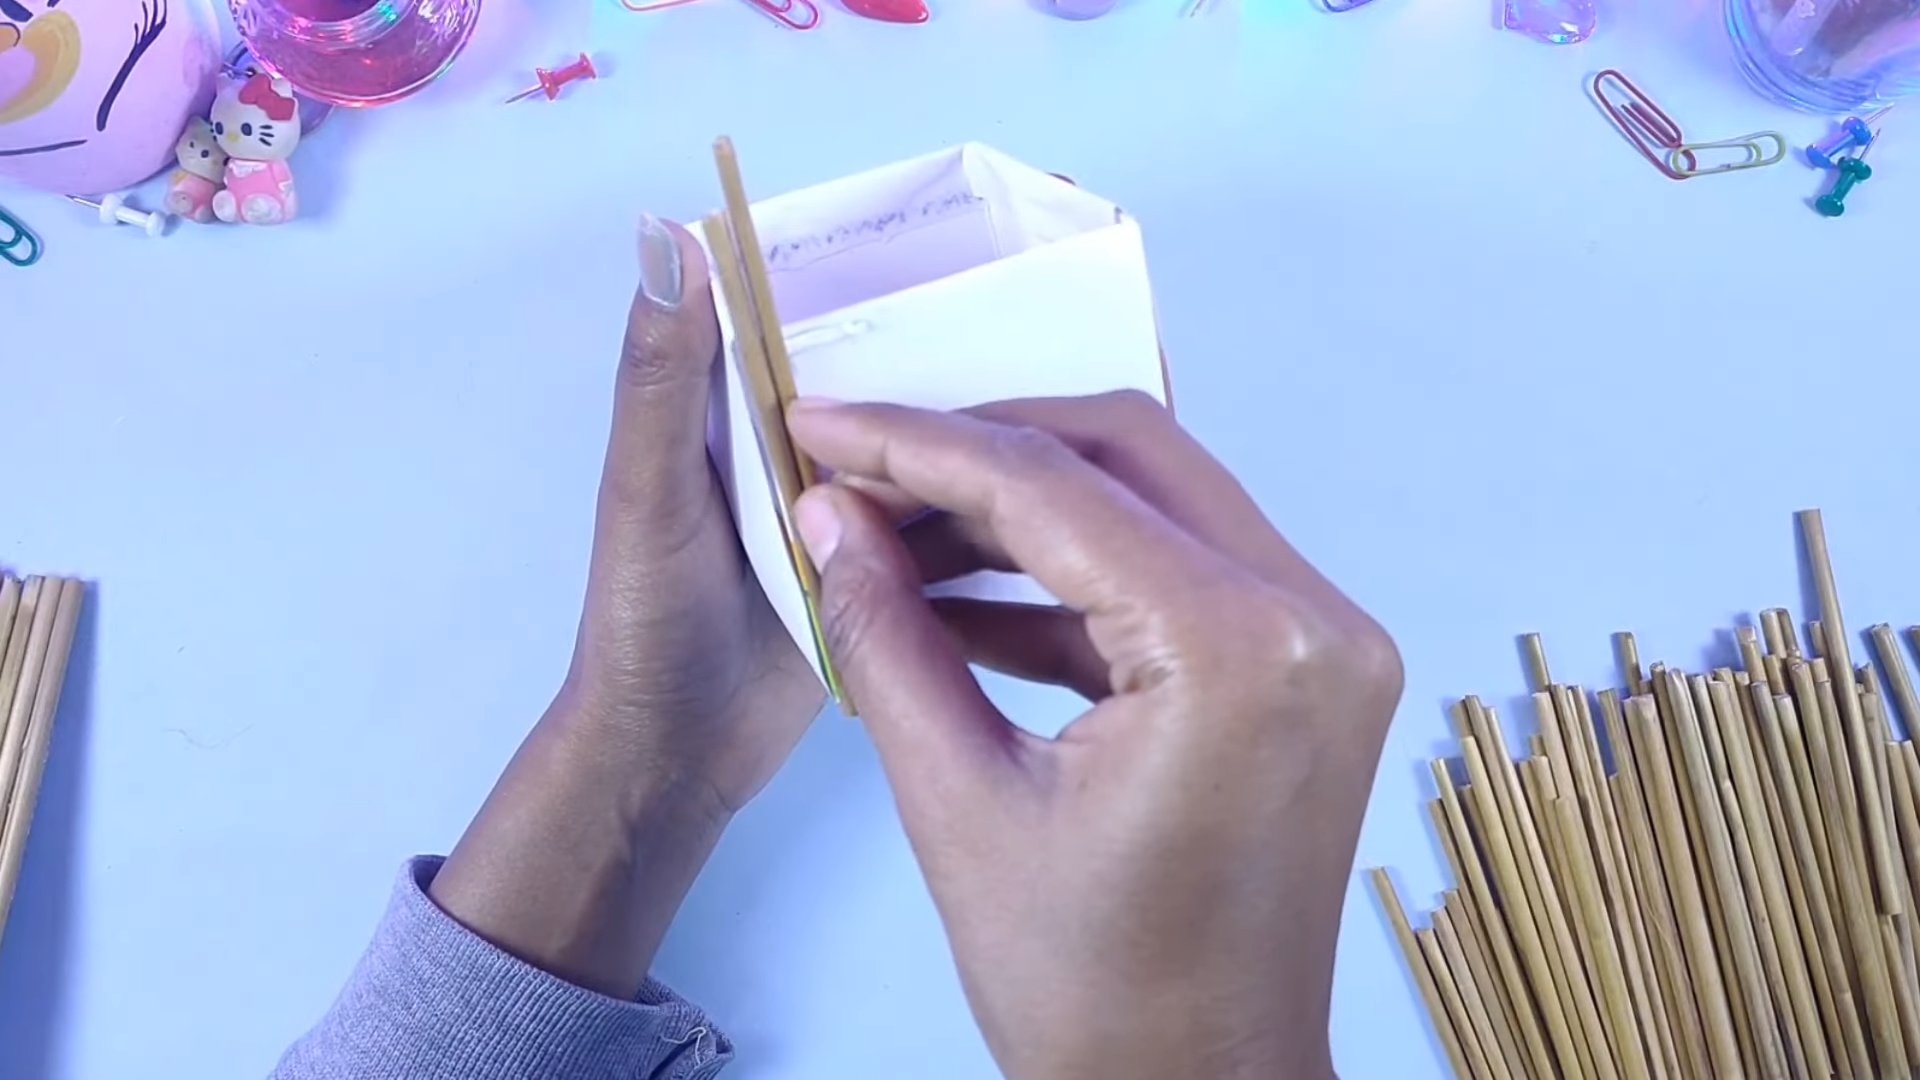
Assembling the Pen Holder
Now for the fun part – putting everything together!
1. **Prepare the Base Container:** Make sure your cardboard or plastic container is clean and dry. If you’re using a cardboard container, you might want to reinforce the bottom with some extra cardboard and glue.
2. **Attaching the First Strip:** Take one of your denim strips and apply a thin line of fabric glue (or hot glue) along the bottom edge of the container. Carefully wrap the strip around the container, pressing it firmly into the glue. Make sure the strip is straight and even.
3. **Sewing the Strips (Sewing Machine Method):** If you’re using a sewing machine, overlap the next denim strip slightly over the first strip (about 1/4 inch). Sew along the top and bottom edges of the overlapping strip, securing it to the container and the previous strip. Continue this process, overlapping each strip slightly and sewing it in place, until you’ve covered the entire container.
4. **Sewing the Strips (Hand-Sewing Method):** If you’re hand-sewing, overlap the next denim strip slightly over the first strip (about 1/4 inch). Use a sturdy stitch, such as a backstitch or running stitch, to sew along the top and bottom edges of the overlapping strip, securing it to the container and the previous strip. Continue this process, overlapping each strip slightly and sewing it in place, until you’ve covered the entire container. This will take a bit longer than using a sewing machine, but the result will be just as beautiful!
5. **Hot Glue Alternative:** If you don’t have a sewing machine or don’t want to hand-sew, you can use hot glue to attach the denim strips. Overlap each strip slightly and apply a small amount of hot glue to the top and bottom edges before pressing it firmly into place. Be careful not to use too much glue, as it can seep through the denim.
6. **Finishing the Top Edge:** Once you’ve covered the entire container, you’ll need to finish the top edge. You can either fold the top edge of the last denim strip inward and glue or sew it in place, or you can add a decorative trim, such as ribbon or lace. I like to fold the denim inward for a clean, finished look.
Embellishing Your Pen Holder (Optional)
This is where you can really let your creativity shine! Here are a few ideas for embellishing your denim pen holder:
* **Buttons:** Sew or glue buttons of various sizes and colors onto the denim.
* **Beads:** Add some sparkle by gluing beads onto the denim.
* **Patches:** Iron-on or sew-on patches are a great way to add personality to your pen holder.
* **Lace:** Glue or sew a strip of lace around the top or bottom edge of the pen holder.
* **Embroidery:** If you’re feeling ambitious, you can embroider a design onto the denim.
* **Paint:** Use fabric paint to add designs or patterns to the denim.
* **Denim Pockets:** Cut out pockets from the remaining denim scraps and sew them onto the pen holder for extra storage. These are perfect for holding small items like paper clips or erasers.
* **Personalized Tags:** Create small tags with your name or initials and attach them to the pen holder.
Alternative Design: Braided Denim Pen Holder
If you’re looking for a different aesthetic, try braiding the denim strips before attaching them to the base.
1. **Prepare the Denim Strips:** Cut the denim into strips as described earlier.
2. **Braid the Strips:** Take three denim strips and braid them together. Secure the ends of the braid with glue or thread.
3. **Attach the Braided Strips:** Starting at the bottom of the container, glue or sew the braided denim strips around the container, overlapping each strip slightly.
4. **Finish and Embellish:** Finish the top edge and embellish as desired.
Tips and Tricks
* Use Different Shades of Denim: For a more visually interesting pen holder, use denim from different pairs of jeans. This will create a patchwork effect.
* Reinforce the Bottom: If you’re using a cardboard container, reinforce the bottom with extra cardboard and glue to prevent it from collapsing under the weight of the pens.
* Protect Your Work Surface: When using glue, protect your work surface with newspaper or a plastic tablecloth.
* Let the Glue Dry Completely: Before using your pen holder, make sure the glue is completely dry.
* Experiment with Different Embellishments: Don’t be afraid to experiment with different embellishments to create a pen holder that is truly unique.
* Consider the Size: Think about the size of your pens and pencils when choosing the height of your base container. You want to make sure they fit comfortably without tipping over.
* Upcycle Other Materials: Get creative and use other upcycled materials in your pen holder. For example, you could use old buttons, zippers, or even scraps of fabric from other projects.
* Make a Set: Why stop at one? Make a set of denim pen holders in different sizes and styles to organize your entire desk.
* Gift Idea: These denim pen holders make fantastic handmade gifts for friends and family.
Cleaning and Maintenance
To keep your denim pen holder looking its best, simply wipe it down with a damp cloth as needed. Avoid getting it too wet, as this could damage the cardboard or plastic base. If you’ve used fabric glue, you can also spot clean any stains with a mild detergent.
And there you have it! A stylish, sustainable, and totally unique denim pen holder that will keep your desk organized and add a touch
Conclusion
So, there you have it! Transforming everyday items into functional and stylish organizers is not only incredibly satisfying but also a fantastic way to declutter and personalize your workspace. This DIY pen holder project is more than just a craft; it’s an opportunity to express your creativity, reduce waste, and create a unique piece that reflects your personality.
Why is this a must-try? Because it’s simple, affordable, and yields impressive results. You’re not just buying a pen holder; you’re crafting a piece with your own hands, imbued with your own style. It’s a small project with a big impact, instantly elevating your desk from cluttered to curated. Plus, it’s a fantastic way to upcycle materials you might otherwise discard, contributing to a more sustainable lifestyle.
But the fun doesn’t stop there! Feel free to experiment with different materials and embellishments. Instead of tin cans, consider using sturdy cardboard tubes from paper towels or wrapping paper. Wrap them in fabric scraps, decorate them with paint, decoupage them with magazine clippings, or even add beads and sequins for a touch of sparkle. For a more rustic look, use twigs and twine to create a natural-looking pen holder. You could even personalize it further by adding labels or initials using stencils or paint markers.
Another variation is to create a multi-tiered pen holder by stacking different sized containers on top of each other. Secure them with strong glue and decorate the entire structure as one cohesive piece. This is a great option if you have a lot of pens, pencils, and other stationery items to organize.
Consider adding small compartments or dividers inside the pen holder to further organize your supplies. You can use cardboard scraps or even small plastic containers to create these dividers. This will help you keep your pens and pencils separated and easily accessible.
Don’t be afraid to get creative and think outside the box! The possibilities are endless when it comes to customizing your DIY pen holder. The most important thing is to have fun and create something that you love.
We wholeheartedly encourage you to give this DIY project a try. It’s a rewarding experience that will not only enhance your workspace but also unleash your inner artist. Once you’ve created your masterpiece, we’d love to see it! Share your creations with us on social media using #DIYPenHolder and let us know what materials you used and what inspired your design. We can’t wait to see your unique and creative pen holders! Your experience and feedback will inspire others to embark on their own DIY journey. So, gather your supplies, unleash your creativity, and get crafting! You’ll be amazed at what you can create with a little imagination and some simple materials.
Frequently Asked Questions (FAQ)
What kind of glue is best for this DIY pen holder project?
The best type of glue depends on the materials you’re using. For paper and cardboard, a standard craft glue or school glue will work perfectly well. For heavier materials like metal or plastic, a stronger adhesive like epoxy or super glue is recommended. Hot glue can also be a good option, especially for attaching embellishments, but be careful when using it as it can be hot! Always ensure the glue is suitable for the specific materials you are bonding to ensure a strong and lasting hold. Consider the drying time as well; some glues require longer to fully cure.
How can I make my DIY pen holder more stable?
Stability is key! If you’re using lightweight materials like cardboard, you can add weight to the bottom of the pen holder to prevent it from tipping over. You can achieve this by gluing small stones, coins, or even sand to the base. Another option is to use a heavier base material, such as a small ceramic tile or a piece of wood. Ensure the base is wider than the top of the pen holder for maximum stability. You can also reinforce the structure by adding extra layers of material or using a stronger adhesive.
What are some eco-friendly alternatives to traditional craft supplies for this project?
Sustainability is important! Instead of buying new materials, try to repurpose items you already have around the house. Use recycled paper, fabric scraps, or even old magazines for decoration. Consider using natural adhesives like flour paste or homemade glue. Look for eco-friendly paints and varnishes that are low in VOCs (volatile organic compounds). You can also use natural materials like twigs, leaves, and flowers to embellish your pen holder. Get creative and see what you can find!
How can I personalize my DIY pen holder to match my desk decor?
Personalization is what makes this project truly unique! Consider the color scheme and style of your desk decor. Choose materials and embellishments that complement your existing aesthetic. You can paint the pen holder in a color that matches your desk or use fabric scraps that coordinate with your curtains or other accessories. Add personalized touches like your initials, favorite quotes, or even small photos. You can also use stencils or stamps to create custom designs. The possibilities are endless!
Can I use this DIY pen holder for other purposes besides holding pens?
Absolutely! While it’s designed as a pen holder, this DIY project can be adapted to hold a variety of items. Use it to organize your makeup brushes, paintbrushes, small tools, or even kitchen utensils. You can also create a small planter by adding soil and planting succulents or herbs. The versatility of this project is one of its greatest strengths. Just adjust the size and shape of the container to suit your specific needs.
How do I clean my DIY pen holder?
The cleaning method depends on the materials you used. For pen holders made from washable materials like plastic or metal, you can simply wipe them down with a damp cloth and mild soap. For pen holders made from paper or cardboard, avoid getting them too wet. Use a dry cloth or a slightly damp cloth to gently wipe away any dust or dirt. If you used paint or varnish, follow the manufacturer’s instructions for cleaning. Avoid using harsh chemicals or abrasive cleaners, as they can damage the surface.
What if I don’t have all the materials listed in the instructions?
Don’t worry! The beauty of DIY projects is that you can always substitute materials based on what you have available. If you don’t have tin cans, use cardboard tubes or plastic containers. If you don’t have paint, use markers or crayons. If you don’t have fabric scraps, use paper or wrapping paper. Get creative and see what you can come up with! The most important thing is to have fun and experiment.
How can I make this project a fun activity for kids?
This DIY pen holder project is a great way to get kids involved in crafting! Choose simple materials and designs that are easy for them to work with. Let them decorate the pen holder with their favorite colors, stickers, and drawings. Supervise them closely when using glue or sharp objects. Make it a collaborative project and let them take ownership of their creations. It’s a fun and educational activity that will help them develop their creativity and fine motor skills.

Leave a Comment