

DIY plastic basin coffee table – sounds a bit crazy, right? But trust me, you’re about to discover a super fun and surprisingly stylish way to upcycle those forgotten plastic basins lurking in your garage! For generations, resourceful folks have been finding creative ways to repurpose everyday items, and this project is a modern twist on that tradition. Think of it as a nod to the “make do and mend” ethos, but with a contemporary, eco-conscious spin.
Let’s be honest, we all have those plastic basins. Maybe they were used for laundry, gardening, or even just collecting odds and ends. Instead of letting them gather dust or, worse, end up in a landfill, we can transform them into a unique and functional piece of furniture. This DIY plastic basin coffee table project is perfect for anyone looking to add a touch of personality to their living space without breaking the bank. Plus, it’s a fantastic way to reduce waste and embrace sustainable living.
I’m going to guide you through the process step-by-step, showing you how to create a sturdy and eye-catching coffee table that will be a conversation starter for sure. Get ready to unleash your inner DIY enthusiast and turn trash into treasure!
DIY Chic Coffee Table from a Plastic Basin: A Step-by-Step Guide
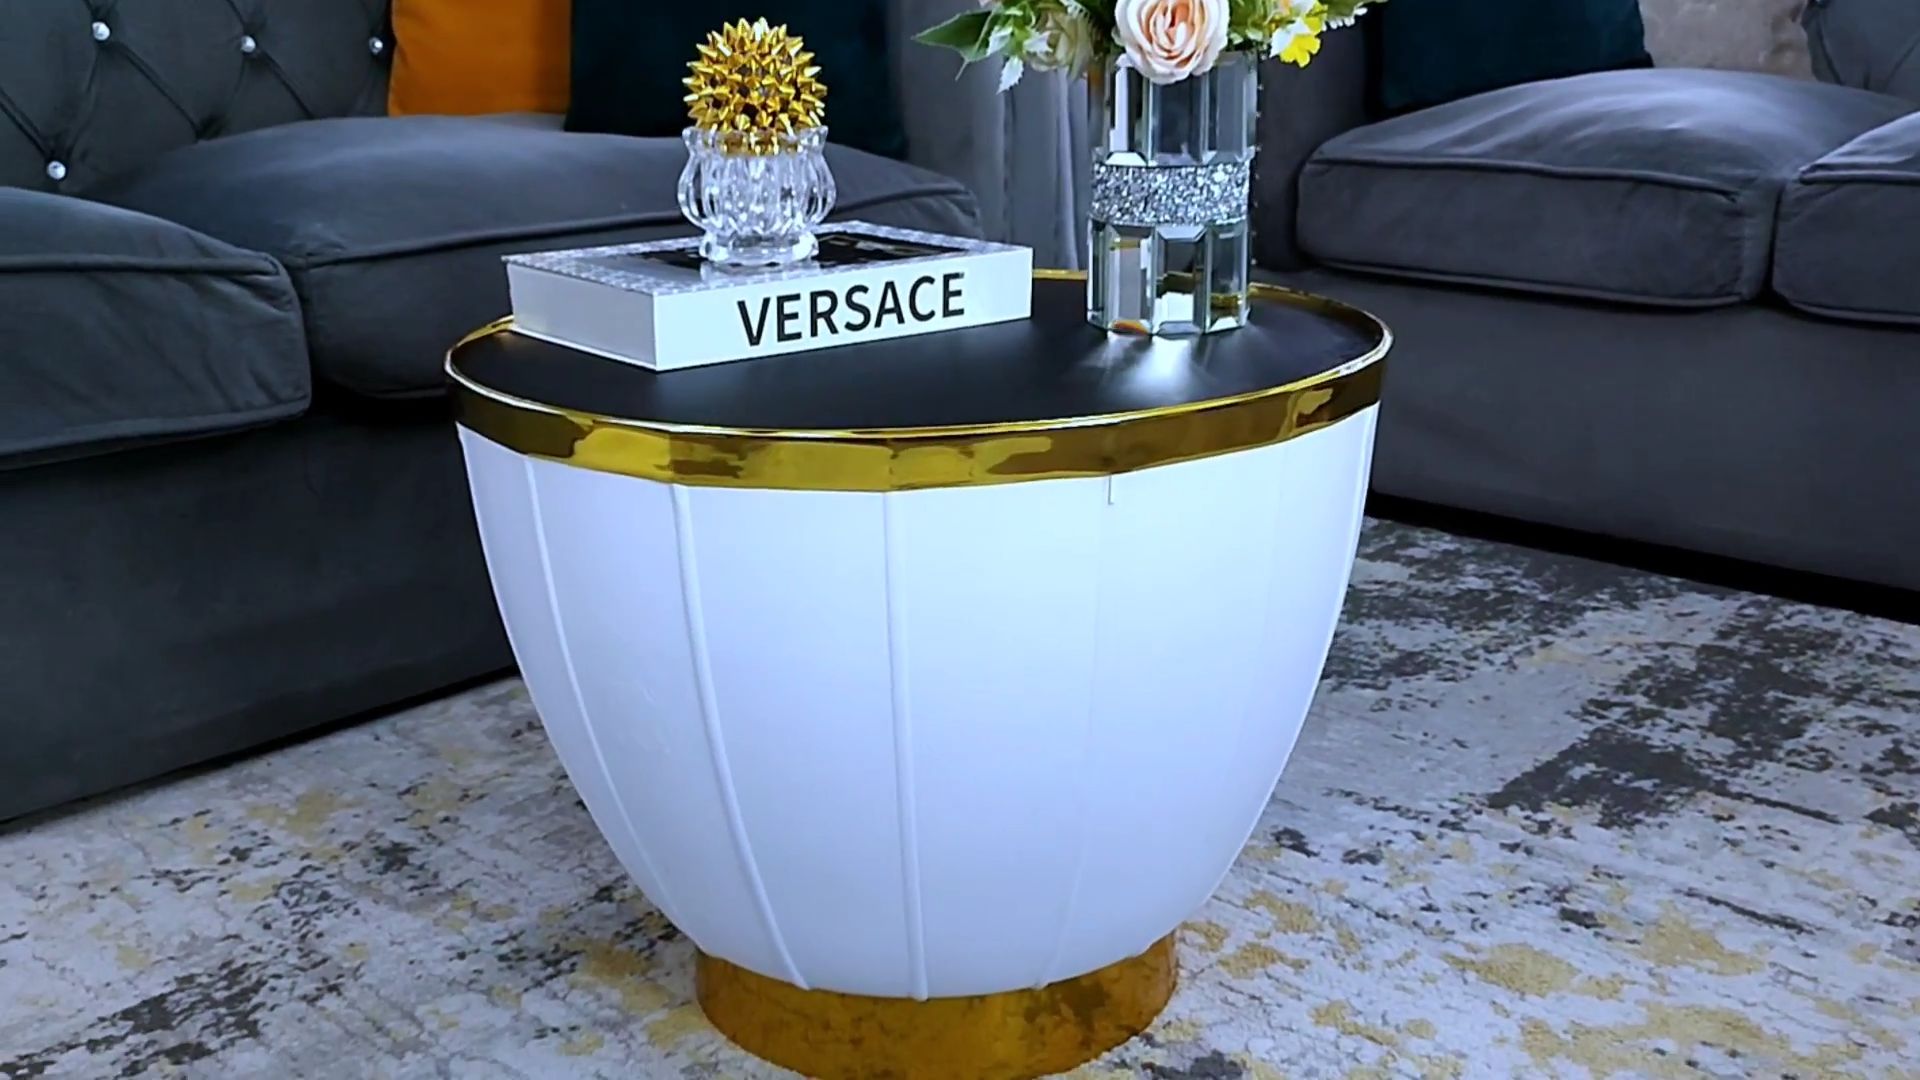
Hey there, fellow DIY enthusiasts! Ever looked at a plain plastic basin and thought, “There has to be more to you than just holding water?” Well, I certainly have! Today, I’m going to walk you through a super fun and surprisingly stylish project: turning an ordinary plastic basin into a chic and functional coffee table. Trust me, it’s easier than you think, and the results are absolutely worth it.
What You’ll Need: Gathering Your Supplies
Before we dive in, let’s make sure we have everything we need. This is crucial for a smooth and enjoyable crafting experience. Nobody wants to run to the store mid-project!
* A sturdy plastic basin: This is the star of our show! Choose a size and shape that suits your living room. I recommend something around 18-24 inches in diameter. Make sure it’s made of thick, durable plastic. Color is up to you, but remember you can always paint it!
* Wooden table legs: You can buy these online, at hardware stores, or even repurpose them from an old table. Consider the height you want your coffee table to be. Typically, coffee tables are between 16 and 18 inches tall.
* Mounting plates for table legs: These are metal plates that attach to the basin and provide a secure base for screwing in the legs. Make sure they are compatible with your chosen table legs.
* Screws: You’ll need screws to attach the mounting plates to the basin and the legs to the mounting plates. Choose screws that are the appropriate length and thickness for the materials you’re working with.
* Drill: A power drill is essential for creating pilot holes and screwing in the screws.
* Drill bits: You’ll need drill bits that are slightly smaller than the screws you’ll be using.
* Sandpaper (various grits): This is for prepping the basin for painting or other finishes. Start with a coarser grit (like 120) and work your way up to a finer grit (like 220).
* Primer (optional): If you plan to paint the basin, primer will help the paint adhere better and create a more even finish.
* Paint (optional): Choose a paint color that complements your decor. Acrylic or spray paint works well on plastic.
* Sealer (optional): A sealer will protect the paint and give the table a more durable finish.
* Measuring tape or ruler: For accurate placement of the mounting plates.
* Pencil or marker: For marking the drilling locations.
* Safety glasses: Always protect your eyes when drilling and sanding.
* Dust mask: To avoid inhaling dust particles when sanding.
* Clamps (optional): To hold the mounting plates in place while you drill.
* Level: To ensure the table legs are even.
* Drop cloth or newspaper: To protect your work surface.
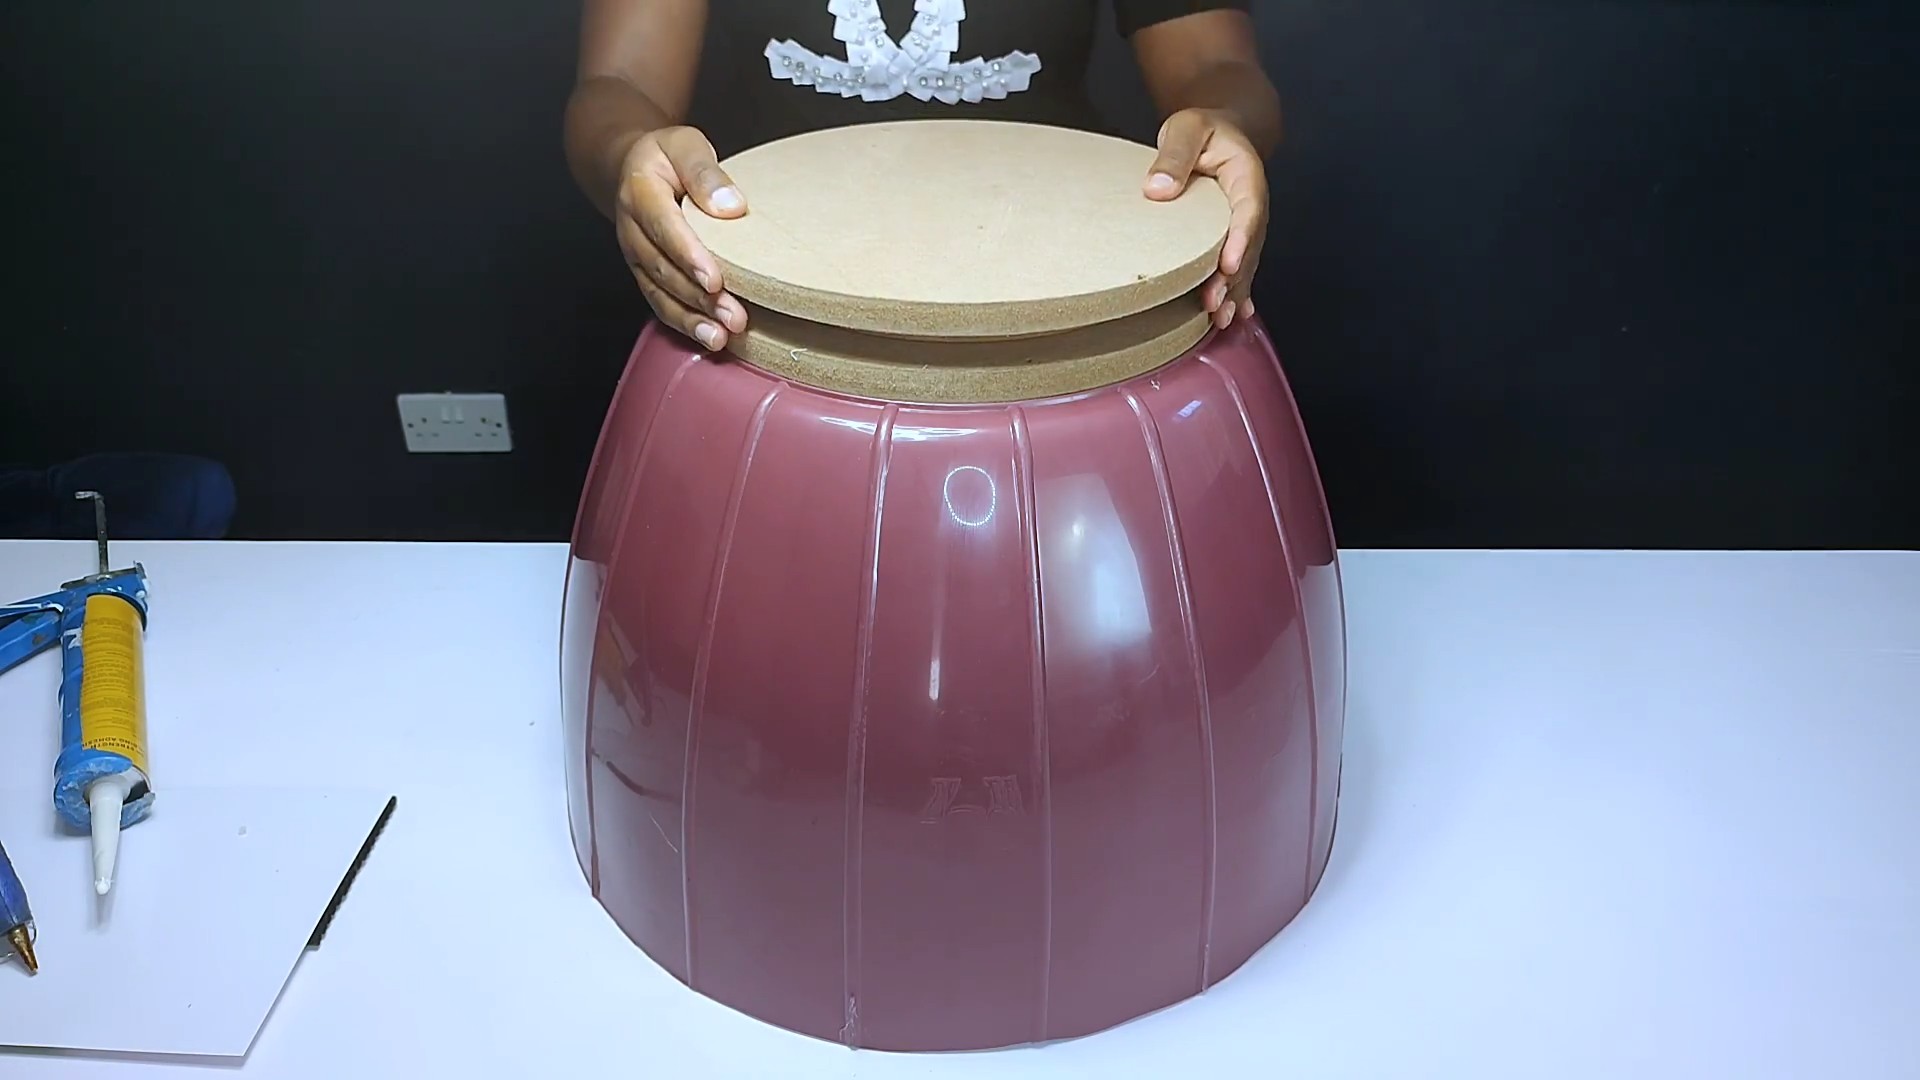
Phase 1: Preparing the Basin
This phase is all about getting the basin ready for its transformation. A little prep work goes a long way in achieving a professional-looking result.
1. Clean the basin: Start by thoroughly cleaning the plastic basin with soap and water. Remove any dirt, grime, or residue. Let it dry completely. This ensures proper adhesion of paint or other finishes.
2. Sand the basin: Use sandpaper to lightly sand the surface of the basin. This will create a slightly rough texture that will help the primer and paint adhere better. Start with a coarser grit sandpaper (like 120) to remove any imperfections, then move to a finer grit (like 220) to smooth out the surface. Remember to wear a dust mask to avoid inhaling dust particles.
3. Wipe down the basin: After sanding, wipe down the basin with a damp cloth to remove any sanding dust. Let it dry completely.
4. Prime the basin (optional): If you plan to paint the basin, apply a coat of primer. This will help the paint adhere better and create a more even finish. Follow the manufacturer’s instructions for application and drying time. I usually do two thin coats for better coverage.
Phase 2: Attaching the Mounting Plates
This is where we start turning the basin into a table! Accurate placement of the mounting plates is key for a stable and balanced coffee table.
1. Measure and mark: Use a measuring tape or ruler to determine the desired placement of the mounting plates on the bottom of the basin. Ensure they are evenly spaced and positioned near the edge of the basin for maximum stability. I usually aim for about 4-6 inches from the edge. Use a pencil or marker to mark the drilling locations for each mounting plate.
2. Drill pilot holes: Using a drill and a drill bit that is slightly smaller than the screws you’ll be using, drill pilot holes at the marked locations. Be careful not to drill all the way through the basin. The pilot holes will make it easier to screw in the screws and prevent the plastic from cracking.
3. Attach the mounting plates: Align the mounting plates with the pilot holes and use screws to attach them to the basin. Make sure the screws are securely tightened, but don’t overtighten them, as this could damage the plastic. Clamps can be helpful to hold the mounting plates in place while you screw them in.
Phase 3: Painting and Finishing (Optional)
This phase is all about adding your personal touch and making the coffee table truly your own.
1. Paint the basin: If you want to paint the basin, apply several thin coats of paint, allowing each coat to dry completely before applying the next. This will help prevent drips and create a more even finish. I prefer using spray paint for plastic, as it tends to adhere better and provides a smoother finish.
2. Apply a sealer: Once the paint is completely dry, apply a coat of sealer to protect the paint and give the table a more durable finish. Follow the manufacturer’s instructions for application and drying time.
3. Let it dry completely: Allow the paint and sealer to dry completely before moving on to the next step. This is crucial for a long-lasting finish.
Phase 4: Attaching the Legs
Almost there! This is the final step in transforming the basin into a functional coffee table.
1. Attach the legs: Screw the table legs into the mounting plates. Make sure the legs are securely tightened.
2. Check for stability: Place the coffee table on a flat surface and check for stability. If the table wobbles, you may need to adjust the legs or add shims to level it out. A level can be very helpful here.
3. Enjoy your creation!: Step back and admire your handiwork! You’ve successfully transformed a plain plastic basin into a stylish and functional coffee table.
Extra Tips and Tricks
* Consider adding a glass top: For a more sophisticated look, consider adding a custom-cut glass top to the coffee table. This will also protect the painted surface.
* Get creative with the paint: Don’t be afraid to experiment with different paint colors, patterns, and techniques. You can use stencils, tape, or sponges to create unique designs.
* Add storage: If you want to add storage to your coffee table, you can place a basket or tray inside the basin.
* Choose the right legs: The style of the legs can dramatically change the look of the coffee table. Consider hairpin legs for a modern look, or turned wooden legs for a more traditional style.
* Protect your floors: Add felt pads to the bottom of the legs to protect your floors from scratches.
* Don’t be afraid to experiment: This is a DIY project, so have fun and get creative! There are no rules, so feel free to experiment with different materials and techniques.
* Safety First: Always wear safety glasses and a dust mask when drilling and sanding. Work in a well-ventilated area when painting or using sealers.
* Upcycle other materials: Instead of buying new legs, consider repurposing legs from an old table or other piece of furniture. This is a great way to save money and reduce waste.
* Personalize it: Add decorative elements to the coffee table to personalize it and make it your own. You can add decorative knobs to the legs, or glue on decorative trim to the basin.
* Consider the weight: Keep in mind the weight capacity of the plastic basin and the legs. Don’t overload the coffee table with heavy items.
I hope you enjoyed this DIY project! I had a blast creating this coffee table, and I’m sure you will too. Remember to have fun and let your creativity shine! Happy crafting!
Conclusion
So, there you have it! Transforming a humble plastic basin into a stylish and functional coffee table is not just a budget-friendly project; it’s a testament to the power of creativity and resourcefulness. We’ve walked you through the simple steps, highlighting how accessible and rewarding this DIY project can be. But why is this particular DIY trick a must-try?
Firstly, it’s incredibly economical. Instead of shelling out a significant amount of money for a brand-new coffee table, you’re repurposing an item that might otherwise end up in a landfill. This makes it a sustainable and environmentally conscious choice. Secondly, it’s customizable. You have complete control over the aesthetic – from the paint color and finish to the style of legs you choose. This allows you to create a piece that perfectly complements your existing décor and reflects your personal style. Thirdly, it’s surprisingly easy! Even if you’re a beginner when it comes to DIY projects, you’ll find this one manageable and satisfying.
But the benefits don’t stop there. This DIY plastic basin coffee table is also incredibly versatile. It’s lightweight and easy to move around, making it ideal for small spaces or rooms that require flexible furniture arrangements. It’s also durable and easy to clean, making it a practical choice for households with children or pets.
Looking for some inspiration to take your project to the next level? Consider these variations:
* **Mosaic Magic:** Cover the basin with colorful mosaic tiles for a vibrant and eye-catching design.
* **Rope Wrap:** Wrap the basin with natural rope or twine for a rustic and bohemian look.
* **Stenciled Style:** Use stencils to create intricate patterns on the basin before painting.
* **Glass Top Upgrade:** Add a custom-cut glass top for a sleek and sophisticated finish.
* **Storage Solution:** Incorporate a hinged lid to create a hidden storage compartment inside the basin.
* **Leg Variety:** Experiment with different leg styles, such as hairpin legs, wooden dowel legs, or even repurposed furniture legs.
We’re confident that you’ll be amazed at how easily you can transform a simple plastic basin into a stunning coffee table. It’s a project that’s not only fun and rewarding but also adds a unique and personal touch to your home.
So, what are you waiting for? Gather your supplies, unleash your creativity, and give this DIY plastic basin coffee table a try! We’re eager to see your creations. Don’t forget to share your photos and experiences with us on social media using #DIYBasinTable. We can’t wait to see what you come up with! Let’s turn those ordinary basins into extraordinary pieces of furniture, one DIY project at a time.
Frequently Asked Questions (FAQ)
What kind of plastic basin is best for this project?
The ideal plastic basin is one that is sturdy and has a relatively smooth surface. Avoid basins that are too thin or flimsy, as they may not be able to support the weight of the legs and any items placed on the table. Look for basins made from durable plastic, such as polypropylene or polyethylene. The size of the basin will depend on the desired size of your coffee table. A basin with a diameter of 18-24 inches is a good starting point for a standard-sized coffee table. Also, consider the shape of the basin. A round or square basin will be easier to work with than one with an irregular shape.
How do I attach the legs to the plastic basin?
There are several ways to attach the legs to the plastic basin, depending on the type of legs you choose. One common method is to use screws and washers. Drill pilot holes through the bottom of the basin and into the legs, then secure them with screws and washers. Make sure the screws are long enough to provide a secure hold but not so long that they poke through the top of the basin. Another option is to use adhesive. Construction adhesive or epoxy can be used to bond the legs to the basin. However, this method may not be as strong as using screws and washers. If you’re using adhesive, make sure to clean the surfaces of the basin and legs thoroughly before applying the adhesive. Clamps can be used to hold the legs in place while the adhesive dries. For hairpin legs, you can purchase mounting plates that attach to the basin with screws and then the legs screw into the plates.
What kind of paint should I use on the plastic basin?
When painting a plastic basin, it’s important to use a paint that is specifically designed for plastic. Acrylic paints are a good option, as they adhere well to plastic and are available in a wide range of colors. Before painting, clean the basin thoroughly with soap and water to remove any dirt or grease. You may also want to lightly sand the surface of the basin to create a better surface for the paint to adhere to. Apply a primer specifically designed for plastic before painting. This will help the paint adhere better and prevent it from peeling or chipping. Apply several thin coats of paint, allowing each coat to dry completely before applying the next. This will help to create a smooth and even finish.
How do I prevent the coffee table from wobbling?
If your coffee table is wobbling, there are a few things you can do to fix it. First, make sure that the legs are all the same length and are securely attached to the basin. If one of the legs is shorter than the others, you can add a shim to the bottom of the leg to level it out. You can also try adjusting the position of the legs to see if that helps to stabilize the table. If the basin itself is uneven, you can try adding a layer of self-leveling compound to the bottom of the basin before attaching the legs. This will create a flat and even surface for the legs to rest on.
Can I use this DIY coffee table outdoors?
Whether you can use this DIY coffee table outdoors depends on the materials you use. If you use a plastic basin that is UV-resistant and paint it with an outdoor-rated paint, it should be able to withstand the elements. However, if you use legs made of wood, they may be susceptible to rot and decay if exposed to moisture. Consider using metal legs or treating the wooden legs with a sealant to protect them from the elements. Also, be aware that the color of the paint may fade over time if exposed to direct sunlight.
How much weight can this DIY coffee table hold?
The amount of weight that this DIY coffee table can hold will depend on the strength of the plastic basin, the type of legs you use, and how securely the legs are attached to the basin. A sturdy plastic basin with well-attached legs should be able to hold a reasonable amount of weight, such as a few books, magazines, or a small plant. However, it’s not recommended to place heavy items on the table, as this could cause the basin to crack or the legs to collapse. Use common sense and avoid overloading the table.
What if I don’t like the look of the plastic basin?
If you don’t like the look of the plastic basin, there are several things you can do to improve its appearance. As mentioned earlier, you can paint the basin, cover it with mosaic tiles, or wrap it with rope or twine. You can also add decorative elements, such as stencils, decals, or appliques. Another option is to cover the basin with fabric. Simply cut a piece of fabric large enough to cover the basin, then glue it in place using fabric glue. You can also add batting underneath the fabric to create a softer and more cushioned surface.
Where can I find inspiration for my DIY plastic basin coffee table?
There are many places to find inspiration for your DIY plastic basin coffee table. You can browse online platforms like Pinterest, Instagram, and home decor blogs for ideas. You can also visit furniture stores and home improvement stores to see what types of coffee tables are currently popular. Pay attention to the colors, materials, and styles that you like, and then try to incorporate those elements into your own DIY project. Don’t be afraid to experiment and try new things. The most important thing is to have fun and create a coffee table that you love.


Leave a Comment