

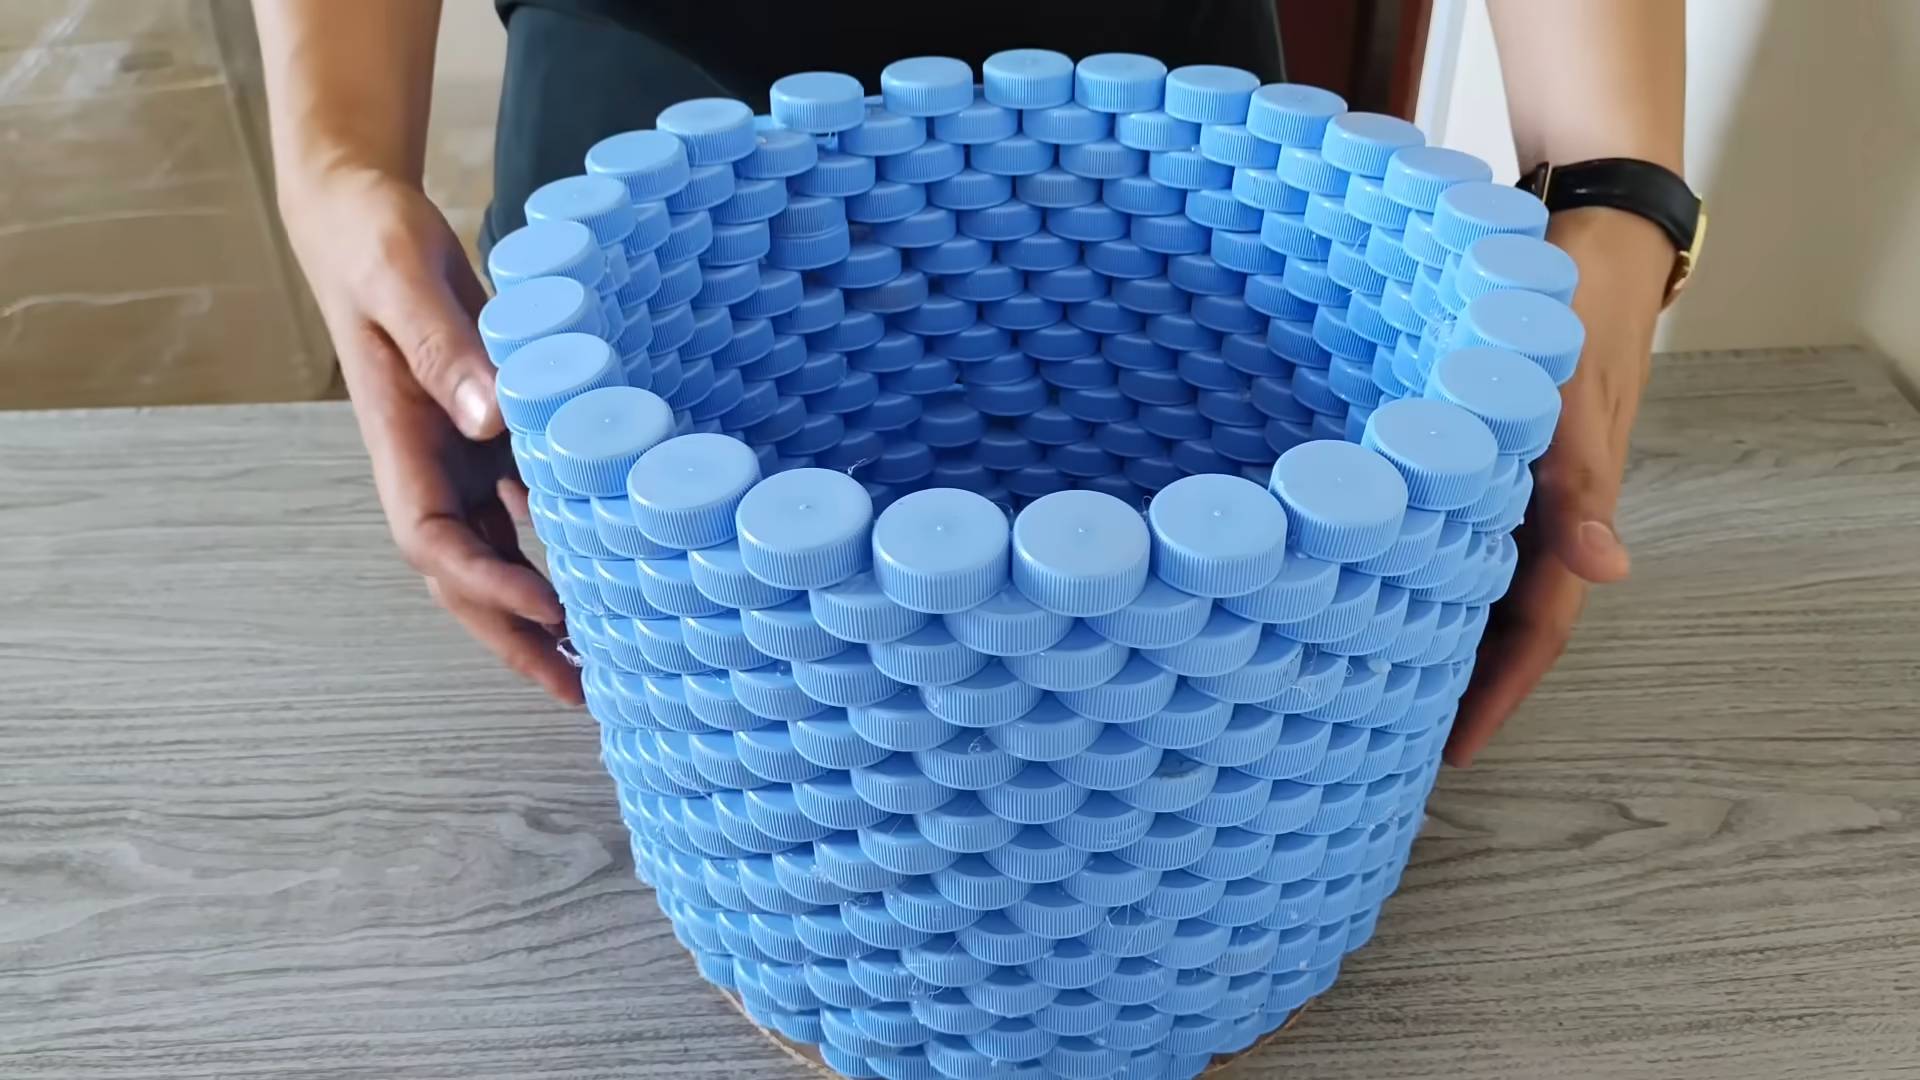
DIY plastic bottle cap laundry basket – sounds a little crazy, right? But trust me, it’s not only possible, it’s incredibly rewarding! I know what you’re thinking: “Why would I spend time making a laundry basket out of bottle caps?” Well, let me tell you, this isn’t just about having a place to toss your dirty clothes; it’s about creativity, sustainability, and adding a unique, conversation-starting piece to your home.
The history of repurposing materials goes way back, of course. Think about the “make do and mend” mentality of past generations, born out of necessity and resourcefulness. Today, that spirit is alive and well, fueled by a desire to reduce waste and embrace eco-friendly living. And that’s where this DIY plastic bottle cap laundry basket project comes in!
Let’s face it, we all generate a lot of plastic waste. Instead of sending those bottle caps to the landfill, why not transform them into something beautiful and functional? This project is not only a fantastic way to recycle, but it also allows you to express your creativity and add a personal touch to your home decor. Plus, imagine the satisfaction of telling your guests, “I made this myself!” So, are you ready to turn trash into treasure? Let’s get started!
DIY Plastic Bottle Cap Laundry Basket: A Step-by-Step Guide
Okay, so you’re drowning in plastic bottle caps and feeling a little crafty? Perfect! I’m going to walk you through how to turn that mountain of plastic waste into a surprisingly sturdy and unique laundry basket. It’s a bit of a project, I won’t lie, but the end result is so rewarding (and eco-friendly!).
Materials You’ll Need:
* A HUGE pile of plastic bottle caps (seriously, the more the merrier. Aim for at least 500-800, depending on the size you want your basket to be).
* Strong, durable wire (galvanized steel wire is a good choice, around 18-20 gauge). You’ll need a lot of it – estimate at least 50-75 feet.
* Pliers (needle-nose pliers are especially helpful).
* Wire cutters.
* A drill with a small drill bit (slightly larger than your wire diameter).
* Gloves (to protect your hands from the wire).
* Measuring tape or ruler.
* A circular object to use as a base guide (a large plate, a bucket lid, or even a smaller laundry basket). This will help you maintain a consistent shape for the base.
* Optional: Spray paint (if you want to color-coordinate your caps or give the finished basket a uniform look).
* Optional: Sandpaper (if some of your caps have rough edges).
Preparing the Bottle Caps:
This is probably the most time-consuming part, but trust me, it’s worth it!
1. Clean the Caps: Give all your bottle caps a good wash with soap and water. Let them dry completely. Nobody wants a smelly laundry basket!
2. Drill Holes: This is where the drill comes in. You’ll need to drill four holes in each bottle cap. Imagine a square on the top of the cap. Drill a hole in each corner of that imaginary square. Make sure the holes are big enough for your wire to pass through easily, but not so big that the wire slips out. I found it helpful to create a little jig to hold the caps steady while drilling. A piece of scrap wood with a small indentation works wonders.
3. Sand Rough Edges (Optional): If any of your caps have sharp or rough edges from being opened, lightly sand them down. This will prevent them from snagging your clothes later.
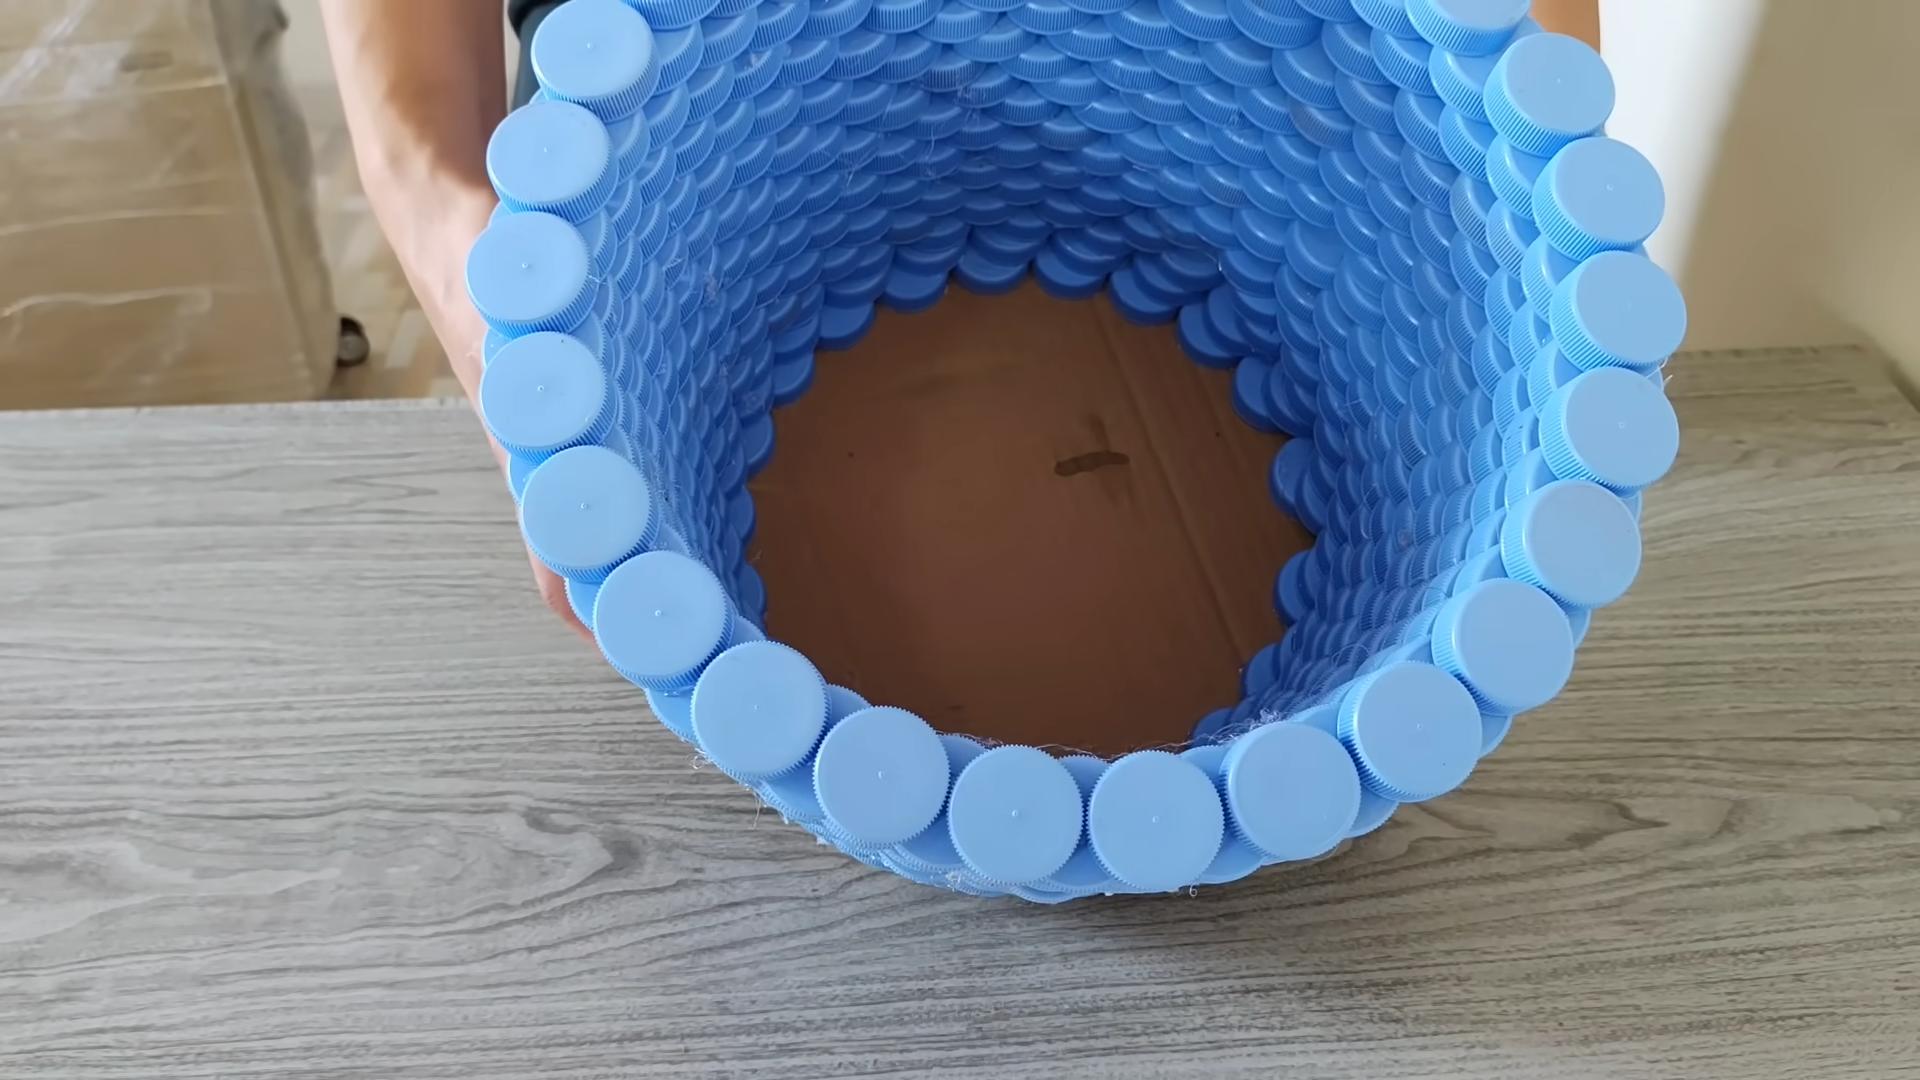
Building the Base:
The base is the foundation of your entire basket, so take your time and make sure it’s sturdy.
1. First Ring: Take your circular guide object (plate, lid, etc.) and place it on a flat surface. Start stringing the bottle caps together with the wire. Thread the wire through the holes you drilled, creating a ring of caps around the guide. Overlap the caps slightly for added strength. Twist the wire ends together tightly to secure the ring. I like to double back the wire and twist it again for extra security.
2. Adding More Rings: Continue adding rings of bottle caps, working outwards from the center. Each new ring should be attached to the previous ring with wire. This is where the pliers come in handy for twisting and securing the wire. Make sure each cap is securely attached to the caps next to it and the caps in the ring below. I found it helpful to weave the wire in a figure-eight pattern between the caps for maximum stability.
3. Maintaining Shape: Keep using your circular guide to ensure the base remains round and even. As you add more rings, you might need to adjust the guide or use your hands to gently shape the base.
4. Base Size: Continue adding rings until the base reaches your desired size. Consider the overall size of the laundry basket you want to create. A larger base will result in a larger basket.
Constructing the Walls:
Now for the fun part – building up the sides of your laundry basket!
1. First Wall Ring: Start by attaching a new ring of bottle caps to the outer edge of the base. This ring will form the bottom of the walls. Use the same wiring technique as before, ensuring each cap is securely attached to the base and the caps next to it.
2. Building Upwards: Continue adding rings of bottle caps, stacking them on top of each other to create the walls. As you build upwards, you’ll need to start shaping the walls. You can make the basket straight-sided, slightly tapered inwards, or even flared outwards. It’s all up to your personal preference!
3. Overlapping and Securing: Make sure each cap is securely attached to the caps above, below, and next to it. Overlap the caps slightly for added strength and stability. I found it helpful to periodically check the stability of the walls and reinforce any weak spots with extra wire.
4. Wall Height: Continue adding rings until the walls reach your desired height. Consider the amount of laundry you typically accumulate and the space you have available for the basket.
5. Reinforcing the Rim: Once you’ve reached the desired height, reinforce the top rim of the basket with an extra layer of wire. This will help prevent the rim from bending or breaking. I like to weave the wire through the top row of caps multiple times for maximum strength.
Adding Handles (Optional):
Handles make it much easier to carry your laundry basket, especially when it’s full.
1. Handle Placement: Decide where you want to place the handles. I recommend placing them on opposite sides of the basket for balanced carrying.
2. Creating the Handles: Cut two lengths of wire, each long enough to form a comfortable handle. Bend each wire into a U-shape.
3. Attaching the Handles: Attach the ends of each U-shaped wire to the basket walls, weaving them through the bottle caps and securing them tightly with pliers. Make sure the handles are securely attached and can support the weight of a full laundry basket. I like to reinforce the handle attachments with extra wire for added security.
4. Handle Comfort: If the wire handles feel uncomfortable, you can wrap them with fabric strips, rope, or even more bottle caps to create a softer grip.
Finishing Touches:
These final steps will help ensure your laundry basket is durable and long-lasting.
1. Inspect for Sharp Edges: Carefully inspect the entire basket for any sharp wire ends or rough cap edges. Use pliers to bend any sharp wire ends inwards and sand down any rough cap edges.
2. Reinforce Weak Spots: Look for any areas that seem weak or unstable and reinforce them with extra wire. Pay particular attention to the base, the walls, and the handle attachments.
3. Spray Painting (Optional): If you want to give your laundry basket a more uniform look, you can spray paint it with a color of your choice. Make sure to use a paint that is suitable for plastic and apply it in thin, even coats. Let the paint dry completely before using the basket.
4. Liner (Optional): If you’re worried about clothes snagging on the bottle caps, you can add a fabric liner to the inside of the basket. Simply cut a piece of fabric to fit the inside of the basket and sew it together to create a liner. You can then attach the liner to the basket with fabric glue or by sewing it in place.
Tips and Tricks:
* Sort Your Caps: Sorting your caps by color can create a visually appealing pattern in your basket.
* Use Different Sized Caps: Using different sized caps can add texture and interest to your basket.
* Don’t Be Afraid to Experiment: This is your project, so don’t be afraid to experiment with different techniques and designs.
* Patience is Key: This project takes time and patience, so don’t get discouraged if it takes longer than you expected.
* Recruit Help: Enlist the help of friends or family members to speed up the process.
* Safety First: Always wear gloves when working with wire to protect your hands from cuts and scrapes.
* Enjoy the Process: Have fun and enjoy the process of creating something unique and sustainable!
And there you have it! Your very own, handmade laundry basket made from recycled plastic bottle caps. It’s a conversation starter, a testament to your crafting skills, and a great way to reduce your environmental impact. Happy crafting!
Conclusion
So, there you have it! Transforming seemingly useless plastic bottle caps into a sturdy and surprisingly stylish laundry basket is not just a fun craft project; it’s a powerful statement about sustainability and resourcefulness. We’ve walked you through the steps, from collecting and cleaning the caps to assembling the final, functional piece. But why is this DIY plastic bottle cap laundry basket a must-try?
Firstly, it’s an incredibly effective way to reduce plastic waste. Think about the sheer number of bottle caps that end up in landfills every single day. By repurposing them into something useful, you’re actively contributing to a cleaner environment and reducing your carbon footprint. You’re not just throwing away trash; you’re giving it a new life and a new purpose.
Secondly, this project is surprisingly budget-friendly. The primary material is free – plastic bottle caps! You might need to invest in some strong adhesive, wire, or zip ties, depending on your chosen construction method, but these are relatively inexpensive. Compared to buying a brand-new laundry basket, this DIY alternative can save you a significant amount of money.
Thirdly, the finished product is remarkably durable. When constructed properly, a plastic bottle cap laundry basket can withstand the weight of a full load of laundry without buckling or breaking. The interlocking nature of the caps creates a strong and stable structure that can last for years.
But the benefits don’t stop there! This project offers endless opportunities for customization. Feel free to experiment with different colors and patterns to create a laundry basket that perfectly matches your décor. You could sort your bottle caps by color and create a vibrant, multi-colored basket, or you could arrange them in a specific design for a more sophisticated look.
Variations and Suggestions:
* Size Matters: Adjust the size of your basket to fit your specific needs. A smaller basket is perfect for delicates or smaller loads, while a larger basket can handle bulkier items like towels and bedding.
* Handle Options: Get creative with the handles! You can use rope, fabric straps, or even more bottle caps to create sturdy and comfortable handles. Consider adding padding for extra comfort.
* Lining It Up: For added protection and a more polished look, consider lining the inside of your basket with fabric. This will prevent delicate items from snagging on the edges of the caps.
* Beyond Laundry: Don’t limit yourself to just laundry! These baskets can also be used for storing toys, books, or other household items. They’re a versatile and eco-friendly storage solution.
* Team Up: This is a great project to do with kids, friends, or family. It’s a fun and engaging way to teach them about recycling and sustainability.
We strongly encourage you to give this DIY plastic bottle cap laundry basket a try. It’s a rewarding project that’s good for the environment, your wallet, and your creative spirit. Once you’ve completed your basket, we’d love to see your creations! Share your photos and experiences on social media using the hashtag #BottleCapBasketDIY. Let’s inspire others to embrace sustainable crafting and reduce plastic waste together! We are excited to see what you create!
Frequently Asked Questions (FAQ)
How many bottle caps do I need to make a laundry basket?
The number of bottle caps required depends entirely on the size of the laundry basket you want to create. A small basket might require a few hundred caps, while a larger basket could need several thousand. It’s best to estimate the dimensions of your desired basket and then start collecting caps. As a general rule, it’s always better to have more caps than you think you’ll need. You can always use the extras for other craft projects. A good starting point for a medium-sized basket (approximately 18 inches in diameter and 24 inches tall) would be around 1500-2000 bottle caps.
What’s the best way to clean the bottle caps?
Cleaning the bottle caps is an essential step to ensure a hygienic and aesthetically pleasing laundry basket. The easiest way to clean them is to soak them in warm, soapy water for at least 30 minutes. Use a mild dish soap and scrub each cap individually with a brush or sponge to remove any dirt, grime, or sticky residue. For stubborn stains or odors, you can add a small amount of bleach to the water. Be sure to rinse the caps thoroughly with clean water and allow them to air dry completely before starting your project. Ensure the caps are completely dry to ensure proper adhesion if you are using glue.
What type of adhesive is best for this project?
The best type of adhesive depends on the construction method you choose. For a strong and durable bond, we recommend using a heavy-duty construction adhesive or epoxy. These adhesives are designed to bond plastic to plastic and can withstand the weight and stress of a full laundry basket. Hot glue can also be used, but it may not be as durable as other options. If you’re using wire or zip ties to connect the caps, adhesive may not be necessary. Always follow the manufacturer’s instructions when using any adhesive and ensure proper ventilation.
How do I ensure the laundry basket is sturdy and won’t fall apart?
The key to a sturdy laundry basket is a strong and secure construction method. Whether you’re using adhesive, wire, or zip ties, make sure each cap is firmly connected to its neighbors. Overlap the caps slightly to create a stronger bond. If using adhesive, apply it generously and allow it to dry completely before adding more caps. If using wire or zip ties, tighten them securely to prevent the caps from shifting. Consider reinforcing the base of the basket with extra layers of caps or a sturdy piece of cardboard or plastic.
Can I paint or decorate the bottle caps?
Absolutely! Painting or decorating the bottle caps is a great way to personalize your laundry basket and make it even more unique. Use acrylic paints or spray paint designed for plastic. Before painting, lightly sand the caps to create a better surface for the paint to adhere to. You can also use stencils, markers, or other decorative elements to add patterns or designs. Be sure to apply a clear sealant after painting to protect the finish and prevent chipping.
Is this project suitable for children?
While the DIY plastic bottle cap laundry basket project is a great way to teach children about recycling and sustainability, it’s important to supervise them closely, especially when using sharp tools or adhesives. The cleaning process is generally safe for children, but adult supervision is required when using bleach. The assembly process may require some dexterity and strength, so younger children may need assistance from an adult.
How long does it take to make a laundry basket?
The time required to make a laundry basket depends on the size of the basket, the construction method you choose, and your level of experience. Collecting and cleaning the bottle caps can take several hours or even days, depending on how many caps you need. The assembly process can take anywhere from a few hours to a few days, depending on the complexity of the design. Be patient and don’t rush the process. The end result will be worth the effort.
What if I don’t have enough bottle caps?
If you don’t have enough bottle caps, don’t despair! Ask your friends, family, and neighbors to save their bottle caps for you. You can also put up a sign at your local community center or school asking for donations. Another option is to supplement the bottle caps with other recycled materials, such as plastic lids or yogurt containers. Get creative and find ways to make it work!
How do I dispose of the laundry basket if it eventually breaks?
While a well-constructed bottle cap laundry basket is durable, it may eventually break down after years of use. When it’s time to dispose of it, try to disassemble it as much as possible. The individual bottle caps can be recycled if your local recycling program accepts them. If not, you can reuse them for other craft projects. If the basket is beyond repair, dispose of it responsibly in accordance with your local waste management guidelines.

Leave a Comment