

DIY Reed Diffuser Home Fragrance: Tired of those overpowering, chemical-laden air fresheners that promise a “tropical breeze” but smell more like a factory exploded? I know I am! For centuries, people have sought natural ways to scent their homes, from burning fragrant woods to scattering herbs. But let’s face it, sometimes we need something a little more consistent and less…flammable. That’s where the magic of a DIY reed diffuser comes in!
Creating your own DIY reed diffuser home fragrance isn’t just about saving money (though, let’s be honest, that’s a huge perk!). It’s about crafting a personalized scent experience that reflects your unique style and preferences. Imagine walking into your home and being greeted by a delicate blend of lavender and chamomile, or a zesty citrus aroma that invigorates your senses. Store-bought diffusers often lack that personal touch, and they can be surprisingly expensive.
In this article, I’m going to walk you through the simple steps of making your own reed diffuser. You’ll learn how to choose the right oils, select the perfect reeds, and create a fragrance that will transform your home into a haven of delightful scents. Get ready to ditch those artificial fragrances and embrace the natural, customizable world of DIY reed diffusers!
DIY Reed Diffuser: A Simple Guide to a Fresh-Smelling Home
Hey there, fragrance fanatics! Are you tired of those expensive store-bought air fresheners that are full of chemicals and seem to disappear in a week? Well, I’ve got the perfect solution for you: a DIY reed diffuser! It’s super easy to make, completely customizable with your favorite scents, and way more budget-friendly. Plus, it adds a touch of elegance to any room. Let’s dive in!
What You’ll Need
Before we get started, let’s gather all the necessary supplies. Don’t worry, most of these are easily accessible and you might even have some lying around already!
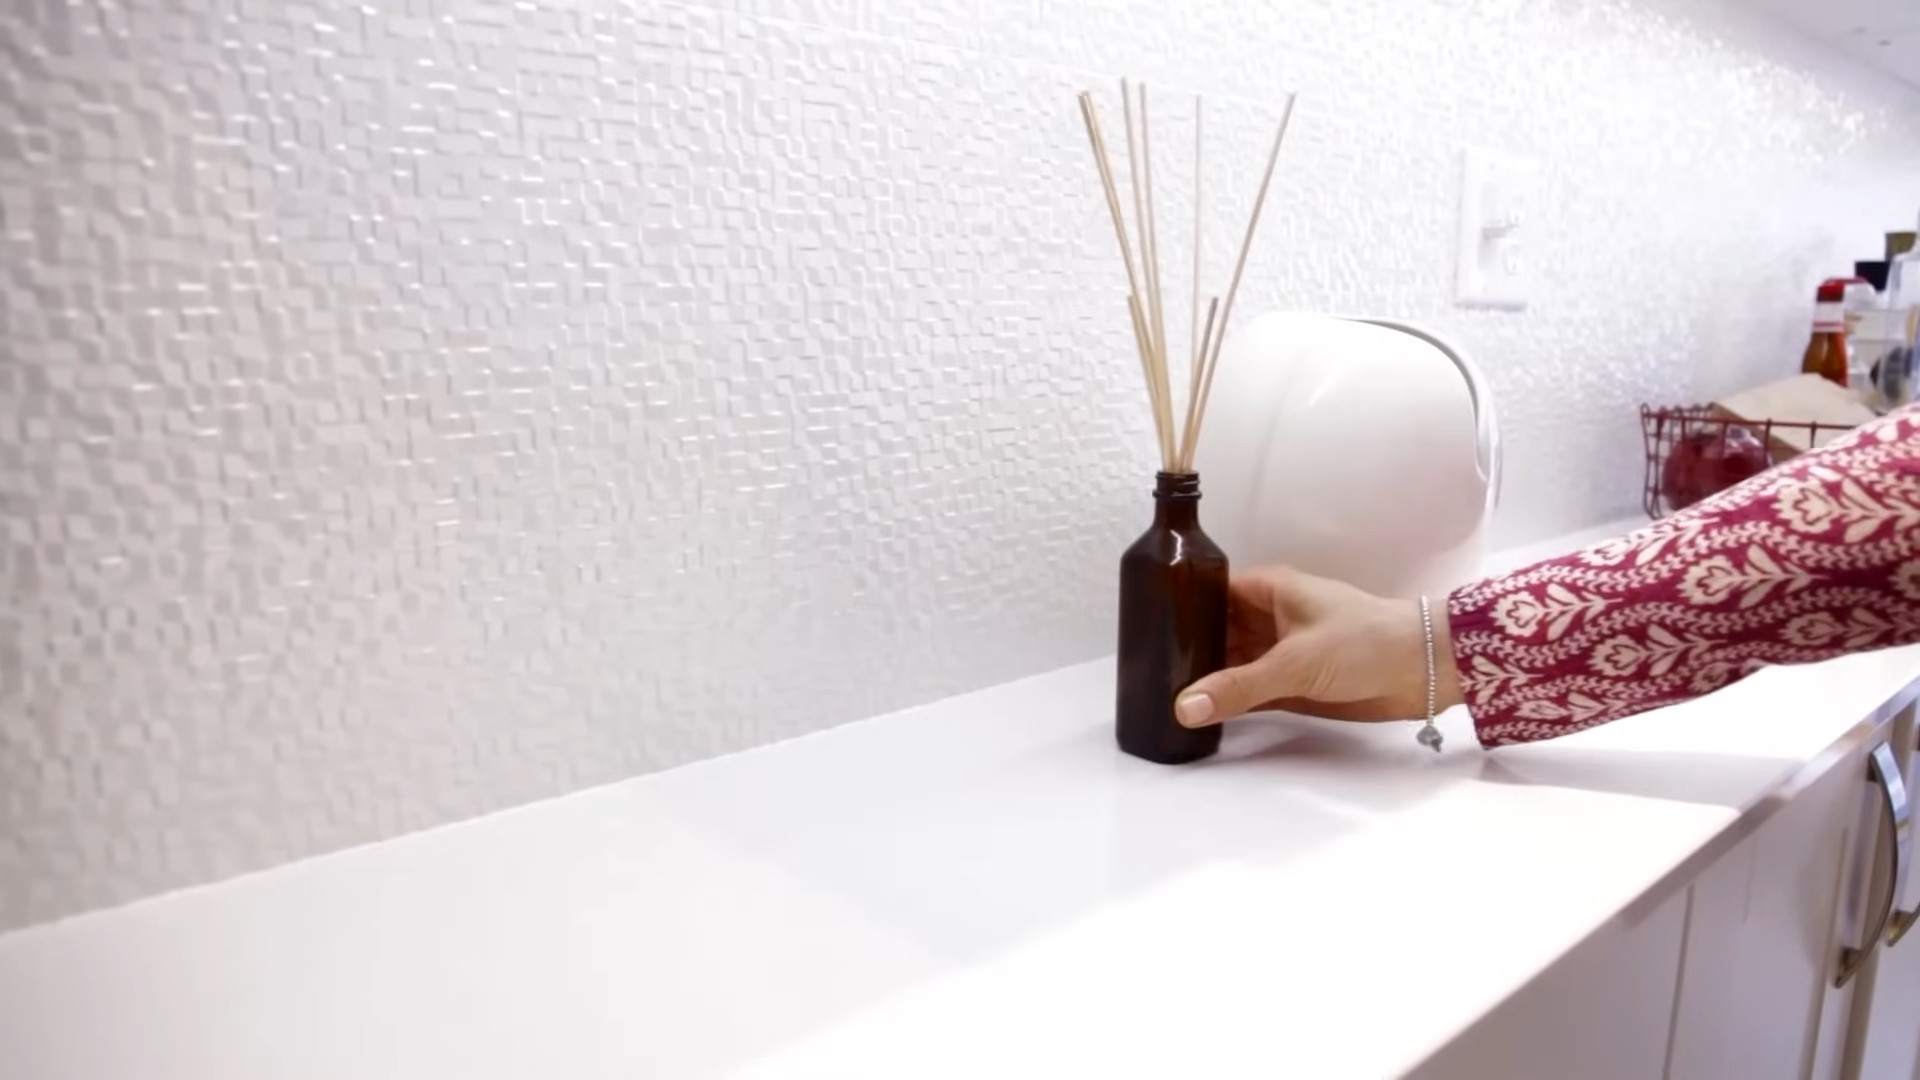
* **A Small Glass Bottle or Vase:** This will be your diffuser container. Think small and stylish! I personally love using repurposed spice jars or small decorative bottles I find at thrift stores. Just make sure it has a narrow opening to prevent the fragrance from evaporating too quickly.
* **Reed Diffuser Reeds:** These are essential for wicking the fragrance oil up and dispersing it into the air. You can find them online or at craft stores. Look for reeds that are around 10-12 inches long. The more reeds you use, the stronger the scent will be.
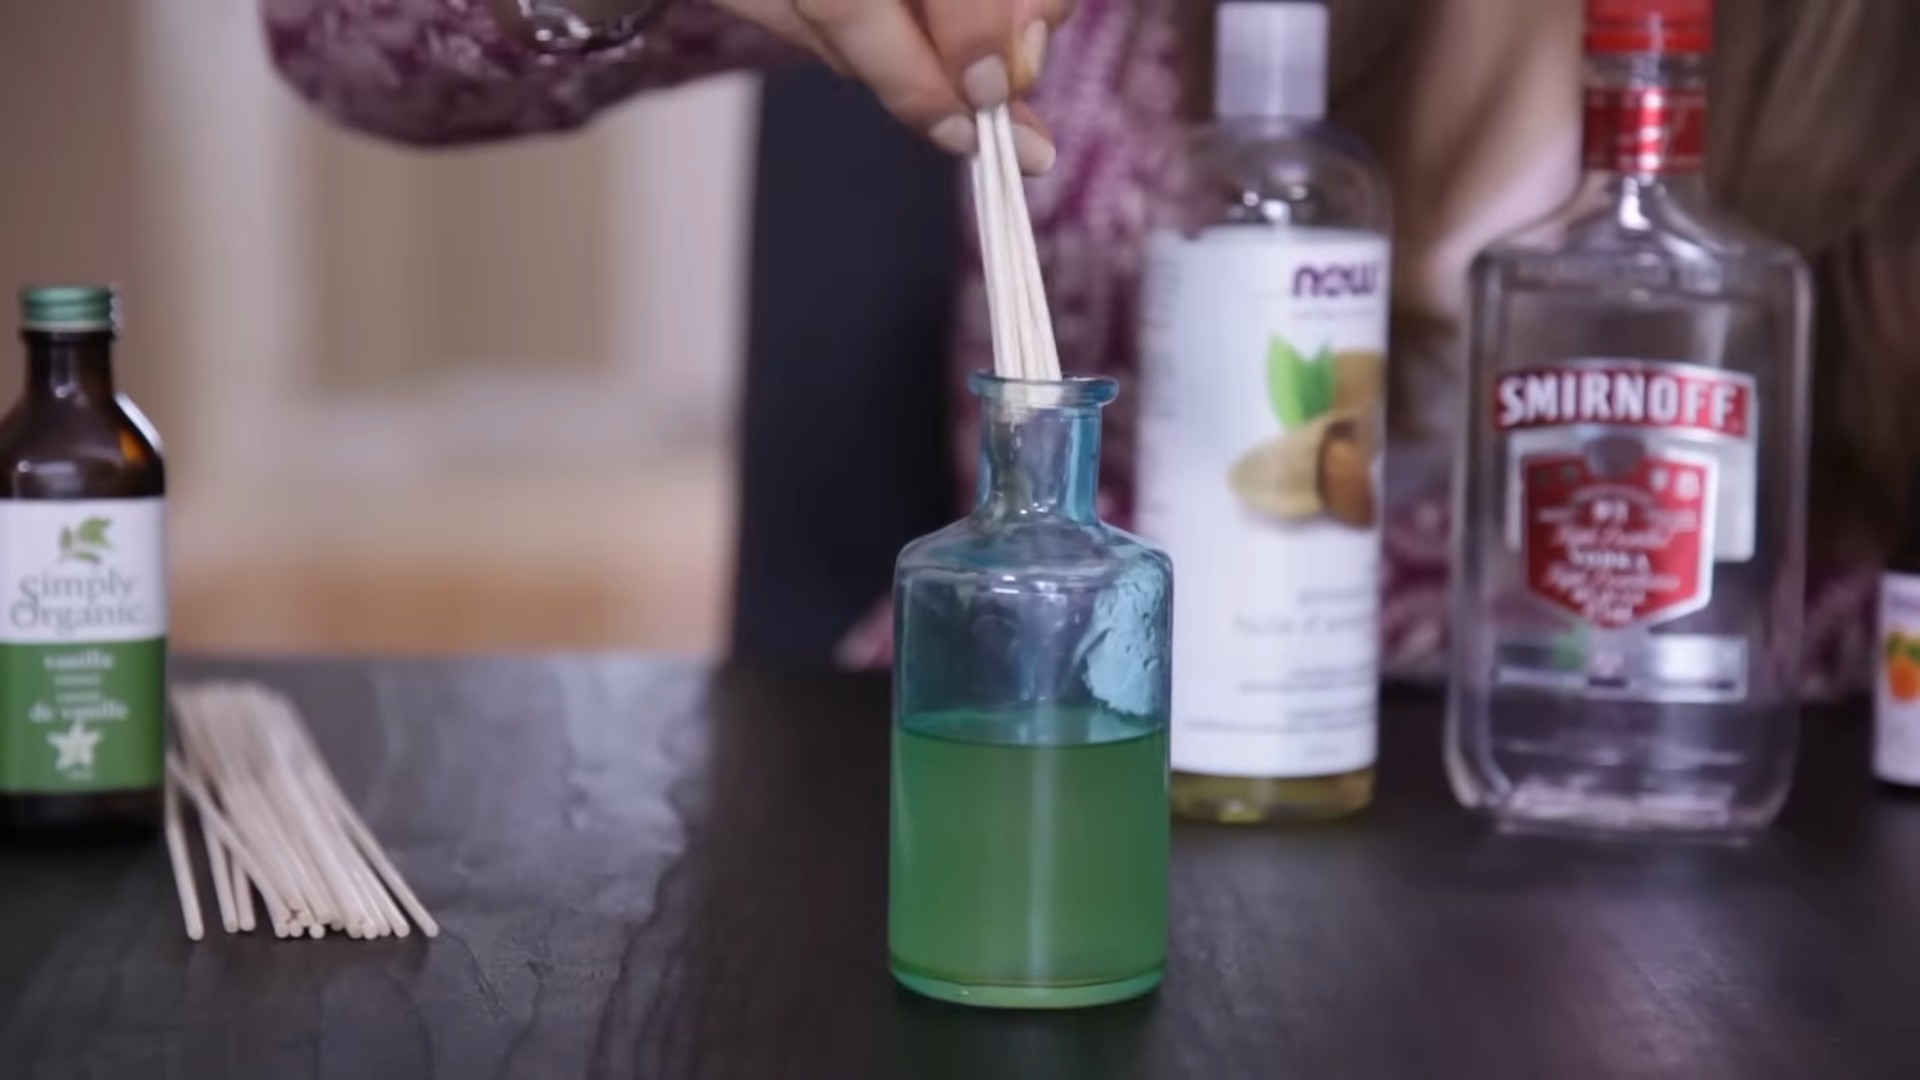
* **Carrier Oil:** This is the base of your fragrance blend. It helps to dilute the essential oils and allows them to travel up the reeds. I recommend using:
* **Safflower Oil:** This is my go-to because it’s odorless, colorless, and has a thin consistency, making it perfect for wicking.
* **Sweet Almond Oil:** Another great option, but it has a slightly nutty scent, so keep that in mind when choosing your essential oils.
* **Fractionated Coconut Oil:** This is coconut oil that stays liquid at room temperature. It’s also odorless and a good choice.
* Avoid using olive oil or vegetable oil as they are too thick and can clog the reeds.
* **Essential Oils:** This is where you get to unleash your creativity! Choose your favorite scents or create a custom blend. Some popular options include:
* **Lavender:** Relaxing and calming.
* **Lemon:** Uplifting and energizing.
* **Eucalyptus:** Refreshing and decongestant.
* **Peppermint:** Invigorating and stimulating.
* **Rosemary:** Improves focus and memory.
* **Cedarwood:** Grounding and woody.
* **Ylang Ylang:** Floral and exotic.
* Experiment with different combinations to find your perfect signature scent!
* **Isopropyl Alcohol (Rubbing Alcohol) or Vodka (Optional):** This helps to thin the oil mixture and allows it to travel up the reeds more easily. It also helps to disperse the scent more effectively.
* **Measuring Spoons or Cups:** For accurate measurements.
* **A Small Funnel (Optional):** To help pour the mixture into the bottle without spilling.
* **Gloves (Optional):** To protect your hands from the essential oils.
* **Paper Towels:** For easy cleanup.
Step-by-Step Instructions: Crafting Your Fragrant Oasis
Alright, let’s get down to business! Follow these simple steps to create your own amazing reed diffuser.
1. **Prepare Your Bottle:** Make sure your glass bottle or vase is clean and dry. This will prevent any unwanted odors from interfering with your fragrance. I usually wash mine with soap and water and then let it air dry completely.
2. **Mix Your Carrier Oil and Alcohol (Optional):** In a measuring cup, combine your carrier oil and alcohol (if using). The ratio I like to use is:
* 3/4 cup carrier oil (e.g., safflower oil)
* 1/4 cup isopropyl alcohol or vodka
The alcohol helps the fragrance travel up the reeds more efficiently, but it’s not absolutely necessary. If you prefer to skip it, just use 1 cup of carrier oil.
3. **Add Your Essential Oils:** This is the fun part! Add your essential oils to the carrier oil mixture. The amount of essential oil you use will depend on the strength of the scent you desire. I usually start with around 20-30 drops of essential oil per cup of carrier oil.
* Start with a smaller amount and add more if needed. You can always add more, but you can’t take it away!
* Consider the potency of the essential oils you’re using. Some oils, like peppermint, are very strong, so you might need to use less.
* Experiment with different blends to create your own unique fragrance. Here are a few of my favorite combinations:
* Lavender + Chamomile: For a relaxing and sleep-inducing scent.
* Lemon + Rosemary: For an energizing and focus-boosting scent.
* Eucalyptus + Peppermint: For a refreshing and decongestant scent.
* Cedarwood + Sandalwood: For a grounding and earthy scent.
* Orange + Cinnamon: For a warm and inviting scent.
4. **Mix Thoroughly:** Gently stir the mixture with a spoon or a small whisk to ensure that the essential oils are evenly distributed throughout the carrier oil.
5. **Pour the Mixture into Your Bottle:** Using a funnel (if desired), carefully pour the fragrance oil mixture into your prepared glass bottle or vase. Be careful not to spill any!
6. **Insert the Reeds:** Insert the reed diffuser reeds into the bottle, making sure they are submerged in the oil. The number of reeds you use will affect the strength of the scent. I usually use 5-7 reeds for a small room.
7. **Flip the Reeds (Important!):** After a few hours (or even better, overnight), flip the reeds over so that the dry ends are now submerged in the oil. This will saturate the reeds and start the diffusion process.
8. **Enjoy Your Fragrant Home!** Place your reed diffuser in a well-ventilated area, away from direct sunlight and heat. The fragrance will gradually diffuse into the air, creating a pleasant and inviting atmosphere.
Maintaining Your Reed Diffuser for Long-Lasting Fragrance
To keep your reed diffuser working its magic, here are a few tips:
* **Flip the Reeds Regularly:** Flip the reeds every week or two to refresh the scent. This will help to prevent the reeds from becoming clogged and ensure that the fragrance continues to diffuse effectively.
* **Replace the Reeds:** Over time, the reeds can become saturated and clogged with oil, which can reduce their ability to diffuse the fragrance. I recommend replacing the reeds every 1-2 months.
* **Refill the Oil:** When the oil level in the bottle gets low, simply refill it with more of your fragrance oil mixture.
* **Adjust the Number of Reeds:** If you want a stronger scent, add more reeds. If you want a weaker scent, remove some reeds.
* **Clean Up Spills Immediately:** If you spill any of the fragrance oil, clean it up immediately with a paper towel. The oil can damage surfaces if left to sit.
* **Keep Away from Children and Pets:** Essential oils can be harmful if ingested, so keep your reed diffuser out of reach of children and pets.
* **Consider the Room Size:** A larger room might require a larger diffuser or more reeds to achieve the desired fragrance level. A smaller room will need fewer reeds.
* **Placement Matters:** Placing your diffuser near a doorway or window can help to circulate the fragrance throughout the room. Avoid placing it in direct sunlight or near a heat source, as this can cause the oil to evaporate too quickly.
Troubleshooting: Common Issues and Solutions
Sometimes, things don’t go exactly as planned. Here are a few common issues you might encounter with your DIY reed diffuser and how to fix them:
* **No Scent:**
* **Problem:** The reeds may be clogged.
* **Solution:** Flip the reeds or replace them with new ones.
* **Problem:** The essential oil concentration may be too low.
* **Solution:** Add more essential oil to the mixture.
* **Problem:** The diffuser is placed in a poorly ventilated area.
* **Solution:** Move the diffuser to a more open area.
* **Scent Too Strong:**
* **Problem:** Too many reeds are being used.
* **Solution:** Remove some of the reeds.
* **Problem:** The essential oil concentration is too high.
* **Solution:** Dilute the mixture with more carrier oil.
* **Problem:** The diffuser is placed in a small, enclosed space.
* **Solution:** Move the diffuser to a larger room.
* **Oil Evaporating Too Quickly:**
* **Problem:** The diffuser is placed in direct sunlight or near a heat source.
* **Solution:** Move the diffuser to a cooler, shadier location.
* **Problem:** The bottle has a wide opening, allowing the
Conclusion
So, there you have it! Creating your own DIY reed diffuser home fragrance is not only incredibly simple and cost-effective, but it also allows you to completely customize the scent profile to perfectly match your mood, your home’s aesthetic, and even the changing seasons. Forget those generic, often overpowering, store-bought air fresheners filled with questionable chemicals. With just a few readily available ingredients and a dash of creativity, you can craft a natural, long-lasting, and beautifully subtle fragrance that will transform your living space into a haven of olfactory delight.
Why is this a must-try? Because it empowers you to take control of your home’s ambiance. You’re no longer limited to the pre-determined scents offered by commercial brands. Want a calming lavender and chamomile blend for your bedroom? Done. A zesty citrus and ginger aroma to invigorate your kitchen? Absolutely. A warm and inviting cinnamon and clove scent for the holidays? It’s all within your reach. Plus, you’ll be saving money and reducing your environmental impact by repurposing glass containers and avoiding the plastic waste associated with disposable air fresheners.
But the beauty of this DIY project lies in its versatility. Feel free to experiment with different essential oil combinations to discover your signature scent. Consider adding a few drops of vanilla extract for a touch of sweetness, or a sprig of dried rosemary for an earthy undertone. You can even infuse your carrier oil with dried flowers or herbs for a visually appealing and subtly fragrant addition.
Here are a few variations to spark your imagination:
* Seasonal Scents: Rotate your diffuser blends with the seasons. Think pumpkin spice in the fall, pine and cranberry in the winter, floral blends in the spring, and citrusy scents in the summer.
* Mood-Boosting Blends: Create specific blends to enhance your mood. Uplifting citrus oils for energy, calming lavender and chamomile for relaxation, or grounding cedarwood and frankincense for focus.
* Room-Specific Scents: Tailor your scents to different rooms. A fresh and clean scent for the bathroom, a warm and inviting scent for the living room, and a relaxing scent for the bedroom.
* Herb Infusion: Add dried herbs like lavender, rosemary, or mint to the carrier oil for a subtle herbal aroma and visual appeal.
Don’t be afraid to get creative and personalize your DIY reed diffuser home fragrance to your liking. The possibilities are endless!
We truly believe that this simple DIY project can make a significant difference in the way you experience your home. It’s a small change that can have a big impact on your well-being and the overall atmosphere of your living space.
So, what are you waiting for? Gather your supplies, unleash your inner perfumer, and create a custom fragrance that will transform your home into a sanctuary of scent. We’re confident that you’ll love the results.
And most importantly, we want to hear about your experience! Share your favorite essential oil combinations, any variations you’ve tried, and how your DIY reed diffuser home fragrance has enhanced your home. Leave a comment below, tag us on social media, and let’s inspire each other to create beautiful and fragrant living spaces. Happy scenting!
Frequently Asked Questions (FAQ)
What type of reeds should I use for my DIY diffuser?
The best reeds for a DIY diffuser are rattan reeds. Rattan is a porous material with channels that allow the fragrance oil to travel up the reed and diffuse into the air. Avoid using bamboo skewers or other types of wood, as they don’t have the same capillary action and won’t diffuse the scent effectively. You can find rattan reeds online or at craft stores. The ideal length is typically between 10-12 inches, but you can trim them to fit your container.
What is the best carrier oil to use for a reed diffuser?
Several carrier oils work well for reed diffusers. Fractionated coconut oil is a popular choice because it’s odorless, colorless, and has a thin consistency, allowing the essential oils to diffuse easily. Sweet almond oil is another good option, but it has a slightly nutty scent that might interfere with some essential oil blends. Safflower oil and mineral oil are also viable alternatives. Avoid using thick oils like olive oil or vegetable oil, as they won’t travel up the reeds properly.
How much essential oil should I add to my reed diffuser blend?
A good starting point is to use a 15-20% concentration of essential oils in your carrier oil. This means for every 100ml of carrier oil, you would add 15-20ml of essential oils. You can adjust the concentration to your preference, but be mindful that too much essential oil can be overpowering. It’s always best to start with a lower concentration and add more if needed. Remember that some essential oils are stronger than others, so adjust accordingly.
How long will my DIY reed diffuser last?
The lifespan of your reed diffuser depends on several factors, including the size of the container, the type of carrier oil used, the concentration of essential oils, and the ambient temperature and humidity. Generally, a 4-ounce diffuser should last for about 2-3 months. To prolong the life of your diffuser, keep it away from direct sunlight and heat sources, which can cause the oil to evaporate more quickly.
How often should I flip the reeds in my diffuser?
Flipping the reeds helps to refresh the scent and keep the diffuser working effectively. It’s generally recommended to flip the reeds every 1-2 weeks, or whenever you notice the scent fading. When you flip the reeds, be sure to do it over a sink or paper towel to avoid drips. Also, remember that the first time you flip the reeds, it may take a few hours for the scent to become noticeable again.
Can I reuse the reeds in my diffuser?
It’s not recommended to reuse reeds, as they can become clogged with oil and dust over time, which reduces their ability to diffuse the scent. Once the reeds are saturated with oil, they won’t absorb new oil effectively. It’s best to replace the reeds each time you refill your diffuser with a new fragrance.
What are some safety precautions I should take when making and using a reed diffuser?
Always handle essential oils with care, as they can be irritating to the skin and eyes. Avoid direct contact with skin and never ingest essential oils. Keep your reed diffuser out of reach of children and pets, as the oil can be harmful if swallowed. Place the diffuser on a stable surface to prevent spills. Avoid placing the diffuser near open flames or heat sources. If you spill any oil, clean it up immediately with a damp cloth.
Can I use fragrance oils instead of essential oils in my reed diffuser?
While you can use fragrance oils, essential oils are generally preferred for their natural aroma and potential therapeutic benefits. Fragrance oils are synthetic and may contain chemicals that some people are sensitive to. If you choose to use fragrance oils, make sure they are specifically designed for reed diffusers and are compatible with the carrier oil you’re using.
How do I clean my reed diffuser container when it’s empty?
To clean your reed diffuser container, first, discard any remaining oil and reeds. Then, wash the container with warm, soapy water. You may need to use a bottle brush to reach the bottom of the container. Rinse thoroughly and allow the container to dry completely before refilling it. If there is any stubborn residue, you can try soaking the container in a solution of vinegar and water.
My reed diffuser isn’t diffusing much scent. What can I do?
If your reed diffuser isn’t diffusing much scent, there are a few things you can try. First, make sure the reeds are not clogged. If they are, replace them with new reeds. Second, try flipping the reeds to refresh the scent. Third, check the concentration of essential oils in your blend. You may need to add more essential oils to increase the scent throw. Finally, make sure the diffuser is placed in a well-ventilated area, as poor ventilation can hinder diffusion. Also, avoid placing the diffuser in direct sunlight or near heat sources, as this can cause the oil to evaporate too quickly.
Leave a Comment