

DIY Soda Can Cups: Who knew your empty soda cans could have a second life beyond the recycling bin? I’m always on the lookout for creative and sustainable ways to reduce waste, and this DIY project is a fantastic way to do just that!
Upcycling, the art of transforming waste materials into something new and useful, has roots stretching back centuries. Think of the resourceful pioneers who mended clothes and repurposed scraps – it’s a tradition of ingenuity and environmental consciousness. Today, with growing concerns about plastic waste and landfill overflow, upcycling is more relevant than ever. And what better way to participate than by crafting your own unique drinking vessels?
Let’s be honest, buying new cups can be expensive, and sometimes you just need a few extra for a party or a picnic. That’s where these DIY soda can cups come in handy! Not only are they incredibly budget-friendly, but they also add a touch of quirky charm to any occasion. Plus, imagine the satisfaction of telling your guests, “I made these myself!”
This article will guide you through the simple steps of transforming those discarded soda cans into stylish and functional cups. You’ll learn how to safely cut, sand, and finish the edges, ensuring a smooth and comfortable drinking experience. So, grab your empty cans, gather your tools, and let’s get crafting! You’ll be amazed at how easy it is to create something beautiful and practical from something you would have otherwise thrown away.
DIY Soda Can Cups: Upcycling Your Way to Unique Drinkware
Hey there, fellow DIY enthusiasts! Ever looked at a pile of empty soda cans and thought, “There has to be something cool I can do with these?” Well, you’re in luck! Today, I’m going to walk you through how to transform those aluminum cylinders into surprisingly stylish and functional cups. It’s a fun project, a great way to reduce waste, and you’ll end up with some seriously unique drinkware. Let’s get started!
Materials You’ll Need:
Before we dive in, let’s gather our supplies. Here’s what you’ll need:
* Empty Soda Cans (as many as you want cups!)
* Sharp Utility Knife or Box Cutter
* Scissors
* Sandpaper (various grits: 120, 220, 400)
* Epoxy Resin (food-safe)
* Mixing Cups and Stir Sticks for Epoxy
* Heat Gun or Hair Dryer (optional, for removing bubbles in epoxy)
* Safety Glasses
* Gloves (nitrile or latex)
* Cutting Mat or Protective Surface
* Ruler or Measuring Tape
* Permanent Marker
* Optional: Decorative Tape or Paint (food-safe)
Safety First!
Safety is paramount when working with sharp tools and chemicals. Please wear safety glasses and gloves throughout the entire process. Work in a well-ventilated area, especially when using epoxy resin. And always, always be careful when handling the utility knife or scissors.
Preparing the Soda Cans
This is where we turn those cylindrical containers into something cup-like.
1. Rinse and Clean: Thoroughly rinse out each soda can with soap and water. Make sure to remove any sticky residue. Let them dry completely before proceeding. This is super important for hygiene and to ensure the epoxy adheres properly.
2. Mark the Cutting Line: Decide how tall you want your cups to be. I usually aim for around 4-5 inches. Use a ruler or measuring tape and a permanent marker to draw a line around the can at your desired height. Try to make the line as straight and even as possible. This will determine the final look of your cup.
3. Initial Cut: Using your utility knife or box cutter, carefully score along the marked line. Don’t try to cut all the way through in one go. Instead, apply gentle pressure and make several passes until you’ve created a groove. This helps prevent the can from crumpling or tearing unevenly.
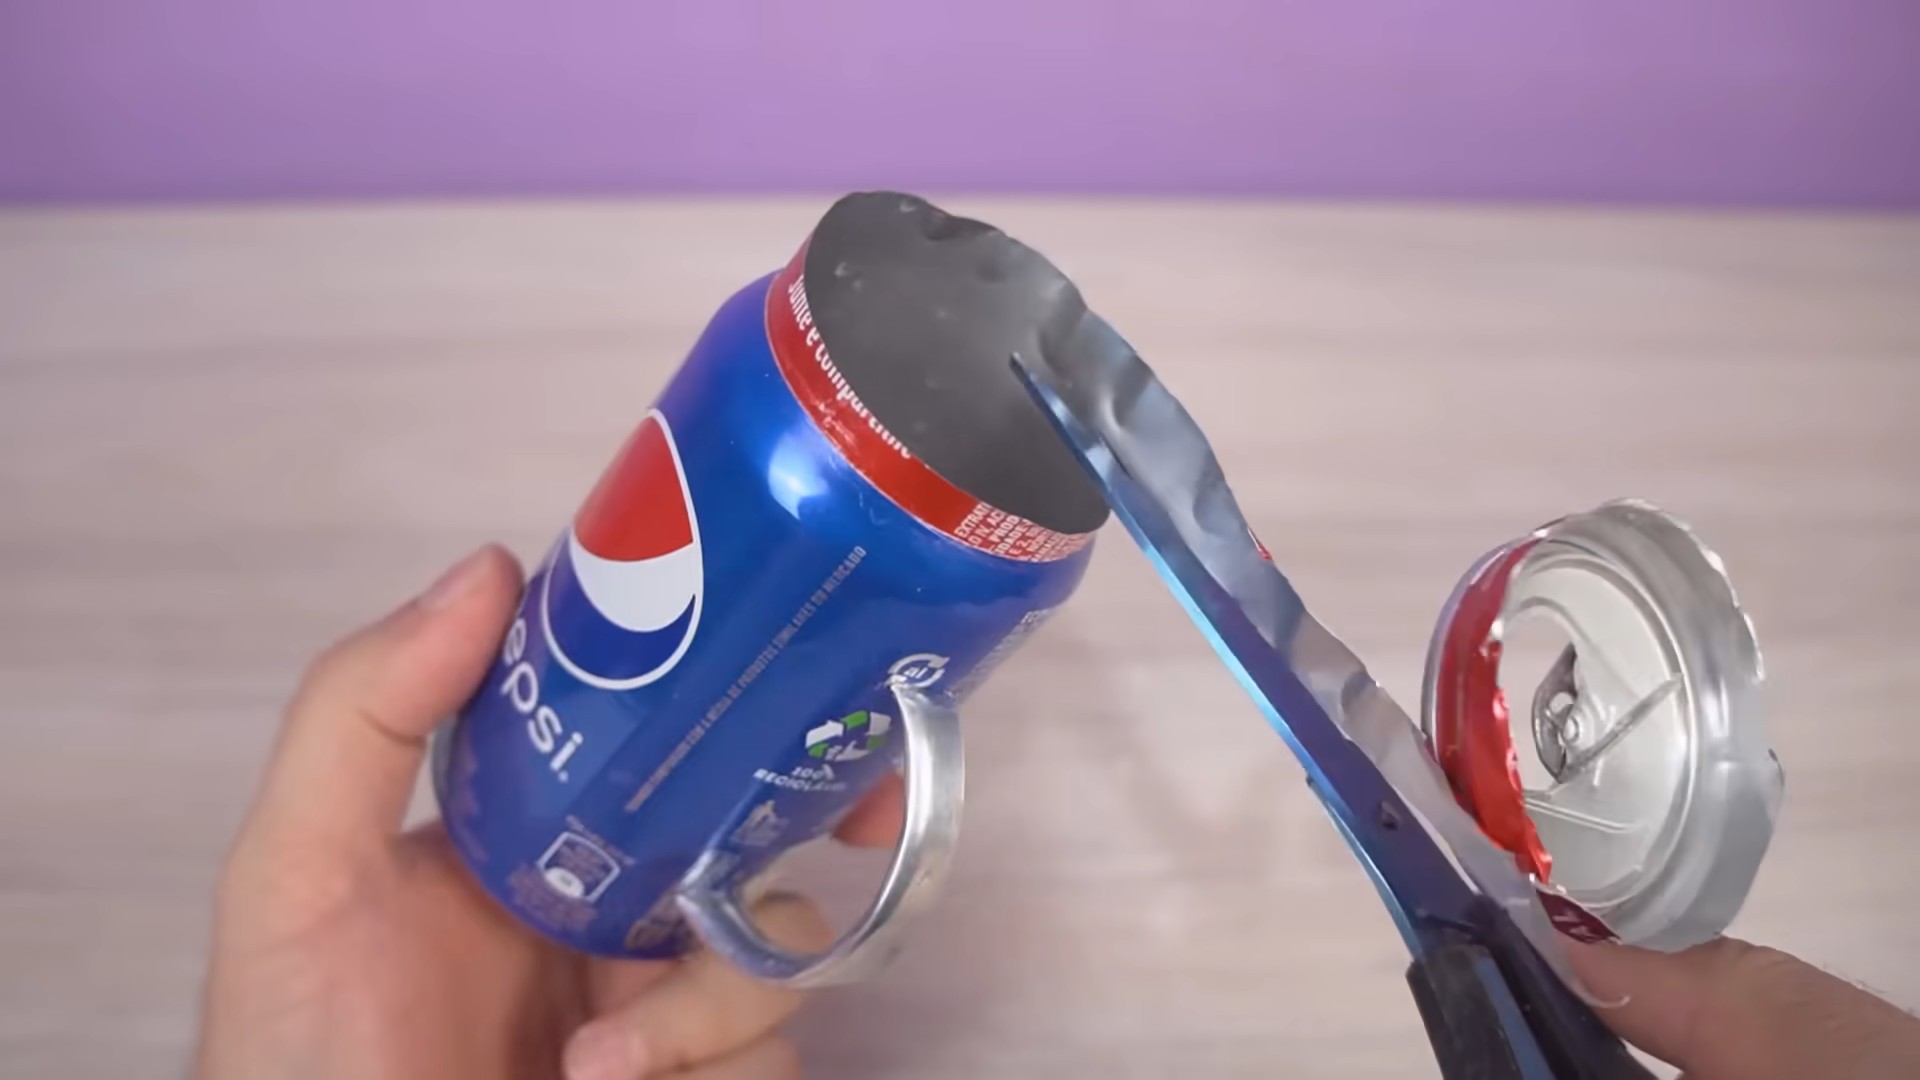
4. Complete the Cut: Once you have a good groove, use your scissors to finish cutting along the line. Insert the scissors into the groove and carefully cut around the can. Take your time and try to follow the line as closely as possible.
5. Remove the Top: You should now have two pieces: the bottom part, which will become your cup, and the top part, which you can recycle!
Smoothing the Edges
This step is crucial for safety and comfort. We need to make sure the cut edge is smooth and free of any sharp burrs.
1. Initial Sanding (120 Grit): Start with the 120-grit sandpaper. This is the coarsest grit and will help remove any major imperfections or sharp edges. Hold the sandpaper firmly and sand the cut edge of the can in a circular motion. Apply moderate pressure and be careful not to cut yourself.
2. Medium Sanding (220 Grit): Once you’ve removed the initial sharpness, switch to the 220-grit sandpaper. This will further smooth the edge and prepare it for finer sanding. Repeat the sanding process, focusing on creating a smooth and even surface.
3. Fine Sanding (400 Grit): Finally, use the 400-grit sandpaper to achieve a super-smooth finish. This will make the edge feel comfortable against your lips when you drink from the cup. Sand gently and evenly until the edge is completely smooth to the touch.
4. Clean the Can: After sanding, wipe down the can with a clean, damp cloth to remove any aluminum dust. Make sure the can is completely dry before moving on to the next step.
Epoxy Coating the Rim
This is where we create a food-safe and durable rim for our cup.
1. Prepare the Epoxy: Carefully read the instructions on your epoxy resin packaging. Different epoxies have different mixing ratios and curing times. Measure out the correct amount of resin and hardener into separate mixing cups.
2. Mix the Epoxy: Slowly pour the hardener into the resin cup. Use a stir stick to mix the two components together thoroughly. Stir gently to avoid creating air bubbles. Scrape the sides and bottom of the cup to ensure everything is well combined. The epoxy should be clear and uniform in appearance.
3. Apply the Epoxy: Carefully pour a small amount of epoxy onto the sanded rim of the can. Use your stir stick or a small brush to spread the epoxy evenly around the entire edge. Make sure to coat the entire rim, both inside and out. You want a nice, even layer of epoxy.
4. Remove Air Bubbles (Optional): If you notice any air bubbles in the epoxy, you can use a heat gun or hair dryer to gently warm the surface. This will help the bubbles rise to the surface and pop. Be careful not to overheat the epoxy, as this can cause it to cure too quickly or unevenly.
5. Cure the Epoxy: Place the coated cans on a level surface and let the epoxy cure according to the manufacturer’s instructions. This usually takes 24-72 hours. Avoid touching or moving the cans during the curing process.
Optional: Decoration
Now for the fun part! If you want to add some extra flair to your cups, here are a few ideas:
* Decorative Tape: Wrap decorative tape around the outside of the can. This is a quick and easy way to add color and patterns.
* Food-Safe Paint: Use food-safe paint to create custom designs on your cups. Be sure to let the paint dry completely before using the cups.
* Etching: You can use etching cream to create permanent designs on the aluminum. Follow the instructions on the etching cream packaging carefully.
Final Touches
1. Inspect the Cups: Once the epoxy is fully cured, carefully inspect the cups for any imperfections. Make sure the rim is smooth and free of any sharp edges.
2. Wash the Cups: Before using your new cups, wash them thoroughly with soap and water.
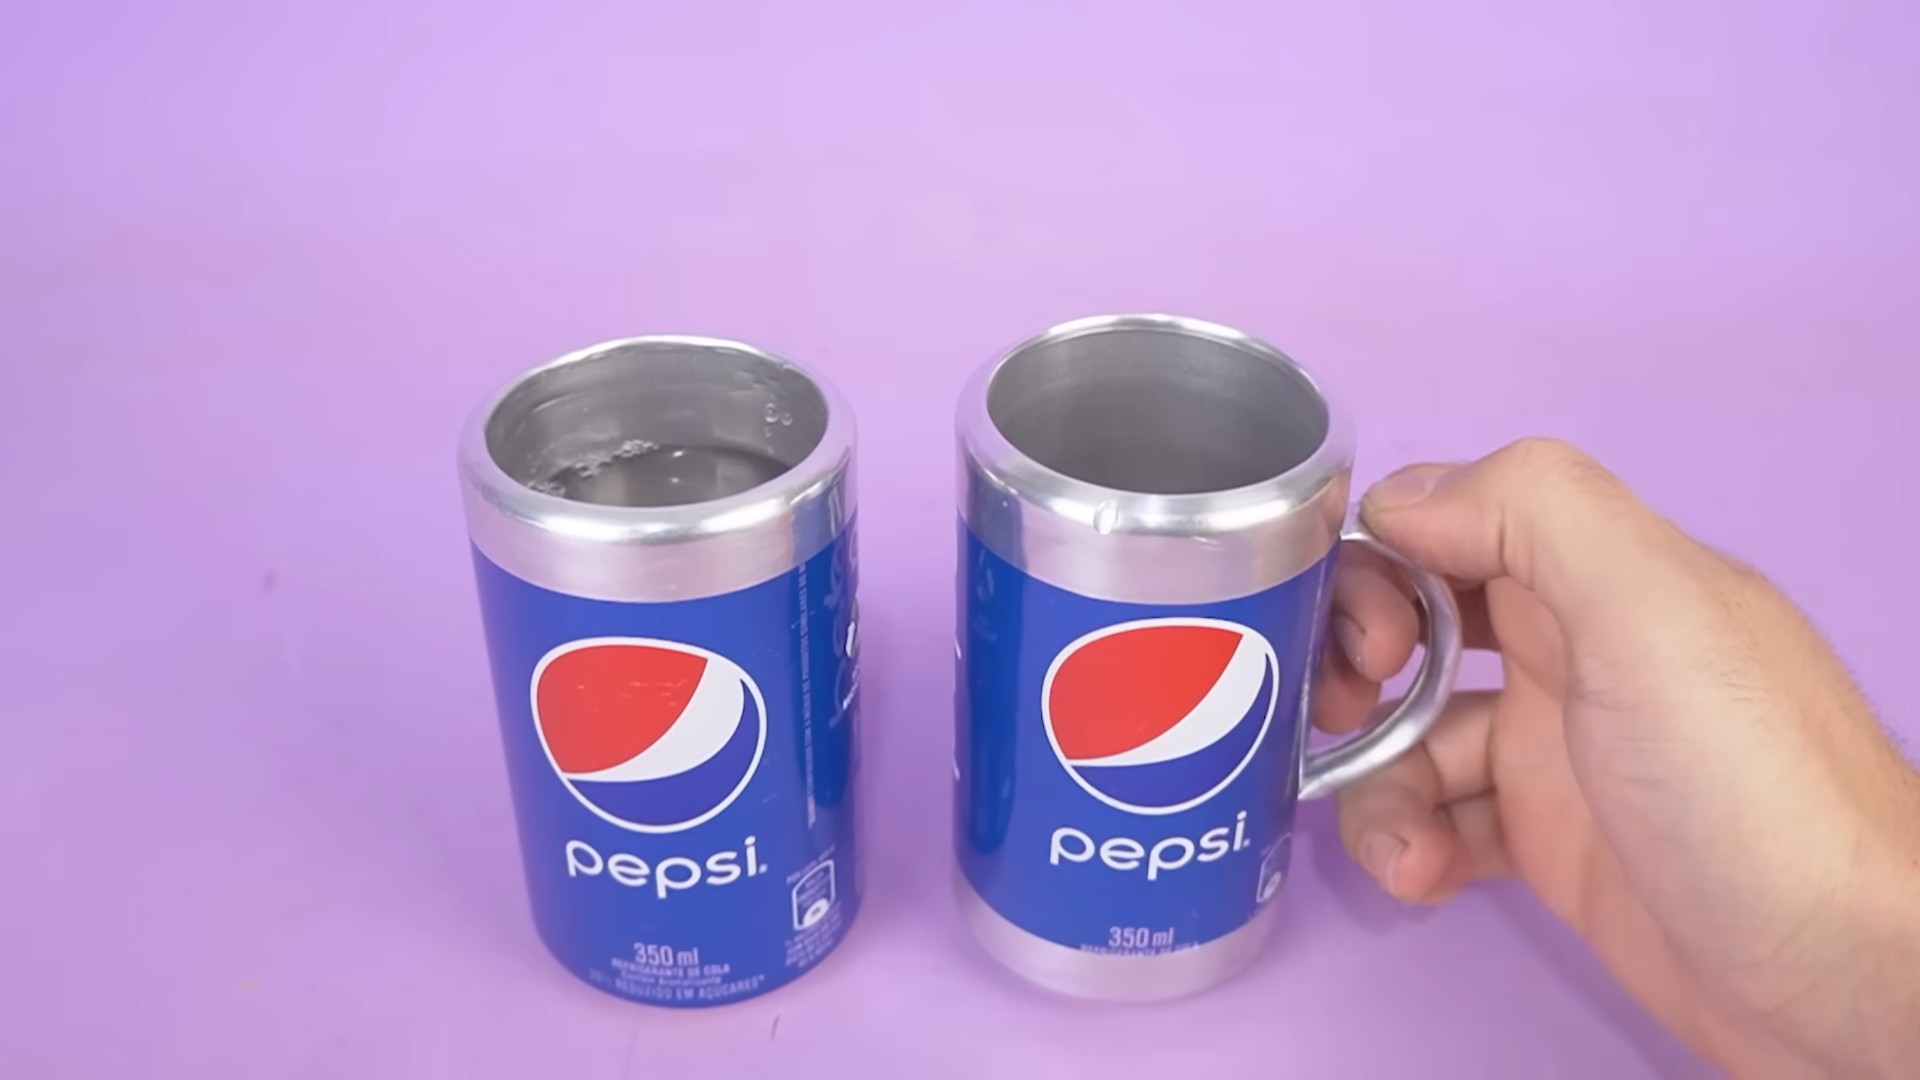
3. Enjoy! Now you can enjoy your favorite beverages in your unique, upcycled soda can cups!
Tips and Troubleshooting
* Cutting Difficulties: If you’re having trouble cutting the cans, try using a new, sharp blade in your utility knife or scissors.
* Uneven Edges: If the cut edge is uneven, don’t worry! You can use sandpaper to smooth it out.
* Epoxy Bubbles: To minimize air bubbles in the epoxy, stir slowly and gently. You can also use a heat gun or hair dryer to remove any bubbles that do form.
* Epoxy Not Curing: If the epoxy isn’t curing properly, make sure you’re using the correct mixing ratio and that the temperature is within the recommended range.
* Choosing Epoxy: Always use a food-safe epoxy resin for this project. This is crucial for ensuring the safety of your drinkware. Look for epoxies that are specifically labeled as food-safe or compliant with FDA regulations.
Cleaning and Maintenance
To keep your soda can cups looking their best, hand wash them with soap and water. Avoid using abrasive cleaners or scrub brushes, as these can scratch the epoxy coating. These cups are not dishwasher safe.
So there you have it! A complete guide to making your own soda can cups. It’s a rewarding project that’s both fun and eco-friendly. Enjoy your new drinkware, and happy crafting!
Conclusion
So, there you have it! Transforming humble soda cans into surprisingly stylish and functional cups is more than just a quirky craft project; it’s a testament to resourcefulness and a fun way to reduce waste. This DIY soda can cups project is a must-try for several compelling reasons.
First and foremost, it’s incredibly budget-friendly. Instead of purchasing new cups, you’re repurposing materials you likely already have on hand. This makes it an ideal activity for families, students, or anyone looking to save a few dollars while engaging in a creative endeavor.
Secondly, it’s a fantastic way to minimize your environmental impact. By giving soda cans a new lease on life, you’re diverting them from landfills and reducing the demand for new plastic or glass cups. Every little bit helps in the fight against waste, and this project offers a tangible way to contribute.
Thirdly, the process itself is surprisingly enjoyable and rewarding. There’s a unique satisfaction in taking something seemingly disposable and transforming it into something useful and aesthetically pleasing. It’s a great way to unwind, de-stress, and tap into your inner creativity.
But the benefits don’t stop there. These DIY soda can cups are also surprisingly versatile. While the basic method outlined provides a solid foundation, there’s plenty of room for customization and experimentation.
Here are a few suggestions to get your creative juices flowing:
* Personalize with Paint: Once your cup is assembled, unleash your inner artist and decorate it with acrylic paints. Consider adding intricate designs, vibrant colors, or even personalized messages. Be sure to use paints that are safe for contact with food and beverages, or apply a food-safe sealant after painting.
* Add a Handle: For a more ergonomic grip, consider adding a handle to your cup. You can create a handle from wire, sturdy cardboard, or even repurposed plastic. Secure the handle to the cup using strong adhesive or by carefully piercing small holes and threading wire through.
* Experiment with Sizes: While standard soda cans are a good starting point, don’t be afraid to experiment with different sizes and shapes. You can use larger juice cans or even smaller energy drink cans to create cups of varying capacities.
* Create a Set: Why stop at just one cup? Gather enough cans to create a matching set for your family or friends. This makes a thoughtful and eco-friendly gift that’s sure to be appreciated.
* Protective Coating: Consider applying a food-safe epoxy resin or sealant to the inside of the cup to ensure it’s completely safe for drinking and to prevent any potential leaching of aluminum. This is especially important if you plan to use the cups for hot beverages.
* Decorative Edges: Instead of simply folding over the top edge, experiment with different decorative techniques. You could use pliers to create a crimped edge, or even glue on a decorative trim made from ribbon or fabric.
Ultimately, the possibilities are endless. The key is to have fun, be creative, and don’t be afraid to experiment.
So, what are you waiting for? Gather your soda cans, grab your tools, and get ready to embark on this exciting DIY adventure. We’re confident that you’ll be amazed at what you can create.
We’d love to hear about your experiences with this DIY soda can cups project. Share your photos, tips, and variations in the comments below. Let’s inspire each other to create beautiful and sustainable solutions for everyday living! We are eager to see your creations and learn from your unique approaches. Happy crafting!
Frequently Asked Questions (FAQ)
Is it safe to drink from a DIY soda can cup?
This is the most common and important question. When properly made, a DIY soda can cup *can* be safe to drink from, but it’s crucial to take precautions. The primary concern is the potential for aluminum to leach into your beverage, especially if it’s acidic or hot. To minimize this risk, thoroughly clean the can before starting, and consider applying a food-safe epoxy resin or sealant to the inside of the cup. This will create a barrier between the aluminum and your drink. Avoid using the cups for long-term storage of liquids, and never use them for highly acidic beverages like lemon juice or vinegar. Regularly inspect the cups for any signs of damage or corrosion, and discontinue use if you notice any. Remember, safety is paramount, so err on the side of caution.
What tools do I need to make a soda can cup?
The basic tools you’ll need include a sharp craft knife or scissors, a ruler or measuring tape, sandpaper or a file (for smoothing edges), and strong adhesive (like epoxy or super glue). Depending on the design you choose, you might also need pliers (for bending edges), paintbrushes (for decorating), and a cutting mat to protect your work surface. Safety glasses are also recommended to protect your eyes from any flying debris. Having a well-lit workspace is also essential for precision and safety.
How do I clean a soda can before using it?
Cleaning the soda can thoroughly is essential for hygiene and safety. Start by rinsing the can with warm, soapy water to remove any residue or debris. Use a bottle brush or sponge to scrub the inside of the can. Next, sanitize the can by soaking it in a solution of water and bleach (1 tablespoon of bleach per gallon of water) for about 10 minutes. Rinse the can thoroughly with clean water and allow it to air dry completely before starting your project. This will help to eliminate any bacteria or contaminants that may be present.
What kind of adhesive should I use?
The best adhesive for this project is a strong, waterproof adhesive that is safe for contact with food and beverages. Epoxy resin is a popular choice because it creates a durable and long-lasting bond. Super glue can also be used, but it may not be as resistant to water and heat. Make sure to follow the manufacturer’s instructions carefully when using any adhesive, and allow it to dry completely before using the cup. Consider using a food-safe sealant over the adhesive for added protection.
How can I make the edges of the cup smooth and safe?
Sharp edges are a common concern with DIY soda can cups. To smooth the edges, use sandpaper or a metal file to carefully round them off. Start with a coarse grit sandpaper and gradually move to a finer grit for a smoother finish. You can also use pliers to bend the edges inward, creating a rounded lip. For added safety, consider applying a bead of silicone sealant around the rim of the cup. This will create a soft, comfortable edge that is less likely to cause cuts or scrapes.
Can I use these cups for hot beverages?
While technically possible, it’s generally not recommended to use DIY soda can cups for hot beverages. The aluminum can heat up quickly and become uncomfortable to hold. Additionally, the heat can potentially accelerate the leaching of aluminum into your drink. If you do choose to use them for hot beverages, be sure to use a cup sleeve or holder to protect your hands, and avoid using them for extended periods of time. It’s always best to err on the side of caution and use them primarily for cold beverages.
How durable are these DIY soda can cups?
The durability of your DIY soda can cup will depend on the quality of the materials and the care you take in constructing it. While they are not as durable as commercially manufactured cups, they can be surprisingly sturdy if made properly. Avoid dropping them or subjecting them to excessive force, as this can cause them to dent or break. With proper care, they can last for a reasonable amount of time.
How can I decorate my soda can cup?
There are many ways to decorate your soda can cup and personalize it to your liking. You can use acrylic paints, markers, stickers, or even decoupage techniques. Before painting, be sure to prime the surface of the can with a metal primer to ensure that the paint adheres properly. You can also use stencils to create intricate designs. For a more permanent finish, consider applying a clear coat of sealant over your decorations. Let your creativity run wild and create a cup that reflects your unique style.
Are there any safety precautions I should be aware of?
Yes, safety should always be your top priority when working on any DIY project. Wear safety glasses to protect your eyes from flying debris. Use caution when using sharp tools like craft knives or scissors. Work in a well-ventilated area when using adhesives or sealants. If you are using heat to bend or shape the can, wear gloves to protect your hands from burns. Always supervise children when they are participating in this project. By taking these precautions, you can ensure a safe and enjoyable crafting experience.
Where can I find more inspiration for DIY soda can cup designs?
The internet is a treasure trove of inspiration for DIY projects. Search online for “DIY soda can cups” or “recycled can crafts” to find a wealth of ideas and tutorials. You can also browse social media platforms like Pinterest and Instagram for inspiration. Look for designs that appeal to your personal style and skill level. Don’t be afraid to experiment and adapt existing designs to create something truly unique.
Leave a Comment