

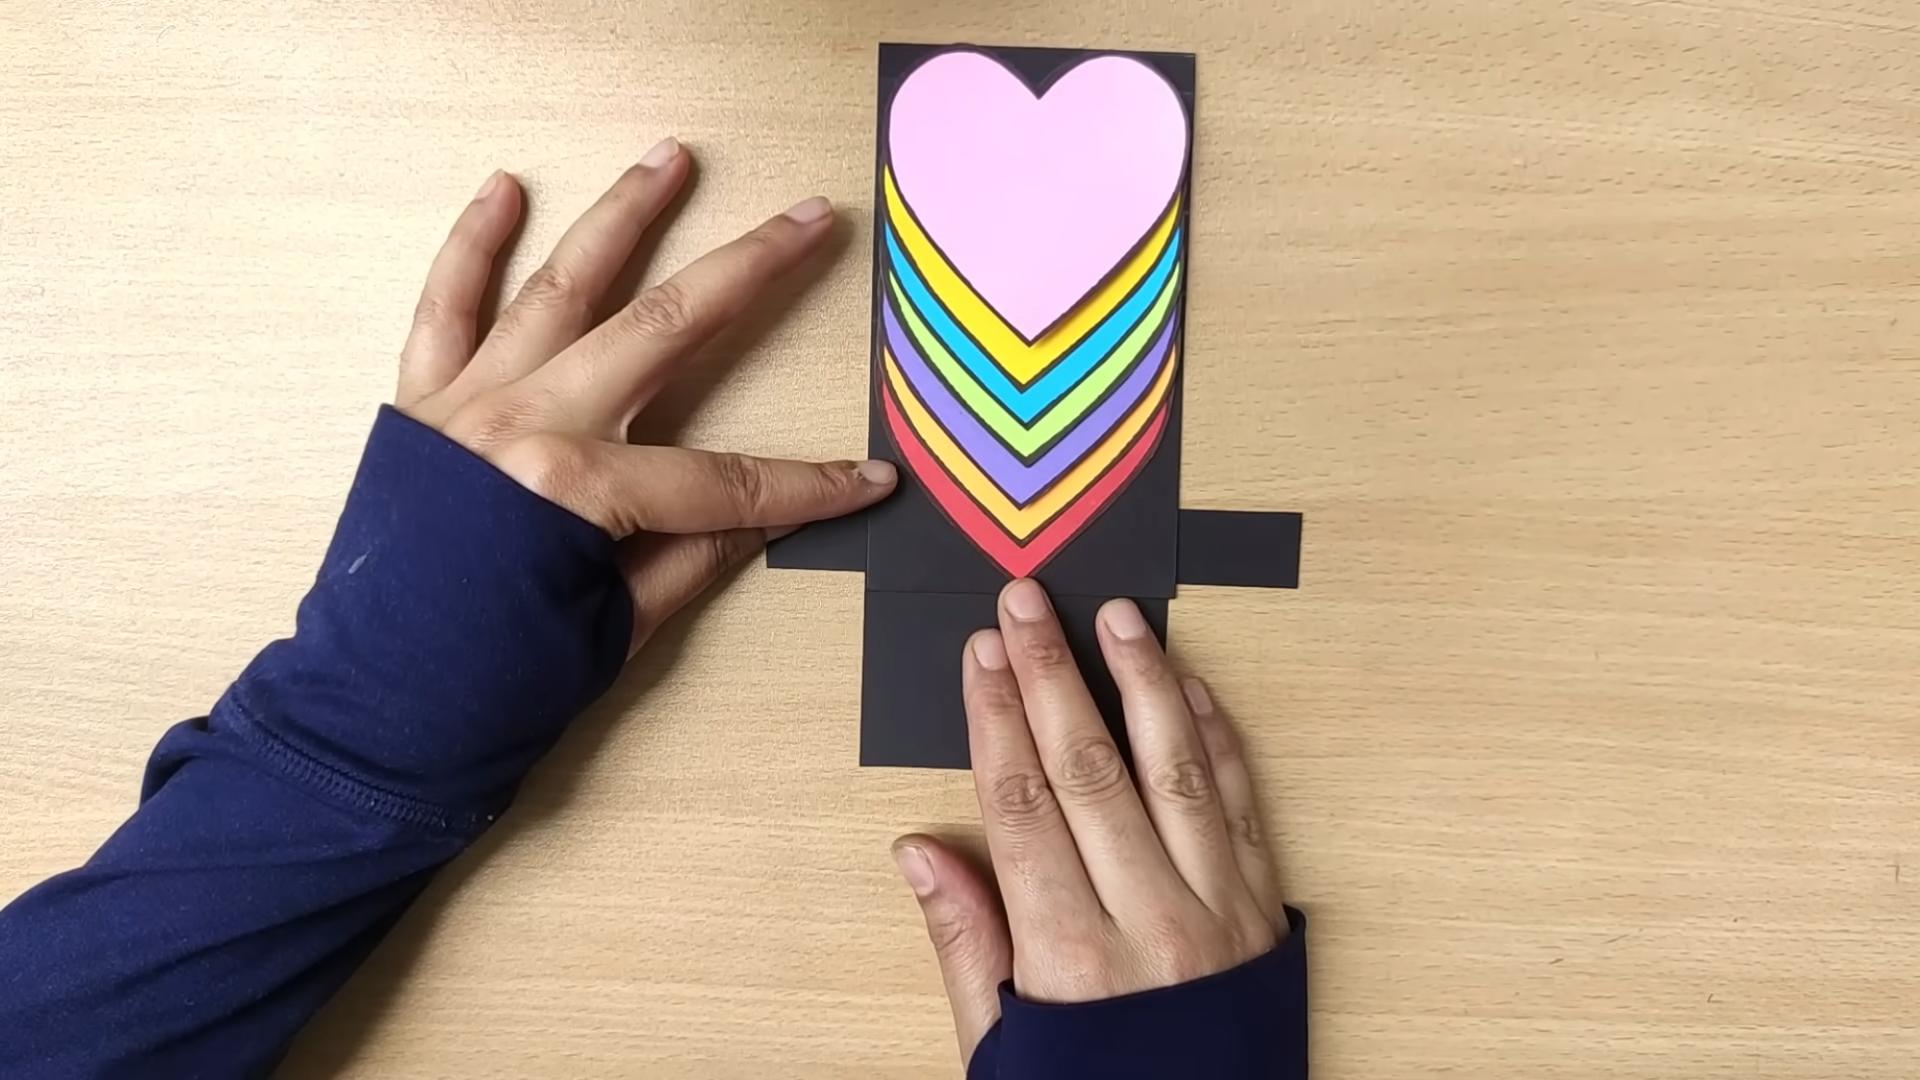
DIY Teacher’s Day Card: Show your appreciation with a heartfelt, handmade creation! Let’s be honest, finding the perfect gift for your favorite teacher can be a real challenge. Store-bought cards often feel impersonal, and sometimes, the best way to express your gratitude is with something you’ve poured your heart and soul into. That’s where the magic of DIY comes in!
Creating a DIY Teacher’s Day Card isn’t just about saving money; it’s about crafting a unique keepsake that your teacher will truly cherish. Think about it – a handmade card speaks volumes about the time and effort you invested, making it far more meaningful than anything you could buy off the shelf. The tradition of giving tokens of appreciation to teachers dates back centuries, evolving from simple handwritten notes to elaborate gifts. In many cultures, teachers are revered as pillars of the community, and Teacher’s Day is a special occasion to acknowledge their dedication and impact.
I believe that everyone can create a beautiful and personalized card, even if you don’t consider yourself particularly crafty. This article will guide you through some easy and fun DIY Teacher’s Day card ideas, using readily available materials. We’ll explore different techniques, from simple paper crafts to more elaborate designs, ensuring there’s something for everyone. So, grab your scissors, glue, and a dash of creativity, and let’s get started on making a card that will truly make your teacher’s day!
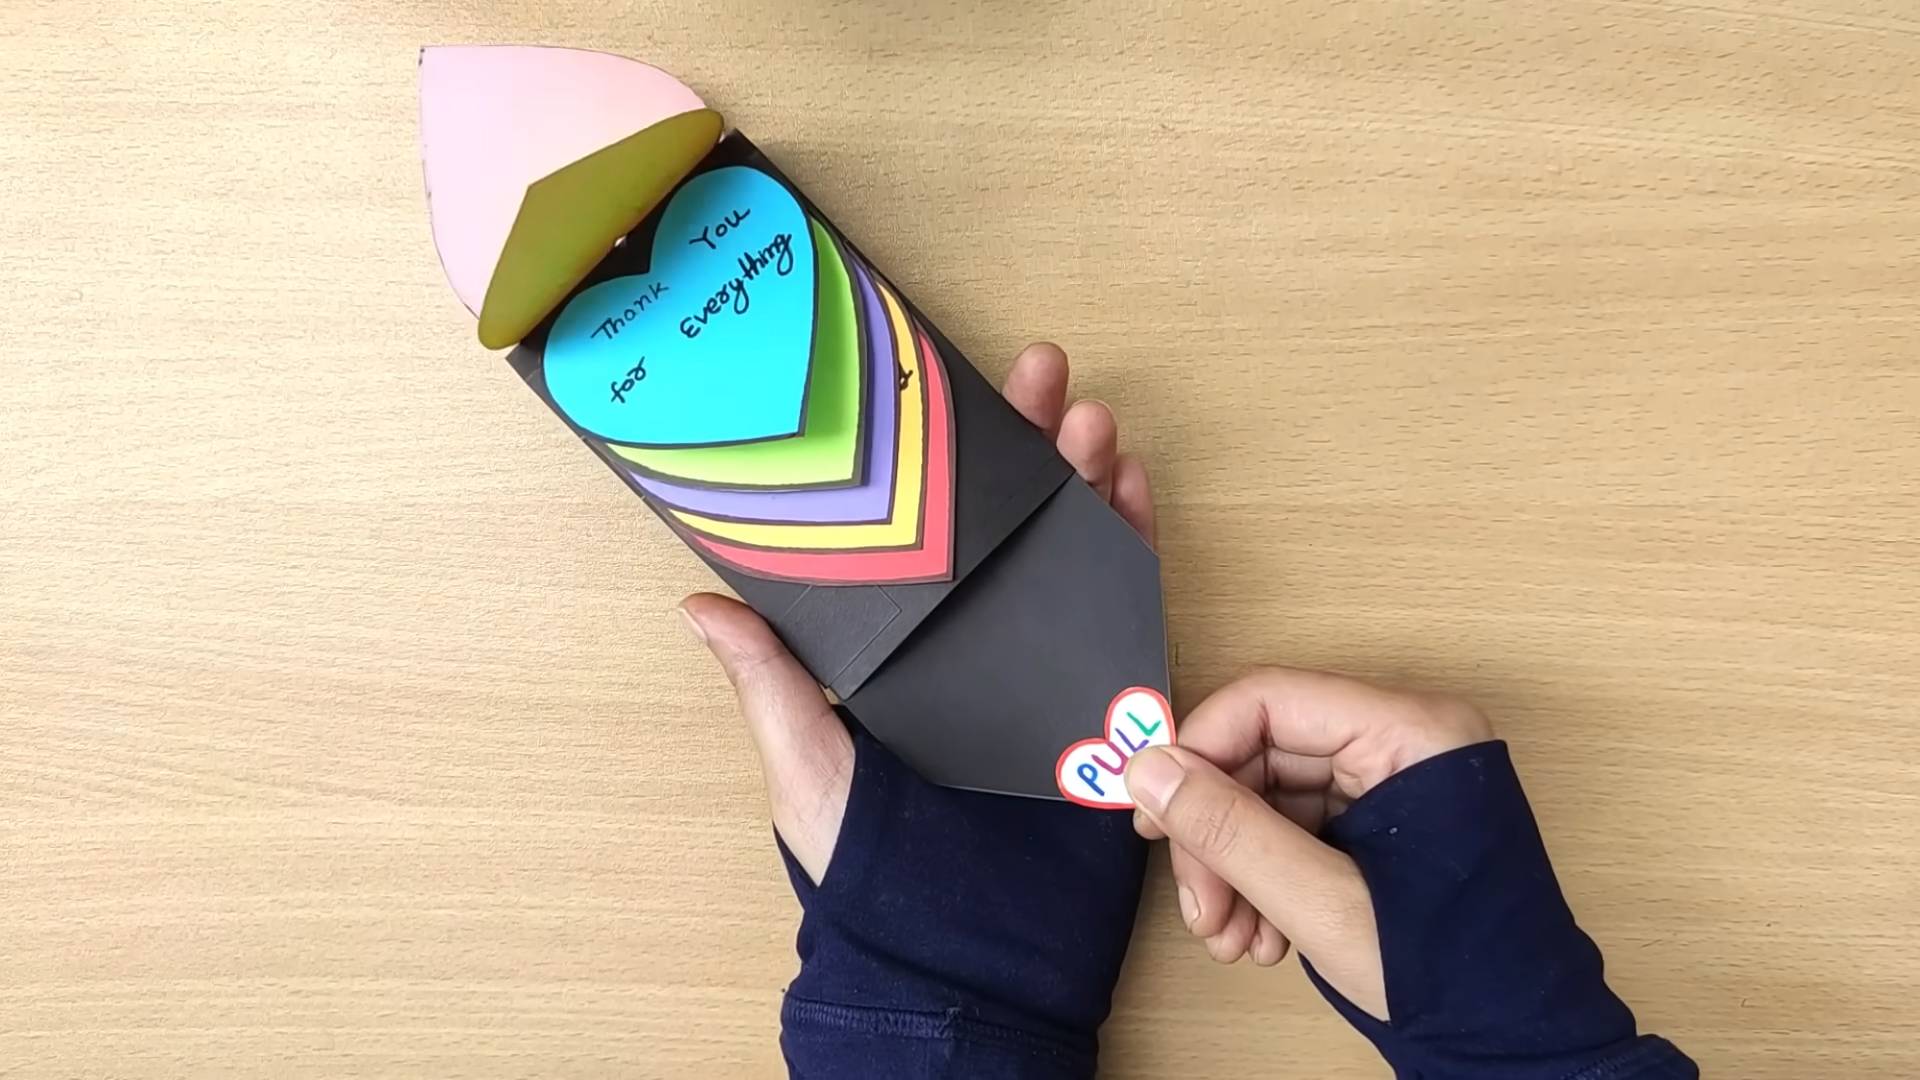
DIY Teacher’s Day Card: A Heartfelt Handmade Gift
Okay, let’s get crafty! Teacher’s Day is just around the corner, and what better way to show your appreciation than with a personalized, handmade card? Forget store-bought cards – this year, we’re going the extra mile with a DIY masterpiece. I’m going to walk you through creating a beautiful and unique card that your teacher will truly cherish.
Materials You’ll Need
Before we dive in, let’s gather our supplies. Don’t worry, you probably have most of these lying around already!
* Cardstock (various colors – think your teacher’s favorite colors!)
* Scissors
* Glue stick or liquid glue (I prefer glue sticks for less mess!)
* Ruler
* Pencil
* Markers, colored pencils, or crayons
* Decorative paper (scrapbook paper, wrapping paper scraps, etc.)
* Ribbon, twine, or yarn
* Buttons, sequins, or other embellishments (optional)
* Stickers (optional)
* Washi tape (optional)
* Hole punch (optional)
* Letter stamps and ink pad (optional)
Designing Your Card
This is where the fun begins! Let’s brainstorm some design ideas. Think about your teacher’s personality, their subject, and what they enjoy. Here are a few ideas to get you started:
* **Apple Theme:** A classic for a reason! Cut out apple shapes from red cardstock and layer them on your card.
* **Bookworm Card:** Create a stack of books using different colored cardstock. You can even write the names of your teacher’s favorite books on the spines!
* **Floral Card:** Cut out flower shapes from decorative paper or draw your own. Arrange them in a bouquet on the front of the card.
* **Chalkboard Card:** Use black cardstock as the base and write a message with white or colored chalk markers.
* **Personalized Message Card:** Simply write a heartfelt message and decorate it with embellishments.
I’m going to show you how to make a layered apple card, but feel free to adapt the techniques to your own design!
Step-by-Step Instructions: Layered Apple Card
Alright, let’s get started! Follow these steps carefully, and you’ll have a beautiful card in no time.
1. **Prepare the Card Base:**
* Take a sheet of cardstock (I’m using a light green color) and fold it in half to create the card base.
* Use a ruler and pencil to measure and mark the center of the card.
* Fold along the marked line to create a crisp fold. You can use a bone folder or the edge of a ruler to make the fold even sharper.
* My card base is approximately 5×7 inches when folded. Adjust the size to your preference.
2. **Cut Out the Apple Shapes:**
* On a piece of red cardstock, draw an apple shape. You can freehand it or use an apple-shaped cookie cutter as a template.
* Cut out the apple shape carefully with scissors.
* Repeat this process to create two more apple shapes, each slightly smaller than the previous one. I’m using different shades of red for each apple to add dimension.
* For the stem, cut out a small rectangle from brown cardstock.
* For the leaf, cut out a small leaf shape from green cardstock.
3. **Layer the Apple Shapes:**
* Take the largest apple shape and apply glue to the back.
* Center it on the front of the card base and press down firmly.
* Next, take the medium-sized apple shape and apply glue to the back.
* Center it on top of the largest apple shape, slightly offset to create a layered effect.
* Finally, take the smallest apple shape and apply glue to the back.
* Center it on top of the medium-sized apple shape, again slightly offset.
4. **Attach the Stem and Leaf:**
* Apply a small amount of glue to the back of the brown stem.
* Attach it to the top of the apple, slightly overlapping the top apple layer.
* Apply a small amount of glue to the back of the green leaf.
* Attach it to the side of the stem, also slightly overlapping the top apple layer.
5. **Add Details and Embellishments:**
* Using a white gel pen or a fine-tipped marker, add some highlights to the apple shapes to make them look more realistic. I’m adding a small curved line on each apple to represent the shine.
* You can also add some small dots or speckles to the apple to give it texture.
* Now, let’s add some embellishments! I’m using some small red sequins to add some sparkle to the apple.
* Apply a tiny dot of glue to the back of each sequin and carefully place them on the apple.
* You can also use buttons, glitter, or other embellishments to personalize your card.
6. **Write Your Message:**
* Open the card and write a heartfelt message to your teacher.
* Think about what you appreciate most about them and express your gratitude.
* Here are some ideas for your message:
* “Thank you for being such an amazing teacher! I’ve learned so much from you.”
* “Happy Teacher’s Day! You’re the best teacher I’ve ever had.”
* “Thank you for your patience, kindness, and dedication. You’ve made a real difference in my life.”
* “Wishing you a happy and relaxing Teacher’s Day!”
* You can also add a quote about teaching or learning.
* If you have nice handwriting, write your message directly on the card. If not, you can type and print your message on a separate piece of paper and glue it inside the card.
7. **Decorate the Inside (Optional):**
* To make your card even more special, you can decorate the inside as well.
* Use decorative paper, stickers, or washi tape to add some color and personality.
* You can also draw some small illustrations or doodles.
* I’m adding a strip of patterned washi tape along the bottom edge of the inside of the card.
8. **Add a Ribbon or Twine (Optional):**
* To add a finishing touch, you can tie a ribbon or twine around the card.
* Punch a small hole in the top left corner of the card.
* Thread a ribbon or twine through the hole and tie it in a bow.
* You can also use a decorative tag to write your teacher’s name or a short message.
Alternative Design: Book Stack Card
If the apple theme isn’t your cup of tea, let’s try a book stack card! This is another fun and easy design that’s perfect for Teacher’s Day.
1. **Prepare the Card Base:** Same as step 1 in the apple card instructions.
2. **Cut Out the Book Shapes:**
* Cut out several rectangular shapes from different colored cardstock. These will be the books. Vary the sizes slightly to make the stack look more interesting.
* Cut out thin strips of brown or black cardstock to represent the spines of the books.
3. **Assemble the Book Stack:**
* Glue the book shapes onto the front of the card, overlapping them to create a stack. Start with the largest book at the bottom and work your way up.
* Glue the spine strips onto the books.
4. **Add Titles and Details:**
* Using a fine-tipped marker, write the titles of your teacher’s favorite books (or just random book titles) on the spines.
* You can also add some details to the books, such as lines to represent pages or small illustrations.
5. **Add a Bookmark (Optional):**
* Cut out a small rectangle from decorative paper to create a bookmark.
* Glue it to the top of the book stack, sticking out slightly.
* Write a short message on the bookmark.
6. **Write Your Message:** Same as step 6 in the apple card instructions.
7. **Decorate the Inside (Optional):** Same as step 7 in the apple card instructions.
Tips and Tricks for a Perfect Card
* Don’t be afraid to experiment! The best part about DIY is that you can let your creativity shine.
* Use high-quality materials. This will make your card look more professional and last longer.
* Take your time. Rushing will only lead to mistakes.
* Practice your handwriting. A neat and legible message will make your card even more special.
* Personalize it! Add details that
Conclusion
Creating a heartfelt, personalized gift doesn’t have to break the bank or require advanced crafting skills. This DIY Teacher’s Day card project is a testament to that. It’s more than just a piece of paper; it’s a tangible expression of gratitude, a unique keepsake that your teacher will cherish far beyond the fleeting moments of the holiday.
Why is this DIY trick a must-try? Because in a world saturated with generic, store-bought items, a handmade card stands out. It screams thoughtfulness, effort, and genuine appreciation. It shows your teacher that you took the time and care to create something special just for them. The act of crafting itself is therapeutic and rewarding, allowing you to channel your creativity and personalize every detail to reflect your teacher’s individual personality and your relationship with them.
Beyond the basic design outlined, the possibilities for personalization are endless. Consider incorporating elements that reflect your teacher’s subject area. For a science teacher, perhaps a card adorned with hand-drawn atoms or a miniature solar system. For a literature teacher, a quote from their favorite author elegantly handwritten inside. You could even add a small, relevant gift card tucked inside, like a coffee shop gift card for the teacher who always needs a caffeine boost, or a bookstore gift card for the avid reader.
Variations to Explore:
* Pop-Up Card: Elevate your card with a simple pop-up element. A pop-up apple, a stack of books, or even a miniature version of your classroom can add a delightful surprise.
* Mixed Media: Don’t be afraid to experiment with different materials. Incorporate fabric scraps, buttons, dried flowers, or even small pieces of artwork to create a textured and visually interesting card.
* Watercolor Wonders: If you’re comfortable with watercolors, use them to create a beautiful background wash or to paint intricate designs.
* Calligraphy Charm: Practice your calligraphy skills to write a heartfelt message inside the card. Elegant lettering can add a touch of sophistication and personalization.
* Photo Integration: Include a class photo or a picture of you and your teacher to make the card even more personal and memorable.
This DIY Teacher’s Day card project is not just about creating a card; it’s about creating a memory. It’s about showing your teacher that you appreciate their hard work, dedication, and the positive impact they have on your life. It’s about fostering a stronger connection and expressing your gratitude in a meaningful way.
So, gather your supplies, unleash your creativity, and embark on this rewarding DIY adventure. We are confident that your teacher will be touched by your thoughtful gesture.
We wholeheartedly encourage you to try this DIY trick and share your experience with us! Post photos of your finished cards on social media using [Your Hashtag Here] and tell us about the reactions you received. We can’t wait to see your creative masterpieces and hear your heartwarming stories. Let’s spread the joy of handmade appreciation this Teacher’s Day!
Frequently Asked Questions (FAQ)
What kind of paper is best for making a DIY Teacher’s Day card?
The best type of paper depends on the design you have in mind. For a simple card with minimal embellishments, cardstock is a great option. It’s sturdy enough to hold its shape and comes in a variety of colors and finishes. If you plan on using watercolors or other wet media, watercolor paper is a must. It’s designed to absorb water without buckling or warping. For a more luxurious feel, consider using textured paper or handmade paper. Ultimately, the best paper is the one that you enjoy working with and that complements your design.
I’m not very artistic. Can I still make a good-looking card?
Absolutely! You don’t need to be a professional artist to create a beautiful and heartfelt card. Focus on simple designs and techniques that you’re comfortable with. Stencils, stamps, and pre-printed templates can be your best friends. Even a simple handwritten message on a nicely decorated card can be incredibly meaningful. Remember, the thought and effort you put into the card are what truly matter. There are tons of free resources online, including printable templates and step-by-step tutorials, that can guide you through the process. Don’t be afraid to experiment and have fun!
What if I don’t have all the supplies listed?
Don’t worry if you don’t have every single item on the supply list. Get creative and use what you have on hand. Construction paper can be a substitute for cardstock, and markers can be used instead of colored pencils. You can also repurpose materials from around your house, such as fabric scraps, buttons, or even old magazines. The key is to be resourceful and adapt the design to fit the materials you have available. Remember, the most important ingredient is your creativity!
How can I make the card more personal?
Personalization is key to making your DIY Teacher’s Day card truly special. Think about your teacher’s interests, hobbies, and personality. Incorporate elements that reflect these aspects into your design. Write a heartfelt message that expresses your gratitude and appreciation. Share a specific memory or anecdote that highlights your positive experience in their class. You can also include a small, thoughtful gift that complements the card, such as a gift card to their favorite coffee shop or a book related to their subject area. The more personal you make the card, the more meaningful it will be to your teacher.
How early should I start making the card?
It’s always a good idea to start planning and gathering your supplies a few days or even a week before Teacher’s Day. This will give you ample time to experiment with different designs, gather the necessary materials, and avoid feeling rushed. If you’re planning on making multiple cards, starting early is even more important. However, even if you only have a day or two, you can still create a beautiful and heartfelt card with a little planning and effort.
What are some message ideas for the card?
Here are a few message ideas to get you started:
* “Thank you for being such an inspiring and dedicated teacher. I’ve learned so much in your class.”
* “I appreciate your hard work and dedication to your students. You make learning fun and engaging.”
* “Thank you for always going the extra mile to help me succeed. I’m so grateful for your support.”
* “You’re not just a teacher, you’re a mentor and a role model. Thank you for making a positive impact on my life.”
* “Happy Teacher’s Day! I hope you have a wonderful day filled with appreciation and joy.”
Remember to personalize the message to reflect your specific experiences and feelings.
Is it appropriate to include a gift card with the card?
Yes, a gift card can be a thoughtful addition to your DIY Teacher’s Day card. However, it’s important to consider your school’s policies regarding teacher gifts and to be mindful of your budget. A small gift card to a coffee shop, bookstore, or office supply store can be a practical and appreciated gesture. The value of the gift card is less important than the thought and effort you put into choosing it.
How can I involve my child in making the card?
Involving your child in the card-making process is a great way to make it even more special. Depending on their age and abilities, they can help with various tasks, such as choosing the colors, drawing pictures, writing their name, or adding embellishments. Supervise them closely and provide guidance as needed. The goal is to make it a fun and collaborative experience that allows them to express their creativity and appreciation for their teacher. Even if they just add a few scribbles or fingerprints, it will make the card even more meaningful.
What if I make a mistake?
Don’t worry about making mistakes! Mistakes are a part of the creative process. If you make a small mistake, try to cover it up with embellishments or decorations. If it’s a larger mistake, you can always start over. The important thing is to learn from your mistakes and keep trying. Remember, the imperfections are what make your handmade card unique and special.
How can I make this card eco-friendly?
There are several ways to make your DIY Teacher’s Day card more eco-friendly. Use recycled paper or cardstock. Repurpose materials from around your house, such as fabric scraps, buttons, or old magazines. Use natural and non-toxic glues and adhesives. Avoid using glitter, which is often made from microplastics. When you’re finished, recycle any leftover materials. By making conscious choices, you can create a beautiful and heartfelt card while minimizing your environmental impact.


Leave a Comment