

DIY Towel Slippers Tutorial: Tired of cold floors greeting your feet every morning? Or perhaps you’re looking for a sustainable and budget-friendly way to pamper yourself after a long day? Well, you’ve landed in the right place! I’m thrilled to share a super simple and incredibly satisfying DIY project that will transform your old towels into cozy, custom-fit slippers.
The concept of repurposing textiles has deep roots in many cultures, reflecting a time when resourcefulness was a necessity. Think of the patchwork quilts lovingly crafted from scraps of fabric, each piece telling a story. Today, this tradition lives on in the growing movement towards sustainable living, and this DIY Towel Slippers Tutorial is my little contribution to that effort.
Let’s face it, buying new slippers can be surprisingly expensive, and often they just don’t fit quite right. Plus, who doesn’t have a few old towels lying around, just waiting for a new purpose? This project is not only a fantastic way to reduce waste, but it also allows you to create slippers that are perfectly tailored to your feet. Imagine the satisfaction of slipping into something you made yourself, knowing you’ve saved money and helped the environment. So, grab those old towels, and let’s get crafting! I promise, you’ll be amazed at how easy and rewarding this project is.
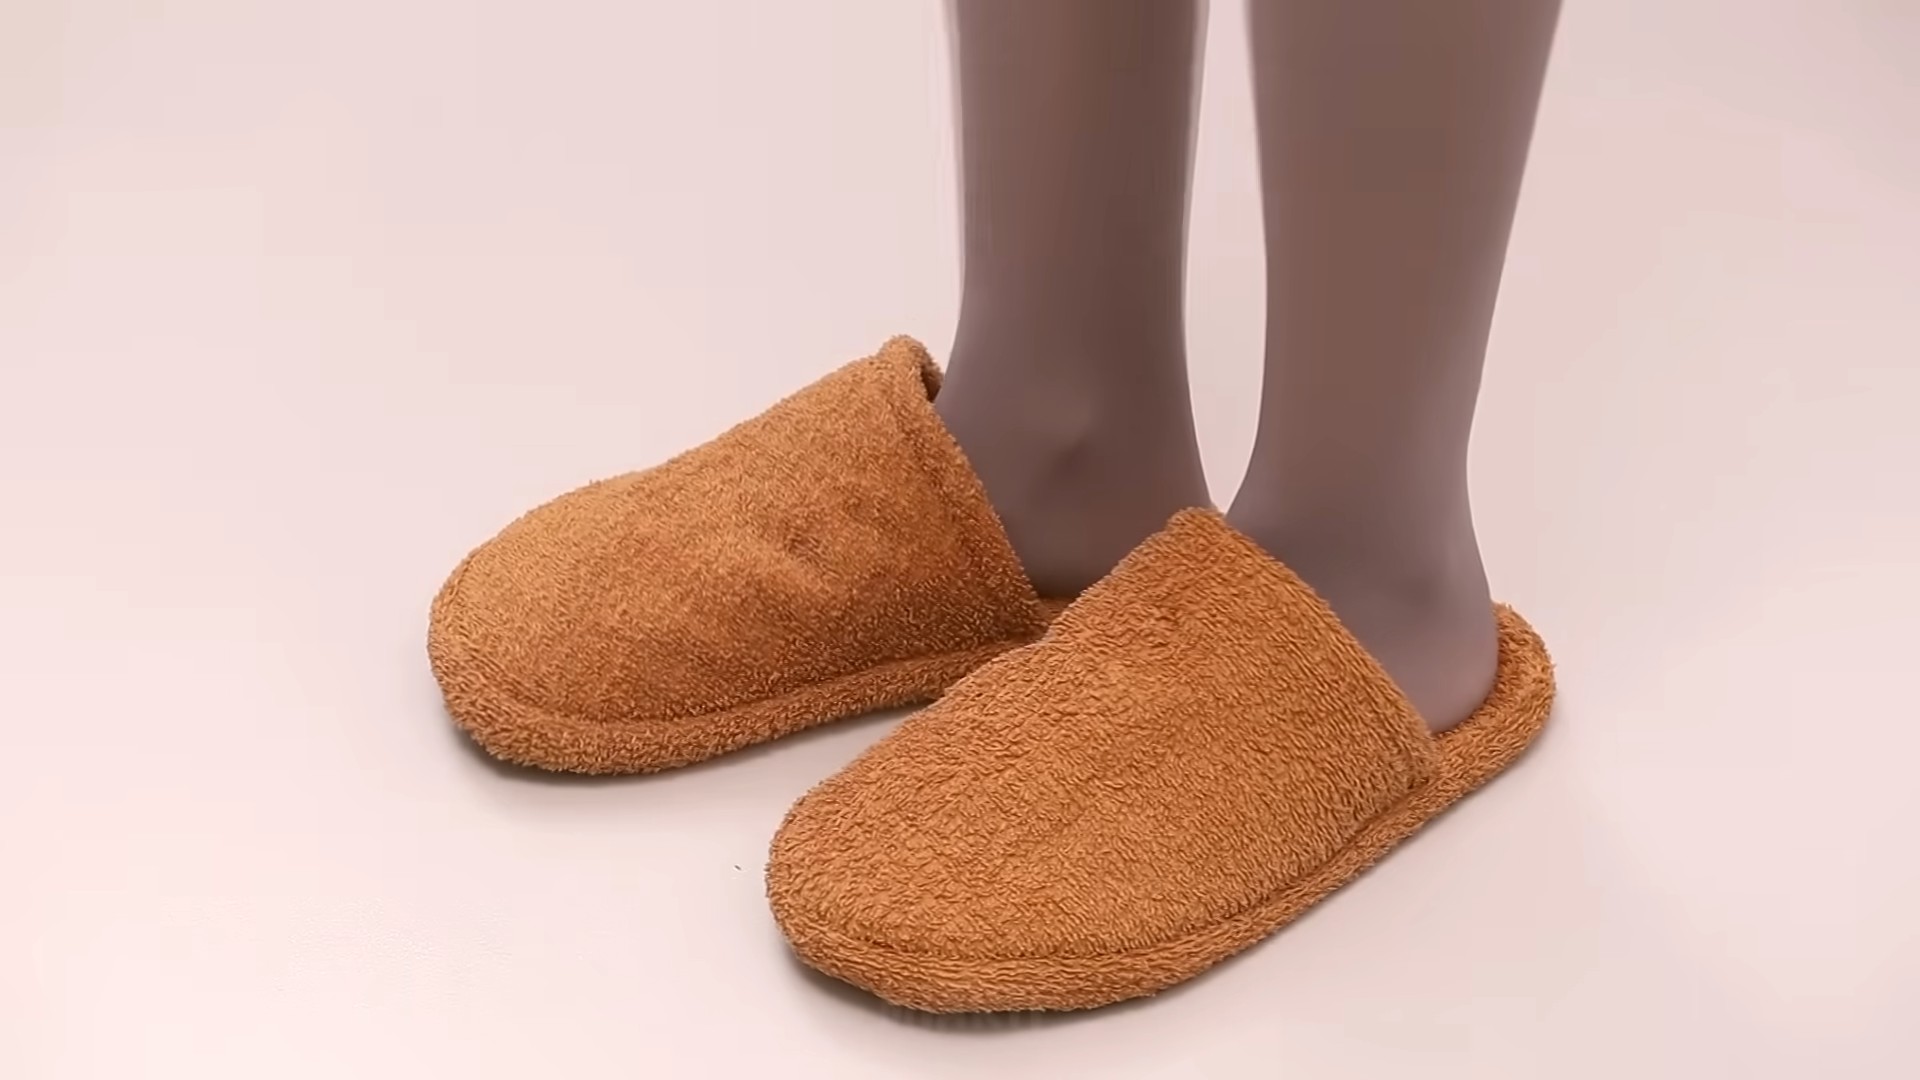
DIY Towel Slippers: Cozy Comfort Under Your Feet!
Okay, friends, let’s get real. Who doesn’t love a good pair of slippers? Especially after a long day, slipping your feet into something soft and comfy is pure bliss. But buying slippers can be surprisingly expensive, and sometimes they just don’t fit quite right. That’s why I’m so excited to share this super easy DIY towel slipper tutorial with you! We’re going to transform those old, slightly worn-out towels into the most comfortable slippers you’ve ever owned. Trust me, your feet will thank you!
What You’ll Need: The Supply List
Before we dive in, let’s gather our supplies. Don’t worry, you probably already have most of these lying around the house!
* Old Towels: The thicker, the better! Bath towels are ideal, but even hand towels can work for smaller sizes. Just make sure they’re clean and dry.
* Cardboard or Thick Paper: This will be used to create the sole pattern. Cereal boxes work great!
* Scissors: A good, sharp pair of scissors is essential for cutting through the towel and cardboard.
* Fabric Marker or Pen: For tracing your foot and marking the fabric.
* Sewing Machine (Optional): While you can hand-sew these slippers, a sewing machine will make the process much faster and more durable.
* Needle and Thread: If you’re hand-sewing, choose a strong thread that matches your towel color.
* Pins: These will help hold the fabric pieces together while you sew.
* Measuring Tape or Ruler: To measure your foot and ensure a good fit.
* Non-Slip Material (Optional): Shelf liner, rubberized fabric, or even puffy paint can be used to add grip to the soles.
* Embellishments (Optional): Buttons, ribbons, fabric scraps – get creative and personalize your slippers!
Creating the Pattern: Your Foot’s Blueprint
This is a crucial step, so take your time and be accurate. A well-fitting pattern is the key to comfortable slippers!
1. Trace Your Foot: Place a piece of cardboard or thick paper on a flat surface. Stand on the cardboard and carefully trace around your foot with a fabric marker or pen. Make sure to keep the pen perpendicular to the cardboard for an accurate outline. Trace both feet, as they might be slightly different sizes.
2. Add Seam Allowance: Around the traced outline, draw a second line about 1/2 inch (1.25 cm) wider than the original tracing. This extra space is the seam allowance, which will allow you to sew the pieces together without making the slippers too small.
3. Cut Out the Pattern: Carefully cut out the larger outline (including the seam allowance) with your scissors. You now have your sole pattern!
4. Create the Upper Pattern: Now, we need a pattern for the upper part of the slipper. This can be a bit more freeform. I like to create a simple oval shape that covers the top of my foot, extending from the base of my toes to about halfway up my foot. You can experiment with different shapes and sizes to find what feels most comfortable for you. A good starting point is to measure the width of your foot at the widest point and the length from the base of your toes to where you want the upper to end. Add about an inch to each measurement for seam allowance and overlap. Draw this shape on cardboard and cut it out. Remember, you can always adjust the pattern later if needed.
Cutting the Fabric: Towel Time!
Now for the fun part – transforming those towels into slipper components!
1. Cut the Soles: Place your sole pattern on the towel. Pin it in place to prevent it from shifting. Using your scissors, carefully cut out two sole pieces for each slipper (four pieces total). This will give your slippers a nice, thick sole for extra comfort and durability.
2. Cut the Uppers: Place your upper pattern on the towel, pin it in place, and cut out two upper pieces for each slipper (four pieces total).
3. Optional: Cut Lining (If Desired): If you want an extra layer of softness inside your slippers, you can cut out lining pieces using a thinner fabric like flannel or cotton. Use the same patterns as the sole and upper pieces.
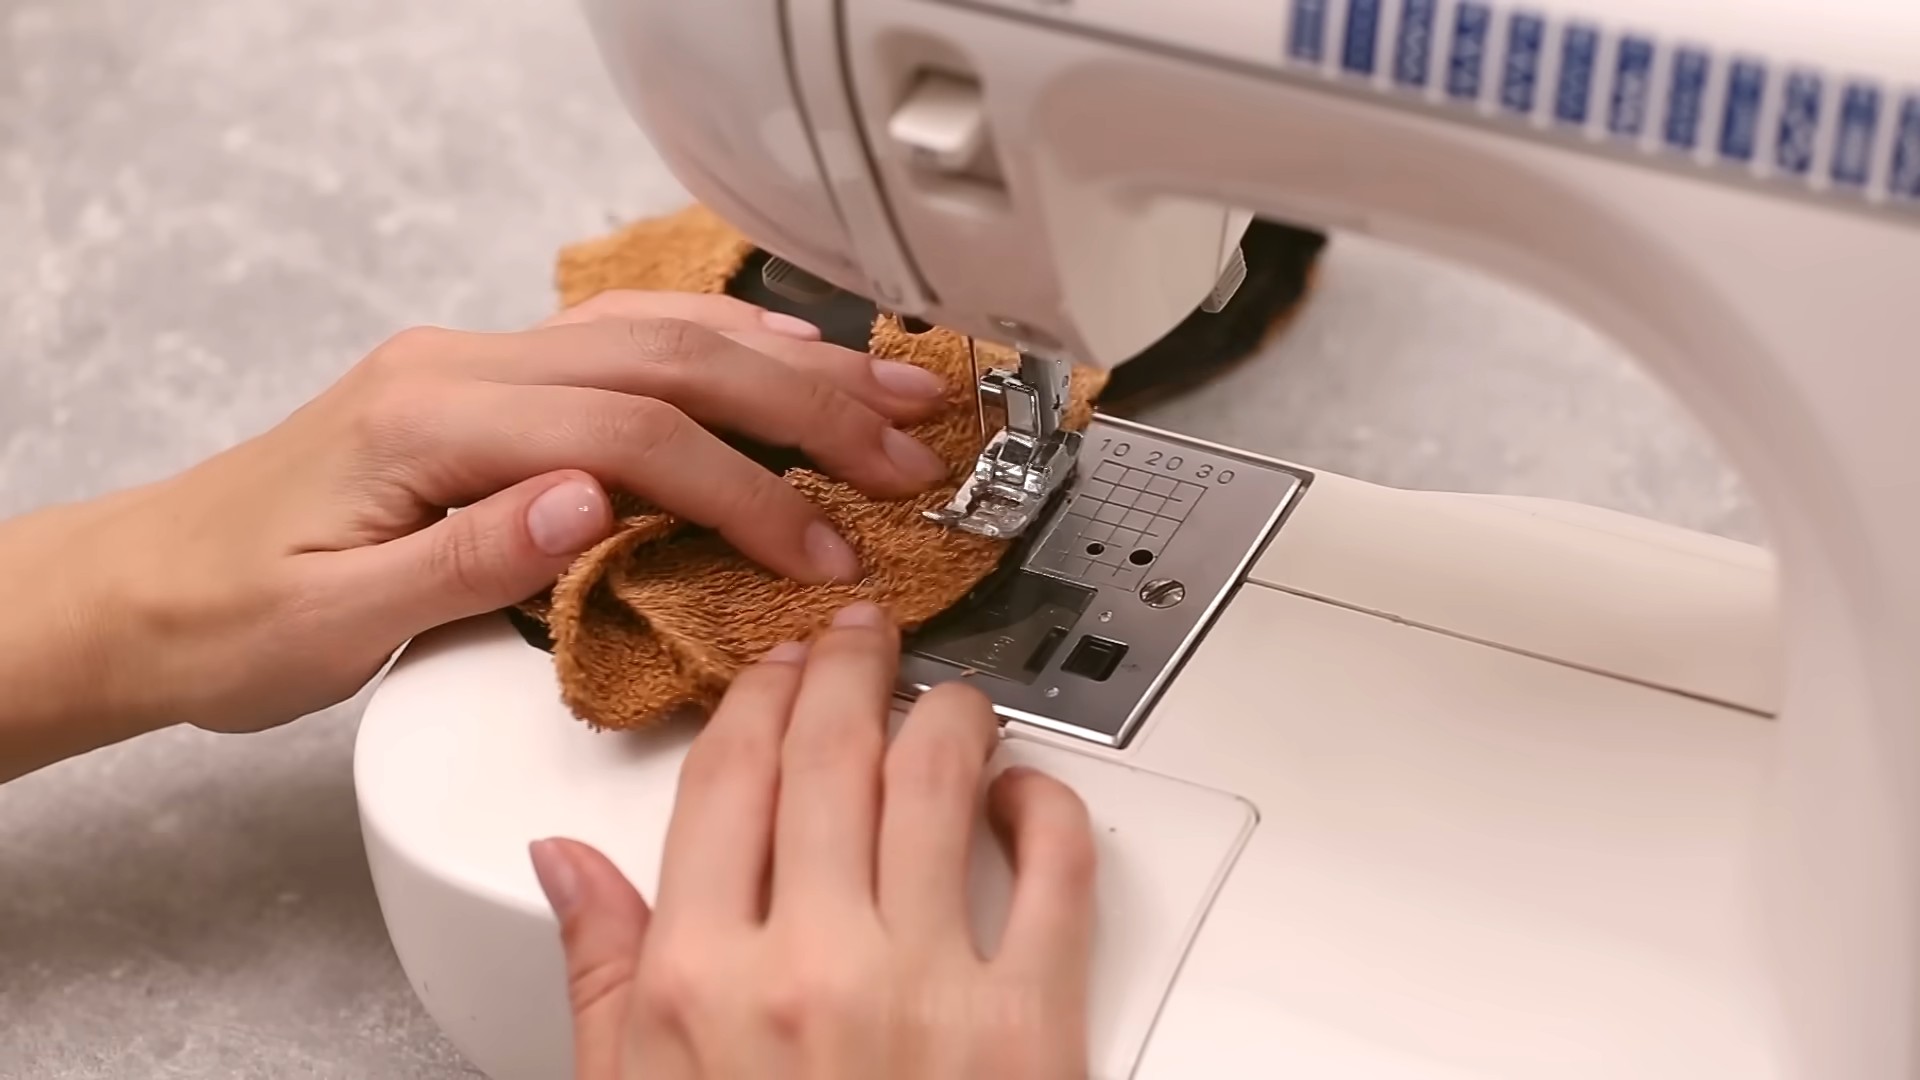
Sewing the Slippers: Putting It All Together
This is where the magic happens! Whether you’re using a sewing machine or hand-sewing, take your time and focus on creating strong, even seams.
1. Sew the Sole Layers Together: Take two sole pieces for one slipper and pin them together, wrong sides facing each other. Sew around the perimeter of the sole, leaving a 1/2 inch seam allowance. Repeat for the other slipper. This creates a nice, sturdy sole.
2. Prepare the Uppers: If you’re using a lining, pin the lining piece to the wrong side of the upper piece. Sew around the perimeter, leaving the bottom edge open. This will create a clean, finished edge for the upper. Repeat for all upper pieces.
3. Attach the Uppers to the Soles: This is the trickiest part, so take your time. Pin the bottom edge of the upper to the top of the sole, aligning the center of the upper with the center of the sole. The right side of the upper should be facing up. Pin all the way around, easing the fabric as needed to create a smooth curve.
4. Sew the Uppers to the Soles: Carefully sew the upper to the sole, using a 1/2 inch seam allowance. Go slowly and make sure the fabric is feeding evenly through the sewing machine. If you’re hand-sewing, use a strong backstitch to ensure a secure seam. Repeat for the other slipper.
5. Reinforce the Seams (Optional): For extra durability, you can go back and sew a second line of stitching around the perimeter of the sole and where the upper is attached. This will help prevent the seams from unraveling over time.
Adding Non-Slip Grip (Optional): Safety First!
Slippery floors and slippers don’t mix! Adding a non-slip grip to the soles will help prevent accidents.
1. Cut Non-Slip Material: Cut two pieces of non-slip material (shelf liner, rubberized fabric, etc.) to the same size and shape as your soles.
2. Attach the Non-Slip Material: You can glue the non-slip material to the bottom of the soles using fabric glue or hot glue. Alternatively, you can sew it on using a sewing machine or by hand.
3. Puffy Paint Option: If you’re using puffy paint, simply apply dots or lines of paint to the bottom of the soles. Let the paint dry completely before wearing the slippers.
Embellishing Your Slippers (Optional): Let Your Creativity Shine!
Now for the fun part – adding your personal touch!
* Buttons: Sew buttons onto the uppers for a cute and decorative touch.
* Ribbons: Add ribbons around the edges of the uppers or tie them into bows.
* Fabric Scraps: Use fabric scraps to create appliques or patches to decorate your slippers.
* Embroidery: Embroider your initials or a fun design onto the uppers.
* Pom-Poms: Attach pom-poms to the toes of the slippers for a playful look.
Final Touches: The Finishing Line
1. Trim Any Loose Threads: Use your scissors to trim any loose threads or stray fabric pieces.
2. Try Them On! Slip your feet into your new towel slippers and enjoy the cozy comfort! Walk around and make sure they fit comfortably and securely.
3. Make Adjustments (If Needed): If the slippers are too loose or too tight, you can make adjustments by adding or removing padding or by altering the seams.
And there you have it! Your very own pair of DIY towel slippers. I hope you enjoyed this tutorial and that your feet are now happy and cozy. Happy crafting!
Conclusion
So, there you have it! Transforming old towels into cozy, custom-fit slippers is not just a fun craft project; it’s a practical and sustainable way to pamper your feet. We’ve walked you through the steps, from gathering your materials to adding those final, personalized touches. But why is this DIY towel slippers project a must-try?
Firstly, it’s incredibly budget-friendly. Instead of shelling out money for expensive slippers, you’re repurposing something you already have – old towels that might otherwise end up in the landfill. This makes it an eco-conscious choice, contributing to a more sustainable lifestyle.
Secondly, the comfort factor is undeniable. Imagine slipping your feet into soft, absorbent towel slippers after a long day. The plush texture provides gentle cushioning and warmth, offering instant relaxation. Plus, because you’re making them yourself, you can customize the fit to perfectly match your foot size and shape. No more awkwardly sized slippers that slip off or pinch your toes!
Thirdly, the creative possibilities are endless. While we’ve provided a basic template, feel free to experiment with different towel thicknesses, colors, and embellishments. Want to add a touch of luxury? Use a plush bath towel and line the inside with fleece. Feeling festive? Opt for brightly colored towels and add pom-poms or embroidery. You can even personalize them with initials or fun designs.
Consider these variations to elevate your DIY towel slipper game:
* Spa Day Slippers: Infuse your slippers with essential oils. Before sewing, lightly spray the towel pieces with a lavender or eucalyptus essential oil blend for a calming and aromatic experience.
* Grippy Soles: Add non-slip fabric or rubber dots to the soles for better traction, especially on smooth floors. You can find these at most craft stores.
* Memory Foam Upgrade: Insert a layer of memory foam between the towel layers for extra cushioning and support. This is perfect for those who spend a lot of time on their feet.
* Gift-Worthy Slippers: Make a batch of these slippers as thoughtful and personalized gifts for friends and family. Tailor the colors and embellishments to their individual tastes.
* Seasonal Slippers: Create different versions for different seasons. Use lighter, more breathable towels for summer and thicker, warmer towels for winter.
Ultimately, this DIY project is about more than just making slippers; it’s about embracing creativity, sustainability, and self-care. It’s a chance to transform something old into something new, useful, and beautiful.
So, what are you waiting for? Gather your old towels, dust off your sewing machine (or needle and thread), and get ready to create your own pair of luxurious DIY towel slippers. We’re confident that you’ll love the process and the result.
We can’t wait to see what you create! Share your finished slippers with us on social media using #DIYTowelSlippers. We’re eager to see your unique designs and hear about your experience. Happy crafting!
Frequently Asked Questions (FAQs)
What kind of towels work best for DIY towel slippers?
The best towels for this project are absorbent and relatively thick. Old bath towels are ideal, as they offer a good balance of softness and durability. However, you can also use hand towels or even beach towels, depending on the desired thickness and size of your slippers. Avoid using very thin or worn-out towels, as they may not provide enough cushioning or support. Consider the texture as well; a plush towel will create a more luxurious feel, while a terrycloth towel will offer better absorbency. Experiment with different types of towels to find what works best for your preferences.
I don’t have a sewing machine. Can I still make these slippers?
Absolutely! While a sewing machine can speed up the process, these slippers can easily be made by hand-sewing. Use a sturdy needle and thread, and opt for a simple running stitch or backstitch to secure the layers of towel together. Hand-sewing may take a bit longer, but it’s a perfectly viable option, especially for smaller sizes or if you’re making a single pair. In fact, hand-sewing can give your slippers a more personalized and handcrafted feel.
How do I determine the right size for my slippers?
The easiest way to determine the right size is to trace your foot onto a piece of paper. Add about 1/2 inch to 1 inch around the tracing to allow for seam allowance and wiggle room. This will give you a template to cut out the towel pieces. You can also measure the length and width of your foot and use those measurements to create a custom template. If you’re making slippers as a gift, try to discreetly find out the recipient’s shoe size or trace a pair of their existing slippers. Remember to account for the thickness of the towel when determining the size.
How do I make the slippers non-slip?
Adding a non-slip sole is crucial for safety, especially on smooth floors. There are several ways to achieve this:
* Non-Slip Fabric: Purchase non-slip fabric from a craft store and attach it to the bottom of the slippers using fabric glue or by sewing it on.
* Rubber Dots: Apply rubber dots or puffy paint to the soles in a pattern. Allow them to dry completely before wearing the slippers.
* Suede or Leather Scraps: Attach scraps of suede or leather to the soles for added grip.
* Hot Glue: Carefully apply hot glue in a textured pattern to the soles. Be cautious when using hot glue, as it can be hot and may not be as durable as other options.
How do I wash my DIY towel slippers?
The best way to wash your DIY towel slippers depends on the materials you’ve used. If you’ve used all-cotton towels and durable stitching, you can typically machine wash them on a gentle cycle with cold water. However, if you’ve added embellishments or used delicate fabrics, hand-washing is recommended. To hand-wash, fill a basin with lukewarm water and mild detergent. Gently agitate the slippers to remove dirt and grime. Rinse thoroughly with clean water and squeeze out excess moisture. Avoid wringing them out, as this can damage the stitching. Air dry the slippers completely before wearing them again. To maintain their shape, you can stuff them with paper towels while they dry.
Can I add embellishments to my DIY towel slippers?
Absolutely! Embellishments are a great way to personalize your slippers and add a touch of flair. Consider adding:
* Embroidery: Embroider your initials, a favorite design, or a fun pattern onto the slippers.
* Pom-Poms: Attach pom-poms to the toes or heels for a playful look.
* Ribbon or Lace: Sew ribbon or lace around the edges of the slippers for a delicate touch.
* Buttons: Add decorative buttons to the tops of the slippers.
* Appliqués: Iron-on or sew-on appliqués can add a fun and whimsical element.
Just be sure to use embellishments that are durable and won’t easily come off with wear and tear.
What if my towel isn’t big enough for the slipper pattern?
If your towel isn’t large enough to cut out the entire slipper pattern in one piece, you can piece together smaller pieces of towel. Simply cut out the pattern in sections and sew the sections together to create the full slipper shape. Be sure to use a strong stitch to ensure that the seams are durable. You can also use different colored towels to create a patchwork effect.
How can I make these slippers more durable?
To increase the durability of your DIY towel slippers:
* Use Strong Stitching: Use a sturdy stitch, such as a backstitch or zigzag stitch, to sew the layers of towel together.
* Reinforce Seams: Reinforce the seams by sewing over them multiple times.
* Add a Lining: Add a lining of durable fabric, such as canvas or denim, to the inside of the slippers.
* Use a Durable Sole: Choose a durable material for the sole, such as non-slip fabric or rubber.
* Avoid Over-Washing: Wash the slippers only when necessary to prevent wear and tear.
By following these tips, you can create DIY towel slippers that are both comfortable and long-lasting.
Leave a Comment