

DIY wood polish recipe – ever feel like your beloved wooden furniture is looking a little… lackluster? I know I have! That beautiful dining table, the antique dresser passed down through generations, even that quirky little side table you found at a flea market – they all deserve to shine. But those store-bought polishes can be expensive, and honestly, sometimes I wonder what exactly *is* in them.
For centuries, people have been finding natural ways to care for their wood. Think about it – before the age of mass-produced chemicals, our ancestors relied on simple, readily available ingredients to keep their homes looking their best. This tradition of resourcefulness and natural care is something I truly admire, and it’s what inspired me to explore the world of homemade wood polishes.
That’s why I’m so excited to share this DIY wood polish recipe with you! Not only will you save money, but you’ll also know exactly what’s going onto your furniture. Plus, it’s incredibly satisfying to create something yourself that brings out the natural beauty of your wood. This simple trick will breathe new life into your furniture, protect it from everyday wear and tear, and leave your home smelling wonderfully fresh. Ready to ditch the store-bought stuff and embrace a more natural approach? Let’s get started!
“`html
DIY Wood Polish: Revive Your Furniture with Natural Ingredients!
Hey there, fellow DIY enthusiasts! Are your wooden furniture pieces looking a little dull? Don’t rush out to buy expensive commercial polishes filled with mystery ingredients. I’m going to show you how to whip up your own fantastic wood polish using simple, natural ingredients you probably already have in your kitchen! This recipe is not only cost-effective but also much gentler on your furniture and the environment. Let’s get started!
Gathering Your Supplies
Before we dive into the mixing, let’s make sure we have everything we need. This will save you time and frustration later.
* Olive Oil: This is the base of our polish, providing moisture and shine. Extra virgin olive oil is great, but regular olive oil works just as well.
* Lemon Juice: The lemon juice acts as a mild cleaner and helps to cut through any grime or buildup. Plus, it smells amazing!
* White Vinegar (Optional): For extra cleaning power, especially on stubborn stains or watermarks, we can add a touch of white vinegar. Use sparingly!
* Essential Oils (Optional): Want to add a personalized scent? A few drops of your favorite essential oil will do the trick. Lavender, orange, or cedarwood are all excellent choices for wood.
* Soft Cloths: You’ll need at least two soft, lint-free cloths. Microfiber cloths are ideal. One will be for applying the polish, and the other for buffing.
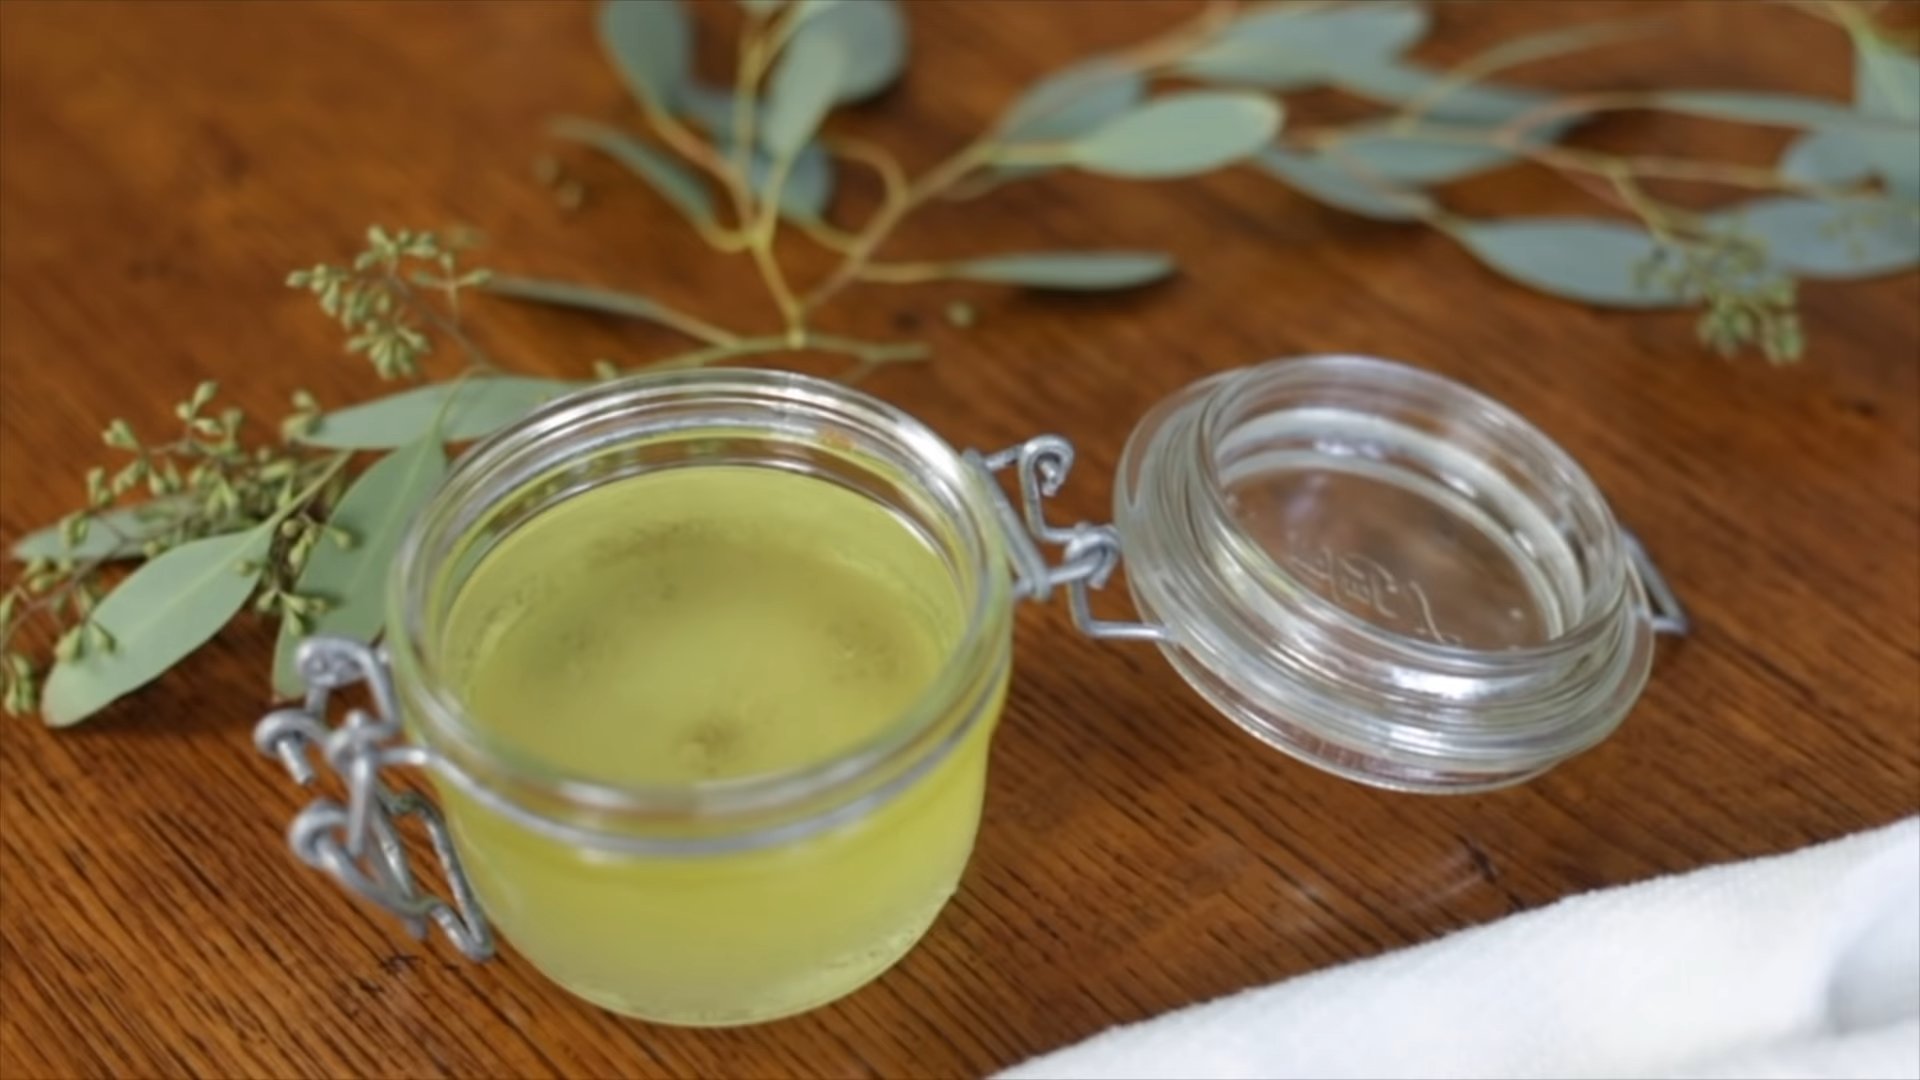
* Glass Jar or Bottle: For mixing and storing your homemade wood polish. A small mason jar works perfectly.
* Measuring Spoons: To ensure accurate measurements of our ingredients.
The Basic Recipe: Olive Oil and Lemon Juice
This is the foundation of our wood polish. It’s simple, effective, and smells wonderful.
1. Combine the Ingredients: In your glass jar or bottle, combine 1/2 cup of olive oil with 1/4 cup of lemon juice.
2. Mix Thoroughly: Close the jar tightly and shake vigorously for at least 30 seconds to ensure the oil and lemon juice are well combined. They might separate a bit over time, so always shake well before each use.
3. Test in an Inconspicuous Area: Before applying the polish to the entire piece of furniture, test it on a small, hidden area to make sure it doesn’t react negatively with the finish. This is especially important for antique or delicate pieces.
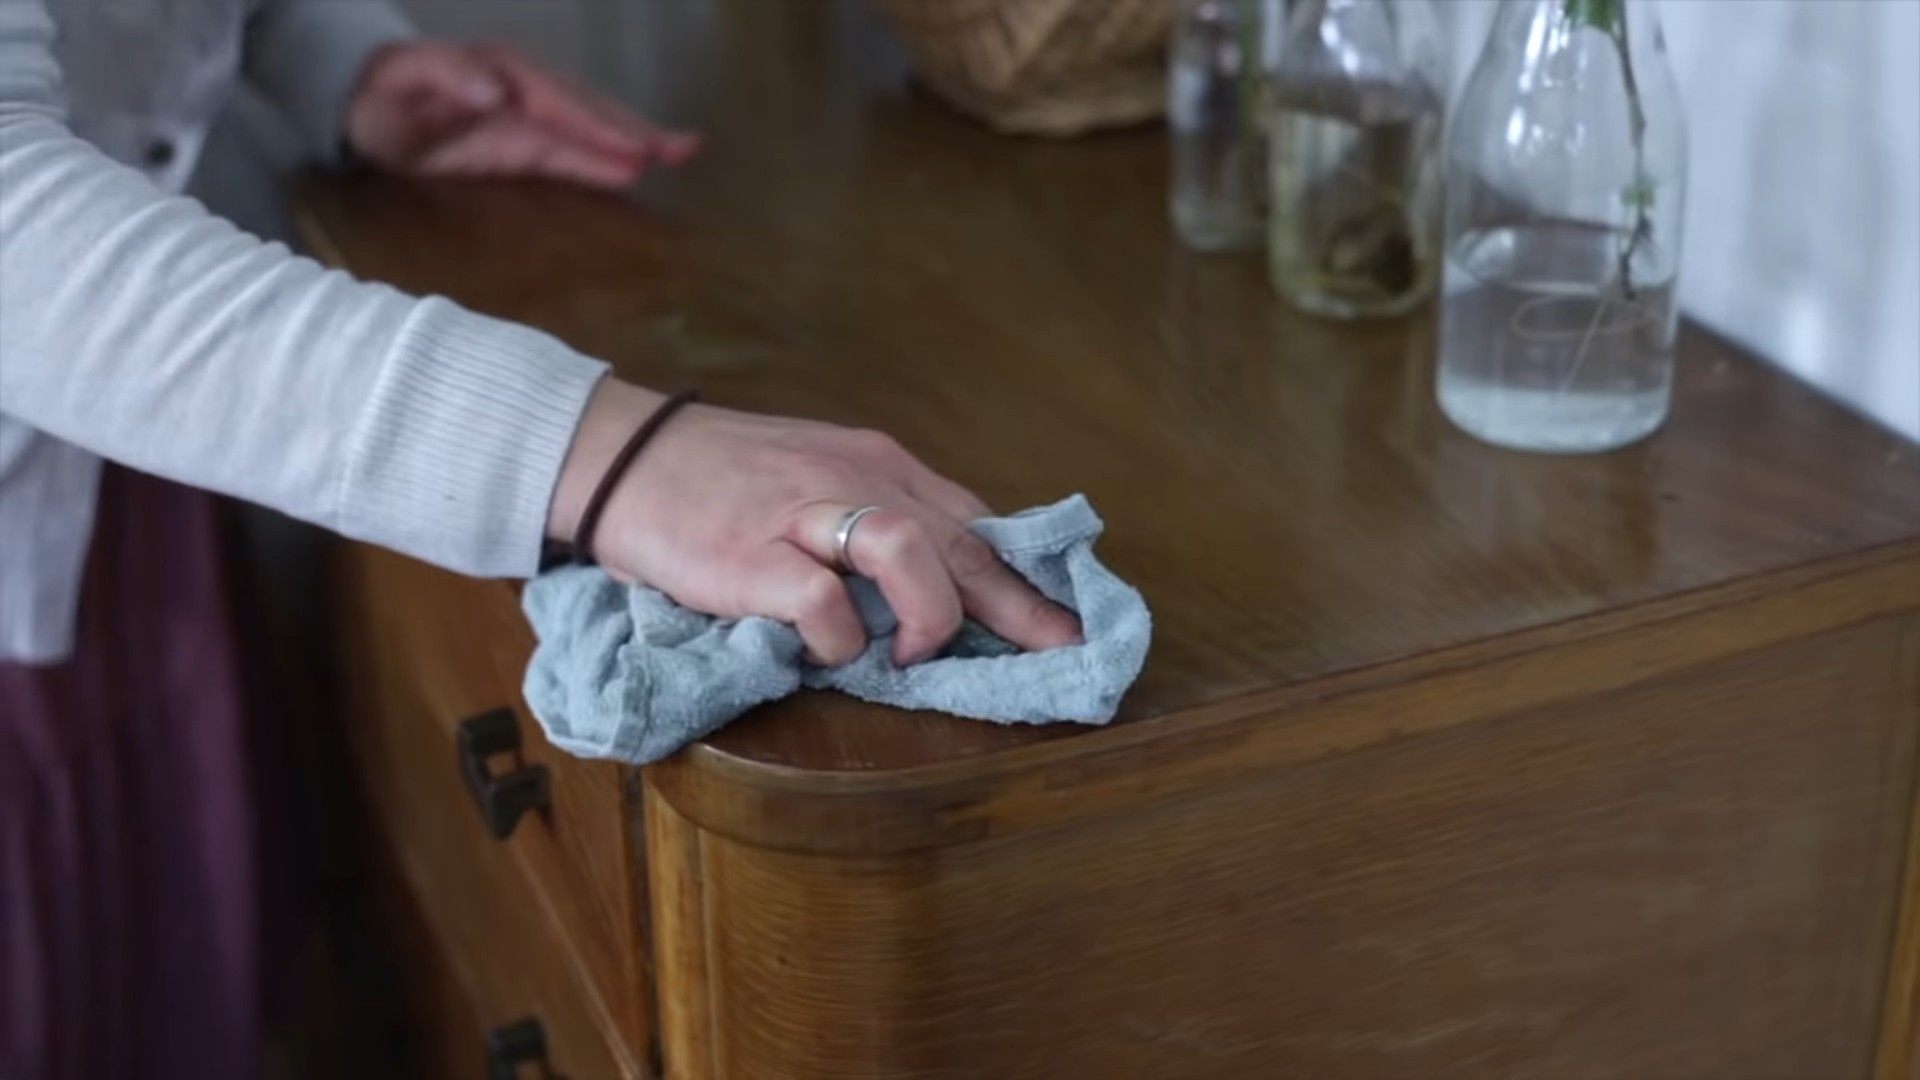
4. Apply the Polish: Dip a soft cloth into the polish and apply a thin, even layer to the wood surface. Don’t over-saturate the cloth; a little goes a long way.
5. Buff to a Shine: Using a clean, dry cloth, buff the wood surface in a circular motion until it shines. Remove any excess polish as you go.
6. Admire Your Work: Step back and admire your beautifully polished furniture!
Adding Extra Cleaning Power: The Vinegar Boost
If your furniture has stubborn stains or watermarks, adding a touch of white vinegar can help.
1. Modify the Recipe: Start with the basic olive oil and lemon juice recipe (1/2 cup olive oil, 1/4 cup lemon juice).
2. Add Vinegar: Add 1 tablespoon of white vinegar to the mixture. Remember, a little goes a long way! Too much vinegar can damage some finishes.
3. Mix Well: Shake the jar vigorously to combine all the ingredients.
4. Test and Apply: As with the basic recipe, test the polish in an inconspicuous area before applying it to the entire piece of furniture. Then, apply a thin layer and buff to a shine.
5. Be Careful with Delicate Finishes: If you’re working with antique or delicate furniture, be extra cautious with the vinegar. You might want to reduce the amount even further or skip it altogether.
Adding a Pleasant Scent: Essential Oil Infusion
Want to give your furniture a lovely aroma? Adding a few drops of essential oil is the perfect way to do it.
1. Choose Your Essential Oil: Select an essential oil that complements the wood and your personal preferences. Lavender, orange, cedarwood, lemon, and sandalwood are all great choices.
2. Add to the Basic Recipe: Start with the basic olive oil and lemon juice recipe (1/2 cup olive oil, 1/4 cup lemon juice).
3. Add Essential Oil: Add 5-10 drops of your chosen essential oil to the mixture. Start with less and add more if you want a stronger scent.
4. Mix Thoroughly: Shake the jar well to distribute the essential oil evenly.
5. Test and Apply: As always, test the polish in a hidden area before applying it to the entire piece of furniture. Then, apply a thin layer and buff to a shine.
6. Enjoy the Aroma: Enjoy the subtle and pleasant scent that your essential oil-infused wood polish leaves behind!
Tips for Success
Here are a few extra tips to help you get the best results with your homemade wood polish:
* Shake Well Before Each Use: The ingredients in the polish may separate over time, so always shake the jar vigorously before each use to ensure they are properly combined.
* Use a Light Touch: When applying the polish, use a light touch and avoid over-saturating the cloth. A little goes a long way!
* Buff Thoroughly: Buffing is key to achieving a beautiful shine. Use a clean, dry cloth and buff the wood surface in a circular motion until all excess polish is removed.
* Store Properly: Store your homemade wood polish in a cool, dark place. It should last for several months.
* Avoid Using on Unfinished Wood: This polish is designed for finished wood surfaces. Avoid using it on unfinished wood, as it may not absorb properly and could leave a sticky residue.
* Clean Before Polishing: For best results, clean your furniture before polishing it. This will remove any dirt, dust, or grime that could interfere with the polish. A simple dusting or wiping with a damp cloth is usually sufficient.
* Frequency of Polishing: How often you need to polish your furniture will depend on how frequently it’s used and exposed to dust and dirt. Generally, polishing every few months is sufficient.
* Dealing with Sticky Residue: If you accidentally apply too much polish and end up with a sticky residue, don’t panic! Simply wipe the surface with a clean, damp cloth and then buff it dry.
* Consider the Wood Type: Different types of wood may react differently to the polish. If you’re unsure, always test in an inconspicuous area first.
* Don’t Use on Waxed Furniture: This polish is not recommended for furniture that has been waxed. The oil in the polish can dissolve the wax and leave a dull finish.
* Safety First: While these ingredients are natural, it’s always a good idea to wear gloves when working with cleaning products, especially if you have sensitive skin.
Troubleshooting
Even with the best instructions, sometimes things don’t go exactly as planned. Here are a few common issues and how to fix them:
* Streaky Finish: If you’re getting a streaky finish, it could be due to several factors:
* Too much polish: Use less polish and buff more thoroughly.
* Dirty cloth: Use a clean cloth for buffing.
* Uneven application: Apply the polish in a thin, even layer.
* Dull Finish: If your furniture isn’t shining as much as you’d like, try these tips:
* Buff more vigorously: Spend more time buffing the surface.
* Use a microfiber cloth: Microfiber cloths are excellent for buffing.
* Add a few drops of lemon essential oil: Lemon oil can enhance the shine.
* Sticky Residue: As mentioned earlier, sticky residue is usually caused by applying too much polish. Wipe the surface with a clean, damp cloth and then buff it dry.
* Cloudy Appearance: A cloudy appearance can sometimes occur if the polish isn’t properly mixed or if the wood is damp. Make sure to shake the polish well before each use and ensure the wood is completely dry before applying the polish.
I hope you found this guide helpful! With a little bit of effort and these simple ingredients, you can keep your wooden furniture looking its best for years to come. Happy polishing!
“`
Conclusion
So, there you have it! This DIY wood polish recipe isn’t just a cost-effective alternative to store-bought products; it’s a gateway to reviving and protecting your beloved wooden furniture and surfaces with ingredients you likely already have in your pantry. Forget harsh chemicals and overpowering artificial scents. This homemade solution offers a natural, gentle, and incredibly effective way to bring out the natural beauty of your wood.
Why is this DIY wood polish a must-try? Because it empowers you to take control of what you’re using in your home. You know exactly what’s going into the polish, eliminating any concerns about potentially harmful ingredients. Plus, the satisfaction of creating something yourself that yields such impressive results is truly rewarding. The subtle sheen and revitalized appearance of your wood will speak volumes about your commitment to quality and natural care.
But the beauty of this recipe lies not only in its simplicity but also in its adaptability. Feel free to experiment with different essential oils to create a custom scent that perfectly complements your home’s ambiance. Lavender, cedarwood, or even a citrus blend can add a delightful aromatic touch to your polishing routine. For darker woods, consider adding a touch of brewed coffee to the oil mixture to deepen the color and enhance the richness. Remember to test any variations on an inconspicuous area first to ensure you achieve the desired effect.
Don’t be afraid to adjust the ratios slightly to suit your specific needs and preferences. If you find the polish too oily, simply reduce the amount of oil in the next batch. If you prefer a thicker consistency, add a bit more beeswax. The key is to find the perfect balance that works best for your wood and your application technique.
We wholeheartedly encourage you to give this DIY wood polish a try. It’s a simple, sustainable, and satisfying way to care for your wooden treasures. Once you experience the difference this homemade polish can make, you’ll never go back to store-bought alternatives.
And most importantly, we want to hear about your experience! Share your results, variations, and tips in the comments below. Let’s build a community of DIY enthusiasts who are passionate about natural wood care. Your insights could inspire others to embrace this simple yet transformative recipe and discover the joy of creating their own effective and eco-friendly wood polish. Let us know what essential oils you used, what kind of wood you polished, and any other helpful hints you discovered along the way. Together, we can unlock the full potential of this amazing DIY trick and keep our wooden furniture looking its absolute best for years to come.
Frequently Asked Questions (FAQ)
What types of wood is this DIY wood polish suitable for?
This DIY wood polish is generally safe and effective for most types of finished wood, including furniture, cabinets, and hardwood floors. However, it’s always recommended to test the polish on an inconspicuous area first, especially if you’re dealing with antique or delicate wood. Avoid using it on unfinished wood, as the oil may absorb unevenly and cause staining. For specific wood types like teak or rosewood, research their specific care requirements before applying any polish.
How often should I use this DIY wood polish?
The frequency of polishing depends on the wood’s exposure to wear and tear. For furniture that sees daily use, polishing every 1-2 months is generally sufficient. For less frequently used items, polishing every 3-6 months may be adequate. Over-polishing can lead to a buildup of residue, so it’s best to err on the side of caution. Observe your wood and polish only when it starts to look dull or dry.
Can I use this DIY wood polish on wood floors?
Yes, you can use this DIY wood polish on wood floors, but with caution. Apply a very thin layer and buff thoroughly to avoid making the floor slippery. It’s best to use a microfiber mop or cloth for application and buffing. Test a small, hidden area first to ensure compatibility and desired results. Avoid using excessive amounts of polish, as this can create a sticky residue and attract dirt.
What if I don’t have beeswax? Can I substitute it with something else?
Beeswax is a key ingredient in this recipe as it provides a protective layer and adds shine. While there isn’t a perfect substitute, you can try using carnauba wax as an alternative. However, carnauba wax is harder than beeswax, so you’ll need to melt it carefully and use a smaller amount. The consistency and results may vary slightly. If you don’t have either wax, you can still use the oil and vinegar mixture, but it won’t provide the same level of protection and shine.
How should I store the DIY wood polish?
Store your DIY wood polish in an airtight container in a cool, dark place. This will help prevent the oils from going rancid and the beeswax from melting. A glass jar with a tight-fitting lid is ideal. Properly stored, the polish should last for several months. Check for any changes in smell or consistency before each use. If it smells off or appears separated, discard it.
What kind of essential oils are best to use in this DIY wood polish?
The best essential oils to use depend on your personal preference and the type of wood you’re polishing. Lavender and cedarwood are popular choices for their calming scents and wood-friendly properties. Lemon and orange essential oils can add a refreshing citrus aroma and help to cut through grime. Tea tree oil has antibacterial properties and can be beneficial for cleaning wood surfaces. Always use high-quality, pure essential oils for the best results.
My wood polish seems too oily. What can I do?
If your wood polish feels too oily, there are a few things you can try. First, make sure you’re applying a very thin layer and buffing thoroughly. If that doesn’t help, you can try adding a bit more beeswax to the mixture to thicken it up. Alternatively, you can wipe off the excess oil with a clean, dry cloth after polishing. In the future, reduce the amount of oil in your recipe.
Can I use this DIY wood polish on painted wood?
It’s generally not recommended to use this DIY wood polish on painted wood. The oils in the polish can soften or damage the paint, especially if it’s a water-based paint. If you want to clean painted wood, use a mild soap and water solution instead.
How do I clean my wood furniture before applying the DIY wood polish?
Before applying the DIY wood polish, it’s important to clean your wood furniture to remove any dirt, dust, or grime. You can use a soft cloth dampened with a mild soap and water solution. Be sure to wring out the cloth well to avoid getting the wood too wet. After cleaning, allow the wood to dry completely before applying the polish.
What are the benefits of using a DIY wood polish over store-bought products?
There are several benefits to using a DIY wood polish. First, it’s often more cost-effective than store-bought products. Second, you have complete control over the ingredients, so you can avoid harsh chemicals and artificial fragrances. Third, it’s a more sustainable option, as you’re reducing your reliance on plastic packaging and mass-produced products. Finally, it’s a fun and rewarding project that allows you to connect with your home and your belongings.
Leave a Comment