

Grapevine Water Propagation DIY: Ever dreamt of having your own vineyard, but thought it was too complicated or expensive? Well, I’m here to tell you it’s easier than you think! For centuries, gardeners have propagated plants using simple methods, and grapevine propagation is no exception. Think of the ancient Romans, carefully nurturing their vines to produce the wines that fueled their empire – you can tap into that same tradition, right in your own backyard!
This DIY guide will walk you through the surprisingly simple process of propagating grapevines using just water. Why is this so important? Because buying established grapevines can be costly, and starting from seed is a long and uncertain process. With grapevine water propagation DIY, you can easily create new grapevines from cuttings, expanding your garden or sharing the joy of growing with friends and family. Plus, it’s incredibly rewarding to watch those tiny roots emerge and know you’ve created a new life!
Imagine the satisfaction of harvesting your own grapes, knowing you nurtured them from a simple cutting. This method is perfect for beginners and experienced gardeners alike, offering a cost-effective and fun way to expand your grapevine collection. Let’s get started and turn your gardening dreams into a fruitful reality!
DIY Grapevine Propagation: From Cutting to Thriving Vine
Hey there, fellow gardening enthusiasts! Ever looked at a grapevine and thought, “I wish I could have more of these”? Well, you absolutely can! Propagating grapevines from cuttings is a surprisingly simple and rewarding DIY project. I’m going to walk you through the entire process, from selecting the right cuttings to planting your new vine. Get ready to expand your vineyard (even if it’s just a small one in your backyard!).
Choosing and Preparing Your Grapevine Cuttings
This is arguably the most crucial step. A healthy cutting is the foundation for a successful new grapevine.
* Timing is Key: The best time to take grapevine cuttings is during the dormant season, typically late winter or early spring (before the buds start to swell). I usually aim for late February or early March in my area.
* Source Matters: Choose a healthy, vigorous grapevine that produces the type of grapes you want. If you don’t have your own, ask a friend or neighbor who grows grapes. Most grape growers are happy to share cuttings!
* Selecting the Right Wood: Look for one-year-old wood. This is the growth from the previous season. It will be thicker than new growth and have a brownish color. Avoid thin, weak, or diseased-looking canes.
* Cane Diameter: Aim for cuttings that are about the diameter of a pencil – not too thin, not too thick.
* Node Count: Each cutting should have at least three to four nodes (the points where leaves or buds emerge). More nodes can be beneficial, but don’t go overboard.
* Cutting Length: I usually make my cuttings about 12-18 inches long. This gives them enough energy reserves to get started.
* Making the Cuts: Use clean, sharp pruning shears or a grafting knife. Make a straight cut at the bottom of the cutting, just below a node. Make a slanted cut at the top of the cutting, about an inch above a node. The slant helps you remember which end is up when planting.
* Bundling and Labeling: If you’re taking multiple cuttings from different grape varieties, bundle them together and label them clearly. I use masking tape and a permanent marker. Trust me, you don’t want to mix them up!
* Hydration is Important: Once you’ve taken your cuttings, soak them in water for 24-48 hours. This will rehydrate them and give them a good start.
Water Propagation: The Step-by-Step Guide
Now for the fun part – watching your cuttings sprout roots! Water propagation is a simple and effective method.
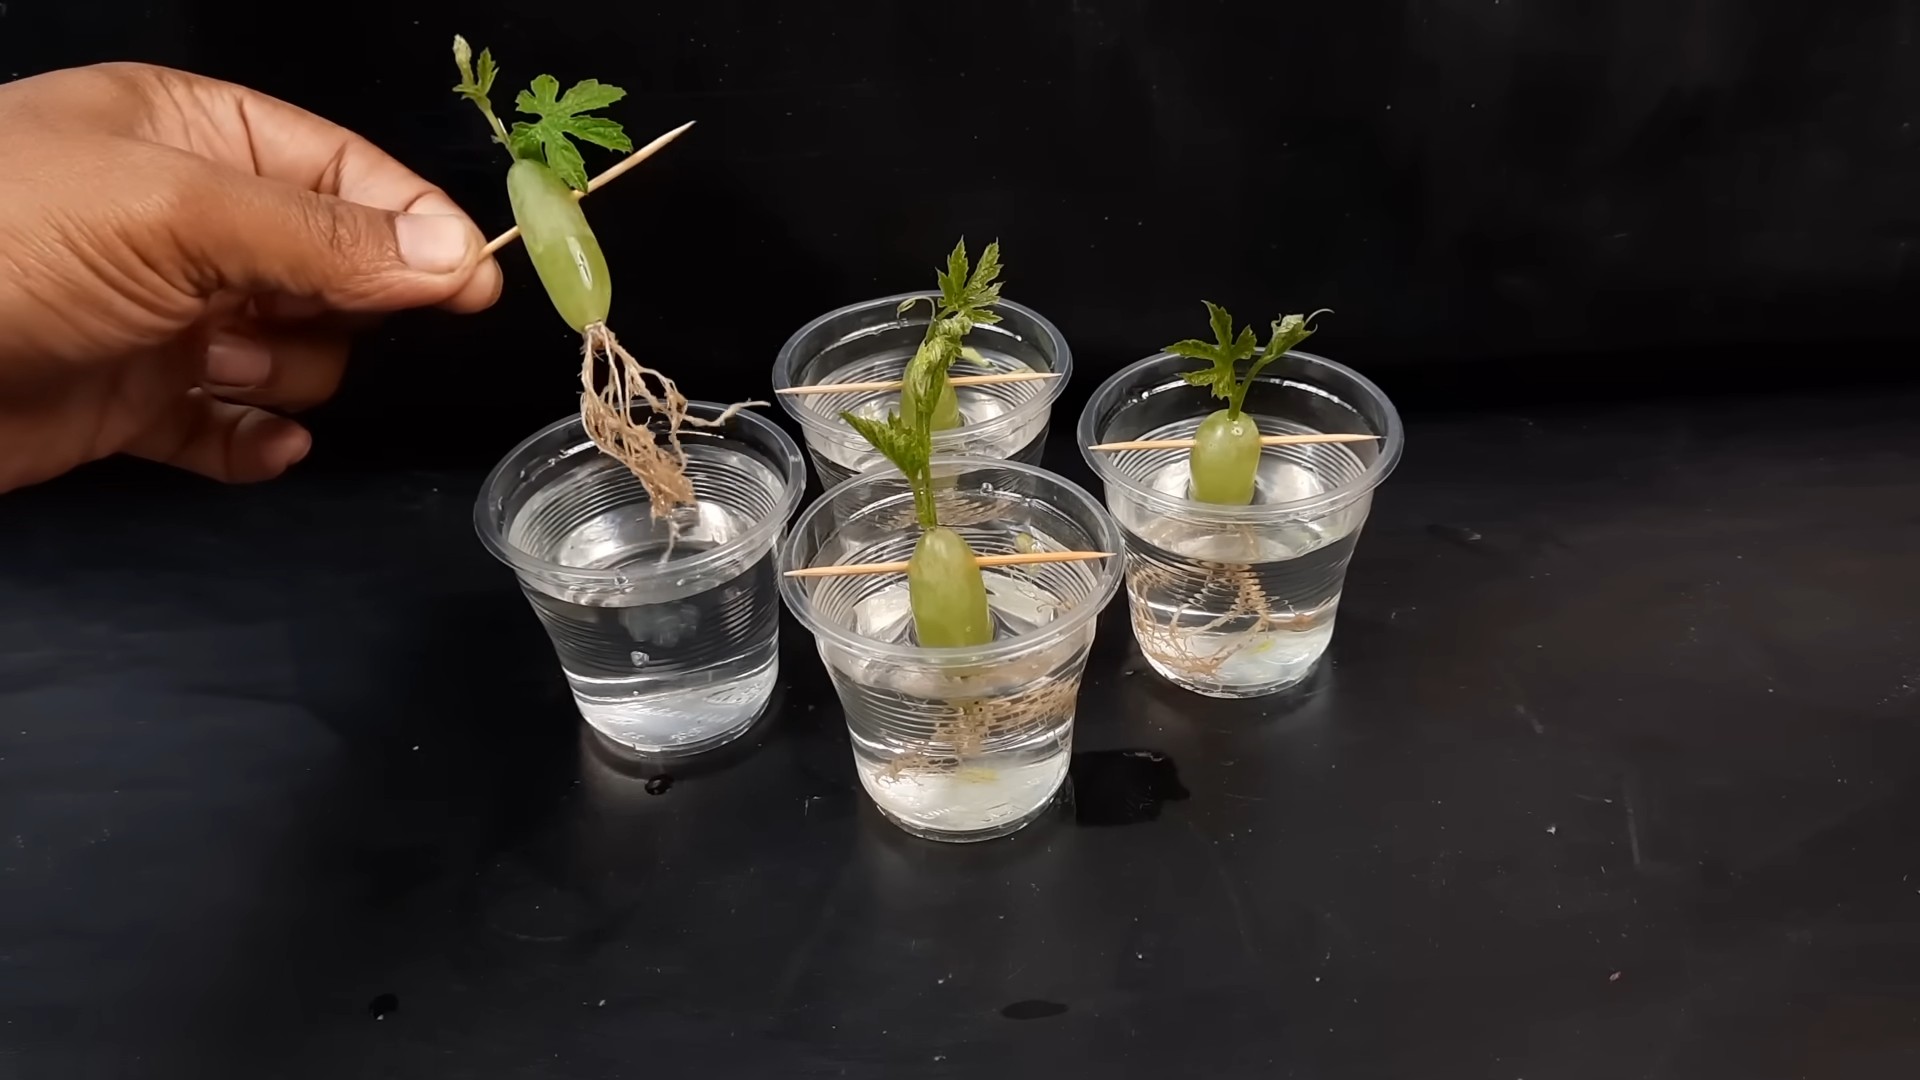
1. Prepare Your Containers: Choose clear glass or plastic containers. I like to use mason jars or recycled plastic bottles. The clear containers allow you to monitor root growth. Make sure they are clean.
2. Water Quality: Use distilled or filtered water. Tap water can contain chlorine and other chemicals that can inhibit root growth.
3. Submerge the Bottom Nodes: Place the cuttings in the containers so that the bottom one or two nodes are submerged in water. The top cut should be above the water line.
4. Light and Location: Place the containers in a bright, indirect light location. Avoid direct sunlight, which can overheat the water and damage the cuttings. A windowsill that receives morning sun is ideal.
5. Water Changes: Change the water every 3-5 days to prevent algae growth and keep the water fresh.
6. Patience is a Virtue: Root development can take several weeks, so be patient. You should start to see small roots emerging from the nodes within 2-4 weeks.
7. Monitor Root Growth: Once the roots are about 1-2 inches long, it’s time to pot them up.
Potting Up Your Rooted Cuttings
This is where your little cuttings transition from water to soil.
1. Prepare Your Pots: Choose small pots (about 4-inch diameter) with drainage holes.
2. Potting Mix: Use a well-draining potting mix. I like to use a mix of equal parts potting soil, perlite, and vermiculite. This provides good drainage and aeration.
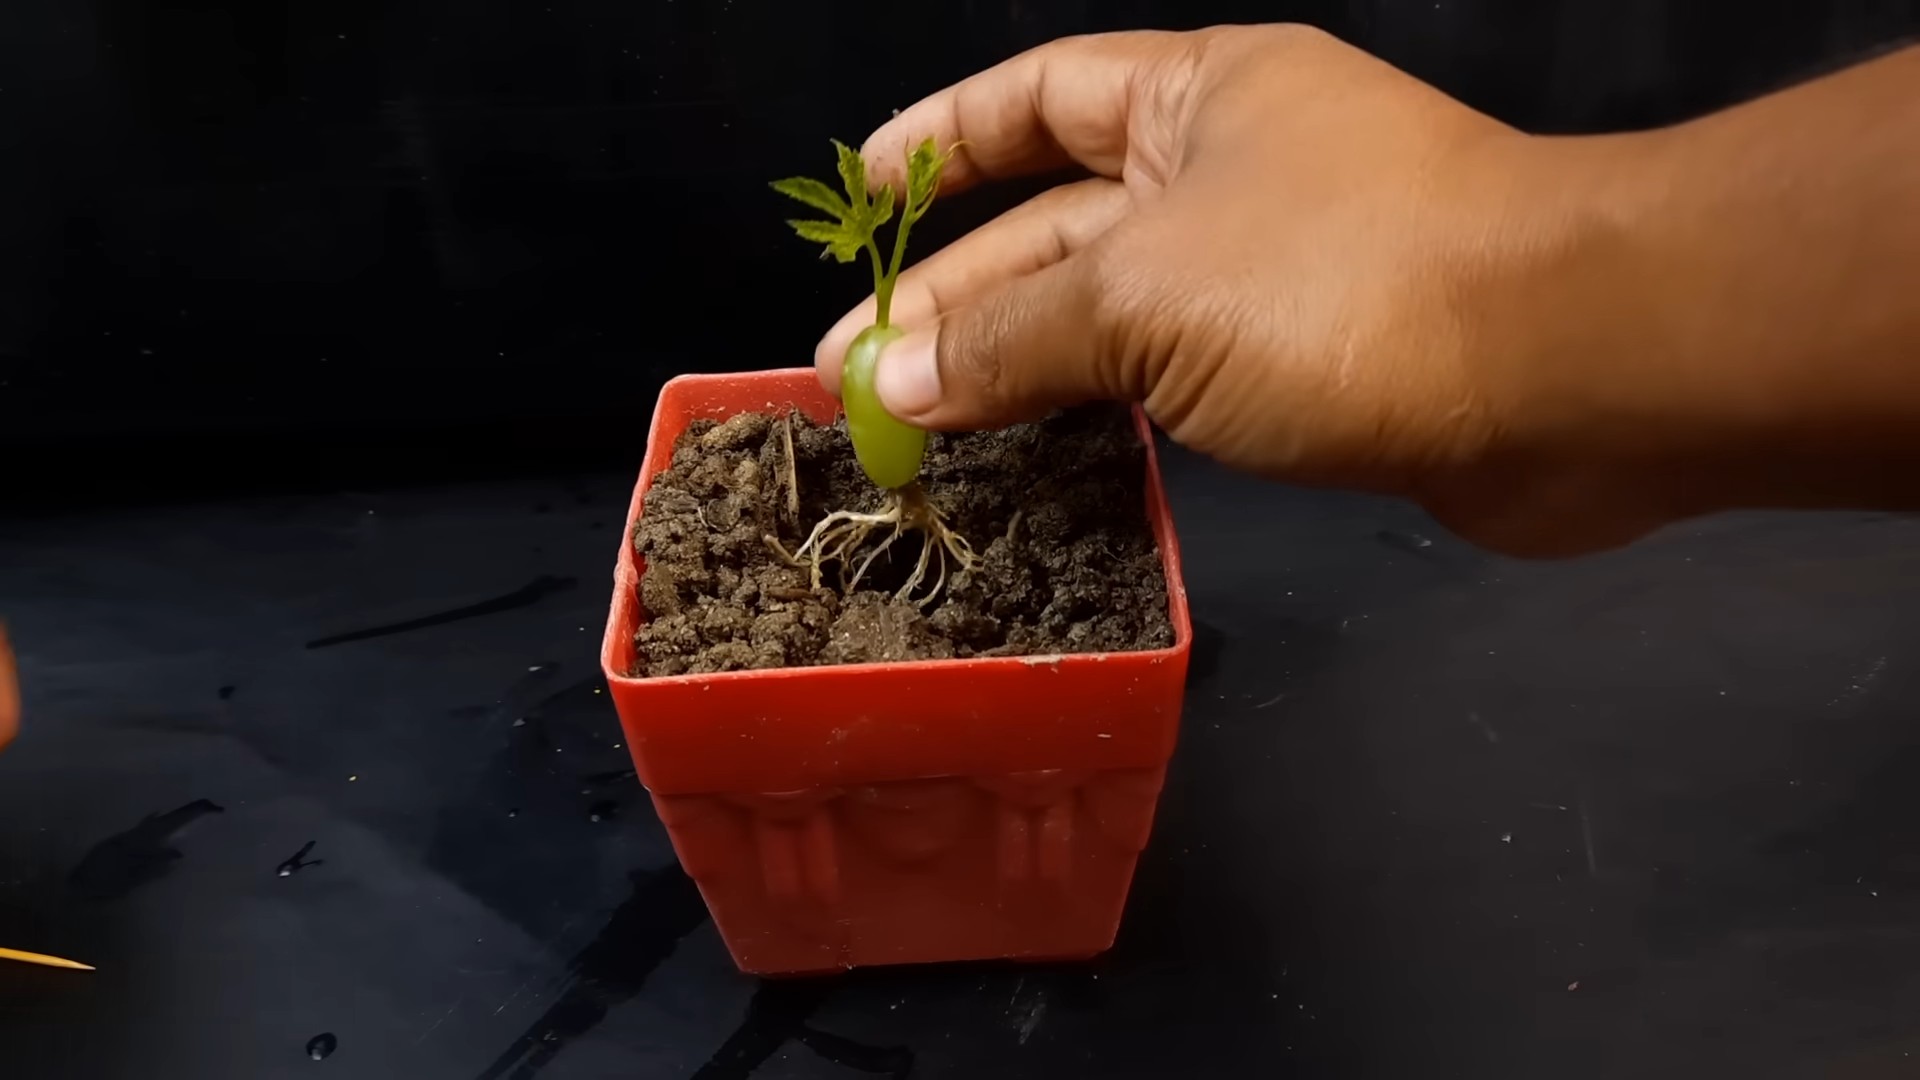
3. Gently Remove the Cuttings: Carefully remove the rooted cuttings from the water containers. Be gentle, as the roots are delicate.
4. Planting Depth: Plant the cuttings in the pots so that the top of the root ball is level with the soil surface.
5. Water Thoroughly: Water the newly potted cuttings thoroughly until water drains out of the drainage holes.
6. Humidity Dome (Optional): To help maintain humidity, you can cover the pots with a clear plastic bag or humidity dome. This will help the cuttings adjust to their new environment. Just make sure to vent the bag or dome occasionally to prevent mold growth.
7. Light and Location: Place the potted cuttings in a bright, indirect light location. Avoid direct sunlight, which can scorch the leaves.
8. Watering Schedule: Keep the soil consistently moist, but not soggy. Water when the top inch of soil feels dry to the touch.
9. Fertilizing: After a few weeks, you can start fertilizing the cuttings with a diluted liquid fertilizer. Follow the instructions on the fertilizer label.
Hardening Off Your Grapevine Seedlings
Before planting your new grapevines outdoors, you need to harden them off. This process gradually acclimates them to outdoor conditions.
1. Gradual Exposure: Start by placing the potted cuttings outdoors in a sheltered location for a few hours each day. Gradually increase the amount of time they spend outdoors over a period of 1-2 weeks.
2. Sunlight Acclimation: Gradually expose the cuttings to more sunlight each day. Start with morning sun and gradually increase the amount of direct sunlight they receive.
3. Wind Protection: Protect the cuttings from strong winds, which can damage the delicate leaves.
4. Temperature Acclimation: Monitor the temperature and bring the cuttings indoors if there is a risk of frost.
5. Watering: Continue to water the cuttings regularly, but avoid overwatering.
Planting Your Grapevine Outdoors
Finally, the moment you’ve been waiting for – planting your new grapevine in its permanent home!
1. Choosing a Location: Grapevines need plenty of sunlight (at least 6-8 hours per day) and well-draining soil. Choose a location that meets these requirements.
2. Soil Preparation: Amend the soil with compost or other organic matter to improve drainage and fertility.
3. Planting Time: The best time to plant grapevines is in the spring after the last frost.
4. Digging the Hole: Dig a hole that is twice as wide as the root ball and just as deep.
5. Planting Depth: Plant the grapevine so that the top of the root ball is level with the soil surface.
6. Backfilling: Backfill the hole with soil, gently firming it around the root ball.
7. Watering: Water the newly planted grapevine thoroughly.
8. Mulching: Apply a layer of mulch around the base of the grapevine to help retain moisture and suppress weeds.
9. Support System: Grapevines need a support system to grow properly. Install a trellis or other support system at the time of planting.
10. Pruning: Prune the grapevine back to one or two buds. This will encourage strong growth in the first year.
Caring for Your New Grapevine
Congratulations! You’ve successfully propagated and planted your own grapevine. Now, here’s how to keep it thriving:
* Watering: Water regularly, especially during dry periods. Grapevines need about 1 inch of water per week.
* Fertilizing: Fertilize in the spring with a balanced fertilizer. Follow the instructions on the fertilizer label.
* Pruning: Prune annually to maintain the shape of the vine and encourage fruit production. Pruning is a whole topic in itself, so do some research on the specific pruning techniques for your grape variety.
* Pest and Disease Control: Monitor your grapevine for pests and diseases. Take action promptly to prevent problems from spreading. There are many organic and conventional pest and disease control options available.
* Weed Control: Keep the area around the grapevine free of weeds. Weeds can compete with the grapevine for water and nutrients.
* Patience: It may take a few years for your grapevine to start producing fruit. Be patient and continue to care for it properly.
Troubleshooting Common Problems
Even with the best care, you might encounter some challenges. Here are a few common problems and how to address them:
* Cuttings Not Rooting: This could be due to several factors, including poor quality cuttings, improper watering, or lack of
Conclusion
So, there you have it! Transforming grapevine cuttings into thriving new plants through water propagation is not just a cost-effective method, it’s a deeply rewarding experience. Forget expensive nursery trips and embrace the satisfaction of nurturing new life from something you already have. This simple yet effective DIY trick unlocks the potential of your existing grapevines, allowing you to expand your vineyard, share the bounty with friends and family, or simply enjoy the beauty of these climbing plants in new corners of your garden.
Why is this a must-try? Because it’s accessible, affordable, and yields impressive results. You don’t need specialized equipment or years of horticultural experience. With just a few basic supplies and a little patience, you can witness the magic of root development firsthand. Plus, water propagation allows you to closely monitor the progress of your cuttings, ensuring they receive the optimal conditions for growth.
But the beauty of this DIY grapevine water propagation method lies in its adaptability. Feel free to experiment with different types of containers. While clear glass jars are ideal for observing root growth, you can also use opaque containers, just be sure to change the water regularly. Consider adding a rooting hormone to the water to further boost root development, although it’s often not necessary. And don’t be afraid to try propagating different varieties of grapevines – each one may have its own unique rooting characteristics.
For those looking to add a touch of elegance, try using decorative glass bottles or vases for your water propagation setup. This not only serves a practical purpose but also adds a touch of botanical charm to your home. You can even create a stunning display by grouping several propagated cuttings together in a larger container.
Remember, success with grapevine water propagation hinges on a few key factors: selecting healthy cuttings, providing clean water, and ensuring adequate light. By following these simple guidelines, you’ll be well on your way to creating a thriving collection of grapevine plants.
We wholeheartedly encourage you to give this DIY trick a try. It’s a fantastic way to connect with nature, learn about plant propagation, and expand your garden without breaking the bank. Once you’ve successfully propagated your grapevine cuttings, we’d love to hear about your experience! Share your photos, tips, and any variations you’ve tried in the comments below. Let’s build a community of grapevine enthusiasts and learn from each other’s successes (and occasional setbacks!). Happy propagating!
Frequently Asked Questions (FAQ)
1. What is the best time of year to propagate grapevines using water propagation?
The ideal time for grapevine water propagation is during the dormant season, typically late winter or early spring, before the buds begin to swell. This is when the grapevine is storing energy and the cuttings are more likely to root successfully. Avoid taking cuttings during the active growing season, as they may be more susceptible to disease and less likely to root.
2. How do I select the best grapevine cuttings for water propagation?
Choose healthy, mature grapevine canes that are about pencil-thick and 12-18 inches long. Look for canes that are free from disease, pests, and damage. The cuttings should have at least 3-4 nodes (the points where leaves or buds emerge). Make a clean cut at a 45-degree angle just below a node at the bottom of the cutting and a straight cut a few inches above a node at the top.
3. What kind of water should I use for grapevine water propagation?
Use clean, filtered water or rainwater for grapevine water propagation. Avoid using tap water that contains high levels of chlorine or other chemicals, as these can inhibit root growth. Change the water every few days to prevent the growth of bacteria and algae.
4. How much light do grapevine cuttings need during water propagation?
Grapevine cuttings need bright, indirect light during water propagation. Avoid placing them in direct sunlight, as this can scorch the cuttings and overheat the water. A location near a window with filtered light is ideal. You can also use a grow light if natural light is limited.
5. How long does it take for grapevine cuttings to root in water?
It typically takes 2-4 weeks for grapevine cuttings to develop roots in water. The exact time will depend on the variety of grapevine, the temperature, and the amount of light. Be patient and continue to change the water regularly. Once the roots are about 1-2 inches long, the cuttings are ready to be planted in soil.
6. Can I use rooting hormone to speed up the rooting process?
Yes, you can use rooting hormone to speed up the rooting process of grapevine cuttings. Dip the bottom of the cutting in rooting hormone powder or liquid before placing it in water. Follow the instructions on the rooting hormone package. While not always necessary, rooting hormone can increase the success rate of water propagation, especially for difficult-to-root varieties.
7. What type of soil should I use when transplanting the rooted grapevine cuttings?
Use a well-draining potting mix when transplanting the rooted grapevine cuttings. A mixture of equal parts potting soil, perlite, and vermiculite is ideal. Avoid using heavy clay soil, as this can suffocate the roots.
8. How do I care for the newly planted grapevine cuttings?
Water the newly planted grapevine cuttings regularly, keeping the soil moist but not waterlogged. Provide them with bright, indirect light. Fertilize them with a balanced fertilizer every few weeks. As the plants grow, gradually acclimate them to outdoor conditions before transplanting them to their permanent location in the garden.
9. What are some common problems I might encounter during grapevine water propagation?
Some common problems you might encounter during grapevine water propagation include:
* **Rotting:** This can be caused by using contaminated water or allowing the cuttings to sit in stagnant water. Change the water regularly and use clean containers.
* **Lack of root development:** This can be caused by insufficient light, cold temperatures, or using unhealthy cuttings. Ensure the cuttings receive adequate light and warmth, and select healthy, mature canes.
* **Algae growth:** This can occur in clear containers exposed to sunlight. Change the water frequently and consider using an opaque container.
10. Can I propagate any type of grapevine using water propagation?
While water propagation can work for many grapevine varieties, some are easier to root than others. Experiment with different varieties to see what works best for you. European grapevines (Vitis vinifera) can be more challenging than American grapevines (Vitis labrusca) or hybrid varieties. Don’t be discouraged if some cuttings don’t root – it’s all part of the learning process.
11. What do I do if mold starts growing on my grapevine cutting?
If you notice mold growing on your grapevine cutting, gently wipe it off with a clean cloth. Change the water immediately and ensure the cutting is not overcrowded in the container. Good air circulation can also help prevent mold growth. If the mold persists, you may need to discard the cutting to prevent it from spreading to other cuttings.
12. How often should I fertilize my water propagated grapevine once it’s planted in soil?
Once your water propagated grapevine is planted in soil, you should fertilize it every 2-3 weeks during the growing season (spring and summer). Use a balanced fertilizer diluted to half strength to avoid burning the delicate roots. Reduce or stop fertilizing during the dormant season (fall and winter).
13. Can I use rainwater collected from my roof for water propagation?
Yes, rainwater is an excellent choice for water propagation as it is naturally soft and free from chemicals often found in tap water. However, ensure that your rainwater collection system is clean and free from contaminants. Avoid using rainwater collected from roofs treated with chemicals or if the water appears discolored.
14. What is the best way to harden off my water propagated grapevine before planting it outdoors?
Hardening off is the process of gradually acclimating your water propagated grapevine to outdoor conditions before planting it permanently. Start by placing the potted grapevine in a sheltered location outdoors for a few hours each day, gradually increasing the amount of time it spends outside over a week or two. Protect it from direct sunlight, strong winds, and extreme temperatures during this process. This will help it adjust to the outdoor environment and prevent transplant shock.

Leave a Comment