

Grow Anemones at Home and unlock a burst of vibrant color in your garden! Have you ever dreamt of transforming your outdoor space into a painter’s palette, filled with jewel-toned blooms that dance in the breeze? Well, you’re in the right place! This DIY guide is your secret weapon to cultivating these captivating flowers, even if you’re a complete beginner.
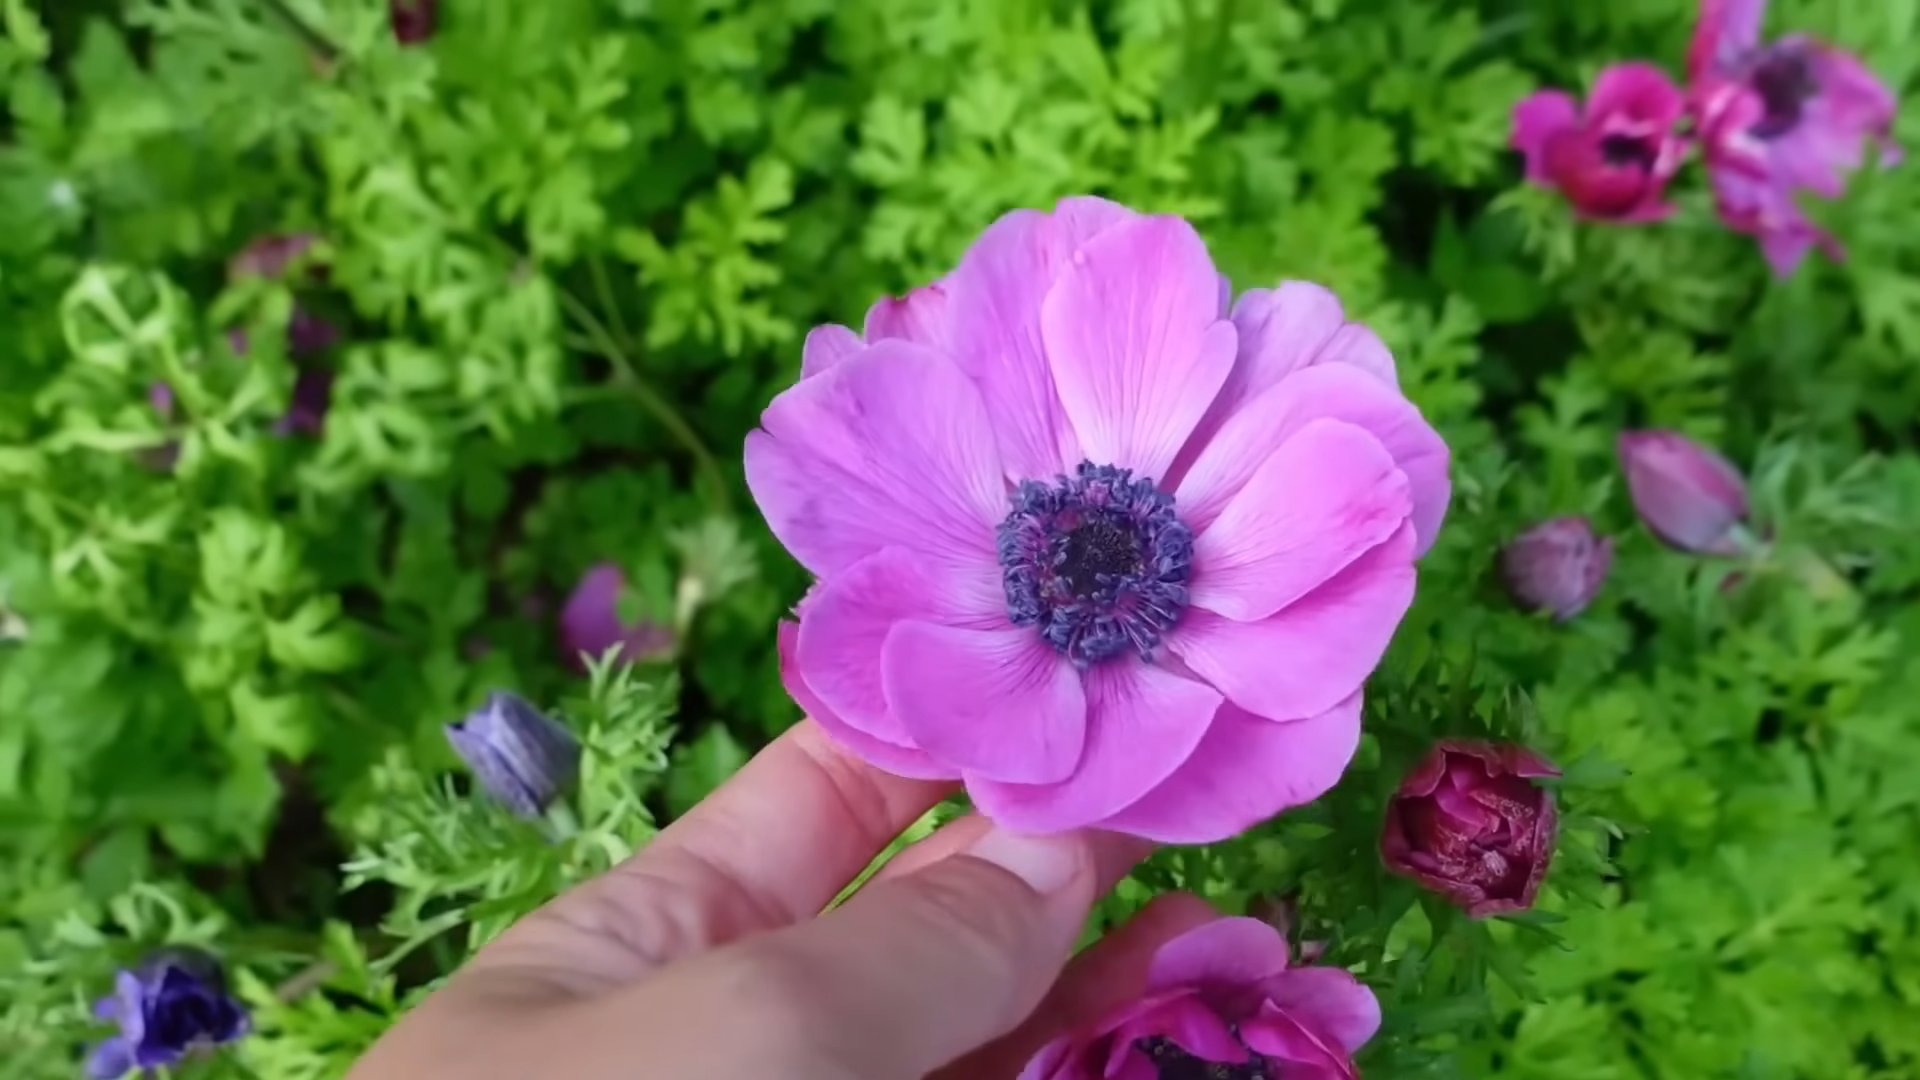
Anemones, with their delicate petals and striking dark centers, have a rich history, often associated with mythology and folklore. In Greek mythology, the anemone sprang from the tears of Aphrodite as she mourned the death of Adonis. For centuries, these blooms have been cherished for their beauty and symbolic meaning, adding a touch of romance and elegance to gardens around the world.
But why should you learn to grow anemones at home? In today’s busy world, creating a tranquil and beautiful outdoor space is more important than ever. Anemones are relatively easy to care for, and their stunning blooms can brighten up any garden, patio, or balcony. Plus, imagine the joy of cutting your own fresh flowers for bouquets, bringing a touch of nature’s beauty indoors. I’m here to show you how to easily add these beauties to your garden!
Growing Anemones at Home: A DIY Guide to Breathtaking Blooms
Anemones, with their vibrant colors and delicate petals, are a true showstopper in any garden or floral arrangement. While they might seem intimidating to grow, trust me, with a little patience and the right know-how, you can cultivate these beauties right in your own home! I’m going to walk you through everything you need to know, from selecting the right corms to nurturing them into stunning blooms.
What You’ll Need
Before we dive in, let’s gather our supplies. This will make the whole process smoother and more enjoyable.
* **Anemone Corms:** These are the bulb-like structures that will grow into your anemone plants. Choose healthy-looking corms from a reputable source. Look for firm corms, avoiding any that are soft, mushy, or show signs of mold.
* **Potting Mix:** A well-draining potting mix is crucial. I recommend a mix specifically formulated for bulbs or a general-purpose mix amended with perlite or sand to improve drainage.
* **Pots or Containers:** Select pots with drainage holes. The size will depend on how many corms you’re planting. A 6-inch pot can typically accommodate 3-5 corms.
* **Watering Can or Hose:** For gentle watering.
* **Shallow Dish or Bowl:** For soaking the corms.
* **Optional: Rooting Hormone:** This can help encourage root development, but it’s not strictly necessary.
* **Optional: Fertilizer:** A balanced liquid fertilizer, diluted to half strength, can be used to feed your anemones once they start growing.
* **Gardening Gloves:** To keep your hands clean.
Preparing the Anemone Corms: The Soaking Process
Anemone corms are notoriously dry and need to be rehydrated before planting. This soaking process is essential for successful germination.
1. **Gather Your Supplies:** Grab your shallow dish or bowl and the anemone corms.
2. **Soak the Corms:** Fill the dish with lukewarm water. Place the anemone corms in the water and let them soak for 2-4 hours. You’ll notice that the corms will plump up as they absorb water. Some people recommend soaking for up to 24 hours, changing the water every 6-8 hours, but I’ve found 2-4 hours to be sufficient.
3. **Observe the Corms:** After soaking, the corms should be noticeably larger and feel heavier. This indicates that they’ve absorbed enough water.
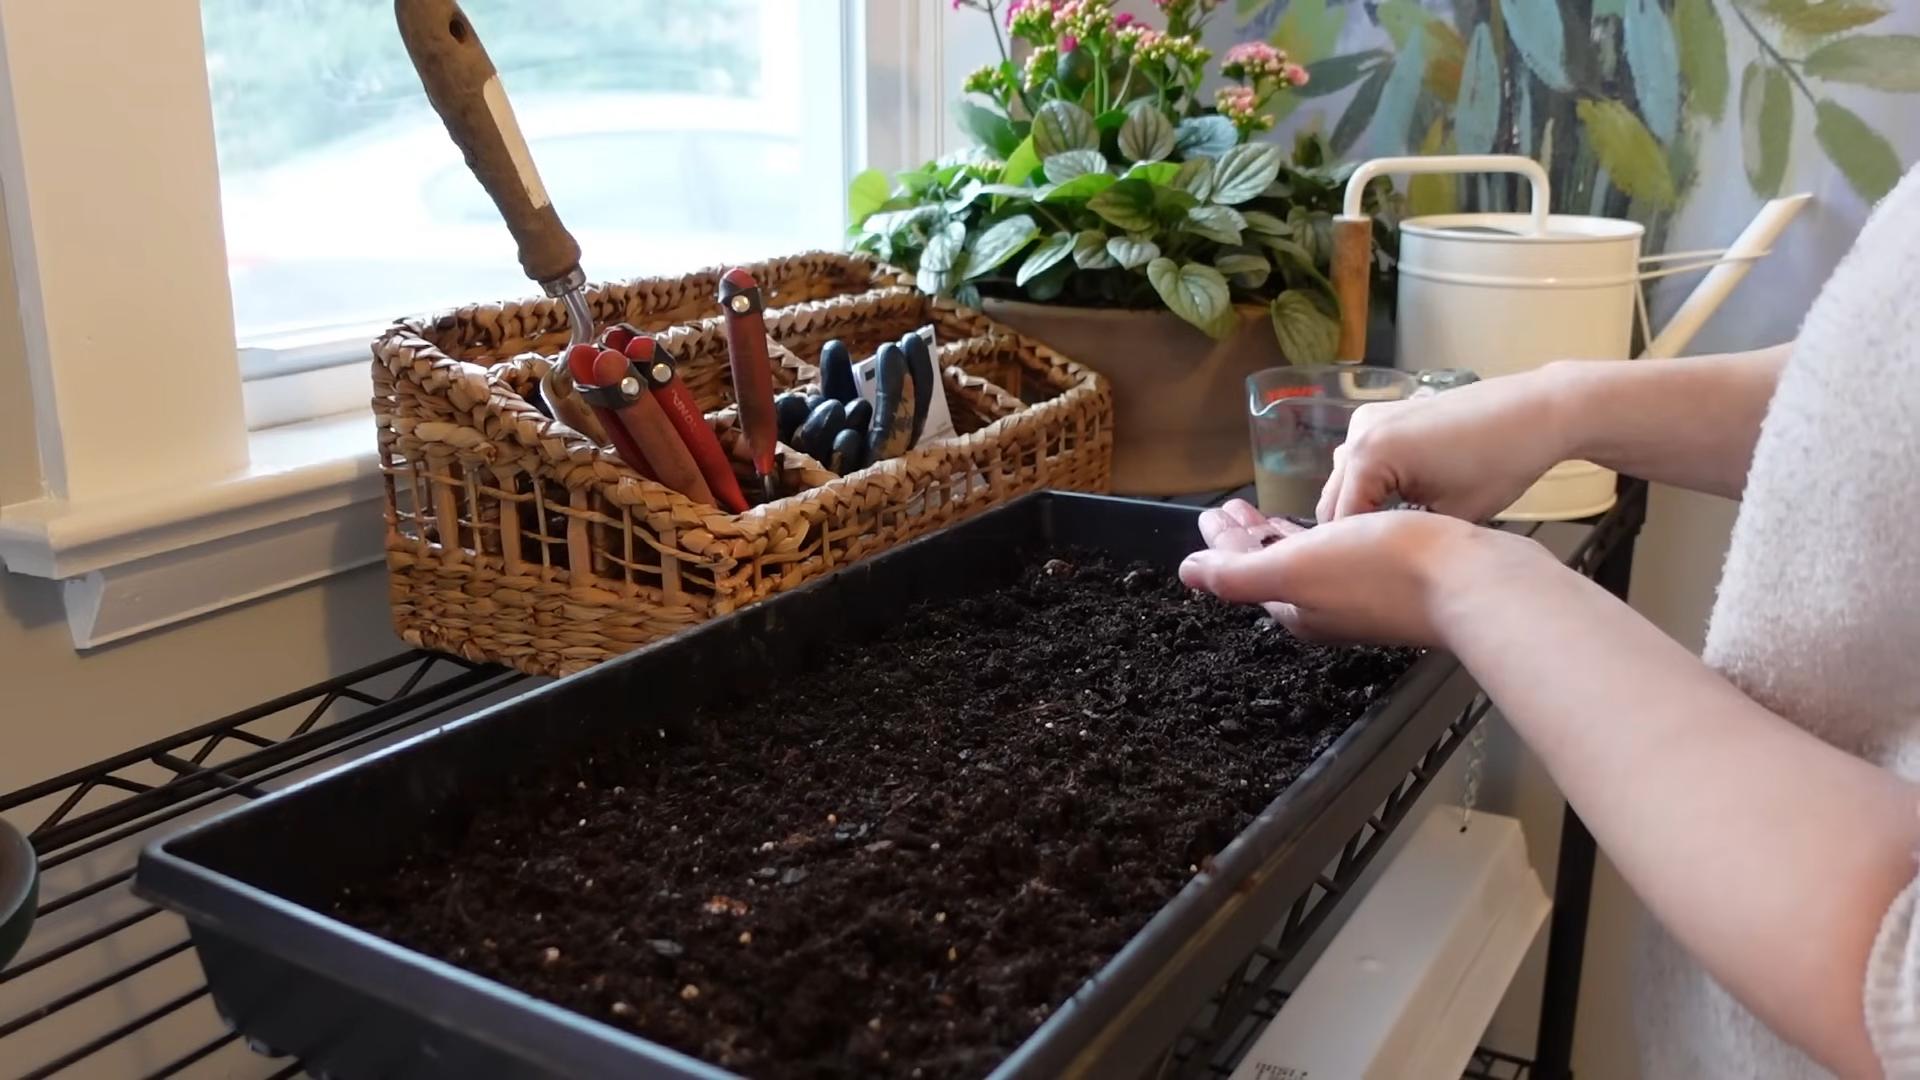
Planting the Anemone Corms: Getting Them Started
Now that our corms are nice and plump, it’s time to get them planted!
1. **Prepare the Pots:** Fill your pots with the well-draining potting mix, leaving about an inch of space at the top.
2. **Plant the Corms:** The tricky part is figuring out which side is up! Anemone corms are often irregularly shaped. Look closely for a slightly pointed end or a small indentation – this is usually the top. Plant the corms with the pointed end facing up, about 1-2 inches deep. If you’re unsure which side is up, don’t worry too much! Plant them on their side. The plant will usually find its way.
3. **Space the Corms:** If you’re planting multiple corms in the same pot, space them about 2-3 inches apart.
4. **Water Gently:** After planting, water the pots gently until the soil is evenly moist. Avoid overwatering, as this can lead to rot.
Caring for Your Anemones: Nurturing Growth
Once planted, your anemones need the right environment to thrive.
1. **Location:** Place the pots in a cool, dark location until sprouts appear. A basement, garage, or even a cool closet works well. This period of darkness helps stimulate root growth.
2. **Watering:** Keep the soil consistently moist, but not soggy. Check the soil moisture regularly by sticking your finger into the soil. If the top inch feels dry, it’s time to water.
3. **Light:** Once sprouts emerge (usually within 2-4 weeks), move the pots to a bright, indirect light location. Avoid direct sunlight, which can scorch the delicate foliage.
4. **Temperature:** Anemones prefer cool temperatures, ideally between 50-65°F (10-18°C). Avoid placing them near heat sources.
5. **Fertilizing (Optional):** Once the plants have established themselves and are actively growing, you can start fertilizing them every 2-4 weeks with a balanced liquid fertilizer diluted to half strength.
6. **Support (Optional):** As the plants grow taller, they may need support to prevent them from flopping over. You can use small stakes or a support ring to keep them upright.
Encouraging Blooms: The Final Push
Getting your anemones to bloom is the ultimate goal! Here’s how to encourage those beautiful flowers.
1. **Consistent Watering:** Continue to water regularly, keeping the soil consistently moist.
2. **Adequate Light:** Ensure your anemones are receiving enough light. If they’re not getting enough natural light, you can supplement with grow lights.
3. **Cool Temperatures:** Maintain cool temperatures to encourage blooming.
4. **Deadheading:** As flowers fade, remove them promptly by cutting the stem just above a leaf node. This will encourage the plant to produce more blooms.
5. **Pest Control:** Keep an eye out for pests such as aphids or spider mites. If you notice any pests, treat them with an appropriate insecticide or insecticidal soap.
Troubleshooting: Common Issues and Solutions
Even with the best care, you might encounter some challenges along the way. Here are some common issues and how to address them.
* **Corms Not Sprouting:** If your corms haven’t sprouted after several weeks, it could be due to several factors:
* **Insufficient Soaking:** Make sure you soaked the corms adequately before planting.
* **Poor Drainage:** The soil may be too wet, causing the corms to rot. Ensure your potting mix is well-draining and that the pots have drainage holes.
* **Incorrect Temperature:** The temperature may be too warm or too cold. Anemones prefer cool temperatures during the sprouting phase.
* **Yellowing Leaves:** Yellowing leaves can be a sign of overwatering, underwatering, or nutrient deficiency.
* **Overwatering:** Allow the soil to dry out slightly between waterings.
* **Underwatering:** Water more frequently, ensuring the soil is consistently moist.
* **Nutrient Deficiency:** Fertilize with a balanced liquid fertilizer.
* **Lack of Blooms:** If your anemones are growing but not blooming, it could be due to:
* **Insufficient Light:** Ensure they are receiving enough light.
* **Warm Temperatures:** Anemones prefer cool temperatures to bloom.
* **Lack of Nutrients:** Fertilize with a balanced liquid fertilizer.
* **Pests:** Aphids and spider mites can infest anemones. Treat them with an appropriate insecticide or insecticidal soap.
Extending the Bloom: Keeping the Show Going
Anemones typically bloom in spring or early summer. To extend the bloom period, you can try succession planting, planting corms at intervals of a few weeks. This will ensure a continuous supply of flowers.
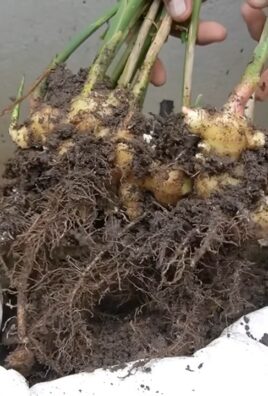
Storing Corms: Preparing for Next Year
Once the foliage has died back after blooming, you can dig up the corms and store them for the next growing season.
1. **Dig Up the Corms:** Carefully dig up the corms, being careful not to damage them.
2. **Clean the Corms:** Remove any soil or debris from the corms.
3. **Dry the Corms:** Allow the corms to dry completely in a cool, dry place for several days.
4. **Store the Corms:** Store the dried corms in a paper bag or cardboard box in a cool, dry, and dark location.
5. **Replant Next Season:** Replant the corms in the fall for blooms the following spring.
Growing anemones at home can be incredibly rewarding. With a little care and attention, you can enjoy these stunning flowers for years to come. Don’t be discouraged if you don’t succeed the first time. Gardening is all about learning and experimenting. So, get your hands dirty, have fun, and enjoy the beauty of your own homegrown anemones!
Conclusion
So, there you have it! Growing anemones at home, while it might seem daunting at first, is entirely achievable with a little patience, the right knowledge, and a dash of dedication. This DIY trick isn’t just about saving money; it’s about connecting with nature on a deeper level, witnessing the miracle of life unfold before your eyes, and adding a unique, personal touch to your aquarium. Forget the sterile, mass-produced anemones from the store – imagine the pride you’ll feel knowing you nurtured these vibrant creatures from their earliest stages.
But why is this DIY approach a must-try? Beyond the cost savings and the personal satisfaction, it offers unparalleled control over the anemone’s environment. You can meticulously manage water parameters, lighting, and feeding, ensuring optimal conditions for growth and health. This level of care is often difficult to replicate when purchasing anemones that have already been through the stresses of transportation and acclimation. You’re essentially giving your anemones the best possible start in life, increasing their chances of thriving in your reef tank.
And the possibilities don’t end there! Once you’ve mastered the basics, you can experiment with different anemone varieties, each boasting its own unique colors and patterns. Consider trying different lighting spectrums to enhance their coloration, or explore various feeding techniques to optimize their growth rates. You could even try propagating your anemones once they’ve matured, expanding your collection and sharing the joy with fellow reef enthusiasts. Think about the vibrant tapestry of colors and textures you could create in your aquarium, all thanks to your own efforts!
Furthermore, growing anemones at home allows you to observe their behavior up close, gaining a deeper understanding of their symbiotic relationship with clownfish and other reef inhabitants. This firsthand experience is invaluable for any serious reef keeper, providing insights that simply can’t be gleaned from books or online articles. You’ll become a true expert on anemone care, capable of troubleshooting any issues that may arise and ensuring the long-term health and well-being of your aquatic ecosystem.
We strongly encourage you to give this DIY trick a try. Don’t be intimidated by the perceived complexity – break it down into manageable steps, follow our guidelines carefully, and remember that patience is key. The rewards are well worth the effort. And most importantly, we want to hear about your experiences! Share your successes, your challenges, and your tips with us in the comments below. Let’s build a community of DIY anemone growers, supporting each other and sharing our knowledge to create thriving reef tanks around the world. Your journey into the world of home-grown anemones starts now! Let us know how your **grow anemones at home** journey goes!
Frequently Asked Questions (FAQ)
What type of anemone is easiest to grow at home?
The Bubble Tip Anemone (Entacmaea quadricolor) is generally considered the easiest anemone for beginners to grow at home. They are relatively hardy, adaptable to a range of water parameters, and readily host clownfish. They also tend to be more forgiving of minor fluctuations in water quality compared to other anemone species. However, it’s crucial to research the specific needs of any anemone you choose to ensure you can provide the appropriate environment.
What are the ideal water parameters for growing anemones?
Maintaining stable and optimal water parameters is crucial for anemone health. Here’s a general guideline:
* **Temperature:** 76-82°F (24-28°C)
* **Salinity:** 1.024-1.026 specific gravity
* **pH:** 8.1-8.4
* **Ammonia:** 0 ppm
* **Nitrite:** 0 ppm
* **Nitrate:** Less than 10 ppm (ideally closer to 0 ppm)
* **Calcium:** 400-450 ppm
* **Alkalinity:** 8-11 dKH
* **Magnesium:** 1250-1350 ppm
Regular testing and adjustments are essential to maintain these parameters within the recommended ranges.
What kind of lighting do anemones need?
Anemones require moderate to high-intensity lighting to thrive. They rely on symbiotic algae called zooxanthellae within their tissues for energy production through photosynthesis. The specific lighting requirements will vary depending on the anemone species. Metal halide, LED, and T5 fluorescent lighting are all suitable options. It’s important to acclimate anemones slowly to new lighting to prevent bleaching. Start with lower intensity and gradually increase it over several weeks.
How often should I feed my anemone?
Anemones can obtain some nutrients from photosynthesis, but supplemental feeding is still necessary for optimal growth and health. You can feed them small pieces of meaty foods, such as mysis shrimp, brine shrimp, or chopped seafood, 1-2 times per week. Observe your anemone’s feeding response and adjust the frequency and amount of food accordingly.
How do I know if my anemone is healthy?
A healthy anemone will have vibrant colors, inflated tentacles, and a strong attachment to the substrate. It will also readily accept food. Signs of an unhealthy anemone include:
* **Bleaching:** Loss of color due to expulsion of zooxanthellae.
* **Shrinking:** Reduction in size and tentacle inflation.
* **Detachment:** Inability to stay attached to the substrate.
* **Mouth gaping:** The mouth remains open and does not close properly.
* **Sliming:** Excessive mucus production.
If you observe any of these signs, it’s important to investigate the cause and take corrective action.
What should I do if my anemone starts to move around the tank?
Anemones may move around the tank in search of a more suitable location with better lighting or flow. While some movement is normal, excessive or frequent movement can be a sign of stress. Ensure that your water parameters are stable and that the anemone is receiving adequate lighting and flow. If the anemone is stinging other corals, you may need to relocate it to a more isolated area.
Can I keep different types of anemones together in the same tank?
It’s generally not recommended to keep different types of anemones together in the same tank, as they can be territorial and may sting each other. Some anemones are more aggressive than others, and the weaker anemone may be outcompeted or even killed. If you do choose to keep multiple anemones, provide them with ample space and ensure that they are compatible species.
What fish are compatible with anemones?
Clownfish are the most well-known and popular fish to keep with anemones. They form a symbiotic relationship with anemones, providing them with protection and food scraps in exchange for shelter. However, not all clownfish species will host all anemone species. Research the specific compatibility of clownfish and anemone species before introducing them to your tank. Other fish that may be compatible with anemones include some species of damsels and gobies.
How do I prevent my anemone from stinging other corals?
Anemones can sting other corals with their nematocysts (stinging cells). To prevent this, provide ample space between the anemone and other corals. You can also use barriers, such as rocks or frag plugs, to create physical separation. Regularly monitor the anemone’s location and adjust its placement if necessary.
What if my anemone gets sucked into a powerhead or pump?
This is a common concern for reef tank owners. To prevent this, use powerhead guards or sponges to cover the intakes of your powerheads and pumps. If an anemone does get sucked into a powerhead, immediately turn off the powerhead and gently remove the anemone. Observe the anemone closely for signs of damage and provide supportive care, such as maintaining pristine water quality and feeding it small pieces of food.


Leave a Comment