

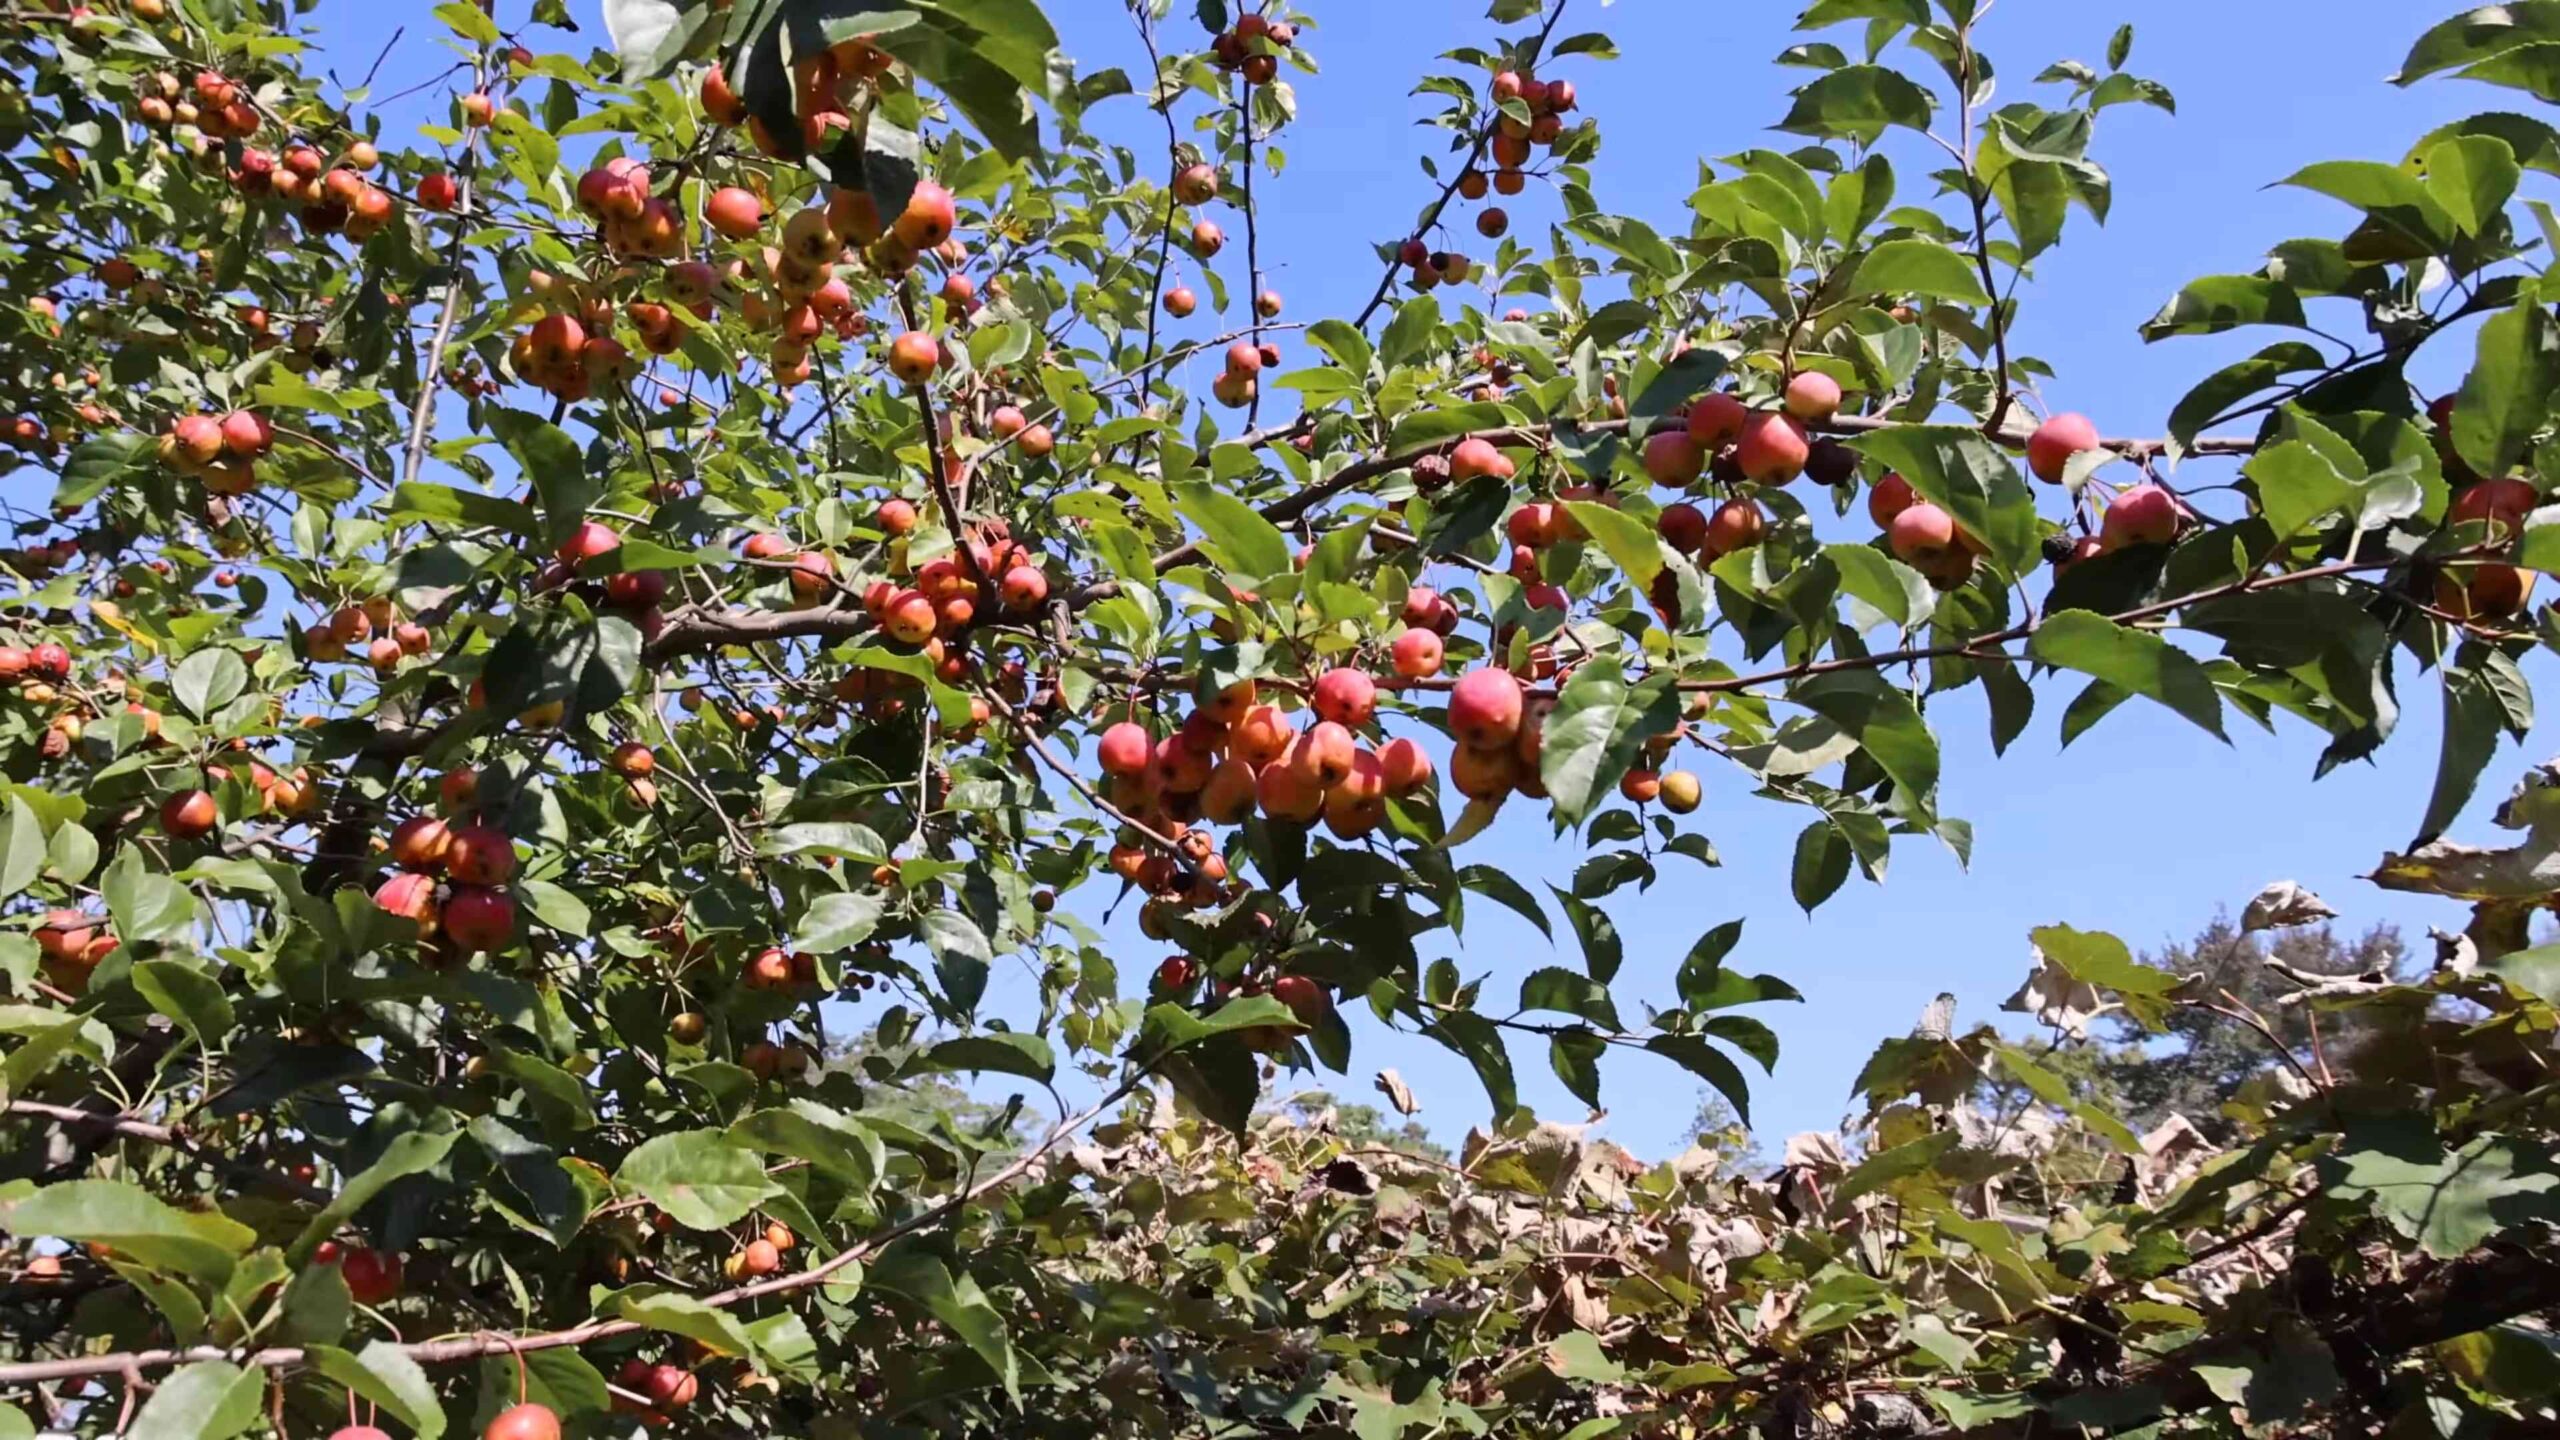
Grow apple tree from seed? Sounds like a fairytale, right? Like something out of a childhood storybook where anything is possible with a little bit of magic. Well, I’m here to tell you that while it might not be *exactly* magic, growing your own apple tree from a seed is absolutely achievable, and I’m going to show you how!
For centuries, the apple tree has held a special place in cultures around the world, symbolizing knowledge, abundance, and even immortality. From the Garden of Eden to Johnny Appleseed, the apple’s story is deeply woven into the fabric of human history. But beyond the symbolism, there’s a primal satisfaction in nurturing something from its very beginning.
Why should you embark on this DIY adventure? Because in a world of mass-produced everything, there’s something incredibly rewarding about creating something yourself, from scratch. Plus, knowing you nurtured an apple tree from a tiny seed to a fruit-bearing marvel is an accomplishment you can be proud of. This guide will provide you with the essential steps and tips to successfully grow apple tree from seed, even if you’re a complete beginner. So, grab your gardening gloves, and let’s get started on this exciting journey!

Growing Apple Trees From Seed: A Patient Gardener’s Guide
Okay, so you want to grow an apple tree from seed? That’s fantastic! It’s a rewarding, albeit lengthy, process. Be warned: you won’t get the exact same apple as the one you took the seeds from. Apple trees are rarely true-to-seed, meaning the offspring will be a unique variety. Think of it as creating your own apple cultivar! It might be amazing, it might be… well, let’s just say interesting. But hey, that’s part of the fun!
Here’s a comprehensive guide to help you navigate the journey from seed to (eventual) apple tree.
Understanding the Basics
Before we dive in, let’s cover some crucial points:
* Patience is Key: Growing an apple tree from seed takes time. Expect several years before you see any fruit.
* Not True-to-Seed: As mentioned, the apple you get won’t be identical to the parent apple. Cross-pollination is the reason.
* Rootstock Considerations: Apple trees are often grafted onto rootstock to control size and disease resistance. Growing from seed bypasses this, so your tree’s size and vigor will be determined by its genetics.
* Chill Hours: Apple trees need a certain number of “chill hours” (hours below 45°F) to properly set fruit. Make sure the variety you’re starting from is suitable for your climate.
* Pollination: Most apple trees need a different variety nearby for pollination. Keep this in mind when your tree starts to mature.
Phase 1: Seed Extraction and Preparation
This is where we get our hands dirty!
1. Choose Your Apple: Select a ripe, healthy apple from a tree you like. Organic apples are preferable, as they’re less likely to be treated with chemicals that could inhibit germination. I usually pick a few different apples to increase my chances of success.
2. Extract the Seeds: Cut the apple open and carefully remove the seeds. Look for plump, brown seeds. Flat, white, or shriveled seeds are unlikely to germinate. I usually aim for at least 10 seeds per apple.
3. Clean the Seeds: Rinse the seeds thoroughly under running water to remove any pulp or sugary residue. This helps prevent mold growth during stratification. I gently rub them between my fingers to make sure they’re clean.
4. Dry the Seeds (Slightly): Spread the cleaned seeds on a paper towel and let them air dry for a few hours. You don’t want them completely dry, just surface dry. This helps prevent them from clumping together during stratification.
Phase 2: Stratification (Cold Treatment)
Apple seeds need a period of cold, moist stratification to break dormancy. This mimics winter conditions and tells the seed it’s time to sprout.
1. Prepare Your Stratification Medium: You can use several mediums, including:
* Moist Paper Towels: This is a simple and effective method.
* Moist Peat Moss: Provides good moisture retention.
* Moist Vermiculite: Also provides good moisture retention and aeration.
I personally prefer using slightly moistened peat moss.
2. Moisten the Medium: Whichever medium you choose, make sure it’s moist but not soaking wet. You should be able to squeeze it and only get a few drops of water.
3. Place Seeds in Medium: Place the seeds in the moist medium, making sure they’re not touching each other. If using paper towels, place the seeds between two layers of moist paper towel. If using peat moss or vermiculite, mix the seeds in.
4. Seal in a Bag or Container: Place the seeds and medium in a resealable plastic bag or airtight container. Label the bag with the date and apple variety (if known).
5. Refrigerate: Place the bag or container in the refrigerator. The ideal temperature is between 35°F and 45°F (2°C and 7°C).
6. Monitor Moisture: Check the seeds every few weeks to make sure the medium is still moist. If it’s drying out, lightly mist it with water. Also, check for any signs of mold. If you see mold, remove the affected seeds and replace the medium.
7. Stratification Period: Apple seeds typically need 60-90 days of stratification. I usually aim for 90 days to be on the safe side.
Phase 3: Germination and Initial Growth
After stratification, it’s time to wake up those seeds!
1. Prepare Your Planting Containers: Use small pots or seedling trays filled with a well-draining potting mix. I like to use a mix of peat moss, perlite, and vermiculite.
2. Plant the Seeds: Plant the stratified seeds about 1/2 inch deep in the potting mix.
3. Water Gently: Water the soil gently to moisten it. Avoid overwatering, as this can lead to rot.
4. Provide Warmth and Light: Place the pots in a warm location with bright, indirect light. A sunny windowsill or under grow lights works well.
5. Maintain Moisture: Keep the soil consistently moist, but not soggy.
6. Germination Time: Germination can take anywhere from a few days to a few weeks. Be patient!
7. Thin Seedlings (If Necessary): If you planted multiple seeds in one pot and they all germinate, thin them out to the strongest seedling.
Phase 4: Transplanting and Continued Care
Once your seedlings have developed a few sets of true leaves, it’s time to transplant them into larger pots.
1. Transplant to Larger Pots: Gently remove the seedlings from their small pots and transplant them into larger pots (at least 4 inches in diameter) filled with a well-draining potting mix.
2. Water Regularly: Water the seedlings regularly, allowing the soil to dry out slightly between waterings.
3. Fertilize Lightly: Fertilize the seedlings every few weeks with a diluted liquid fertilizer. I use a balanced fertilizer (e.g., 10-10-10) diluted to half strength.
4. Provide Adequate Light: Ensure the seedlings receive plenty of bright, indirect light.
5. Harden Off: Before planting the seedlings outdoors, you’ll need to “harden them off.” This involves gradually exposing them to outdoor conditions over a period of a week or two. Start by placing them in a sheltered location for a few hours each day, gradually increasing the amount of time they spend outdoors.
6. Choose a Planting Location: Select a sunny location with well-draining soil for your apple tree. Apple trees need at least 6-8 hours of sunlight per day.
7. Planting Outdoors: Dig a hole that’s twice as wide as the root ball and just as deep. Gently remove the seedling from its pot and place it in the hole. Backfill with soil and water thoroughly.
8. Protect from Pests and Diseases: Keep an eye out for pests and diseases. Common apple tree pests include aphids, codling moths, and apple scab. Take appropriate measures to control them.
9. Pruning: Prune your apple tree regularly to maintain its shape and promote fruit production.
10. Be Patient: Remember that it can take several years for an apple tree grown from seed to produce fruit.
Important Considerations for Long-Term Success
* Soil Testing: Before planting, it’s a good idea to test your soil to determine its pH and nutrient levels. Apple trees prefer a slightly acidic soil (pH 6.0-7.0). Amend the soil as needed based on the test results.
* Watering: Apple trees need consistent watering, especially during dry periods. Water deeply and infrequently, rather than shallowly and frequently.
* Fertilizing: Fertilize your apple tree in the spring with a balanced fertilizer. Avoid over-fertilizing, as this can lead to excessive vegetative growth and reduced fruit production.
* Mulching: Apply a layer of mulch around the base of the tree to help retain moisture, suppress weeds, and regulate soil temperature.
* Pollination: Most apple trees require cross-pollination from another variety to produce fruit. Plant a different variety of apple tree nearby to ensure pollination. Crabapples can also be used as pollinators.
* Grafting (Optional): If you want to ensure that your tree produces a specific variety of apple, you can graft a scion (a cutting from a known variety) onto your seedling’s rootstock. This is a more advanced technique, but it can be worth considering.
* Winter Protection: In cold climates, protect your young apple tree from winter damage by wrapping the trunk with burlap or tree wrap.
Growing an apple tree from seed is
Conclusion
So, there you have it! Growing an apple tree from seed might seem like a long game, and it is, but the rewards are immeasurable. It’s a journey of patience, a testament to the power of nature, and an opportunity to cultivate something truly unique. This DIY trick isn’t just about getting a fruit-bearing tree; it’s about connecting with the earth, understanding the life cycle of a plant, and experiencing the satisfaction of nurturing something from its very beginning.
Why is this a must-try? Because you’re not just buying a tree; you’re creating one. You’re selecting the genetics, controlling the environment, and witnessing the miracle of life unfold before your eyes. Plus, you might just end up with an apple variety that’s unlike anything you’ve ever tasted! Imagine the bragging rights when you can say, “These are my apples, grown from seed!”
Don’t be afraid to experiment! Once you’ve mastered the basic technique, consider variations. Try different apple varieties to see which ones thrive in your climate. Grafting a known variety onto your seedling rootstock can significantly shorten the time to fruiting and ensure you get the desired apple type. You could even try cross-pollinating different apple blossoms to create your own hybrid variety – who knows, you might discover the next Honeycrisp!
Remember, success in growing an apple tree from seed requires patience and attention to detail. It’s not a guaranteed process, but the journey is well worth the effort. The key is to provide the right conditions for germination, nurture the seedling through its early stages, and protect it from pests and diseases.
We wholeheartedly encourage you to give this DIY trick a try. It’s a rewarding experience that will deepen your appreciation for nature and provide you with delicious, homegrown apples for years to come. And most importantly, share your experience with us! We’d love to hear about your successes, your challenges, and any tips or tricks you discover along the way. Post pictures of your seedlings, tell us about the apple varieties you’re trying, and let’s create a community of apple-growing enthusiasts! Let us know if this **grow apple tree from seed** guide helped you!
Frequently Asked Questions (FAQ)
Q: How long does it take to grow an apple tree from seed?
A: This is the million-dollar question! Growing an apple tree from seed to fruit-bearing maturity typically takes anywhere from 7 to 10 years, sometimes even longer. This is significantly longer than buying a grafted tree, which can produce fruit in 3-5 years. The reason for the longer timeframe is that seedlings need to mature before they are capable of producing flowers and fruit. Grafting bypasses this maturation period by using a mature scion (the fruiting part) on a rootstock. However, the unique experience and potential for creating a new variety make growing from seed worthwhile for many gardeners.
Q: What kind of apple seeds should I use?
A: You can use seeds from almost any apple variety you enjoy eating. However, keep in mind that apple trees grown from seed will not produce apples identical to the parent fruit. This is because apples are hybrids, meaning they are the result of cross-pollination between two different apple varieties. The seeds will contain a mix of genetic material from both parents, resulting in a unique apple. For best results, use seeds from organically grown apples to avoid any potential chemical treatments. Also, consider using seeds from apples that are known to be disease-resistant in your area.
Q: How do I prepare the apple seeds for planting?
A: Apple seeds require a period of cold stratification to break their dormancy. This mimics the natural winter conditions that they would experience in the wild. To stratify your apple seeds, follow these steps:
1. Collect the seeds from a ripe apple.
2. Rinse the seeds thoroughly to remove any pulp.
3. Place the seeds in a damp paper towel or a small container filled with moist (not wet) peat moss or vermiculite.
4. Seal the paper towel or container in a plastic bag and store it in the refrigerator (not the freezer) for 60-90 days. The ideal temperature is between 33°F and 41°F (0.5°C and 5°C).
5. Check the seeds periodically to ensure the paper towel or peat moss remains moist. If it dries out, add a little water.
Q: When is the best time to plant apple seeds?
A: The best time to plant apple seeds is in the spring, after the cold stratification period. Once the seeds have been stratified for 60-90 days, you can plant them directly in the ground or in pots. If planting in pots, use a well-draining potting mix and plant the seeds about 1/2 inch deep. Keep the soil moist but not waterlogged. If planting directly in the ground, choose a sunny location with well-drained soil.
Q: What kind of soil do apple trees need?
A: Apple trees thrive in well-drained, loamy soil with a slightly acidic pH (between 6.0 and 7.0). Before planting, amend the soil with compost or other organic matter to improve drainage and fertility. Avoid planting in heavy clay soil, as this can lead to root rot. If you have clay soil, consider planting your apple tree in a raised bed or container.
Q: How much sunlight do apple trees need?
A: Apple trees need at least 6-8 hours of direct sunlight per day to produce fruit. Choose a planting location that receives plenty of sunlight throughout the day. If you live in a hot climate, some afternoon shade may be beneficial to prevent sunburn.
Q: How often should I water my apple seedling?
A: Water your apple seedling regularly, especially during dry periods. Keep the soil consistently moist but not waterlogged. Water deeply and less frequently, rather than shallowly and more often. As the tree matures, it will become more drought-tolerant.
Q: Do I need to fertilize my apple seedling?
A: Yes, fertilizing your apple seedling can help it grow and thrive. Use a balanced fertilizer specifically formulated for fruit trees. Follow the instructions on the fertilizer label for application rates and timing. Avoid over-fertilizing, as this can damage the roots.
Q: How do I protect my apple seedling from pests and diseases?
A: Apple trees are susceptible to a variety of pests and diseases. To protect your seedling, monitor it regularly for signs of infestation or disease. Common pests include aphids, codling moths, and apple scab. Common diseases include apple scab, powdery mildew, and fire blight. Use organic pest control methods whenever possible. Prune your tree regularly to improve air circulation and reduce the risk of disease.
Q: Can I grow an apple tree from seed in a container?
A: Yes, you can grow an apple tree from seed in a container, at least for the first few years. Choose a large container with drainage holes and use a well-draining potting mix. As the tree grows, you may need to transplant it to a larger container or eventually plant it in the ground. Container-grown apple trees require more frequent watering and fertilization than trees planted in the ground.
Q: Will my apple tree grown from seed produce good apples?
A: The quality of the apples produced by your tree will depend on the genetics of the seeds and the growing conditions. As mentioned earlier, apple trees grown from seed will not produce apples identical to the parent fruit. The apples may be smaller, larger, sweeter, tarter, or have a different color or texture. However, with proper care and attention, you can increase your chances of growing a tree that produces delicious apples. Grafting a known variety onto your seedling rootstock is the best way to ensure you get the desired apple type.
Q: What if my apple seed doesn’t germinate?
A: Not all apple seeds will germinate. If your seed doesn’t germinate after a reasonable amount of time (e.g., a few weeks), don’t be discouraged. Try planting more seeds to increase your chances of success. Make sure you’ve followed the cold stratification process correctly and that the soil is kept moist but not waterlogged.
Q: Is growing an apple tree from seed worth the effort?
A: Absolutely! While it requires patience and dedication, growing an apple tree from seed is a rewarding experience that connects you with nature and allows you to create something truly unique. Even if the apples aren’t perfect, the satisfaction of growing your own tree from seed is well worth the effort. Plus, you’ll have a beautiful tree that provides shade, beauty, and potentially delicious fruit for years to come.

Leave a Comment