

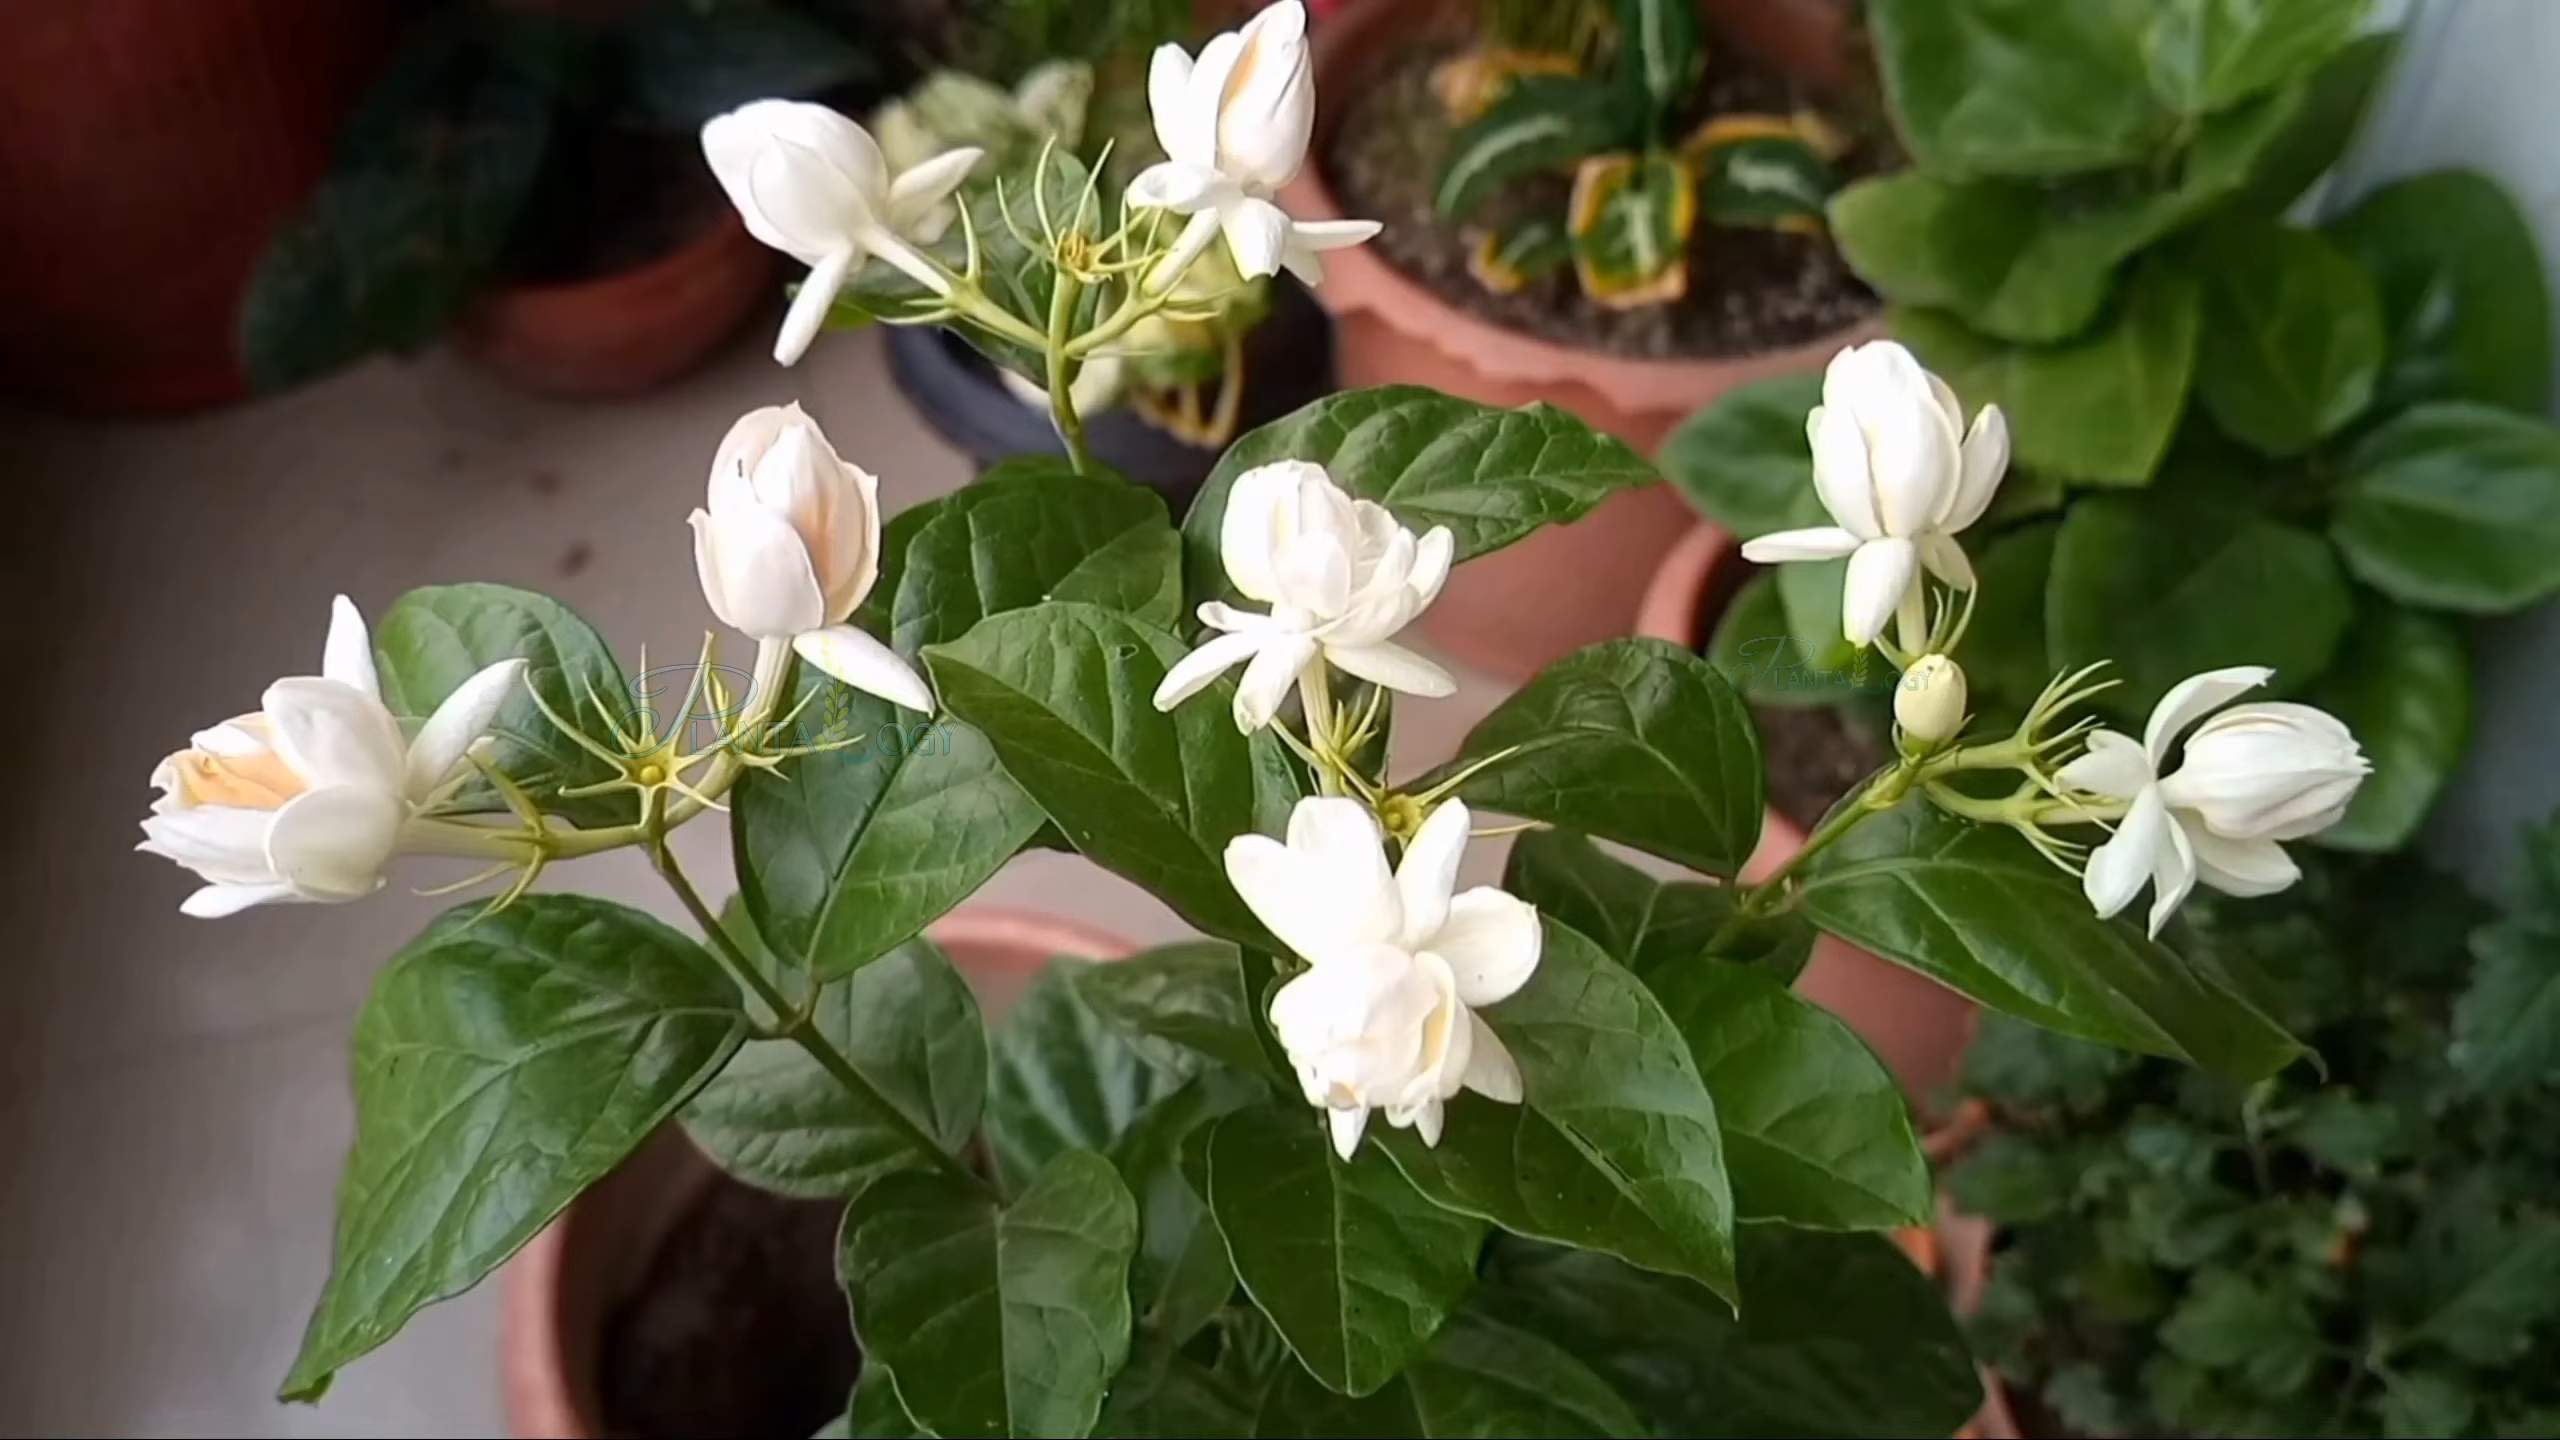
Grow Arabian Jasmine, and transform your home into a fragrant oasis! Have you ever dreamed of stepping into your garden and being greeted by the intoxicating scent of jasmine? It’s a truly magical experience, and I’m here to tell you that it’s easier than you think to bring that magic to your own backyard (or balcony!).
Jasmine, with its delicate white blossoms and captivating aroma, has been cherished for centuries. In many cultures, it symbolizes love, beauty, and purity. From ancient perfumes to traditional teas, jasmine has woven its way into the fabric of human history. Imagine bringing that rich heritage into your own home!
But beyond its romantic appeal, learning how to grow Arabian Jasmine offers practical benefits too. Store-bought air fresheners are often filled with harsh chemicals, but with your own jasmine plant, you can enjoy a natural, mood-boosting fragrance. Plus, gardening is a fantastic way to relieve stress and connect with nature. This DIY guide will provide you with simple, step-by-step instructions and clever hacks to ensure your jasmine thrives, even if you don’t have a green thumb. I’ll share my tried-and-true secrets for optimal growth, abundant blooms, and a garden that smells absolutely divine. Let’s get started!
Propagating Arabian Jasmine from Cuttings: A DIY Guide
Hey there, fellow plant lovers! Ever been captivated by the intoxicating fragrance of Arabian Jasmine (Jasminum sambac)? I know I have! And guess what? You don’t have to rely solely on nurseries to bring this fragrant beauty into your life. You can easily propagate it yourself from cuttings! It’s a rewarding and cost-effective way to expand your jasmine collection or share the joy with friends. Let me walk you through the process, step-by-step.
Choosing the Right Cuttings
Before we dive into the nitty-gritty, let’s talk about selecting the best cuttings. This is crucial for success!
* Timing is Key: The best time to take cuttings is during the active growing season, typically in spring or early summer. This is when the plant is full of energy and ready to root.
* Look for Healthy Stems: Choose stems that are healthy, vigorous, and free from any signs of disease or pests. Avoid stems that are too woody or too soft and flimsy.
* Semi-Hardwood Cuttings: Aim for semi-hardwood cuttings. These are stems that have started to mature but are not yet fully hardened. They should be flexible but not too bendy.
* Length Matters: Cuttings should be about 4-6 inches long. This provides enough stem for rooting and leaf development.
* Node Power: Make sure your cutting has at least 2-3 nodes (the points where leaves emerge). Roots will typically develop from these nodes.
Gathering Your Supplies
Alright, now that we know what to look for in a cutting, let’s gather our supplies. Here’s what you’ll need:
* Sharp, Clean Pruning Shears or Knife: A sharp tool is essential for making clean cuts, which helps prevent disease and promotes rooting. Make sure it’s sterilized with rubbing alcohol to avoid introducing any pathogens.
* Rooting Hormone (Optional but Recommended): Rooting hormone contains auxins, which stimulate root development. It’s not absolutely necessary, but it significantly increases your chances of success. I personally swear by it!
* Potting Mix: Use a well-draining potting mix. A mix of perlite, vermiculite, and peat moss works well. You can also use a commercial seed-starting mix. Avoid using garden soil, as it can be too heavy and may contain pathogens.
* Small Pots or Containers: Choose pots that are about 3-4 inches in diameter. Make sure they have drainage holes to prevent waterlogging.
* Clear Plastic Bag or Humidity Dome: This will help create a humid environment, which is essential for rooting.
* Spray Bottle: For misting the cuttings.
* Water: Preferably distilled or filtered water.
* Labels: To keep track of your cuttings.
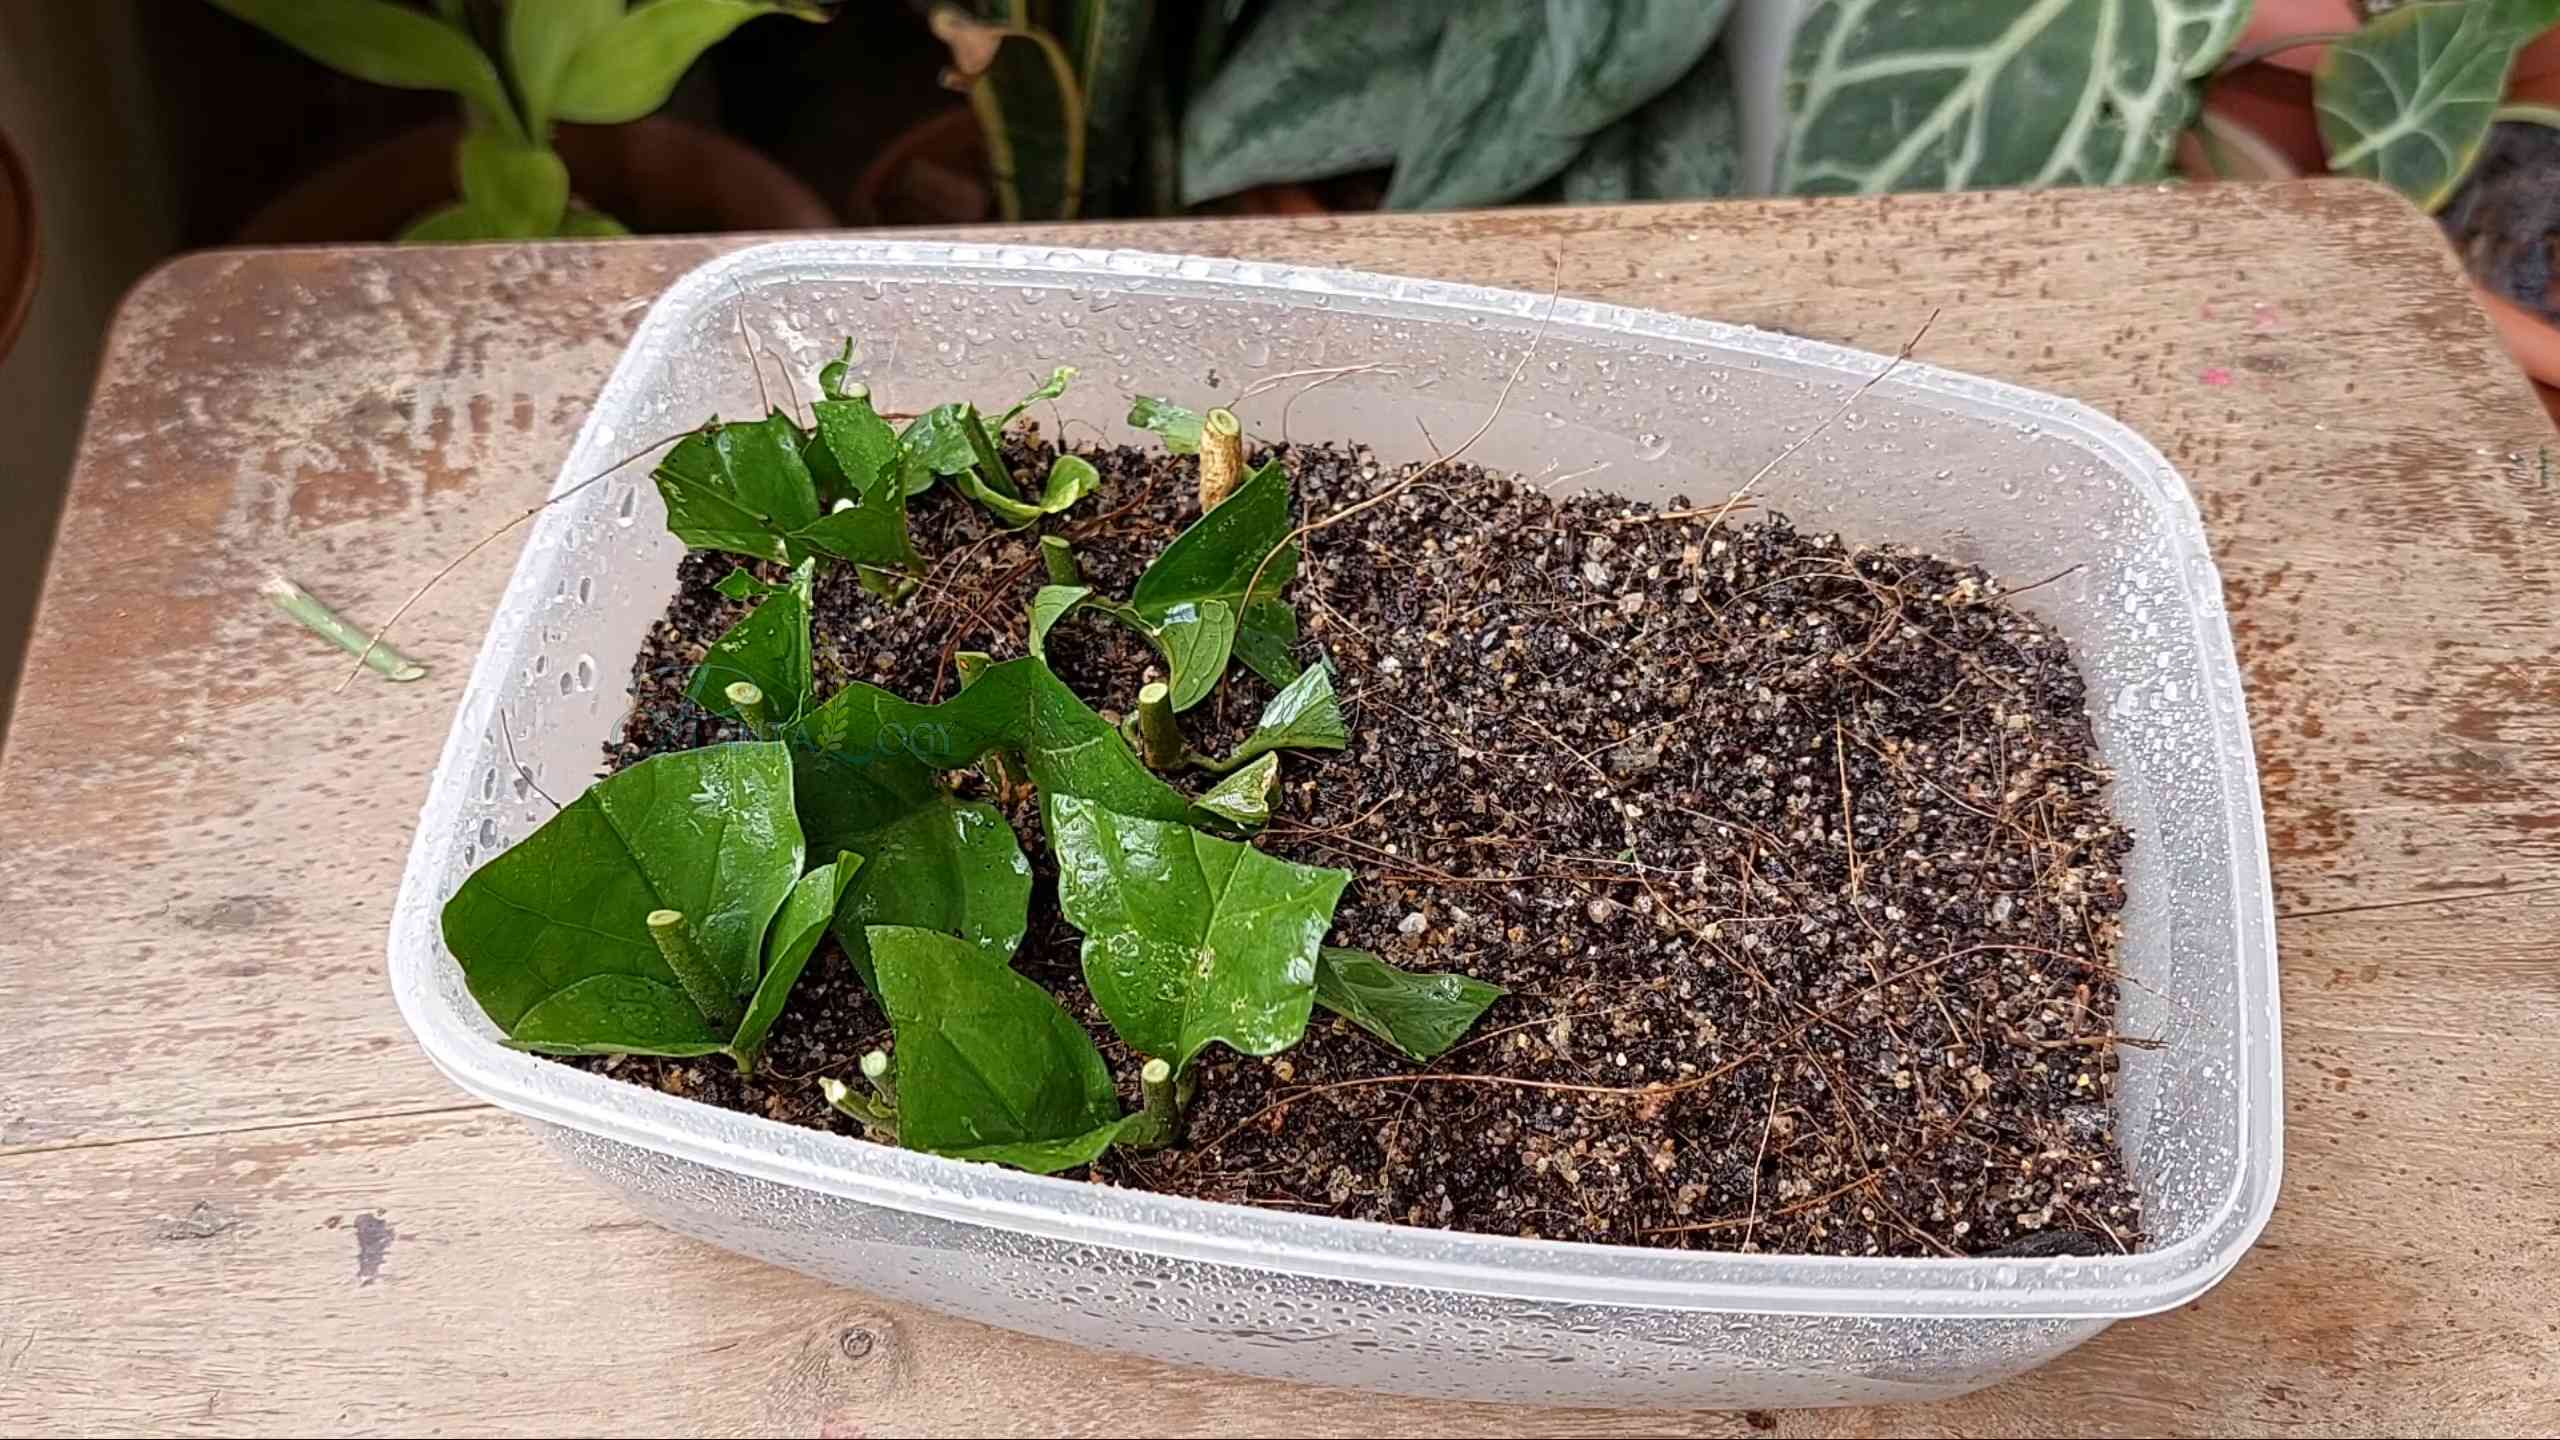
Taking the Cuttings: Step-by-Step
Okay, let’s get our hands dirty! Here’s how to take the cuttings:
1. Prepare Your Tools: Sterilize your pruning shears or knife with rubbing alcohol. This is a crucial step to prevent the spread of disease.
2. Select a Stem: Choose a healthy, semi-hardwood stem that meets the criteria we discussed earlier.
3. Make the Cut: Make a clean, angled cut just below a node. An angled cut increases the surface area for root development.
4. Remove Lower Leaves: Remove the leaves from the bottom 1-2 inches of the cutting. This prevents the leaves from rotting and also encourages the plant to focus its energy on root development.
5. Apply Rooting Hormone (Optional): If you’re using rooting hormone, dip the cut end of the stem into the hormone powder or solution. Tap off any excess.
6. Prepare the Potting Mix: Moisten the potting mix with water. It should be damp but not soggy.
7. Plant the Cutting: Make a hole in the potting mix with your finger or a pencil. Insert the cutting into the hole, making sure that at least one node is buried in the soil. Gently firm the soil around the cutting.
8. Water the Cutting: Water the cutting gently to settle the soil.
9. Create a Humid Environment: Place the pot inside a clear plastic bag or under a humidity dome. This will help maintain high humidity levels, which are essential for rooting.
10. Label the Cutting: Label the pot with the date and the type of plant. This will help you keep track of your cuttings.
Caring for Your Cuttings
Now that you’ve planted your cuttings, it’s time to provide them with the care they need to root and grow.
* Location, Location, Location: Place the cuttings in a warm, bright location, but avoid direct sunlight. Direct sunlight can scorch the leaves and dry out the cuttings. An east-facing window is ideal.
* Maintain Humidity: Keep the humidity high by misting the cuttings regularly with water. If you’re using a plastic bag or humidity dome, open it occasionally to allow for air circulation and prevent the growth of mold.
* Watering: Keep the potting mix consistently moist, but not soggy. Water when the top inch of soil feels dry to the touch.
* Patience is a Virtue: Rooting can take several weeks, so be patient. Don’t be tempted to pull the cuttings out of the soil to check for roots. This can disturb the rooting process.
* Signs of Rooting: After a few weeks, you should start to see signs of new growth, such as new leaves or shoots. This is a good indication that the cuttings have rooted. You can also gently tug on the cutting. If it resists, it has likely rooted.
Transplanting Your Rooted Cuttings
Once your cuttings have developed a healthy root system, it’s time to transplant them into larger pots.
1. Choose a Larger Pot: Select a pot that is a few inches larger in diameter than the current pot.
2. Prepare the Potting Mix: Use a well-draining potting mix, similar to what you used for rooting.
3. Gently Remove the Cutting: Carefully remove the rooted cutting from its current pot. Be gentle to avoid damaging the roots.
4. Plant the Cutting: Place the cutting in the center of the new pot and fill in around it with potting mix. Gently firm the soil around the cutting.
5. Water the Cutting: Water the cutting thoroughly to settle the soil.
6. Provide Ongoing Care: Continue to provide the same care as you did for the cuttings, including regular watering, fertilization, and pruning.
Ongoing Care for Your Arabian Jasmine
Now that your Arabian Jasmine is thriving, here’s how to keep it happy and healthy:
* Sunlight: Arabian Jasmine loves sunlight! Aim for at least 6 hours of direct sunlight per day. If you’re growing it indoors, place it near a sunny window.
* Watering: Water regularly, especially during the growing season. Allow the top inch of soil to dry out between waterings. Avoid overwatering, as this can lead to root rot.
* Fertilizing: Fertilize regularly during the growing season with a balanced fertilizer. Follow the instructions on the fertilizer label.
* Pruning: Prune your Arabian Jasmine regularly to encourage bushier growth and more blooms. Prune after flowering to remove spent blooms and shape the plant.
* Temperature: Arabian Jasmine prefers warm temperatures, between 60-80°F (15-27°C).
* Humidity: Arabian Jasmine appreciates high humidity. If you live in a dry climate, you can increase the humidity by misting the plant regularly or placing it on a pebble tray filled with water.
* Pest Control: Keep an eye out for pests, such as aphids, spider mites, and mealybugs. Treat any infestations promptly with insecticidal soap or neem oil.
Troubleshooting
Sometimes, things don’t go as planned. Here are some common problems you might encounter when propagating Arabian Jasmine and how to fix them:
* Cuttings Not Rooting: This could be due to several factors, such as poor cutting selection, insufficient humidity, or lack of rooting hormone. Make sure you’re using healthy cuttings, providing adequate humidity, and using rooting hormone.
* Cuttings Rotting: This is usually caused by overwatering or poor drainage. Make sure the potting mix is well-draining and avoid overwatering.
* Leaves Turning Yellow: This could be due to overwatering, underwatering, or nutrient deficiencies. Check the soil moisture and adjust your watering accordingly. Fertilize regularly during the growing season.
* Pests: Keep an eye out for pests and treat any infestations promptly.
Enjoy Your Fragrant Jasmine!
And there you have it! Propagating Arabian Jasmine
Conclusion
So, there you have it! Cultivating the intoxicating fragrance and delicate beauty of Arabian Jasmine, right in your own home, is not only achievable but incredibly rewarding. This DIY approach to growing Arabian Jasmine offers a level of control and personalization you simply can’t get from purchasing pre-grown plants. You’re actively participating in the plant’s life cycle, nurturing it from the ground up, and witnessing its transformation firsthand.
Why is this DIY trick a must-try? Because it empowers you to create a thriving, fragrant oasis, tailored to your specific environment and preferences. Forget relying on nurseries that may not understand the unique needs of your space. With this method, you become the expert, adapting your care routine to ensure your Arabian Jasmine flourishes. Plus, there’s an undeniable satisfaction in knowing you nurtured this beautiful plant from a cutting or seedling to a blooming masterpiece.
But the journey doesn’t end with the basic method. Feel free to experiment! Consider using different types of potting mixes to see which one your Arabian Jasmine responds to best. Some gardeners swear by a mix of coco coir, perlite, and compost, while others prefer a more traditional soil-based blend. You can also explore different training techniques, such as using a trellis to encourage vertical growth or pruning to shape the plant into a desired form.
For those seeking even more control, consider propagating your own Arabian Jasmine cuttings. This allows you to expand your fragrant collection and share the joy with friends and family. It’s a simple process that involves taking stem cuttings from a healthy plant, rooting them in water or a rooting medium, and then transplanting them into pots.
And don’t forget about the power of fertilizer! Experiment with different types of fertilizers to find the one that best promotes blooming. A balanced fertilizer with a slightly higher phosphorus content can encourage abundant flower production. Just be sure to follow the instructions on the fertilizer label and avoid over-fertilizing, which can damage your plant.
Ultimately, the key to success with growing Arabian Jasmine is observation and adaptation. Pay close attention to your plant’s needs, and adjust your care routine accordingly. If the leaves are yellowing, it may be a sign of overwatering or nutrient deficiency. If the plant isn’t blooming, it may need more sunlight or fertilizer.
We wholeheartedly encourage you to embark on this fragrant adventure. The rewards are well worth the effort. Imagine stepping into your home and being greeted by the sweet, intoxicating scent of Arabian Jasmine. It’s a truly magical experience.
So, grab your supplies, follow our guide, and get ready to experience the joy of growing your own Arabian Jasmine. And most importantly, don’t forget to share your experiences with us! We’d love to hear about your successes, your challenges, and any tips or tricks you’ve discovered along the way. Share your photos and stories on social media using #DIYArabianJasmine and let’s create a community of passionate Jasmine growers! Let’s all enjoy the beauty and fragrance of home-grown Arabian Jasmine.
Frequently Asked Questions (FAQ)
Q: How much sunlight does Arabian Jasmine need?
A: Arabian Jasmine thrives in bright, indirect sunlight. Aim for at least 6 hours of sunlight per day. If you’re growing it indoors, place it near a sunny window, preferably one that faces south or west. If you don’t have enough natural light, you can supplement with a grow light. However, be careful not to expose the plant to direct sunlight for extended periods, as this can scorch the leaves.
Q: What kind of soil is best for Arabian Jasmine?
A: Arabian Jasmine prefers well-draining soil that is rich in organic matter. A good potting mix for Arabian Jasmine would be a blend of peat moss, perlite, and vermiculite. You can also add some compost or aged manure to improve drainage and fertility. Avoid using heavy clay soils, as they can retain too much moisture and lead to root rot.
Q: How often should I water my Arabian Jasmine?
A: Water your Arabian Jasmine regularly, especially during the growing season (spring and summer). Allow the top inch of soil to dry out before watering again. When you water, water thoroughly until water drains out of the bottom of the pot. Avoid overwatering, as this can lead to root rot. During the dormant season (fall and winter), reduce watering frequency.
Q: How do I encourage my Arabian Jasmine to bloom?
A: To encourage blooming, make sure your Arabian Jasmine is getting enough sunlight, water, and fertilizer. Use a fertilizer that is high in phosphorus, which promotes flower production. You can also prune your plant after it has finished blooming to encourage new growth and more flowers. Deadheading spent blooms will also encourage the plant to produce more flowers.
Q: What are some common pests and diseases that affect Arabian Jasmine?
A: Arabian Jasmine can be susceptible to pests such as aphids, spider mites, and mealybugs. These pests can suck the sap from the leaves and stems, causing them to yellow and wilt. To control these pests, you can spray your plant with insecticidal soap or neem oil. Arabian Jasmine can also be susceptible to diseases such as root rot and fungal leaf spots. To prevent these diseases, make sure your plant is planted in well-draining soil and avoid overwatering.
Q: Can I grow Arabian Jasmine outdoors?
A: Yes, you can grow Arabian Jasmine outdoors in warm climates. It is hardy in USDA zones 9-11. If you live in a colder climate, you can grow it in a pot and bring it indoors during the winter. When growing Arabian Jasmine outdoors, choose a location that is sheltered from strong winds and gets plenty of sunlight.
Q: How do I propagate Arabian Jasmine?
A: Arabian Jasmine can be propagated by stem cuttings. Take stem cuttings from a healthy plant in the spring or summer. The cuttings should be about 4-6 inches long and have several leaves. Remove the lower leaves and dip the cut end in rooting hormone. Plant the cuttings in a pot filled with well-draining potting mix. Keep the soil moist and place the pot in a warm, humid location. The cuttings should root in about 4-6 weeks.
Q: Is Arabian Jasmine fragrant?
A: Yes, Arabian Jasmine is known for its incredibly strong and sweet fragrance, especially at night. The fragrance is often described as intoxicating and is used in perfumes and aromatherapy. The intensity of the fragrance can vary depending on the variety of Arabian Jasmine and the growing conditions.
Q: How do I prune Arabian Jasmine?
A: Prune your Arabian Jasmine after it has finished blooming. Remove any dead, damaged, or diseased branches. You can also prune to shape the plant and encourage new growth. When pruning, use sharp, clean pruning shears. Avoid pruning too heavily, as this can reduce flowering.
Q: What if my Arabian Jasmine leaves are turning yellow?
A: Yellowing leaves on Arabian Jasmine can indicate several issues. Overwatering is a common cause, leading to root rot. Ensure the soil drains well and allow it to dry slightly between waterings. Nutrient deficiencies, particularly nitrogen, can also cause yellowing. Fertilize with a balanced fertilizer according to package directions. Pests like spider mites can also cause yellowing; inspect the plant carefully and treat accordingly. Finally, insufficient sunlight can also contribute to yellowing leaves. Ensure your plant receives adequate bright, indirect light.

Leave a Comment