

Grow Bitter Gourd Easily, even if you think you don’t have a green thumb! Have you ever dreamt of harvesting your own vibrant, knobbly bitter gourds right from your backyard? It might sound intimidating, but trust me, it’s more achievable than you think. For centuries, bitter gourd, also known as karela, has been a staple in Asian cuisine and traditional medicine, revered for its unique flavor and impressive health benefits. From stir-fries to juices, this versatile vegetable has earned its place in our kitchens and gardens.
But let’s be honest, growing bitter gourd can sometimes feel like a battle. The seeds can be finicky, the vines need support, and pests seem to love it as much as we do (well, almost!). That’s why I’ve compiled this ultimate guide to help you grow bitter gourd easily, with simple DIY tricks and hacks that will transform your gardening experience. Whether you’re a seasoned gardener or just starting out, these tips will empower you to cultivate a thriving bitter gourd patch, bursting with fresh, homegrown goodness. Say goodbye to expensive store-bought gourds and hello to a bountiful harvest right at your fingertips! Let’s get started!
“`html
Grow Bitter Gourd Like a Pro: My Foolproof DIY Guide
Hey there, fellow gardening enthusiasts! I’m so excited to share my tried-and-true method for growing bitter gourd (also known as bitter melon or karela) right in your own backyard. Trust me, even if you think you have a “brown thumb,” you can totally nail this. I’ve broken down the process into easy-to-follow steps, so let’s get started!
Choosing the Right Variety and Starting Seeds
First things first, you need to pick the right bitter gourd variety for your climate and growing space. There are several types, varying in size, shape, and bitterness. Some popular choices include:
- Long Green: A classic variety, known for its long, slender fruits.
- White Bitter Gourd: Milder in flavor compared to the green varieties.
- Chinese Bitter Gourd: Often shorter and thicker than the long green type.
- Hybrid Varieties: These are often disease-resistant and high-yielding.
I personally prefer the Long Green variety because it’s readily available and produces a good amount of fruit. Once you’ve chosen your variety, it’s time to start the seeds!
Why start seeds indoors? Starting seeds indoors gives your bitter gourd plants a head start, especially if you live in a region with a shorter growing season. It also protects the delicate seedlings from pests and harsh weather conditions.
Here’s how I start my bitter gourd seeds:
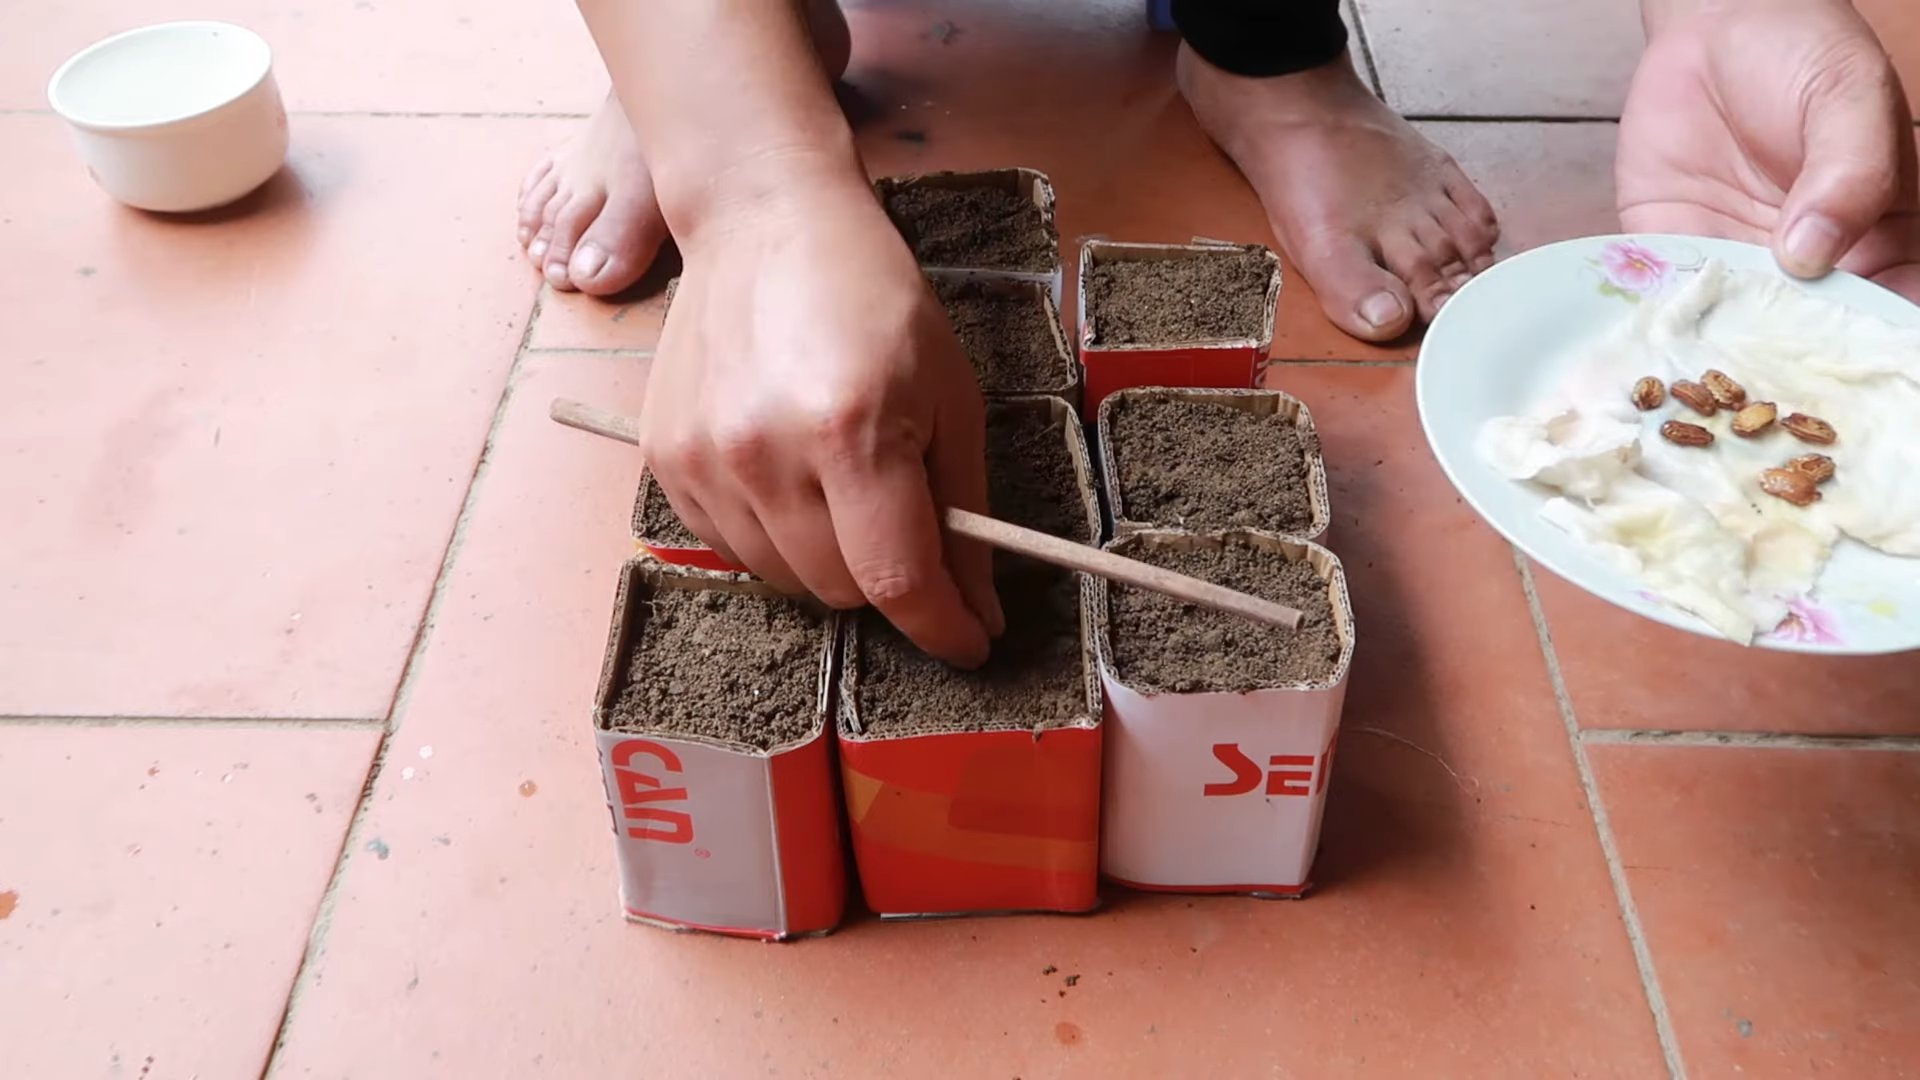
- Soak the Seeds: Before planting, soak the seeds in warm water for 24 hours. This helps to soften the hard seed coat and promotes faster germination. I usually use a small bowl and place it in a warm spot.
- Prepare Seed Trays or Pots: Fill seed trays or small pots (about 2-3 inches in diameter) with a good quality seed-starting mix. Make sure the mix is well-draining. I like to use a mix of peat moss, vermiculite, and perlite.
- Plant the Seeds: Make a small hole (about ½ inch deep) in the center of each pot or cell. Place one seed in each hole and cover it gently with the seed-starting mix.
- Water Gently: Water the seeds gently using a spray bottle or a watering can with a fine rose. Avoid overwatering, as this can lead to fungal diseases.
- Provide Warmth and Light: Bitter gourd seeds need warmth to germinate. I place my seed trays on a heat mat or in a warm location (around 80-85°F). They also need plenty of light. If you don’t have a sunny windowsill, you can use grow lights. I keep my grow lights on for about 14-16 hours a day.
- Keep the Soil Moist: Check the soil moisture regularly and water when the top inch feels dry. Don’t let the soil dry out completely.
- Wait for Germination: Bitter gourd seeds usually germinate within 7-14 days. Be patient!
Preparing the Garden Bed and Transplanting Seedlings
While your seeds are germinating, it’s time to prepare the garden bed. Bitter gourd plants need a sunny location with well-drained soil.
- Choose a Sunny Spot: Select a location that receives at least 6-8 hours of direct sunlight per day.
- Prepare the Soil: Bitter gourd plants prefer well-drained soil that is rich in organic matter. Amend the soil with compost, well-rotted manure, or other organic materials. I usually add a generous amount of compost to my garden bed.
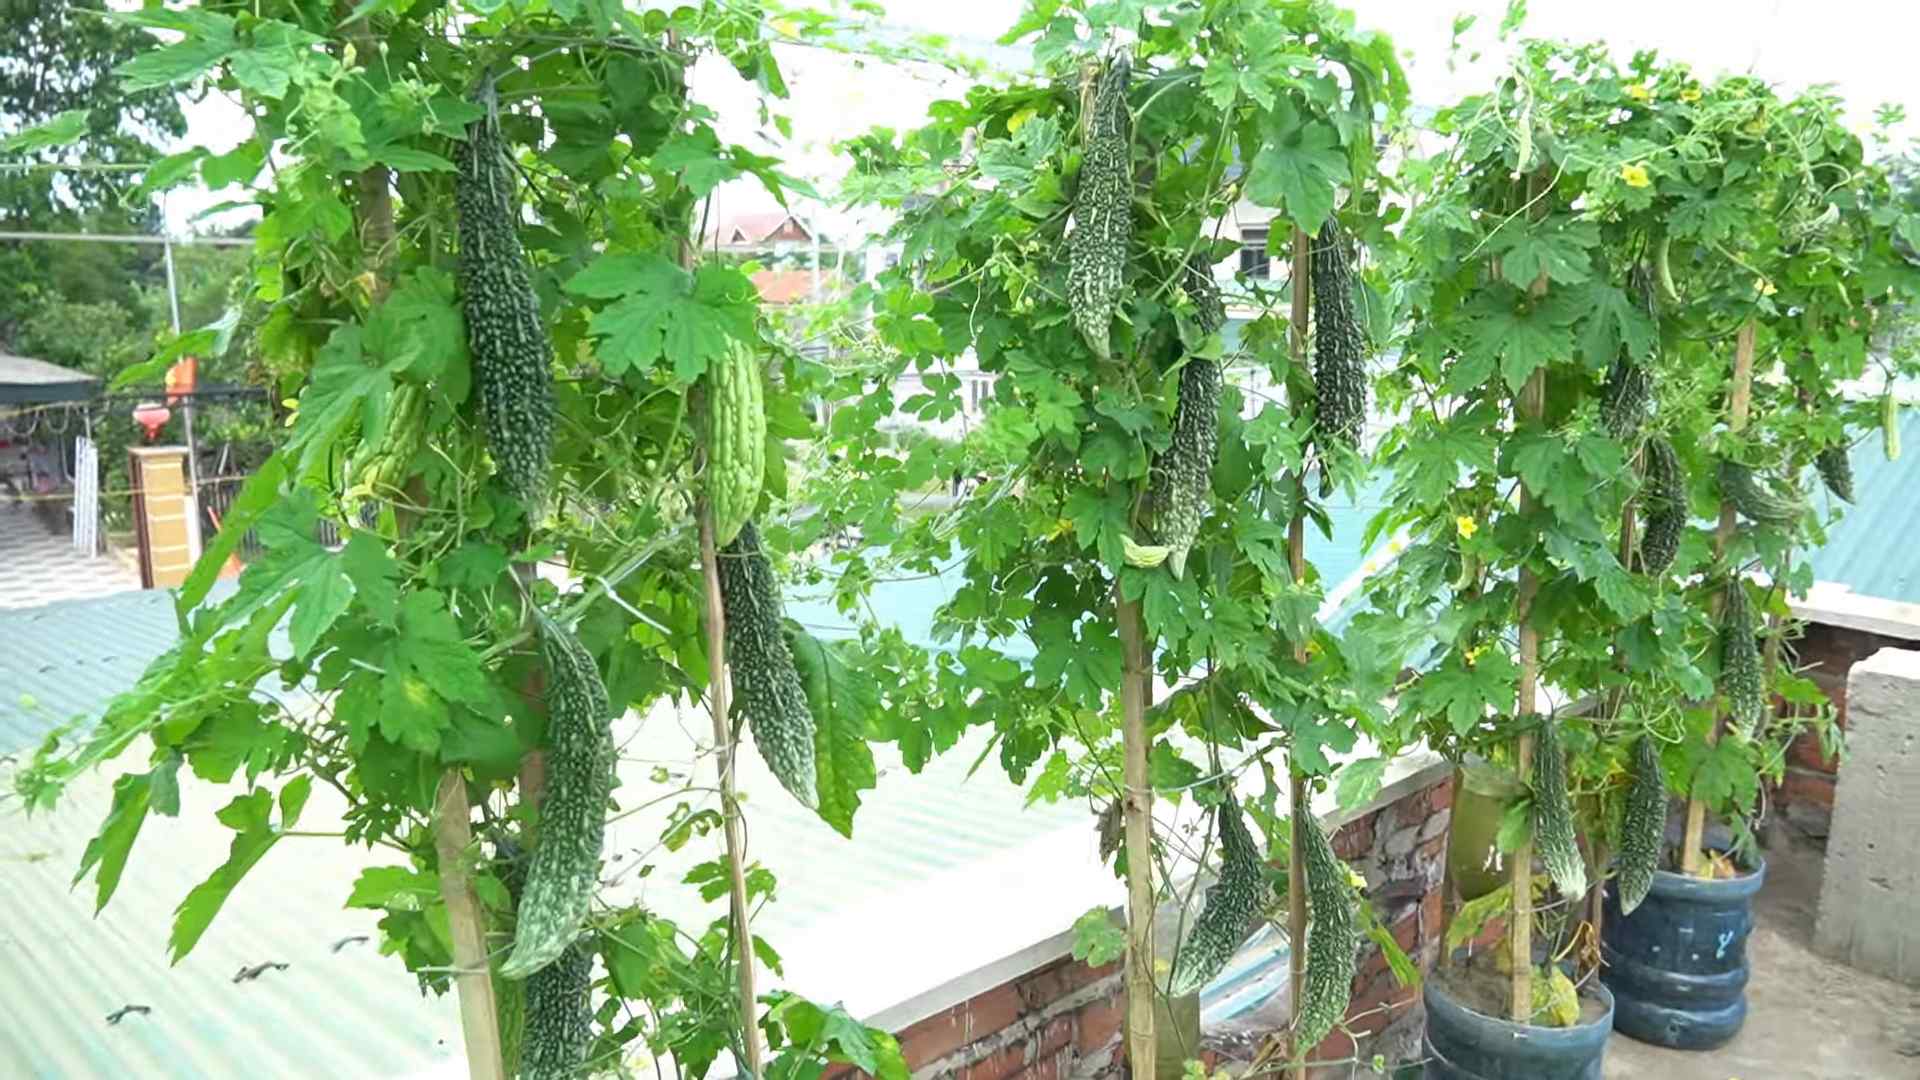
- Build a Trellis or Support Structure: Bitter gourd is a vine that needs a trellis or other support structure to climb on. You can use a fence, a pergola, or a homemade trellis. I’ve used bamboo poles tied together to create a simple trellis, and it works great!
- Harden Off Seedlings: Before transplanting your seedlings outdoors, you need to “harden them off.” This means gradually exposing them to outdoor conditions over a period of 7-10 days. Start by placing the seedlings outdoors in a sheltered location for a few hours each day, gradually increasing the amount of time they spend outdoors.
- Transplant Seedlings: Once the seedlings are hardened off, it’s time to transplant them into the garden bed. Space the plants about 2-3 feet apart. Dig a hole that is slightly larger than the root ball of the seedling. Gently remove the seedling from the pot and place it in the hole. Backfill the hole with soil and water thoroughly.
Caring for Your Bitter Gourd Plants
Now that your bitter gourd plants are in the ground, it’s important to provide them with the care they need to thrive.
- Water Regularly: Water your bitter gourd plants regularly, especially during hot, dry weather. Aim to keep the soil consistently moist, but not waterlogged. I usually water deeply once or twice a week, depending on the weather.
- Fertilize Regularly: Bitter gourd plants are heavy feeders and need regular fertilization. Use a balanced fertilizer (e.g., 10-10-10) every 2-3 weeks. You can also use organic fertilizers, such as compost tea or fish emulsion. I prefer using organic fertilizers because they are gentler on the plants and the environment.
- Prune the Vines: Pruning can help to improve air circulation and promote fruit production. Remove any dead or yellowing leaves. You can also prune the tips of the vines to encourage branching.
- Control Pests and Diseases: Bitter gourd plants can be susceptible to pests and diseases, such as aphids, spider mites, and powdery mildew. Inspect your plants regularly and take action if you notice any problems. You can use insecticidal soap or neem oil to control pests. For powdery mildew, you can use a fungicide or a homemade remedy, such as baking soda spray. I always try to use organic methods to control pests and diseases whenever possible.
- Provide Support: As the vines grow, make sure they are properly supported by the trellis or support structure. You may need to tie the vines to the trellis using twine or plant ties.
Pollination and Harvesting
Bitter gourd plants produce separate male and female flowers. The female flowers have a small fruit behind them, while the male flowers do not.
- Pollination: Bitter gourd plants are pollinated by insects, such as bees and butterflies. If you don’t see many insects in your garden, you may need to hand-pollinate the flowers. To hand-pollinate, use a small paintbrush to transfer pollen from the male flowers to the female flowers.
- Harvesting: Bitter gourd fruits are usually ready to harvest about 2-3 months after planting. Harvest the fruits when they are still green and slightly immature. If you wait too long, the fruits will become bitter and tough. I usually harvest my bitter gourds when they are about 6-8 inches long.
- Cut the Fruit: Use a sharp knife or pruning shears to cut the fruit from the vine. Leave a small stem attached to the fruit.
Tips for Success
Here are a few extra tips to help you grow bitter gourd successfully:
- Choose a disease-resistant variety: This will help to prevent problems with diseases.
- Provide good air circulation: This will help to prevent fungal diseases.
- Water deeply but infrequently: This will encourage deep root growth.
- Fertilize regularly: This will provide the plants with the nutrients they need to thrive.
- Harvest the fruits regularly: This will encourage the plants to produce more fruit.
Enjoy Your Harvest!
Growing bitter gourd can be a rewarding experience. With a little bit of care and attention, you can enjoy a bountiful harvest of fresh, homegrown bitter gourds. I love using my homegrown bitter gourds in stir-fries, curries, and soups. They’re also great for making juice!
So, what are you waiting for? Get out there and start growing your own bitter gourd today! Happy gardening!
“`
Conclusion
So, there you have it! Growing bitter gourd doesn’t have to be a daunting task. This simple, yet effective DIY trick transforms the entire process, making it accessible even to novice gardeners. We’ve shown you how to bypass common pitfalls and cultivate a thriving bitter gourd vine, laden with healthy, homegrown produce.
Why is this a must-try? Because it addresses the core challenges of bitter gourd cultivation: germination rates, soil conditions, and support systems. By pre-sprouting your seeds, you significantly increase your chances of success. By amending your soil with the right nutrients, you create the ideal environment for vigorous growth. And by providing a sturdy trellis, you ensure your vine has the support it needs to flourish. This isn’t just about growing bitter gourd; it’s about growing it *well*.
But don’t stop there! Experiment with different variations to tailor the process to your specific needs and preferences. Try using different types of organic fertilizers, such as compost tea or fish emulsion, to boost your plant’s growth. Consider companion planting with basil or marigolds to deter pests naturally. If you live in a cooler climate, you might want to start your seeds indoors even earlier to give them a head start. You can also explore different trellis designs to find one that best suits your garden space and aesthetic.
The beauty of gardening lies in its adaptability and the joy of discovery. This DIY method provides a solid foundation, but it’s up to you to personalize it and make it your own. We encourage you to embrace the process, learn from your experiences, and share your successes (and even your failures!) with the gardening community.
Ready to embark on your bitter gourd growing adventure? We’re confident that this DIY trick will empower you to cultivate a bountiful harvest. So, grab your seeds, gather your supplies, and get ready to enjoy the satisfaction of growing your own delicious and nutritious bitter gourd. Don’t forget to take pictures of your progress and share them with us! We can’t wait to see your thriving vines and hear about your experiences. Remember, successful **bitter gourd** cultivation is within your reach!
Frequently Asked Questions (FAQ)
Q: How long does it take for bitter gourd seeds to germinate using this method?
A: Typically, pre-sprouting bitter gourd seeds using the damp paper towel method takes between 3 to 7 days. You’ll notice small roots emerging from the seeds, indicating they’re ready to be planted. This is significantly faster and more reliable than directly sowing the seeds into the soil. Remember to keep the paper towels consistently moist, but not soaking wet, during the germination process.
Q: What kind of soil is best for growing bitter gourd?
A: Bitter gourd thrives in well-draining, fertile soil that is rich in organic matter. A slightly acidic to neutral pH (around 6.0 to 7.0) is ideal. Before planting, amend your soil with compost, well-rotted manure, or other organic amendments to improve its fertility and drainage. If your soil is heavy clay, consider adding sand or perlite to improve drainage.
Q: How often should I water my bitter gourd plants?
A: Water your bitter gourd plants regularly, especially during hot and dry weather. Aim to keep the soil consistently moist, but avoid overwatering, which can lead to root rot. Water deeply at the base of the plant, rather than overhead, to prevent fungal diseases. A good rule of thumb is to water when the top inch of soil feels dry to the touch. Mulching around the base of the plant can help retain moisture and suppress weeds.
Q: What kind of trellis is best for bitter gourd?
A: Bitter gourd vines are vigorous climbers and require a sturdy trellis to support their weight. A trellis made of wood, bamboo, or metal is suitable. The trellis should be at least 6 to 8 feet tall and wide enough to accommodate the growing vine. You can also use a fence or a wall as a trellis. Ensure the trellis is strong enough to withstand strong winds and the weight of the mature vine and fruits.
Q: How do I deal with pests and diseases on my bitter gourd plants?
A: Bitter gourd plants can be susceptible to pests such as aphids, spider mites, and squash bugs, as well as diseases like powdery mildew and downy mildew. Regularly inspect your plants for signs of pests or diseases. For pests, you can use insecticidal soap, neem oil, or handpick them off the plants. For diseases, ensure good air circulation around the plants and avoid overhead watering. You can also use organic fungicides if necessary. Companion planting with basil or marigolds can help deter pests naturally.
Q: When is the best time to harvest bitter gourd?
A: Bitter gourd is typically ready to harvest about 8 to 12 weeks after planting. The fruits should be firm, green, and about 6 to 8 inches long. Harvest the fruits before they turn yellow or orange, as they will become more bitter and less palatable. Use a sharp knife or pruning shears to cut the fruits from the vine, leaving a short stem attached.
Q: Can I grow bitter gourd in containers?
A: Yes, you can grow bitter gourd in containers, but you’ll need a large container (at least 15-20 gallons) with good drainage. Use a well-draining potting mix and provide a sturdy trellis for the vine to climb. Container-grown bitter gourd plants may require more frequent watering and fertilization than those grown in the ground.
Q: What are some variations I can try with this DIY method?
A: Absolutely! Here are a few variations to consider:
* **Seed Scarification:** Gently scarify the bitter gourd seeds before soaking them to improve germination rates. You can do this by lightly rubbing the seeds with sandpaper or nicking them with a knife.
* **Compost Tea:** Use compost tea to fertilize your bitter gourd plants. Compost tea is a nutrient-rich liquid that can boost plant growth and improve soil health.
* **Vertical Gardening:** If you have limited space, consider growing bitter gourd vertically using a tower garden or a similar vertical gardening system.
* **Different Trellis Designs:** Experiment with different trellis designs to find one that best suits your garden space and aesthetic. You can build your own trellis using bamboo, wood, or metal.
* **Companion Planting:** Plant basil, marigolds, or other beneficial plants near your bitter gourd to deter pests and attract pollinators.
Q: What if my bitter gourd fruits are too bitter?
A: The bitterness of bitter gourd is a natural characteristic, but there are ways to reduce it. Soaking the sliced bitter gourd in salted water for about 30 minutes before cooking can help draw out some of the bitterness. You can also blanch the bitter gourd in boiling water for a few minutes before cooking. Choose younger, smaller fruits, as they tend to be less bitter than older, larger ones.
Q: How can I save seeds from my bitter gourd plants for next year?
A: To save seeds from your bitter gourd plants, allow a few fruits to mature fully on the vine. The fruits will turn yellow or orange and become soft. Once the fruits are fully ripe, harvest them and scoop out the seeds. Wash the seeds thoroughly and spread them out on a paper towel to dry completely. Store the dried seeds in an airtight container in a cool, dry place.


Leave a Comment