

Grow Bitter Melon Home, and unlock a world of culinary possibilities right in your backyard! Have you ever dreamt of harvesting your own exotic vegetables, impressing your friends with unique dishes, and knowing exactly where your food comes from? Well, you’re in the right place! This isn’t just about gardening; it’s about embracing a tradition that spans centuries and cultures.
Bitter melon, also known as bitter gourd, has a rich history, deeply rooted in Asian and African cuisines. For generations, it’s been celebrated not only for its distinctive bitter flavor but also for its impressive health benefits. Think of it as a superfood you can cultivate yourself! But let’s be honest, growing bitter melon can seem a little intimidating at first. That’s where this DIY guide comes in.
I’m going to share my favorite tricks and hacks to help you grow bitter melon home successfully, even if you’re a complete beginner. We’ll cover everything from seed starting to pest control, ensuring you have a thriving bitter melon patch. Why do you need this? Because store-bought bitter melon often lacks the freshness and flavor of homegrown varieties. Plus, there’s nothing quite like the satisfaction of nurturing a plant from seed to harvest. So, grab your gardening gloves, and let’s get started on this exciting journey!
Growing Bitter Melon at Home: A Comprehensive DIY Guide
Hey there, fellow gardening enthusiasts! I’m so excited to share my experience and guide you through growing your own bitter melon at home. It might seem intimidating at first, but trust me, with a little patience and the right steps, you’ll be harvesting your own bitter gourds in no time. Bitter melon, also known as bitter gourd or karela, is a nutritious and flavorful vegetable that’s a staple in many Asian cuisines. Let’s dive in!
Choosing Your Variety and Starting Seeds
First things first, you need to decide which variety of bitter melon you want to grow. There are several types, differing in size, shape, and bitterness. Some popular choices include:
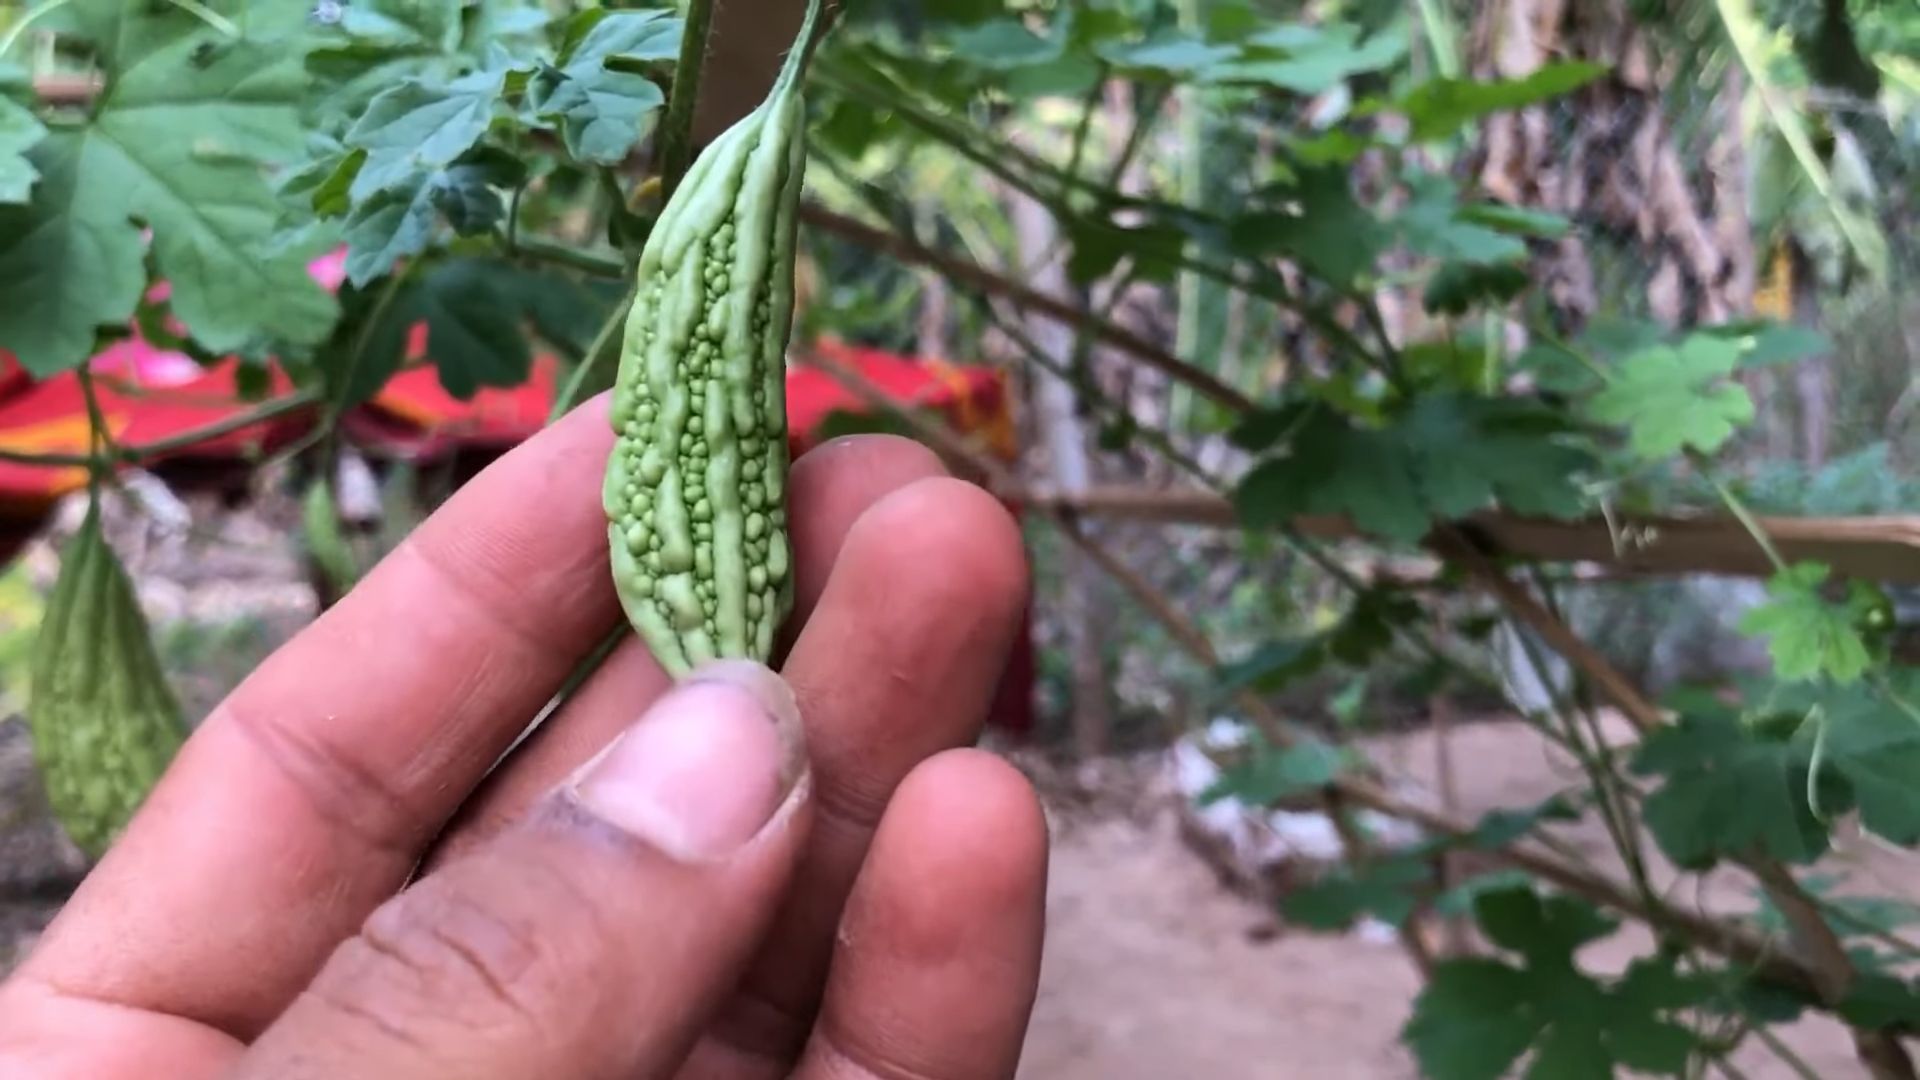
* Chinese Bitter Melon: These are typically longer and lighter green with smoother skin. They tend to be less bitter than other varieties.
* Indian Bitter Melon: These are smaller, darker green, and have a more bumpy, ridged skin. They are generally more bitter.
* Japanese Bitter Melon: This variety is known for its relatively mild bitterness and is often used in stir-fries.
Once you’ve chosen your variety, it’s time to start the seeds. You can either directly sow them into the ground (if your climate is warm enough) or start them indoors for an earlier harvest. I prefer starting them indoors because it gives them a head start and protects them from pests and unpredictable weather.
Here’s how I start my bitter melon seeds indoors:
1. Soaking the Seeds: Before planting, I soak the seeds in warm water for 24 hours. This helps to soften the hard outer shell and encourages germination. I usually use a small bowl and make sure the seeds are fully submerged.
2. Preparing the Seedling Trays: I use seedling trays with individual cells filled with a good quality seed-starting mix. You can find these at most garden centers. Make sure the mix is well-draining to prevent the seeds from rotting.
3. Planting the Seeds: I plant one seed per cell, about half an inch deep. Gently cover the seed with the seed-starting mix and lightly water the tray.
4. Creating a Warm and Humid Environment: Bitter melon seeds need warmth and humidity to germinate. I place the seedling tray in a warm location, like on top of my refrigerator or near a sunny window. I also cover the tray with a clear plastic dome or plastic wrap to create a mini-greenhouse effect.
5. Maintaining Moisture: I check the soil moisture daily and water lightly whenever the top of the soil feels dry. Be careful not to overwater, as this can lead to fungal problems.
6. Waiting for Germination: It usually takes about 7-14 days for the seeds to germinate. Once the seedlings emerge, remove the plastic dome or wrap and provide them with plenty of light.
Preparing the Garden Bed
While your seedlings are growing indoors, it’s time to prepare the garden bed where you’ll eventually transplant them. Bitter melon needs a sunny location with well-drained soil.
Here’s how I prepare my garden bed:
1. Choosing the Right Location: Select a spot in your garden that receives at least 6-8 hours of direct sunlight per day. Bitter melon thrives in warm, sunny conditions.
2. Soil Preparation: Bitter melon prefers well-drained soil that is rich in organic matter. I start by removing any weeds, rocks, and debris from the area. Then, I amend the soil with compost, aged manure, or other organic matter to improve its fertility and drainage. I usually dig in about 2-3 inches of compost.
3. Building a Trellis: Bitter melon is a vine, so it needs a trellis or other support structure to climb on. You can use a variety of materials to build a trellis, such as bamboo poles, wooden stakes, or metal fencing. I prefer using a sturdy metal trellis that is at least 6 feet tall. Make sure the trellis is securely anchored in the ground.
4. Spacing: If you’re planting multiple bitter melon plants, space them about 2-3 feet apart to allow them plenty of room to grow.
Transplanting Your Seedlings
Once your seedlings have developed a few sets of true leaves and the weather has warmed up (usually after the last frost), it’s time to transplant them into the garden bed.
Here’s how I transplant my bitter melon seedlings:
1. Hardening Off: Before transplanting, it’s important to harden off the seedlings to acclimate them to outdoor conditions. I do this by gradually exposing them to longer periods of time outdoors over the course of a week. Start by placing them in a sheltered location for a few hours each day, gradually increasing the amount of time they spend outdoors.
2. Transplanting: Choose a cloudy day or late afternoon to transplant the seedlings to minimize stress. Gently remove the seedlings from their cells, being careful not to damage the roots. Dig a hole in the prepared garden bed that is slightly larger than the root ball.
3. Planting Depth: Place the seedling in the hole and backfill with soil, making sure the top of the root ball is level with the surrounding soil. Gently firm the soil around the base of the plant.
4. Watering: Water the newly transplanted seedlings thoroughly to help them settle in.
5. Mulching: Apply a layer of mulch around the base of the plants to help retain moisture, suppress weeds, and regulate soil temperature. I use straw or wood chips for mulching.
Caring for Your Bitter Melon Plants
Now that your bitter melon plants are in the ground, it’s important to provide them with the care they need to thrive.
Here’s how I care for my bitter melon plants:
1. Watering: Bitter melon plants need consistent moisture, especially during hot, dry weather. Water deeply and regularly, making sure the soil stays moist but not waterlogged. I usually water them every other day, or more frequently during heat waves.
2. Fertilizing: Bitter melon plants are heavy feeders, so they benefit from regular fertilization. I use a balanced fertilizer (like 10-10-10) every 2-3 weeks, following the instructions on the fertilizer package. You can also use organic fertilizers like compost tea or fish emulsion.
3. Pruning: Pruning can help to improve air circulation and encourage fruit production. I prune away any dead or yellowing leaves, as well as any suckers (shoots that grow from the base of the plant).
4. Pest and Disease Control: Bitter melon plants can be susceptible to certain pests and diseases, such as aphids, spider mites, and powdery mildew. I regularly inspect my plants for signs of pests or diseases and take action promptly if I find any. For aphids and spider mites, I use insecticidal soap or neem oil. For powdery mildew, I use a fungicide or a homemade solution of baking soda and water.
5. Training the Vines: As the bitter melon vines grow, you’ll need to train them to climb the trellis. Gently guide the vines up the trellis and tie them loosely with twine or plant ties.
Harvesting Your Bitter Melon
The moment you’ve been waiting for! Bitter melon is typically ready to harvest about 2-3 months after planting.
Here’s how I harvest my bitter melon:
1. Timing: Harvest the bitter melon when it is still green and firm. The size will vary depending on the variety, but generally, they are ready to harvest when they are about 6-8 inches long. If you wait too long, the fruit will turn yellow or orange and become more bitter.
2. Harvesting Technique: Use a sharp knife or pruning shears to cut the bitter melon from the vine, leaving a short stem attached.
3. Handling: Handle the bitter melon gently to avoid bruising.
4. Storage: Store the harvested bitter melon in the refrigerator for up to a week.
Enjoying Your Homegrown Bitter Melon
Now that you’ve harvested your own bitter melon, it’s time to enjoy it! Bitter melon can be used in a variety of dishes, such as stir-fries, soups, and curries. It has a distinctively bitter flavor, which some people find off-putting, but it can be mellowed by blanching or soaking it in salted water before cooking.
Here are a few of my favorite ways to enjoy bitter melon:
* Bitter Melon Stir-Fry: Slice the bitter melon thinly and stir-fry it with garlic, ginger, and your favorite vegetables.
* Bitter Melon Soup: Add sliced bitter melon to your favorite soup recipe for a healthy and flavorful twist.
* Bitter Melon Juice: Juice the bitter melon with other fruits and vegetables for a refreshing and nutritious drink. (Be warned, it’s very bitter!)
Growing bitter melon at home can be a rewarding experience. With a little effort and the right knowledge, you can enjoy fresh, homegrown bitter melon all season long. Happy gardening!

Conclusion
So, there you have it! Growing bitter melon at home is not only achievable but also incredibly rewarding. From the satisfaction of nurturing a plant from seed to the joy of harvesting your own fresh, nutrient-packed produce, this DIY project offers a unique connection to your food. We’ve walked you through the essential steps, from selecting the right seeds and preparing the soil to providing the necessary support and diligently managing pests.
But why is this DIY trick a must-try? Beyond the obvious benefit of having access to fresh, organic bitter melon, growing it yourself allows you to control every aspect of the process. You can choose organic fertilizers, avoid harmful pesticides, and tailor the growing conditions to perfectly suit your local climate. This translates to a healthier, more flavorful, and ultimately more satisfying harvest. Plus, let’s be honest, there’s a certain pride that comes with saying, “I grew this myself!”
Consider these variations to personalize your bitter melon growing experience:
* Vertical Gardening: If you’re short on space, embrace vertical gardening! Bitter melon vines thrive on trellises, fences, or even hanging baskets. This not only maximizes your yield but also adds a beautiful green element to your patio or balcony.
* Companion Planting: Experiment with companion plants like basil, marigolds, or nasturtiums. These can help deter pests and attract beneficial insects, creating a healthier ecosystem for your bitter melon.
* Different Varieties: Explore the diverse world of bitter melon varieties! From the smaller, smoother Chinese types to the larger, more heavily textured Indian varieties, each offers a unique flavor profile and appearance. Try growing a few different kinds to discover your personal favorite.
* Seed Saving: Once you’ve successfully grown your bitter melon, consider saving the seeds for future planting. This is a great way to become more self-sufficient and ensure a continuous supply of your favorite variety.
Growing bitter melon at home is an adventure, and we encourage you to embark on it! Don’t be afraid to experiment, learn from your mistakes, and adapt the techniques to suit your specific needs and environment. The rewards – both tangible and intangible – are well worth the effort.
We’re eager to hear about your experiences! Share your tips, tricks, and triumphs in the comments below. Let’s build a community of home gardeners who are passionate about growing their own healthy and delicious bitter melon. What challenges did you face? What successes did you celebrate? Your insights can help others on their own bitter melon growing journey. Happy gardening!
Frequently Asked Questions (FAQ)
What is the best time of year to plant bitter melon?
Bitter melon thrives in warm weather, so the best time to plant is typically in late spring or early summer, after the last frost has passed and the soil has warmed up. The ideal soil temperature for germination is between 70°F and 85°F (21°C and 29°C). If you live in a region with a short growing season, you can start seeds indoors 4-6 weeks before the last expected frost to give them a head start.
How much sunlight does bitter melon need?
Bitter melon requires at least 6-8 hours of direct sunlight per day to thrive. Choose a planting location that receives ample sunlight throughout the day. If you’re growing bitter melon indoors, supplement with grow lights if necessary to ensure adequate light exposure. Insufficient sunlight can lead to weak growth, reduced flowering, and smaller fruit.
What kind of soil is best for growing bitter melon?
Bitter melon prefers well-draining, fertile soil that is rich in organic matter. Amend your soil with compost, aged manure, or other organic materials to improve its drainage, fertility, and water-holding capacity. The ideal soil pH for bitter melon is between 6.0 and 7.0. You can test your soil pH using a soil testing kit and adjust it accordingly with lime (to raise pH) or sulfur (to lower pH).
How often should I water bitter melon?
Water bitter melon regularly, especially during hot, dry weather. Aim to keep the soil consistently moist but not waterlogged. Water deeply and less frequently, rather than shallowly and more often, to encourage deep root growth. Mulching around the base of the plants can help retain moisture and suppress weeds. Reduce watering frequency as the fruits begin to mature to prevent them from splitting.
What are some common pests and diseases that affect bitter melon?
Common pests that can affect bitter melon include aphids, spider mites, squash bugs, and cucumber beetles. Regularly inspect your plants for signs of infestation and take appropriate action, such as spraying with insecticidal soap or neem oil. Diseases that can affect bitter melon include powdery mildew, downy mildew, and fusarium wilt. Ensure good air circulation around the plants and avoid overhead watering to prevent fungal diseases. Use disease-resistant varieties if available.
How do I support bitter melon vines?
Bitter melon vines are climbers and require support to grow properly. Provide a trellis, fence, or other sturdy structure for the vines to climb on. You can also train the vines to grow along wires or ropes. Proper support will not only keep the plants off the ground but also improve air circulation and sunlight exposure, leading to healthier growth and higher yields.
When is bitter melon ready to harvest?
Bitter melon is typically ready to harvest 8-12 weeks after planting, depending on the variety and growing conditions. The fruits are usually harvested when they are still green and slightly immature, before they turn yellow or orange. The exact size and color at harvest will vary depending on the variety. The fruit should be firm to the touch and have a slightly bitter taste. Use a sharp knife or pruning shears to cut the fruit from the vine, leaving a short stem attached.
How do I reduce the bitterness of bitter melon?
Bitter melon is known for its distinctive bitter taste, but there are several ways to reduce the bitterness. Soaking the sliced or chopped bitter melon in salted water for 30-60 minutes can help draw out some of the bitter compounds. You can also blanch the bitter melon in boiling water for a few minutes before cooking. Another technique is to remove the white pith and seeds from the center of the fruit, as these are the most bitter parts. Cooking bitter melon with acidic ingredients like vinegar or lemon juice can also help to balance the bitterness.
Can I grow bitter melon in containers?
Yes, you can successfully grow bitter melon in containers, provided you choose a large enough container (at least 10-15 gallons) and provide adequate support for the vines. Use a well-draining potting mix and ensure that the container has drainage holes. Water regularly and fertilize every 2-3 weeks with a balanced fertilizer. Place the container in a sunny location that receives at least 6-8 hours of direct sunlight per day.
How do I save seeds from bitter melon?
To save seeds from bitter melon, allow the fruit to fully ripen on the vine until it turns yellow or orange. Once the fruit is ripe, cut it open and scoop out the seeds. Wash the seeds thoroughly to remove any pulp or residue. Spread the seeds out on a paper towel to dry completely for several days. Once the seeds are dry, store them in an airtight container in a cool, dark, and dry place. Properly stored bitter melon seeds can remain viable for several years.
Leave a Comment