

Grow mushrooms at home? Absolutely! Imagine stepping into your kitchen and harvesting fresh, flavorful mushrooms, cultivated right in your own space. Forget those bland, store-bought varieties – we’re talking about gourmet delights bursting with earthy goodness, ready to elevate your culinary creations.
For centuries, mushroom cultivation has been shrouded in mystery, often associated with ancient traditions and closely guarded secrets. From the shiitake logs of East Asia to the truffle farms of Europe, the art of growing fungi has been a source of both sustenance and fascination. But fear not, aspiring mycologist! You don’t need generations of experience or a hidden forest to embark on this rewarding journey.
In today’s fast-paced world, knowing how to grow mushrooms at home offers a unique connection to nature and a sustainable way to source healthy food. Plus, it’s incredibly satisfying! This DIY guide will demystify the process, providing you with simple, step-by-step instructions to cultivate your own mushroom patch, regardless of your experience level. Whether you’re a seasoned gardener or a complete beginner, I’m here to show you how to unlock the secrets of mushroom cultivation and enjoy the delicious rewards. Let’s get started!
Grow Your Own Gourmet Mushrooms at Home: A Beginner’s Guide
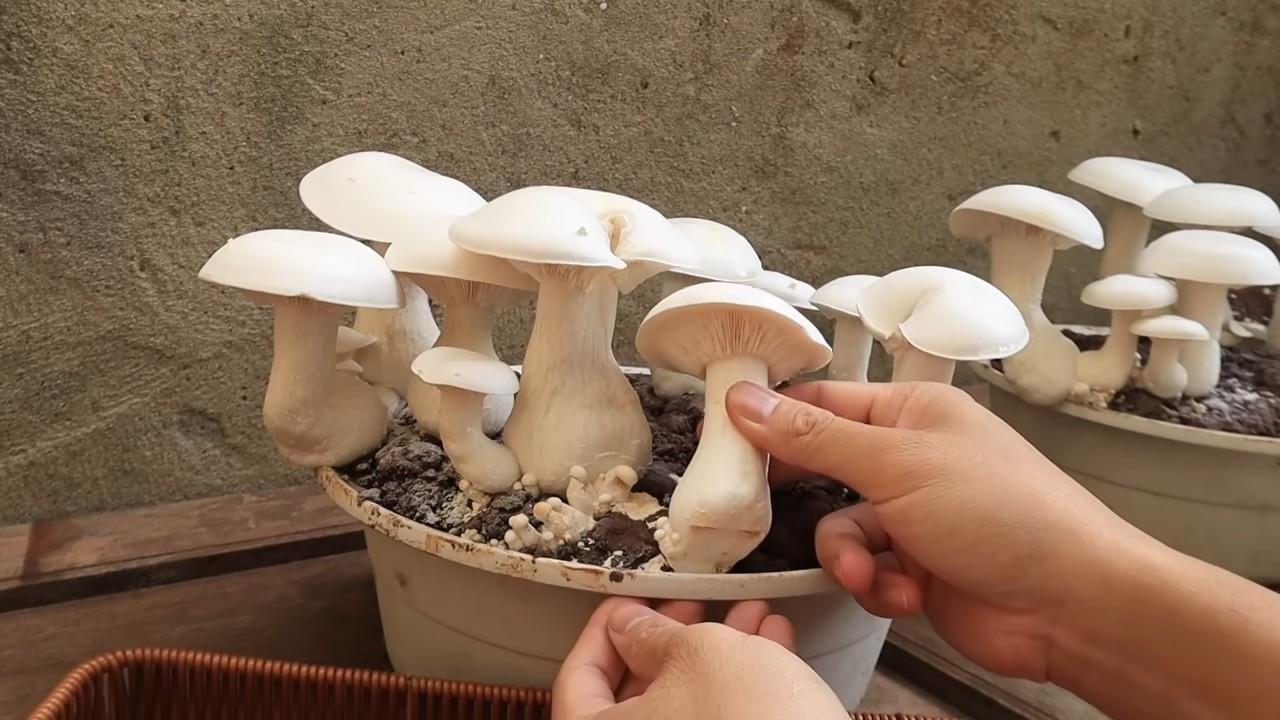
Hey there, fellow fungi enthusiasts! Ever dreamt of harvesting your own delicious, homegrown mushrooms? Well, dream no more! Growing mushrooms at home is surprisingly easier than you might think, and I’m here to guide you through the process. We’ll focus on growing oyster mushrooms, as they’re relatively forgiving and produce a bountiful harvest. Get ready to impress your friends and family with your newfound mushroom-growing prowess!
What You’ll Need: The Essential Supplies
Before we dive in, let’s gather our supplies. This is crucial for a smooth and successful mushroom-growing journey.
* Oyster Mushroom Spawn: This is the “seed” of your mushrooms. You can find it online or at a local gardening supply store. Make sure to choose a reputable source to ensure healthy spawn.
* Substrate: This is the food source for your mushrooms. Straw is a fantastic option for oyster mushrooms. You can also use coffee grounds, cardboard, or even hardwood sawdust. For this guide, we’ll be using straw.
* Large Container: A bucket, tub, or even a large plastic bag will work. Just make sure it’s clean and can hold your substrate.
* Spray Bottle: For misting and maintaining humidity.
* Bleach: For sterilizing the straw.
* Large Pot or Kettle: For pasteurizing the straw.
* Thermometer: To monitor the temperature of the water during pasteurization.
* Gloves: To keep everything clean and prevent contamination.
* Optional: A humidity tent or greenhouse (a large clear plastic bag works great!) to help maintain optimal humidity levels.
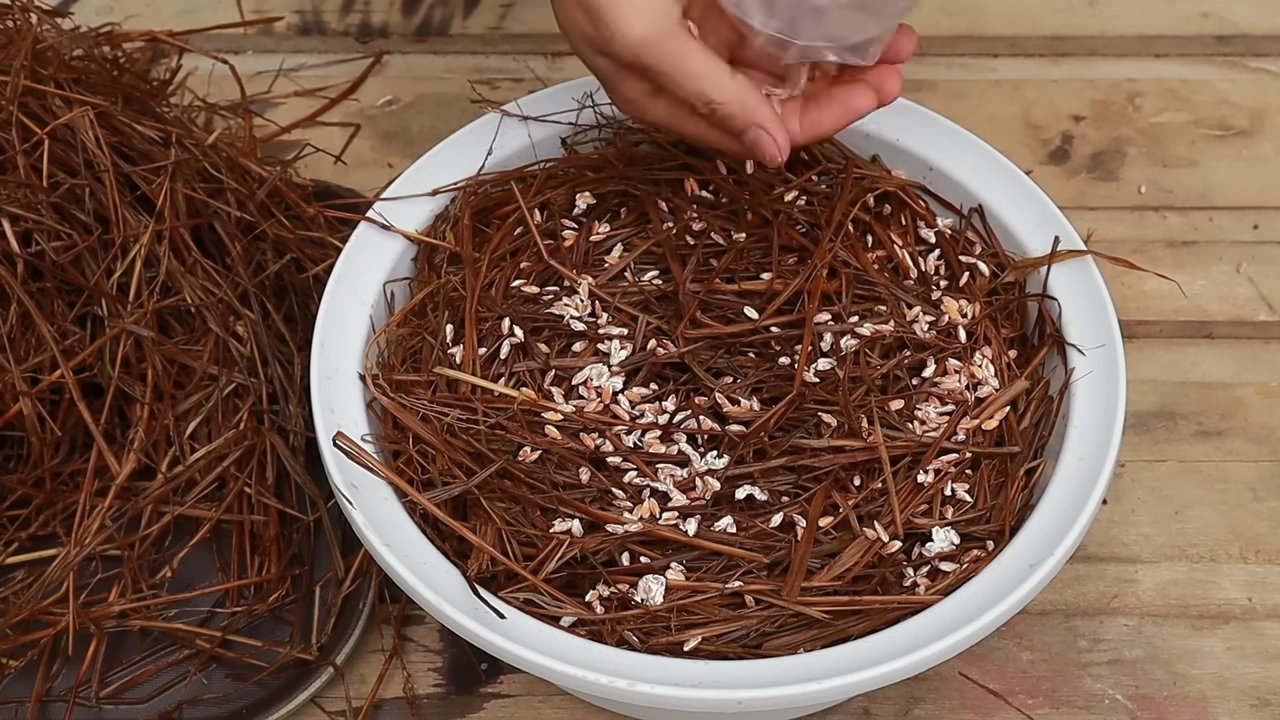
Phase 1: Preparing the Substrate (Straw)
The key to successful mushroom growing is a clean and properly prepared substrate. We need to pasteurize the straw to kill off any competing organisms that could hinder mushroom growth. Think of it like weeding your garden before planting!
1. Chop the Straw: Using scissors or a knife, chop the straw into smaller pieces, about 2-4 inches long. This will make it easier for the mushroom mycelium (the “roots” of the mushroom) to colonize the straw.
2. Prepare the Bleach Solution: In a large container, mix a small amount of bleach with water. The ratio should be about 1 tablespoon of bleach per gallon of water. This solution will help disinfect the straw.
3. Soak the Straw: Submerge the chopped straw in the bleach solution for about 30 minutes. This will help kill off any surface contaminants.
4. Rinse Thoroughly: After soaking, rinse the straw thoroughly with clean water to remove any traces of bleach. You don’t want to harm your precious mushroom spawn!
5. Pasteurize the Straw: This is the most important step! Fill a large pot or kettle with water and bring it to a temperature of 160-180°F (71-82°C). Use your thermometer to monitor the temperature.
6. Submerge the Straw: Carefully submerge the rinsed straw in the hot water. You might need to weigh it down with a brick or a heavy pot to keep it submerged.
7. Maintain the Temperature: Keep the water temperature between 160-180°F (71-82°C) for about 60-90 minutes. This will kill off most of the unwanted organisms while leaving the beneficial ones intact.
8. Drain and Cool: After pasteurization, carefully drain the hot water from the straw. Let the straw cool down to room temperature. This is crucial! You don’t want to cook your mushroom spawn. The straw should be damp but not dripping wet. Squeeze out any excess water.
Phase 2: Inoculating the Substrate (Mixing Spawn and Straw)
Now comes the fun part – introducing the mushroom spawn to the prepared straw! This is where the magic begins.
1. Clean Your Work Area: Before you start, clean your work area thoroughly with soap and water. This will help prevent contamination.
2. Sanitize Your Hands: Wash your hands thoroughly with soap and water, or wear gloves.
3. Layer the Straw and Spawn: In your large container, create layers of straw and mushroom spawn. Start with a layer of straw, then sprinkle a generous amount of spawn on top. Repeat this process until you’ve used all the straw and spawn. Aim for about 5-10% spawn by weight of the straw.
4. Mix Thoroughly: Gently mix the straw and spawn together to ensure even distribution. This will help the mycelium colonize the straw more quickly.
5. Pack Lightly: Don’t pack the straw too tightly. The mycelium needs air to breathe.
Phase 3: Incubation (Letting the Mycelium Grow)
This is the waiting game. During incubation, the mushroom mycelium will spread throughout the straw, consuming it and preparing to fruit.
1. Find a Suitable Location: Place your inoculated container in a dark, humid, and well-ventilated location. A basement, closet, or even a shaded corner of your garage will work. The ideal temperature is between 65-75°F (18-24°C).
2. Maintain Humidity: Keep the humidity level high, around 80-90%. You can achieve this by misting the straw regularly with a spray bottle. If you’re using a humidity tent, mist the inside of the tent.
3. Monitor for Contamination: Check your container regularly for signs of contamination. Look for mold, discoloration, or unusual odors. If you see any contamination, remove the affected area immediately.
4. Wait Patiently: The incubation period typically lasts 2-3 weeks. During this time, the mycelium will spread throughout the straw, turning it white. You’ll know it’s ready to fruit when the straw is almost completely covered in white mycelium.
Phase 4: Fruiting (Harvesting Your Mushrooms!)
The moment you’ve been waiting for! Once the mycelium has fully colonized the straw, it’s time to trigger fruiting.
1. Introduce Light: Move your container to a location with indirect light. Oyster mushrooms need light to fruit properly.
2. Increase Ventilation: Increase the ventilation by opening the container or tent slightly. This will help stimulate fruiting.
3. Maintain Humidity: Continue to mist the straw regularly to maintain high humidity.
4. Wait for Pins: After a few days, you’ll start to see small mushroom “pins” forming. These are the baby mushrooms!
5. Harvest Your Mushrooms: Once the mushrooms have reached a desirable size, harvest them by twisting them off the straw. Harvest before the caps flatten out completely and start dropping spores.
6. Enjoy Your Harvest: Congratulations! You’ve successfully grown your own oyster mushrooms. Enjoy them in your favorite recipes!
Tips for Success:
* Cleanliness is Key: Always sanitize your work area and equipment to prevent contamination.
* Maintain Proper Humidity: Oyster mushrooms need high humidity to fruit properly.
* Don’t Overwater: The straw should be damp but not dripping wet.
* Be Patient: Mushroom growing takes time. Don’t get discouraged if you don’t see results immediately.
* Experiment: Try different substrates and growing conditions to see what works best for you.
* Second Flush: After harvesting your first flush of mushrooms, you can often get a second flush by rehydrating the straw and providing the right conditions. Simply soak the straw in water for a few hours, then drain it and return it to its fruiting location.
Troubleshooting: Common Problems and Solutions
* Contamination: If you see mold or other contaminants, remove the affected area immediately. You can also try spraying the area with a diluted hydrogen peroxide solution.
* Slow Colonization: If the mycelium is colonizing the straw slowly, make sure the temperature is within the ideal range and that the humidity is high enough.
* No Fruiting: If the mycelium has fully colonized the straw but no mushrooms are forming, try increasing the light and ventilation.
* Small Mushrooms: If the mushrooms are small, it could be due to lack of humidity or nutrients. Try misting more frequently and adding a small amount of nutrient-rich material to the substrate.
Growing mushrooms at home is a rewarding and educational experience. With a little patience and attention to detail, you can enjoy a bountiful harvest of delicious, homegrown mushrooms. Happy growing!
Conclusion
So, there you have it! Cultivating your own mushrooms at home is not only surprisingly simple, but also incredibly rewarding. Forget those expensive, pre-packaged mushrooms from the grocery store – imagine the satisfaction of harvesting fresh, flavorful fungi right from your own kitchen. This DIY project is a must-try for anyone interested in sustainable living, gourmet cooking, or simply adding a touch of magic to their everyday life.
The beauty of this method lies in its adaptability. While we’ve outlined a straightforward approach using readily available materials, don’t be afraid to experiment! Try different substrates like coffee grounds mixed with straw for a richer, more complex flavor profile. Explore various mushroom varieties beyond the common oyster mushroom – shiitake, lion’s mane, and even wine caps can be successfully grown at home with a little research and patience. Consider adjusting the humidity levels based on your specific environment; a simple humidity gauge can be a valuable tool.
Why is this a must-try? Because it empowers you to take control of your food source, reduces your environmental footprint, and unlocks a world of culinary possibilities. Freshly grown mushrooms have a depth of flavor that store-bought varieties simply can’t match. Plus, the process itself is fascinating and educational, offering a unique connection to the natural world.
We encourage you to embark on this mushroom-growing adventure. Don’t be intimidated by the initial setup – the process is far more forgiving than you might think. Start small, learn from your experiences, and most importantly, have fun! Once you’ve mastered the basics, you can expand your operation and even share your bounty with friends and neighbors.
We’re confident that you’ll be amazed by the results. The taste of homegrown mushrooms is truly exceptional, and the sense of accomplishment you’ll feel is unparalleled. So, gather your supplies, follow our guide, and prepare to be amazed by the magic of fungi.
Don’t forget to share your experiences with us! We’d love to hear about your successes, challenges, and any unique variations you’ve discovered. Post photos of your mushroom harvests on social media using #HomegrownMushrooms and tag us so we can celebrate your achievements. Let’s build a community of home mushroom growers and inspire others to embrace this rewarding and sustainable practice. This is your chance to truly understand the process of how to grow mushrooms at home.
Frequently Asked Questions (FAQ)
What are the easiest types of mushrooms to grow at home for beginners?
Oyster mushrooms are widely considered the easiest and most forgiving type of mushroom to grow at home, especially for beginners. They are fast-growing, relatively tolerant of varying environmental conditions, and can thrive on a variety of substrates like straw, coffee grounds, and even cardboard. Other good options for beginners include shiitake mushrooms (though they require a bit more patience) and wine cap mushrooms, which can be grown outdoors in wood chip beds. Avoid more demanding varieties like morels until you have some experience under your belt.
What kind of substrate should I use to grow mushrooms at home?
The best substrate depends on the type of mushroom you’re growing. For oyster mushrooms, pasteurized straw is a popular and readily available option. Coffee grounds are another excellent choice, especially when mixed with straw or sawdust. Hardwood sawdust is ideal for shiitake mushrooms, while wine caps thrive in wood chip beds. Make sure your substrate is properly pasteurized or sterilized to eliminate competing organisms that could hinder mushroom growth.
How do I pasteurize or sterilize my mushroom substrate?
Pasteurization aims to reduce the number of competing organisms without completely eliminating them, while sterilization aims to kill all living organisms. For straw, you can pasteurize it by soaking it in hot water (around 160-180°F) for 1-2 hours. For smaller quantities of substrate like coffee grounds, you can microwave them in a microwave-safe container with a bit of water for a few minutes. For sterilization, you’ll need a pressure cooker. Place the substrate in autoclavable bags and pressure cook at 15 PSI for 90 minutes. Always allow the substrate to cool completely before inoculating it with mushroom spawn.
How long does it take to grow mushrooms at home?
The time it takes to grow mushrooms varies depending on the variety, substrate, and environmental conditions. Oyster mushrooms are typically the fastest, often fruiting within 2-3 weeks after inoculation. Shiitake mushrooms can take several months to fruit, while wine caps may take even longer. Patience is key! Monitor your substrate regularly, maintain proper humidity and temperature, and be prepared to wait for the magic to happen.
What are the ideal temperature and humidity conditions for growing mushrooms?
Different mushroom varieties have different temperature and humidity requirements. Oyster mushrooms generally prefer temperatures between 60-75°F and high humidity (80-90%). Shiitake mushrooms prefer cooler temperatures (50-65°F) and slightly lower humidity (70-80%). Research the specific requirements for the mushroom variety you’re growing and adjust your environment accordingly. A humidity gauge and thermometer can be helpful tools.
How do I know when my mushrooms are ready to harvest?
Mushrooms are typically ready to harvest when the caps have fully expanded but before they start to drop spores. For oyster mushrooms, harvest when the edges of the caps are still slightly curled downwards. For shiitake mushrooms, harvest when the caps have flattened out and the gills are visible. Gently twist or cut the mushrooms from the substrate, being careful not to damage the surrounding mycelium.
What if my mushroom substrate gets contaminated with mold?
Contamination is a common issue in mushroom cultivation. If you notice mold growing on your substrate, it’s important to address it quickly. If the contamination is localized, you can try removing the affected area with a clean knife or spoon. However, if the contamination is widespread, it’s best to discard the entire substrate to prevent the mold from spreading. Proper pasteurization or sterilization of the substrate is crucial for preventing contamination.
Can I reuse my mushroom substrate after harvesting?
Yes, you can often get multiple flushes (harvests) from a single substrate. After harvesting the first flush, rehydrate the substrate by soaking it in water for a few hours. Then, return it to its growing environment and wait for the next flush to appear. The number of flushes you can get depends on the type of mushroom and the quality of the substrate. Eventually, the substrate will become depleted of nutrients and will no longer produce mushrooms.
Is it safe to eat mushrooms grown at home?
Yes, it is generally safe to eat mushrooms grown at home, provided that you have correctly identified the species and followed proper cultivation techniques. Only consume mushrooms that you are 100% certain are edible. If you are unsure about the identity of a mushroom, it’s best to err on the side of caution and discard it. Always cook mushrooms thoroughly before eating them.
Where can I buy mushroom spawn?
Mushroom spawn can be purchased from a variety of online retailers and specialty mushroom supply stores. Look for reputable suppliers that offer high-quality spawn of the mushroom variety you want to grow. You can also find mushroom spawn at some local garden centers or agricultural supply stores. Make sure the spawn is fresh and properly stored before using it.
Leave a Comment