

Grow Pea Shoots at Home – and unlock a world of fresh, vibrant flavor right on your windowsill! Have you ever wondered how to bring the taste of spring indoors, even when the weather outside is less than inspiring? Well, I’m here to tell you it’s easier than you think, and incredibly rewarding. For centuries, pea shoots have been a culinary delight in Asian cuisine, prized for their delicate sweetness and crisp texture. Now, you can easily cultivate these nutritional powerhouses yourself, no matter your gardening experience.
Why should you bother learning to grow pea shoots at home? Because store-bought pea shoots can be expensive and often lack the freshness of homegrown. Plus, there’s something incredibly satisfying about nurturing your own food from seed to table. Imagine adding a handful of these tender greens to your salads, stir-fries, or even sandwiches – a burst of flavor and a boost of vitamins, all thanks to your own green thumb! This DIY guide will walk you through every step, from choosing the right seeds to harvesting your first batch of delicious pea shoots. Get ready to transform your kitchen into a mini-garden and enjoy the freshest, most flavorful greens imaginable!
Grow Your Own Delicious Pea Shoots at Home: A Beginner’s Guide
Hey there, fellow plant enthusiasts! Are you looking for a super easy and rewarding way to grow your own fresh greens? Look no further than pea shoots! They’re packed with nutrients, incredibly versatile in the kitchen, and ridiculously simple to cultivate right in your own home. I’m going to walk you through everything you need to know to get started. Trust me, even if you think you have a black thumb, you can totally do this!
What You’ll Need
Before we dive into the nitty-gritty, let’s gather our supplies. The beauty of this project is that you probably already have most of these things lying around.
* Pea Seeds: This is the most important ingredient! You’ll want to use dried peas specifically for sprouting or gardening. Avoid using processed peas meant for cooking, as they might not germinate. I personally love using snow pea or sugar snap pea seeds, but any variety will work. You can find these at your local garden center or online.
* Growing Trays or Containers: You can use anything from shallow plastic trays (like the kind you get from takeout) to repurposed containers like yogurt tubs or even old baking dishes. Just make sure they have drainage holes! If they don’t, you’ll need to drill some.
* Growing Medium: You have a few options here. You can use potting soil, coconut coir, or even just paper towels. I prefer using potting soil because it provides a little extra nutrition for the pea shoots, but coconut coir is a great sustainable alternative.
* Water: Good old H2O! You’ll need a spray bottle or watering can to keep your pea shoots moist.
* Spray Bottle: For misting the seeds and shoots.
* A Dark Place: A cupboard, closet, or even under the sink will do. This is where the seeds will germinate.
* A Sunny Spot: Once the shoots sprout, they’ll need sunlight to grow strong and green. A windowsill or a spot under a grow light works perfectly.
* Scissors or Kitchen Shears: For harvesting your delicious pea shoots!
Step-by-Step Instructions: From Seed to Salad
Okay, now that we have everything we need, let’s get planting!
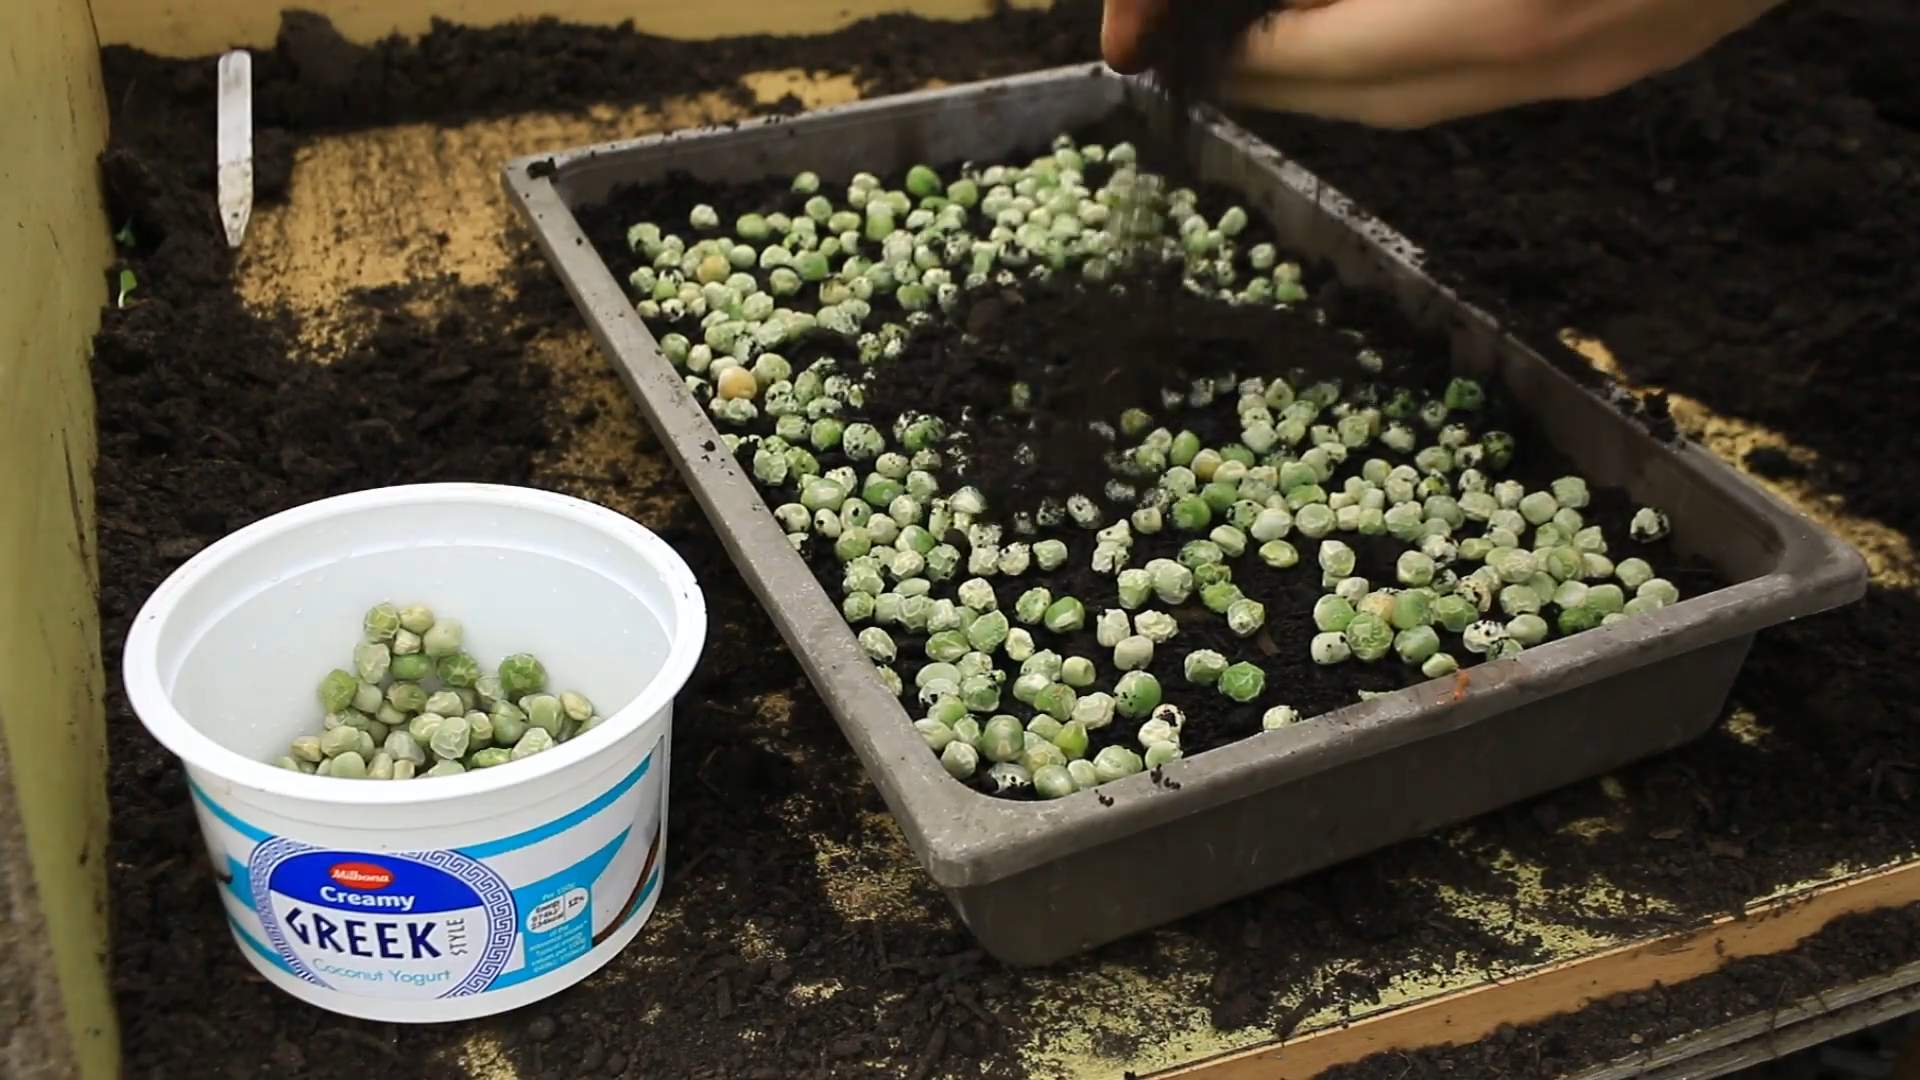
1. Soaking the Seeds: This is a crucial step to kickstart the germination process. Place your pea seeds in a bowl and cover them with plenty of water. Let them soak for 8-12 hours, or even overnight. You’ll notice that the seeds will plump up as they absorb water. This is a good sign! Soaking helps soften the seed coat and makes it easier for the sprouts to emerge.
2. Preparing the Growing Tray: While your seeds are soaking, prepare your growing tray. If you’re using potting soil or coconut coir, fill the tray with about 1-2 inches of the medium. Gently pat it down to create a level surface. If you’re using paper towels, layer several sheets of damp paper towels in the bottom of the tray. Make sure they’re thoroughly wet but not soaking.
3. Sowing the Seeds: Once the seeds have soaked, drain the water and spread them evenly over the surface of the growing medium. You can pack them in pretty densely – pea shoots don’t need a lot of space to grow. Just make sure they’re not overlapping too much.
4. Covering the Seeds: Gently cover the seeds with a thin layer of the growing medium (if using soil or coir) or another layer of damp paper towels. This helps to keep the seeds moist and dark, which is ideal for germination.
5. Darkness is Key: Now, place your growing tray in a dark, cool place. This is where the magic happens! The darkness encourages the seeds to sprout.
6. Misting Regularly: Every day, check on your seeds and mist them with water to keep the growing medium moist. You don’t want it to be soggy, just damp.
7. Sprouting Time: After 2-3 days, you should start to see little sprouts emerging from the seeds. This is so exciting!
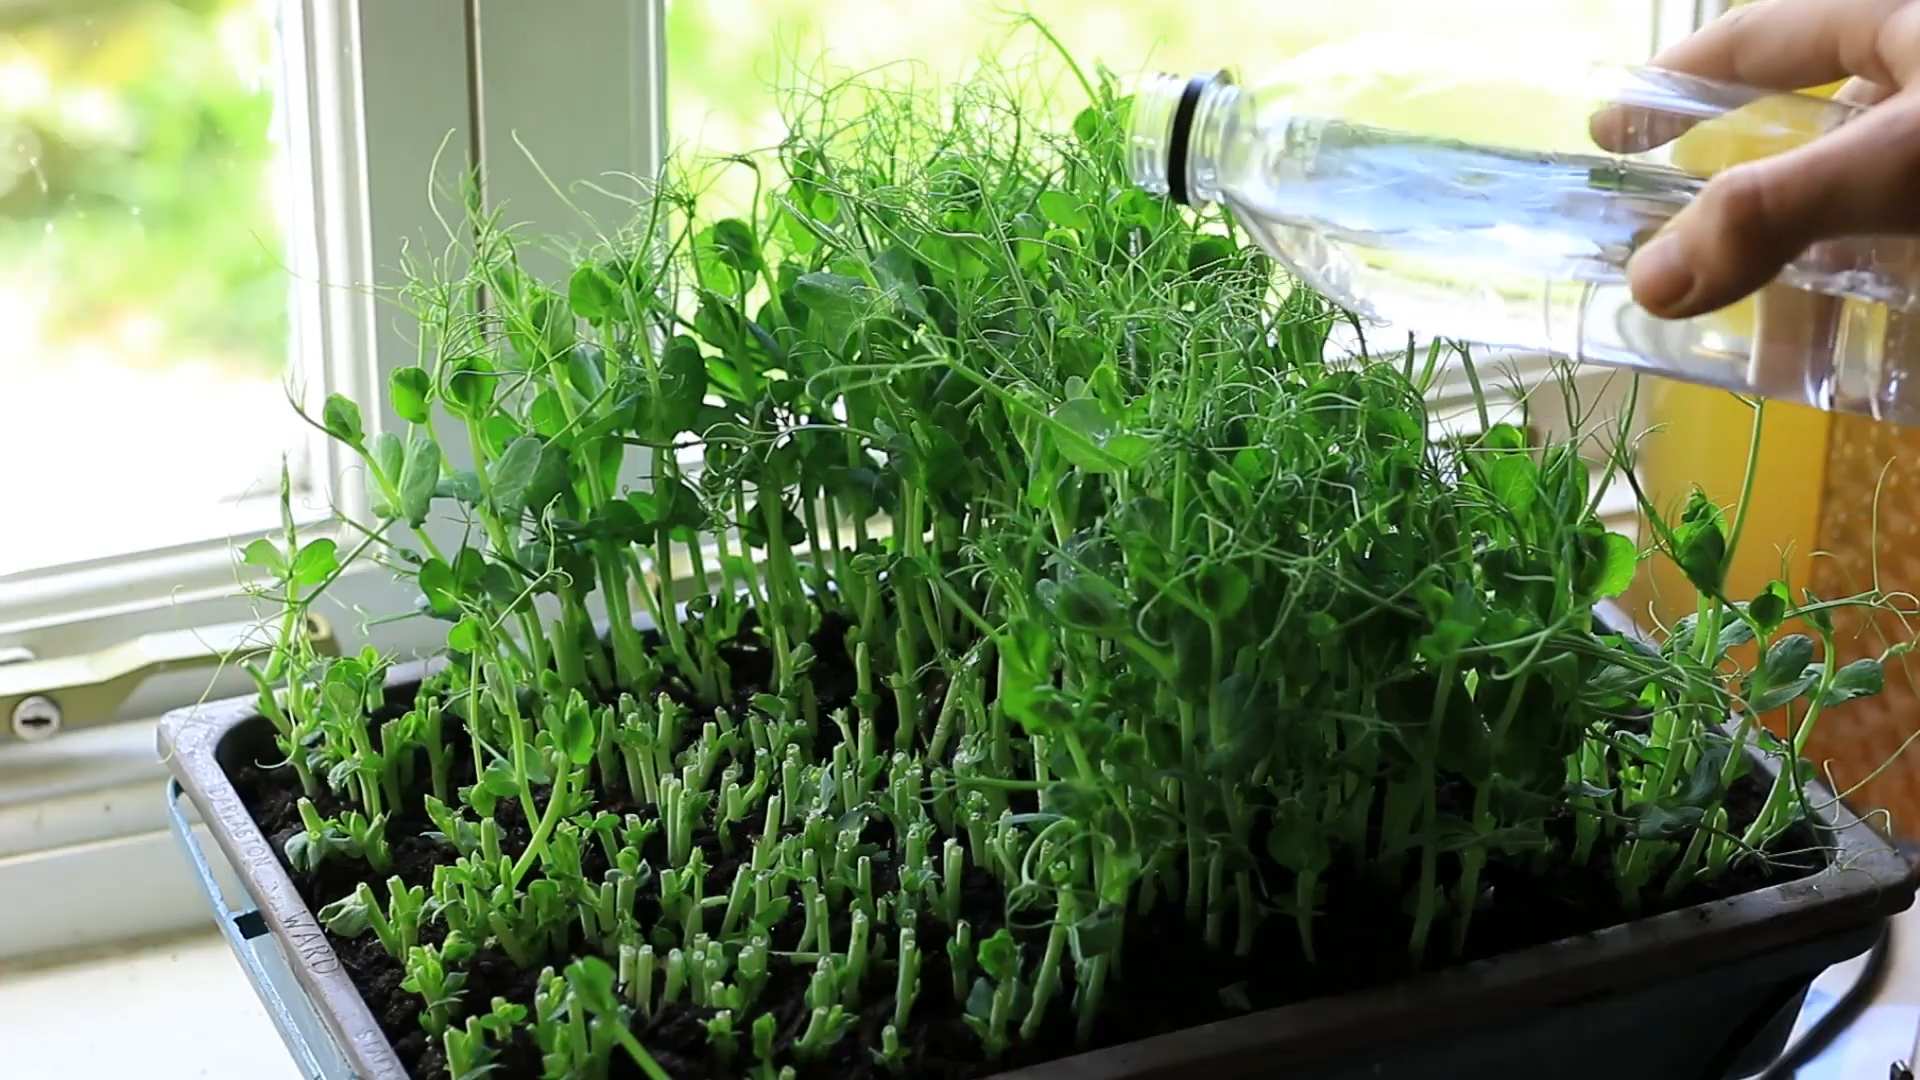
8. Introducing Light: Once the sprouts have emerged, it’s time to move your growing tray to a sunny spot. A windowsill that gets plenty of sunlight is ideal. If you don’t have a sunny windowsill, you can use a grow light.
9. Watering and Monitoring: Continue to water your pea shoots regularly, keeping the growing medium moist but not soggy. You’ll notice that the shoots will start to grow taller and develop leaves.
10. Harvest Time! After about 1-2 weeks, your pea shoots will be ready to harvest. They should be about 4-6 inches tall and have several leaves. To harvest, simply use scissors or kitchen shears to cut the shoots just above the lowest set of leaves.
11. Enjoy Your Harvest: Now for the best part – eating your delicious pea shoots! They’re great in salads, sandwiches, stir-fries, soups, or even just as a snack.
Troubleshooting Tips
Even with the simplest projects, sometimes things don’t go exactly as planned. Here are a few common issues you might encounter and how to fix them:
* Seeds Not Germinating: If your seeds aren’t germinating, it could be due to a few reasons. First, make sure your seeds are fresh and viable. Old seeds may not germinate well. Second, make sure you’re keeping the growing medium moist enough. Third, the temperature might be too cold. Pea seeds germinate best in temperatures between 60-70°F (15-21°C).
* Mold Growth: If you see mold growing on your pea shoots, it’s usually a sign that the growing medium is too wet. Try to improve air circulation by placing a small fan near the growing tray. You can also try misting less frequently. If the mold is severe, you may need to start over with fresh seeds and a clean growing tray.
* Leggy Shoots: If your pea shoots are tall and spindly, it means they’re not getting enough light. Move them to a sunnier spot or use a grow light.
* Yellowing Leaves: Yellowing leaves can be a sign of overwatering or underwatering. Make sure you’re watering your pea shoots regularly, but don’t let the growing medium become waterlogged.
Extending Your Harvest
The great thing about pea shoots is that you can get multiple harvests from a single planting. After you harvest the shoots, leave the bottom portion of the stems intact. With proper watering and sunlight, they will often regrow, giving you another harvest in a week or two.
Creative Uses for Your Pea Shoots
Okay, so you’ve got a bounty of pea shoots. Now what? Here are some of my favorite ways to use them:
* Salads: Pea shoots add a fresh, slightly sweet flavor and a delicate crunch to salads.
* Sandwiches and Wraps: Toss a handful of pea shoots into your sandwiches or wraps for an extra boost of nutrients and flavor.
* Stir-Fries: Pea shoots are a great addition to stir-fries. Add them towards the end of cooking to preserve their crispness.
* Soups: Garnish your soups with pea shoots for a pop of color and flavor.
* Pesto: Blend pea shoots with basil, garlic, Parmesan cheese, and olive oil to make a delicious pesto.
* Juices and Smoothies: Add pea shoots to your juices and smoothies for a healthy dose of vitamins and minerals.
* Microgreen Mixes: Combine pea shoots with other microgreens like radish sprouts or sunflower shoots for a flavorful and nutritious mix.
Why Grow Pea Shoots?
Besides being incredibly easy to grow, pea shoots offer a ton of benefits:
* Nutrient-Rich: Pea shoots are packed with vitamins A, C, and K, as well as folate and fiber.
* Delicious Flavor: They have a sweet, slightly grassy flavor that’s perfect for adding to a variety of dishes.
* Sustainable: Growing your own pea shoots is a sustainable way to get fresh greens.
* Cost-Effective: It’s much cheaper to grow your own pea shoots than to buy them at the store.
* Rewarding: There’s nothing quite like the satisfaction of growing your own food!
Final Thoughts
Growing pea shoots at home is a fun, easy, and rewarding project that anyone can do. So, grab some pea seeds, a container, and get ready to enjoy your own homegrown greens! I hope this guide has been helpful. Happy growing!
Conclusion
So, there you have it! Growing your own pea shoots at home is not just a fun project; it’s a gateway to incredibly fresh, flavorful, and nutritious greens right at your fingertips. Forget those wilted, overpriced bags at the grocery store. With minimal effort and resources, you can cultivate a thriving patch of these delicate tendrils, ready to elevate your salads, stir-fries, and sandwiches.
This DIY trick is a must-try for several compelling reasons. First and foremost, the taste is unparalleled. Homegrown pea shoots boast a sweetness and crispness that you simply can’t find in commercially grown varieties. Secondly, you have complete control over the growing process, ensuring that your greens are free from harmful pesticides and herbicides. This is especially important if you’re conscious about what you’re putting into your body. Thirdly, it’s incredibly cost-effective. A single packet of pea seeds can yield multiple harvests, making it a far more economical option than constantly buying pea shoots from the store. Finally, it’s incredibly rewarding to watch something you’ve nurtured grow and flourish. It’s a small connection to nature that can bring a surprising amount of joy.
But the beauty of this DIY project lies in its adaptability. Feel free to experiment with different types of pea seeds. Snow peas, snap peas, and garden peas all produce delicious shoots, each with its own unique flavor profile. You can also try varying the growing medium. While soil is a classic choice, you can also use coco coir or even just water. If you’re feeling adventurous, try adding a small amount of organic fertilizer to the growing medium to boost growth and nutrient content.
Consider growing your pea shoots in different containers. While a standard tray works perfectly well, you could also use recycled plastic containers, old yogurt tubs, or even a repurposed window box. Just make sure the container has adequate drainage. For those with limited space, vertical growing systems can be a great option.
Don’t be afraid to get creative with how you use your homegrown pea shoots. Beyond salads and stir-fries, try adding them to soups, omelets, or even smoothies. They also make a beautiful and flavorful garnish for almost any dish. Lightly sautéed pea shoots with garlic and a drizzle of olive oil are a simple yet elegant side dish.
We wholeheartedly encourage you to give this DIY trick a try. It’s a simple, rewarding, and delicious way to bring a touch of freshness to your kitchen. Once you’ve experienced the joy of harvesting your own pea shoots, you’ll never want to go back to store-bought again. And most importantly, we want to hear about your experience! Share your photos, tips, and variations in the comments below. Let’s build a community of pea shoot enthusiasts and inspire others to embrace the joys of homegrown goodness. Let us know what worked for you, what challenges you faced, and any creative ways you’ve found to use your homegrown bounty. Happy growing!
Frequently Asked Questions (FAQ)
What kind of peas should I use to grow pea shoots?
You can use a variety of pea seeds to grow pea shoots, but some varieties are better suited than others. Snow peas, snap peas, and garden peas all work well. Look for varieties specifically labeled for “sprouts” or “shoots” as these tend to have a higher germination rate and produce more tender shoots. Avoid using treated seeds, as these are coated with chemicals that are not safe for consumption.
How long does it take to grow pea shoots?
One of the best things about growing pea shoots is how quickly they grow! You can typically harvest your first batch of shoots within 10-14 days of planting. The exact time will depend on factors such as temperature, light, and humidity.
What kind of light do pea shoots need?
Pea shoots need adequate light to grow properly. While they don’t need direct sunlight, they do need bright, indirect light. A sunny windowsill is often sufficient, but if you don’t have access to enough natural light, you can supplement with a grow light. Insufficient light can result in leggy, pale shoots.
How often should I water pea shoots?
It’s important to keep the growing medium consistently moist, but not waterlogged. Water your pea shoots every day or two, depending on the humidity and temperature. The soil should feel damp to the touch. Avoid overwatering, as this can lead to mold or mildew growth.
How do I harvest pea shoots?
Harvesting pea shoots is easy! Once the shoots are 4-6 inches tall, you can snip them off with scissors or kitchen shears. Cut the shoots just above the lowest set of leaves, leaving the roots and lower stem intact. This will allow the plant to regrow and produce another harvest.
Can I get multiple harvests from one planting?
Yes, you can typically get 2-3 harvests from a single planting of pea seeds. After each harvest, continue to water and provide light to the plants. They will usually regrow within a week or two. The subsequent harvests may be slightly less abundant than the first, but they will still provide you with delicious pea shoots.
What if my pea shoots start to mold?
Mold growth is usually a sign of overwatering or poor ventilation. If you notice mold, remove the affected shoots immediately. Improve ventilation by placing a small fan near the growing area. Reduce watering frequency and ensure that the growing medium is well-draining. You can also try spraying the shoots with a diluted solution of hydrogen peroxide and water (1 part hydrogen peroxide to 10 parts water) to help control mold growth.
Are pea shoots nutritious?
Absolutely! Pea shoots are packed with nutrients, including vitamins A, C, and K, as well as folate, fiber, and antioxidants. They are also a good source of protein and minerals like iron and manganese. Adding pea shoots to your diet is a great way to boost your overall health and well-being.
Can I grow pea shoots outdoors?
Yes, you can grow pea shoots outdoors, but they are best suited for cooler temperatures. Plant them in early spring or late summer for best results. Choose a location that receives partial shade, as direct sunlight can scorch the delicate shoots. Protect them from strong winds and heavy rain.
What can I do with pea shoots besides eating them in salads?
Pea shoots are incredibly versatile and can be used in a variety of dishes. Try adding them to stir-fries, soups, omelets, or sandwiches. They also make a delicious and nutritious addition to smoothies. You can even lightly sauté them with garlic and olive oil for a simple yet elegant side dish. Get creative and experiment with different ways to incorporate pea shoots into your meals!
How do I store pea shoots after harvesting?
To store pea shoots, gently rinse them with cold water and pat them dry with a paper towel. Store them in a plastic bag or container in the refrigerator. They will typically last for 3-5 days. For best results, use them as soon as possible after harvesting.
Can I use store-bought dried peas to grow pea shoots?
While it’s possible to use store-bought dried peas, the germination rate may be lower than with seeds specifically intended for sprouting. Also, ensure the dried peas are not treated with any chemicals. Soaking them overnight before planting can help improve germination. However, for the best results, it’s recommended to use seeds specifically labeled for sprouts or shoots.
Leave a Comment