Grow Shallots at Home – and unlock a world of culinary possibilities right in your backyard! Have you ever dreamt of snipping fresh, flavorful shallots just moments before adding them to your favorite dish? Well, dream no more! This DIY guide is your key to cultivating these gourmet gems with ease.
Shallots, with their delicate onion-garlic flavor, have been prized for centuries. Originating in Central or Southwest Asia, they’ve journeyed across continents, becoming a staple in cuisines worldwide. From French sauces to Asian stir-fries, shallots add a depth of flavor that’s simply irresistible. But why rely on store-bought shallots when you can grow shallots at home, ensuring freshness and quality every time?
In today’s world, where we’re increasingly conscious of where our food comes from, home gardening is more popular than ever. Growing your own shallots not only provides you with delicious ingredients but also connects you to the earth and offers a rewarding sense of accomplishment. Plus, let’s be honest, store-bought shallots can be expensive and sometimes lack the vibrant flavor we crave. This DIY guide will empower you to bypass the grocery store and enjoy a constant supply of fresh, flavorful shallots, all while saving money and reducing your environmental impact. So, grab your gardening gloves, and let’s get started!

Grow Shallots at Home: A Beginner’s Guide
Hey there, fellow gardening enthusiasts! Ever dreamt of snipping fresh shallots right from your own backyard? Well, dream no more! Growing shallots at home is surprisingly easy and rewarding. I’m going to walk you through everything you need to know, from choosing the right shallots to harvesting your flavorful bounty. Let’s get our hands dirty!
Choosing Your Shallots
Before we even think about planting, we need to select our shallots. You have two main options:
* Shallot Sets: These are small, immature shallots that are ready to plant. They’re the easiest option for beginners and widely available at garden centers. Look for firm, healthy sets without any signs of mold or rot.
* Shallots from the Grocery Store: Yes, you can actually grow shallots from the ones you buy for cooking! Just make sure they’re organic to avoid any growth inhibitors. Choose shallots that are firm and plump, with no soft spots or sprouting. If they’re already sprouting, even better!
Preparing for Planting
Shallots are pretty adaptable, but they thrive in well-drained soil and plenty of sunlight. Here’s how to get your garden ready:
* Sunlight: Shallots need at least 6 hours of direct sunlight per day. Choose a spot in your garden that gets plenty of sunshine.
* Soil: Well-drained soil is crucial. Shallots don’t like sitting in soggy soil, which can lead to rot. Amend your soil with compost or other organic matter to improve drainage and fertility. Aim for a slightly acidic to neutral pH (around 6.0 to 7.0).
* Timing: The best time to plant shallots is in the fall (September-October) in warmer climates or early spring (February-March) in colder climates. This allows them to establish roots before the hot summer months.
Planting Your Shallots
Now for the fun part! Let’s get those shallots in the ground.
1. Prepare the Soil: Loosen the soil with a garden fork or tiller to a depth of about 12 inches. Mix in plenty of compost or other organic matter.
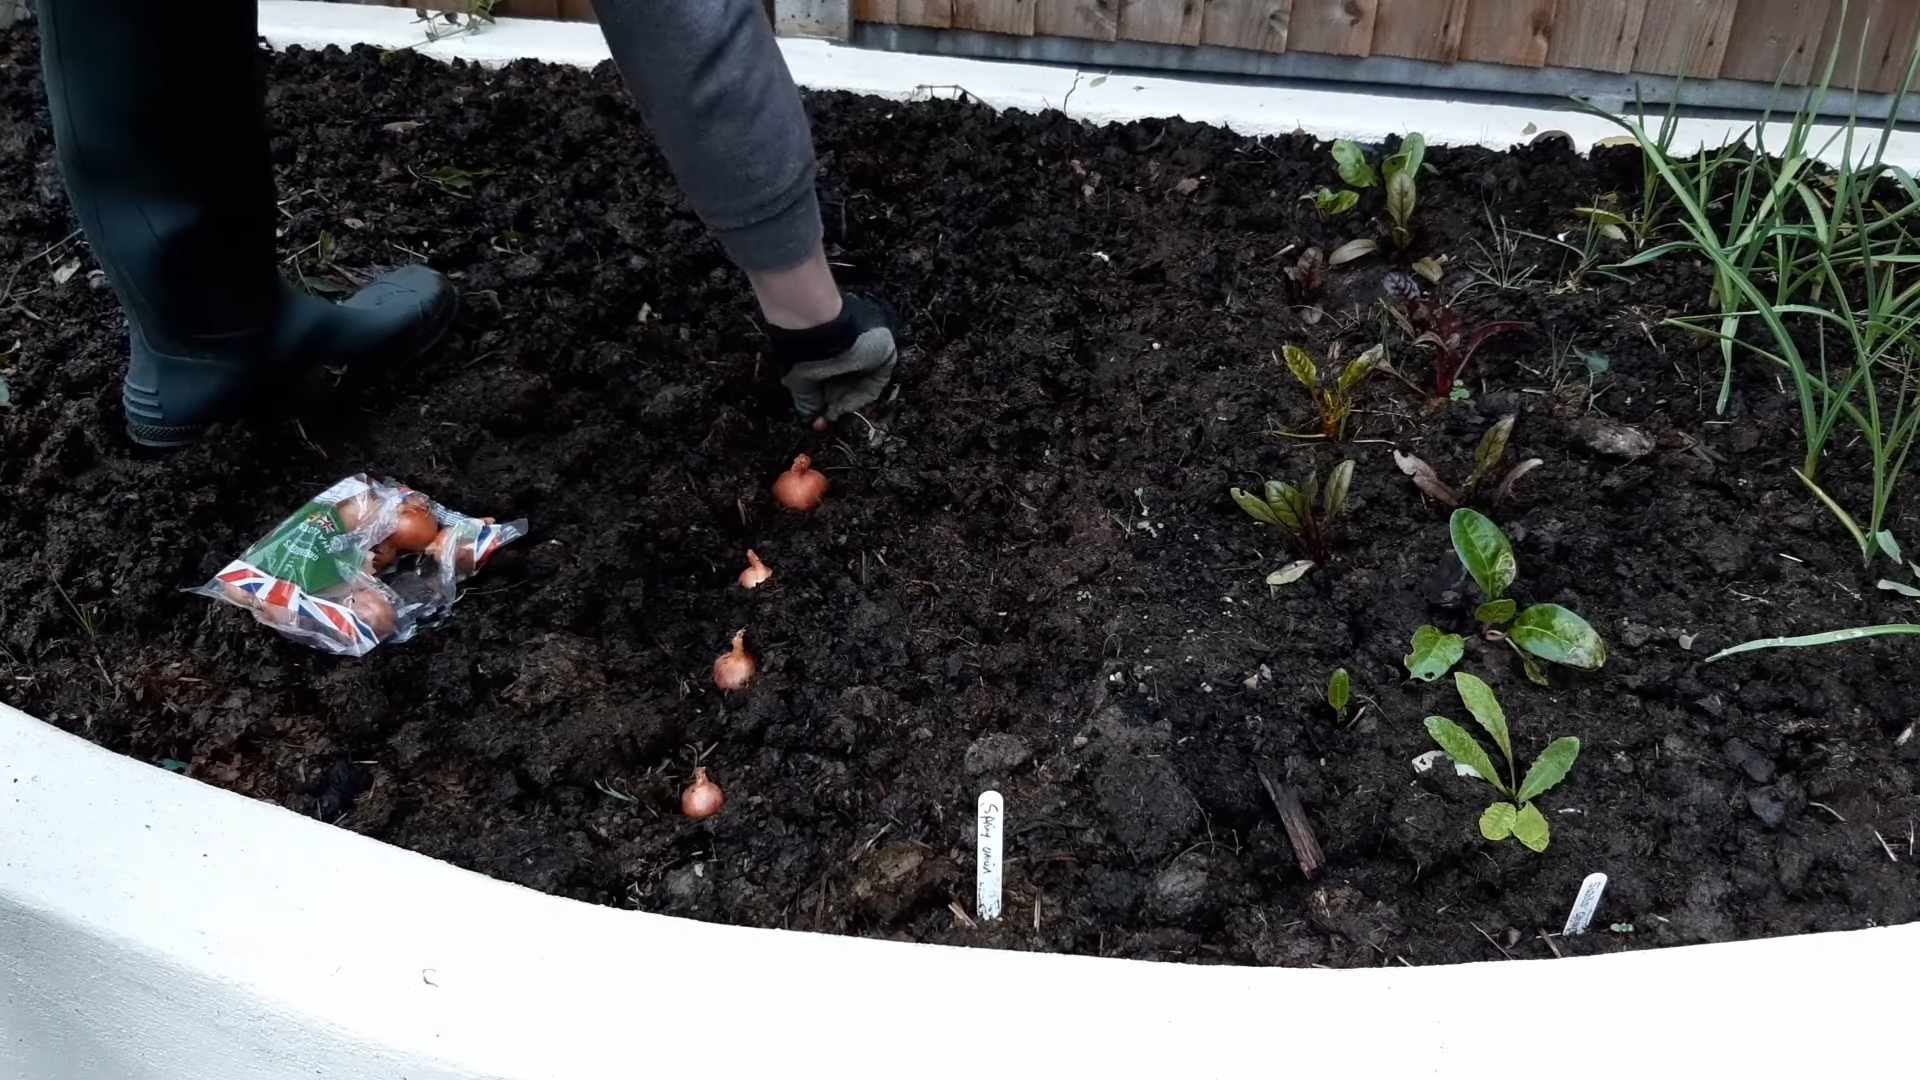
2. Planting Depth: Plant the shallot sets or bulbs about 1-2 inches deep, with the pointed end facing up.
3. Spacing: Space the shallots about 6-8 inches apart in rows that are 12-18 inches apart. This gives them enough room to grow and multiply.
4. Watering: Water the newly planted shallots thoroughly. The soil should be moist but not soggy.
5. Mulching: Apply a layer of mulch, such as straw or shredded leaves, around the shallots. This helps to retain moisture, suppress weeds, and regulate soil temperature.
Caring for Your Shallots
Shallots are relatively low-maintenance, but they do need some attention to thrive.
* Watering: Water regularly, especially during dry periods. Aim to keep the soil consistently moist, but avoid overwatering.
* Weeding: Keep the area around your shallots free of weeds. Weeds compete for nutrients and water, which can stunt the growth of your shallots.
* Fertilizing: Shallots benefit from occasional feeding. Apply a balanced fertilizer every few weeks during the growing season. You can also side-dress with compost or well-rotted manure.
* Pest and Disease Control: Shallots are generally resistant to pests and diseases, but they can be susceptible to onion maggots and fungal diseases. Inspect your plants regularly for any signs of problems. If you notice any pests, you can try using insecticidal soap or neem oil. For fungal diseases, ensure good air circulation and avoid overwatering.
Harvesting Your Shallots
The moment we’ve all been waiting for! Harvesting your homegrown shallots.
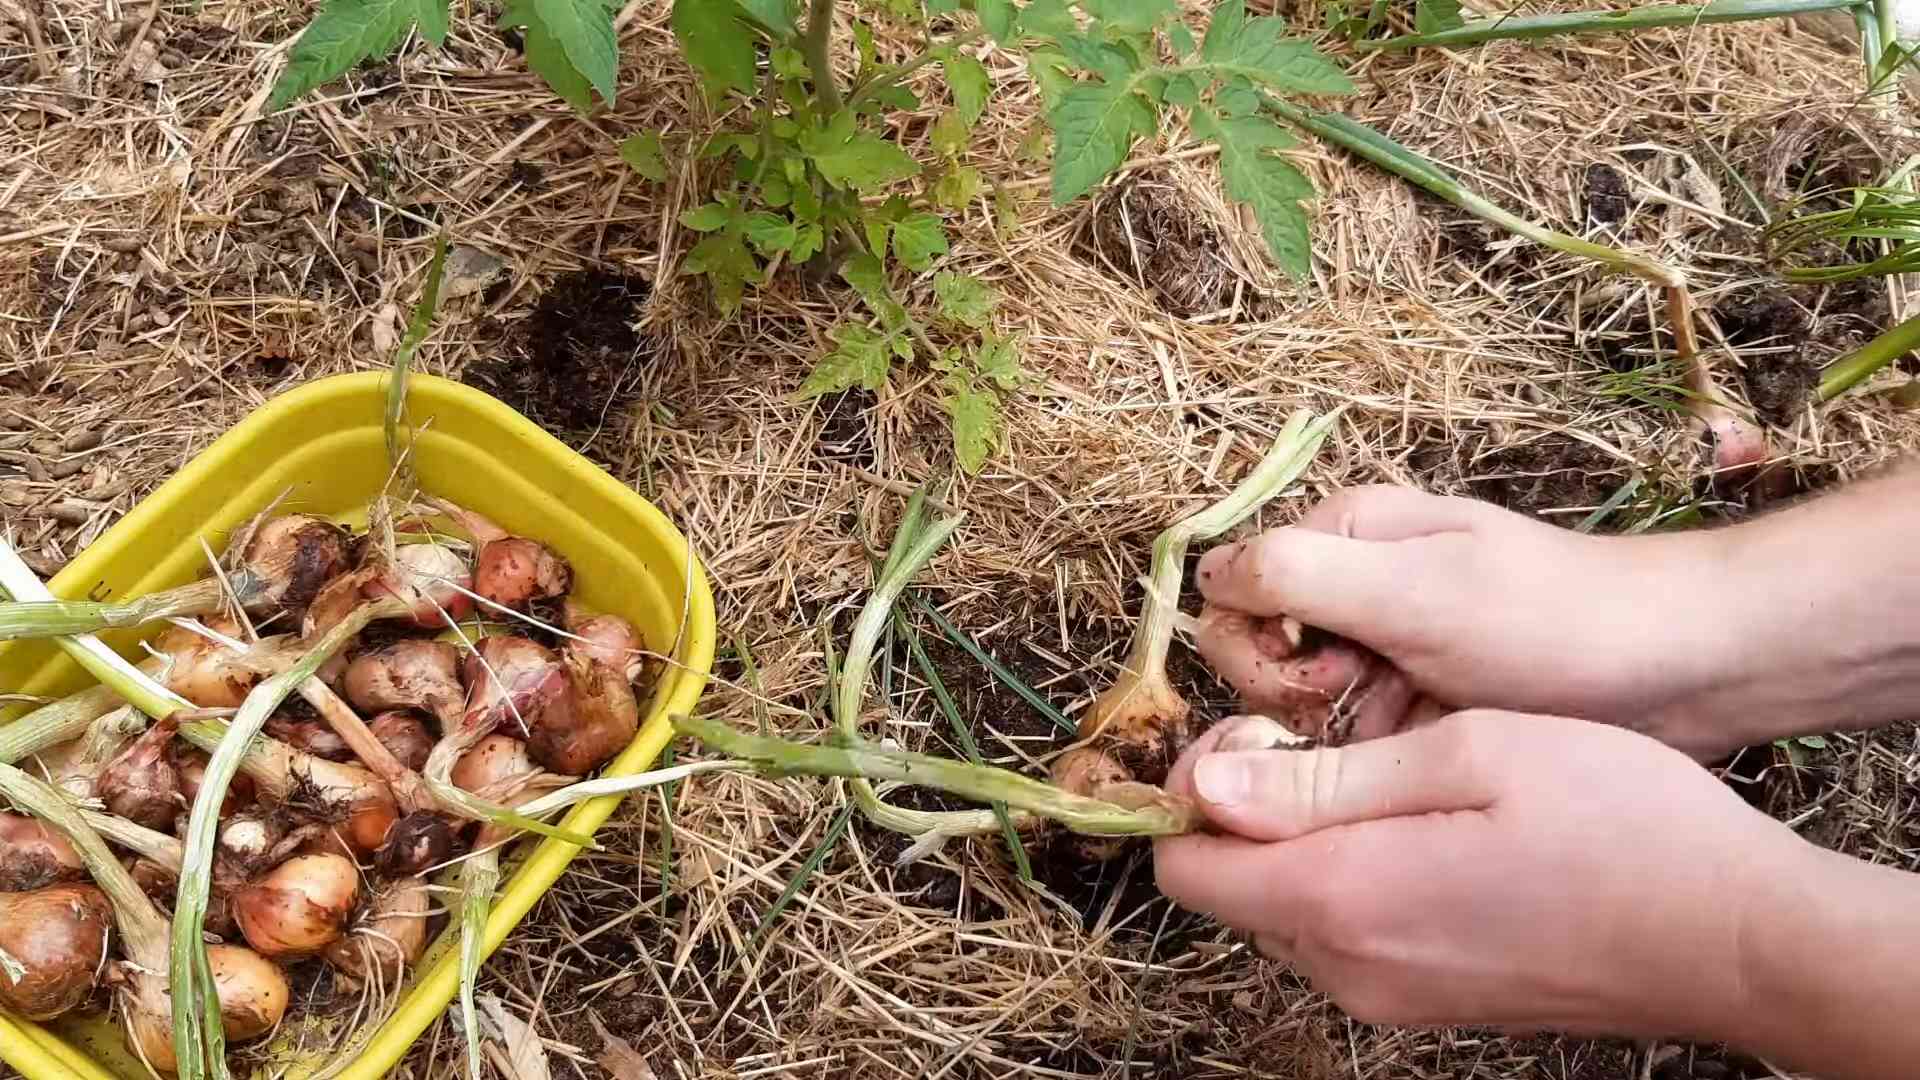
1. When to Harvest: Shallots are typically ready to harvest in the summer, about 90-120 days after planting. The leaves will start to turn yellow and brown, and the bulbs will be plump and firm.
2. How to Harvest: Gently loosen the soil around the shallots with a garden fork or trowel. Carefully lift the bulbs from the ground.
3. Curing: After harvesting, cure the shallots in a warm, dry place for about 2-3 weeks. This allows the outer layers to dry and toughen, which helps to prevent rot during storage. Spread the shallots out in a single layer on a screen or tray, and make sure they have good air circulation.
4. Storing: Once the shallots are cured, store them in a cool, dry, and dark place. They should last for several months. You can store them in a mesh bag or a basket.
Troubleshooting
Even with the best care, you might encounter some challenges along the way. Here are a few common problems and how to address them:
* Shallots Not Bulbing: This can be caused by several factors, including poor soil, lack of sunlight, or overwatering. Make sure your soil is well-drained and fertile, and that your shallots are getting enough sunlight. Avoid overwatering, and consider fertilizing with a balanced fertilizer.
* Yellowing Leaves: Yellowing leaves can be a sign of nutrient deficiency, overwatering, or disease. Check your soil pH and nutrient levels, and adjust accordingly. Ensure good drainage and avoid overwatering. If you suspect a disease, treat with an appropriate fungicide.
* Rotting Bulbs: Rotting bulbs are usually caused by overwatering or poor drainage. Make sure your soil is well-drained, and avoid overwatering. If you notice any rotting bulbs, remove them immediately to prevent the spread of disease.
Growing Shallots in Containers
Don’t have a garden? No problem! You can easily grow shallots in containers.
1. Choose the Right Container: Select a container that is at least 8 inches deep and wide. Make sure it has drainage holes to prevent waterlogging.
2. Use a Good Potting Mix: Use a high-quality potting mix that is well-draining and contains plenty of organic matter.
3. Planting: Plant the shallot sets or bulbs about 1-2 inches deep, with the pointed end facing up. Space them about 4-6 inches apart.
4. Watering: Water regularly, especially during dry periods. The soil should be moist but not soggy.
5. Fertilizing: Fertilize every few weeks with a balanced fertilizer.
6. Sunlight: Place the container in a location that gets at least 6 hours of direct sunlight per day.
Propagating Shallots
Shallots are perennials, which means they can be grown year after year. You can propagate them by dividing the bulbs.
1. When to Divide: Divide the bulbs in the fall or early spring.
2. How to Divide: Carefully dig up the shallot bulbs. Gently separate the individual bulbs.
3. Replanting: Replant the bulbs in a new location, following the same planting instructions as above.
Using Your Homegrown Shallots
Now that you’ve harvested your delicious shallots, it’s time to enjoy them! Shallots have a milder, sweeter flavor than onions, making them a versatile ingredient in a variety of dishes.
* Raw: Finely chop shallots and add them to salads, salsas, or vinaigrettes.
* Cooked: Sauté shallots in butter or olive oil and add them to soups, stews, sauces, or stir-fries.
* Roasted: Roast shallots with other vegetables for a flavorful side dish.
* Pickled: Pickle shallots for a tangy condiment.
Different Varieties of Shallots
While all shallots share similar characteristics, there are different varieties that offer subtle variations in flavor and size. Exploring these can add a fun dimension to your gardening and cooking. Here are a few popular types:
* French Red Shallots: These are known for their classic shallot flavor, a balance of onion and garlic with a hint of sweetness. They’re a reliable choice for most recipes.
* Gray Shallots (Griselle): These are considered by many to be the “true” shallot, with a more intense and complex flavor. They’re often used in French cuisine. They can be a bit harder to find than other varieties.
* Dutch Yellow Shallots: These are larger and milder than French red shallots, making them a good choice for those who prefer a less pungent flavor.
* Jersey Shallots: These are a heritage variety known for their exceptional flavor and storage capabilities. They are a bit harder to find but worth the effort if you can locate them.
Experimenting with different varieties can help you discover your favorite shallot flavor profile!
Saving Shallot Seeds (Technically, Not Seeds!)
While shallots are typically

Conclusion
So, there you have it! Growing shallots at home isn’t just a gardening project; it’s an investment in flavor, freshness, and a more sustainable kitchen. Forget those sad, overpriced shallots at the grocery store. Imagine plucking plump, flavorful shallots straight from your own garden, ready to elevate your next culinary creation. This simple DIY trick transforms a humble bulb into a bountiful harvest, offering a rewarding experience for both novice and seasoned gardeners alike.
Why is this a must-try? Because it’s economical, environmentally friendly, and incredibly satisfying. You’re reducing your reliance on commercially grown produce, minimizing your carbon footprint, and gaining a deeper connection to the food you eat. Plus, the taste of homegrown shallots is simply unmatched. They possess a delicate sweetness and subtle pungency that store-bought varieties often lack.
But the fun doesn’t stop there! Feel free to experiment with different varieties of shallots to discover your personal favorite. Try growing French Grey shallots for their delicate flavor, or Dutch Yellow shallots for their robust taste. You can also explore different planting methods, such as starting shallots from seed or using shallot sets for a quicker harvest. Consider companion planting with herbs like rosemary or thyme to deter pests and enhance the flavor of your shallots.
Furthermore, don’t limit yourself to just the bulbs. Shallot greens are also edible and delicious! Use them as a substitute for scallions in salads, soups, or as a garnish for your favorite dishes. They offer a mild, oniony flavor that adds a fresh, vibrant touch to any meal.
This DIY trick for growing shallots at home is more than just a gardening tip; it’s a gateway to a more flavorful and sustainable lifestyle. It’s a chance to connect with nature, learn new skills, and enjoy the fruits (or rather, the bulbs) of your labor.
We wholeheartedly encourage you to give this a try. It’s easier than you think, and the rewards are well worth the effort. Don’t be afraid to experiment, adapt the techniques to your own garden conditions, and most importantly, have fun!
Once you’ve experienced the joy of harvesting your own homegrown shallots, we’d love to hear about it! Share your experiences, tips, and photos in the comments below. Let’s create a community of shallot-loving gardeners and inspire others to embrace the joys of growing their own food. What variety did you grow? What challenges did you face, and how did you overcome them? Your insights could be invaluable to other aspiring shallot growers. So, get your hands dirty, plant those shallots, and let the growing begin!
Frequently Asked Questions (FAQ)
What are the best conditions for growing shallots?
Shallots thrive in well-drained soil and full sun (at least 6 hours of direct sunlight per day). The soil should be rich in organic matter. Amend your soil with compost or well-rotted manure before planting to improve drainage and fertility. The ideal soil pH is between 6.0 and 7.0. If your soil is heavy clay, consider growing shallots in raised beds or containers to improve drainage. Proper drainage is crucial to prevent bulb rot.
When is the best time to plant shallots?
The best time to plant shallots depends on your climate. In colder climates, plant shallots in early spring, as soon as the ground can be worked. In milder climates, you can plant shallots in the fall for a summer harvest. Fall-planted shallots will overwinter and produce larger bulbs. If you’re unsure, consult your local gardening extension office for specific planting recommendations for your region.
How do I plant shallots?
To plant shallots, separate the bulbs and plant them about 6-8 inches apart in rows that are 12-18 inches apart. Plant the bulbs with the pointed end facing up, burying them about 1-2 inches deep. Water thoroughly after planting. As the shallots grow, you may need to thin them out to provide adequate space for bulb development.
How often should I water shallots?
Shallots need consistent moisture, especially during bulb formation. Water deeply whenever the top inch of soil feels dry. Avoid overwatering, as this can lead to bulb rot. During periods of heavy rain, you may need to reduce watering frequency. Mulching around the plants can help retain moisture and suppress weeds.
What kind of fertilizer should I use for shallots?
Shallots benefit from regular fertilization. Use a balanced fertilizer (e.g., 10-10-10) at planting time. You can also side-dress with a nitrogen-rich fertilizer a few weeks after planting to promote leafy growth. Avoid over-fertilizing, as this can lead to excessive foliage growth at the expense of bulb development. Organic options include compost tea or fish emulsion.
How do I harvest shallots?
Shallots are typically ready to harvest when the tops begin to yellow and fall over. Gently loosen the soil around the bulbs and pull them up. Cure the shallots by laying them out in a warm, dry, well-ventilated place for a week or two. This allows the outer skins to dry and toughen, which helps prevent spoilage during storage.
How do I store shallots?
Store cured shallots in a cool, dry, and dark place. A mesh bag or basket is ideal for allowing air circulation. Avoid storing shallots in the refrigerator, as this can cause them to sprout or become soft. Properly stored shallots can last for several months.
What are some common pests and diseases that affect shallots?
Common pests that affect shallots include onion thrips, onion maggots, and aphids. Diseases include onion rot, downy mildew, and white rot. Practice crop rotation to prevent soilborne diseases. Use insecticidal soap or neem oil to control pests. Ensure good air circulation to prevent fungal diseases. Remove and destroy any infected plants immediately.
Can I grow shallots in containers?
Yes, shallots can be successfully grown in containers. Choose a container that is at least 8 inches deep and wide. Use a well-draining potting mix. Provide adequate sunlight and water regularly. Container-grown shallots may require more frequent fertilization than those grown in the ground.
Can I eat the shallot greens?
Absolutely! Shallot greens are delicious and can be used in the same way as scallions or chives. They have a mild, oniony flavor that adds a fresh touch to salads, soups, and other dishes. Harvest the greens by snipping them off with scissors. The plant will continue to produce more greens throughout the growing season.
What are shallot sets?
Shallot sets are small, immature shallot bulbs that are used for planting. They offer a quicker harvest than starting shallots from seed. Shallot sets are readily available at garden centers in the spring and fall.
Can I grow shallots from seed?
Yes, you can grow shallots from seed, but it takes longer than growing them from sets. Start seeds indoors 8-10 weeks before the last frost. Transplant the seedlings outdoors after the danger of frost has passed. Be patient, as it may take a full growing season to produce mature bulbs.
How do I prevent shallots from bolting (flowering)?
Bolting occurs when shallots are exposed to prolonged periods of cold weather followed by warm weather. This can cause the plant to prematurely flower, which reduces bulb size. To prevent bolting, choose varieties that are less prone to bolting, and avoid planting too early in the spring. Mulching can also help regulate soil temperature and prevent bolting.


Leave a Comment