

Grow Watermelons Backyard – sounds like a dream, right? Imagine biting into a juicy, sweet watermelon you nurtured from a tiny seed, right in your own backyard! It’s more achievable than you think, and I’m here to show you how with some simple DIY tricks and hacks.
Watermelons have a rich history, dating back thousands of years to Africa. They were even found in King Tut’s tomb! Over time, they’ve become a symbol of summer, picnics, and pure refreshment. But you don’t need a sprawling farm to enjoy this delicious fruit.
Let’s face it, store-bought watermelons can be a gamble. Sometimes they’re perfect, other times they’re bland and disappointing. That’s where the magic of growing your own comes in. Plus, there’s something incredibly satisfying about nurturing a plant from seed to harvest. This DIY guide will provide you with the knowledge and simple techniques to grow watermelons backyard, even if you have limited space. I’ll share my favorite tips and tricks to ensure you get the sweetest, most flavorful watermelons possible. So, grab your gardening gloves, and let’s get started!
Growing Watermelons in Your Backyard: A Comprehensive DIY Guide
Hey there, fellow gardening enthusiasts! Ever dreamt of biting into a juicy, homegrown watermelon on a hot summer day? Well, dream no more! Growing watermelons in your backyard is totally achievable, even if you’re a beginner. I’m going to walk you through everything you need to know, from choosing the right variety to harvesting your sweet reward. Let’s get started!
Choosing the Right Watermelon Variety
Before you even think about digging, you need to pick the perfect watermelon variety for your space and climate. Here’s a breakdown to help you decide:
* Space Considerations:
* Bush or Compact Varieties: If you have limited space, opt for bush or compact varieties like ‘Bush Sugar Baby’ or ‘Garden Baby’. These take up significantly less room than traditional sprawling vines.
* Vining Varieties: If you have ample space, you can go for classic vining varieties like ‘Crimson Sweet’ or ‘Charleston Gray’. Just be prepared for them to spread!
* Climate:
* Short Growing Seasons: If you live in an area with a short growing season, choose early-maturing varieties like ‘Sugar Baby’ or ‘Yellow Doll’. These will ripen faster, giving you a better chance of harvesting before the first frost.
* Long Growing Seasons: If you have a long, warm growing season, you have more options! You can try larger, later-maturing varieties like ‘Jubilee’ or ‘Black Diamond’.
* Taste Preference:
* Red Flesh: ‘Crimson Sweet’, ‘Jubilee’, and ‘Black Diamond’ are popular choices for their classic red flesh and sweet flavor.
* Yellow Flesh: ‘Yellow Doll’ and ‘Buttercup Yellow’ offer a unique, sweeter taste with a vibrant yellow flesh.
* Seedless: ‘Triploid’ varieties like ‘Millionaire’ or ‘Jackpot’ produce seedless watermelons, but they require a pollinator variety nearby to set fruit.
Preparing Your Garden Bed
Watermelons are heavy feeders, meaning they need a lot of nutrients to thrive. Proper soil preparation is crucial for a successful harvest.
* Sunlight: Watermelons need at least 6-8 hours of direct sunlight per day. Choose a location in your yard that gets plenty of sun.
* Soil: Watermelons prefer well-drained, sandy loam soil with a pH between 6.0 and 6.8.
* Soil Testing: I highly recommend getting your soil tested to determine its nutrient content and pH level. You can purchase a soil testing kit at most garden centers or send a sample to your local agricultural extension office.
* Amending the Soil: Based on your soil test results, amend the soil with plenty of organic matter, such as compost, well-rotted manure, or peat moss. This will improve drainage, aeration, and nutrient availability.
* Fertilizing: Incorporate a slow-release fertilizer formulated for vegetables into the soil before planting. Follow the instructions on the fertilizer package for application rates.
Planting Your Watermelon Seeds or Seedlings
You can start watermelon seeds indoors or direct sow them in your garden, depending on your climate and growing season.
* Starting Seeds Indoors (Recommended for Short Growing Seasons):
1. Timing: Start seeds indoors about 4-6 weeks before the last expected frost.
2. Containers: Use peat pots or biodegradable containers to avoid disturbing the roots when transplanting.
3. Soil: Fill the containers with a seed-starting mix.
4. Planting: Sow 2-3 seeds per pot, about 1 inch deep.
5. Watering: Water gently to keep the soil moist but not soggy.
6. Warmth: Place the pots in a warm location, such as on a heat mat or near a sunny window.
7. Light: Once the seedlings emerge, provide them with plenty of light, either from a grow light or a sunny window.
8. Thinning: Once the seedlings have developed a few true leaves, thin them to one plant per pot.
* Direct Sowing (Suitable for Long Growing Seasons):
1. Timing: Sow seeds directly in the garden after the last expected frost, when the soil temperature has warmed to at least 70°F (21°C).
2. Spacing: Plant seeds 1 inch deep and space them 2-3 feet apart in rows that are 6-8 feet apart.
3. Watering: Water gently to keep the soil moist.
4. Thinning: Once the seedlings emerge, thin them to one plant per hill.
* Transplanting Seedlings:
1. Hardening Off: Before transplanting seedlings grown indoors, you need to harden them off by gradually exposing them to outdoor conditions. Start by placing them in a sheltered location for a few hours each day, gradually increasing the amount of time they spend outdoors over the course of a week.
2. Planting: Dig a hole that is slightly larger than the root ball of the seedling.
3. Placement: Gently remove the seedling from the pot and place it in the hole.
4. Backfilling: Backfill the hole with soil and gently firm it around the base of the plant.
5. Watering: Water thoroughly after planting.
6. Spacing: Space transplants 2-3 feet apart in rows that are 6-8 feet apart.
Caring for Your Watermelon Plants
Once your watermelon plants are established, it’s important to provide them with the care they need to thrive.
* Watering: Watermelons need consistent moisture, especially during fruit development. Water deeply and regularly, aiming for about 1-2 inches of water per week. Avoid overhead watering, as this can promote fungal diseases. Drip irrigation is an excellent option for watering watermelons.
* Fertilizing: Side-dress your watermelon plants with a balanced fertilizer every 2-3 weeks during the growing season. Follow the instructions on the fertilizer package for application rates.
* Weeding: Keep the area around your watermelon plants free of weeds. Weeds compete with watermelons for nutrients and water.
* Mulching: Apply a layer of mulch around your watermelon plants to help retain moisture, suppress weeds, and regulate soil temperature. Straw, wood chips, or black plastic mulch are all good options.
* Pollination: Watermelons require pollination to set fruit. Bees are the primary pollinators of watermelons. To attract bees to your garden, plant flowering plants nearby. If you’re not seeing enough bee activity, you can hand-pollinate your watermelon flowers.
* Hand-Pollination: Identify the male and female flowers. Male flowers have a long, thin stem, while female flowers have a small, immature watermelon at the base. Use a small paintbrush to transfer pollen from the male flower to the female flower.
* Vine Training: As your watermelon vines grow, you can train them to grow in a specific direction. This can help to save space and improve air circulation. You can use stakes or trellises to support the vines.
* Protecting from Pests and Diseases: Watermelons are susceptible to a variety of pests and diseases, including aphids, squash bugs, vine borers, and fungal diseases. Monitor your plants regularly for signs of pests or diseases and take action promptly.
* Pest Control: Use insecticidal soap or neem oil to control aphids and squash bugs. Wrap the base of the watermelon vines with aluminum foil to prevent vine borers from laying their eggs.
* Disease Control: Apply a fungicide to prevent fungal diseases. Ensure good air circulation around your plants by spacing them properly and pruning away any crowded foliage.
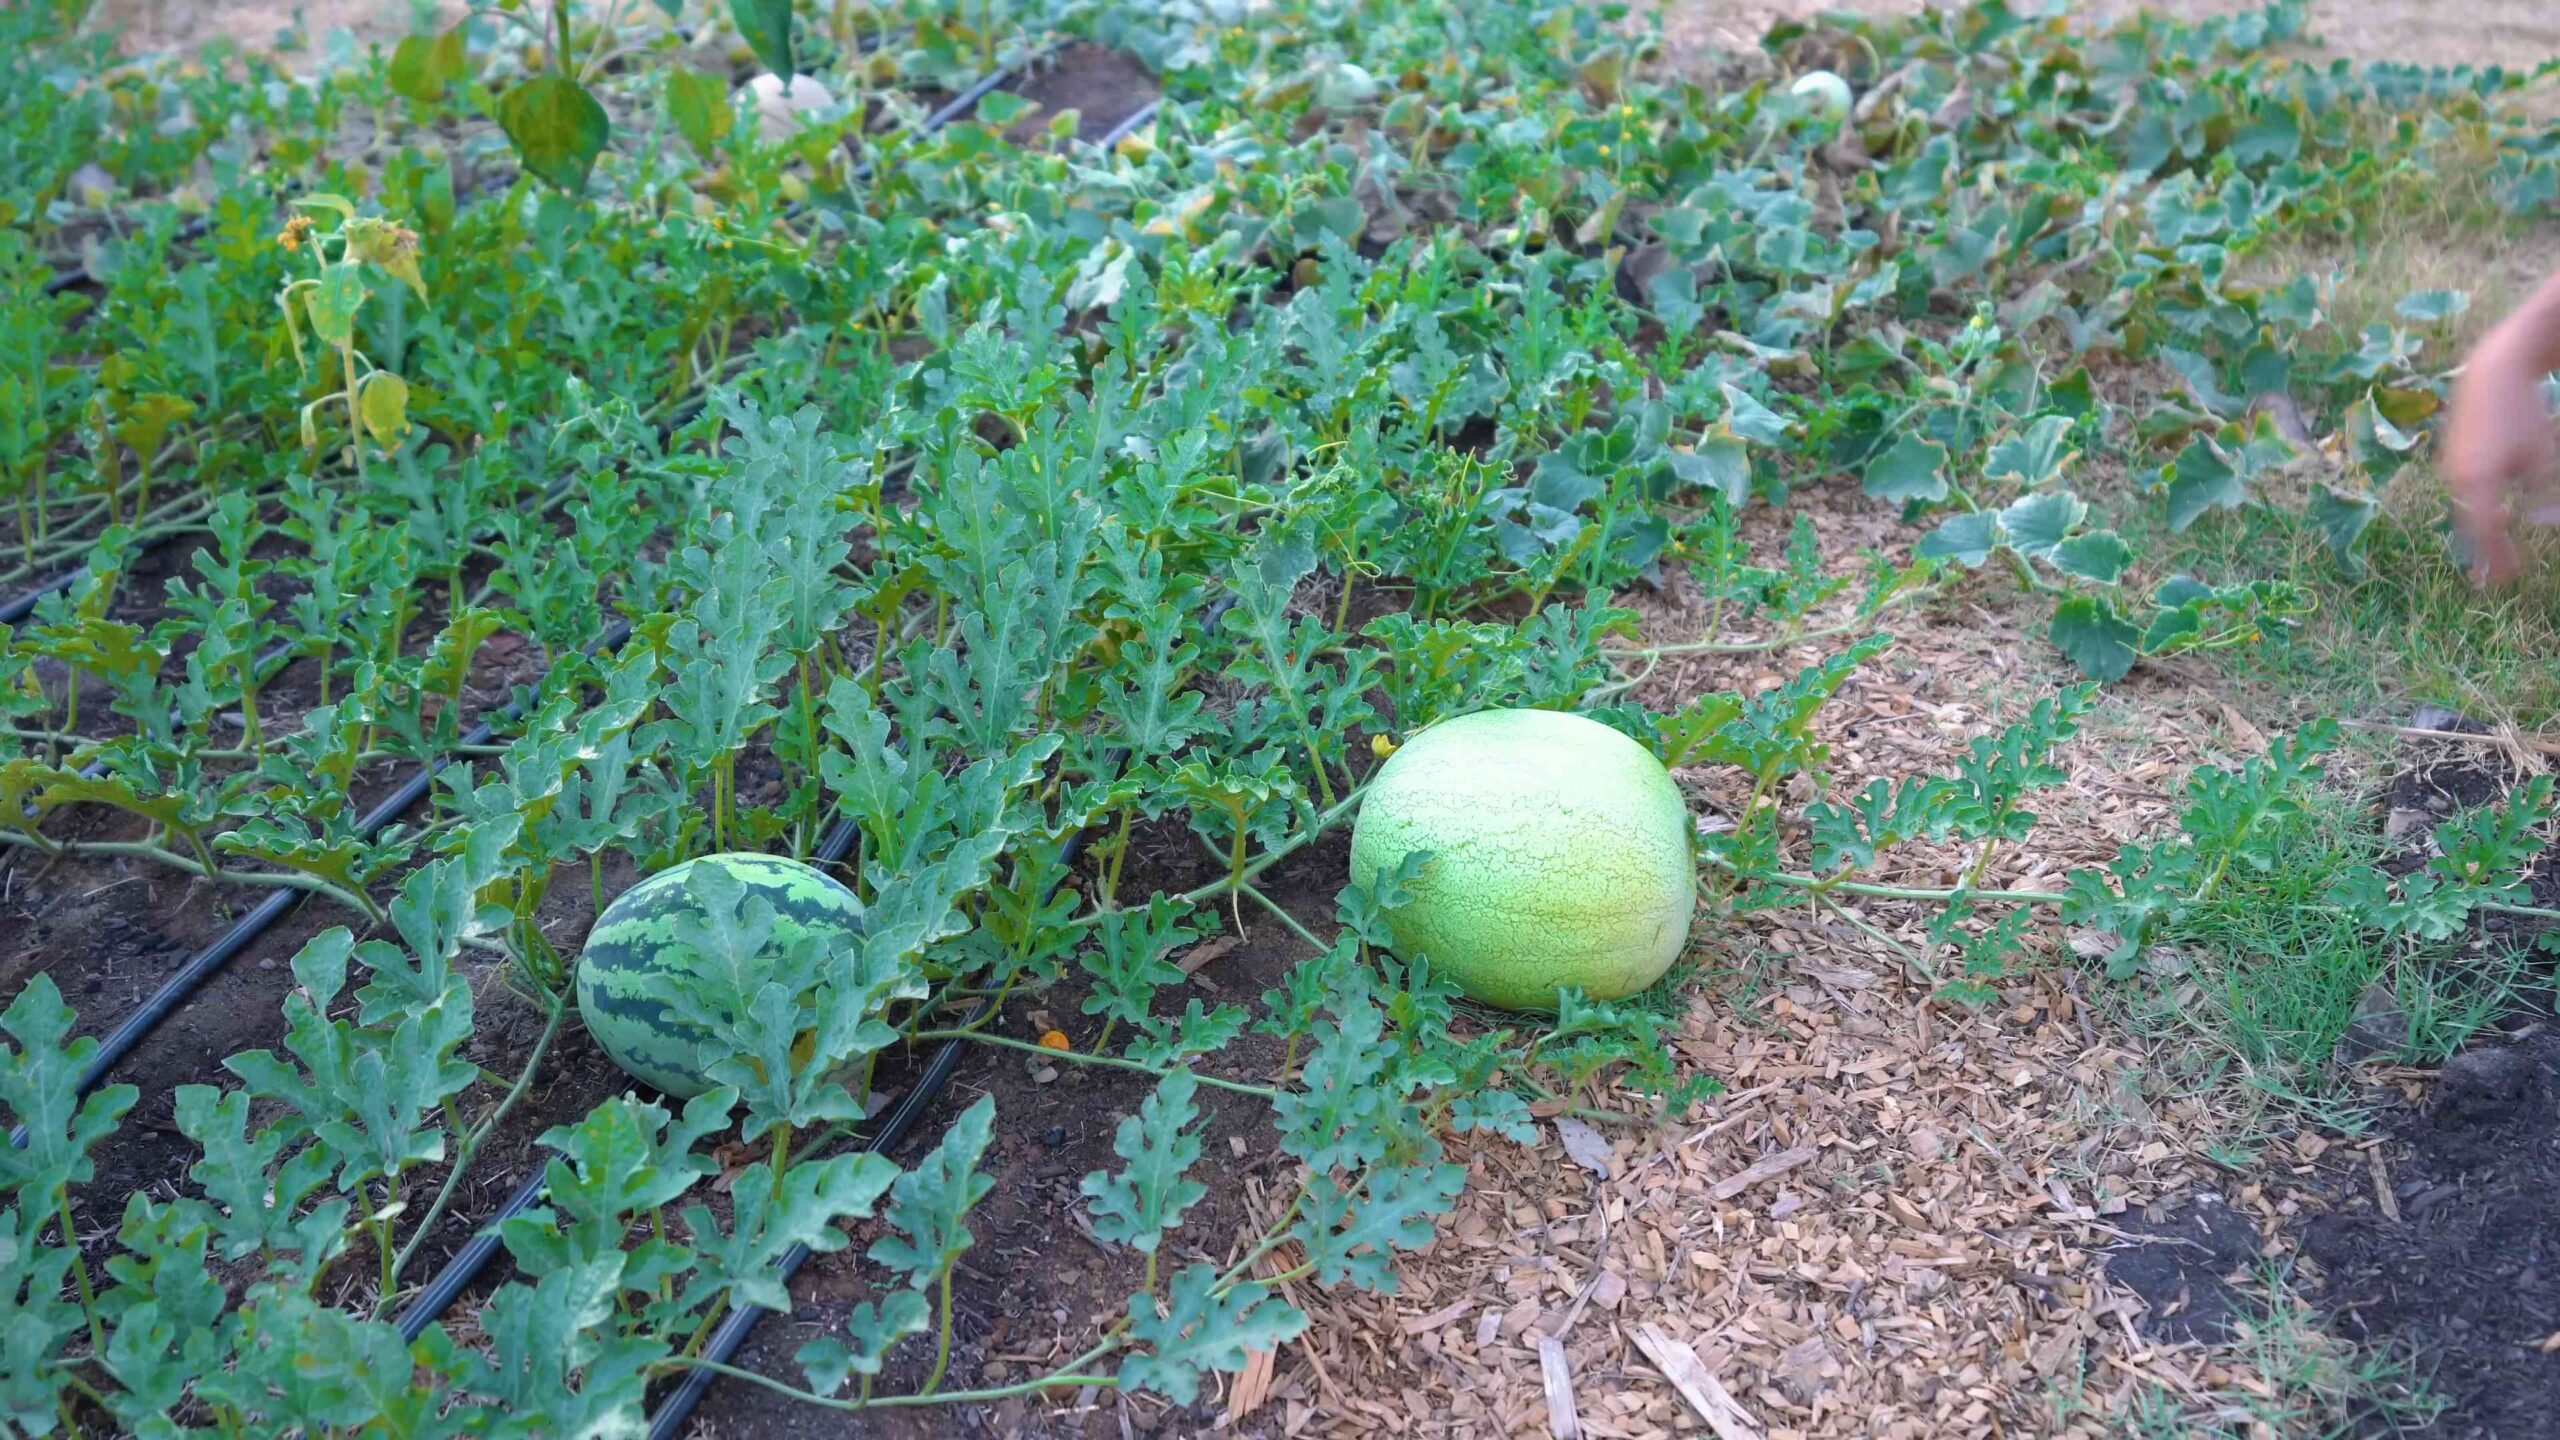
Harvesting Your Watermelons
Harvesting watermelons at the right time is crucial for getting the best flavor and texture. Here are some signs that your watermelons are ready to harvest:
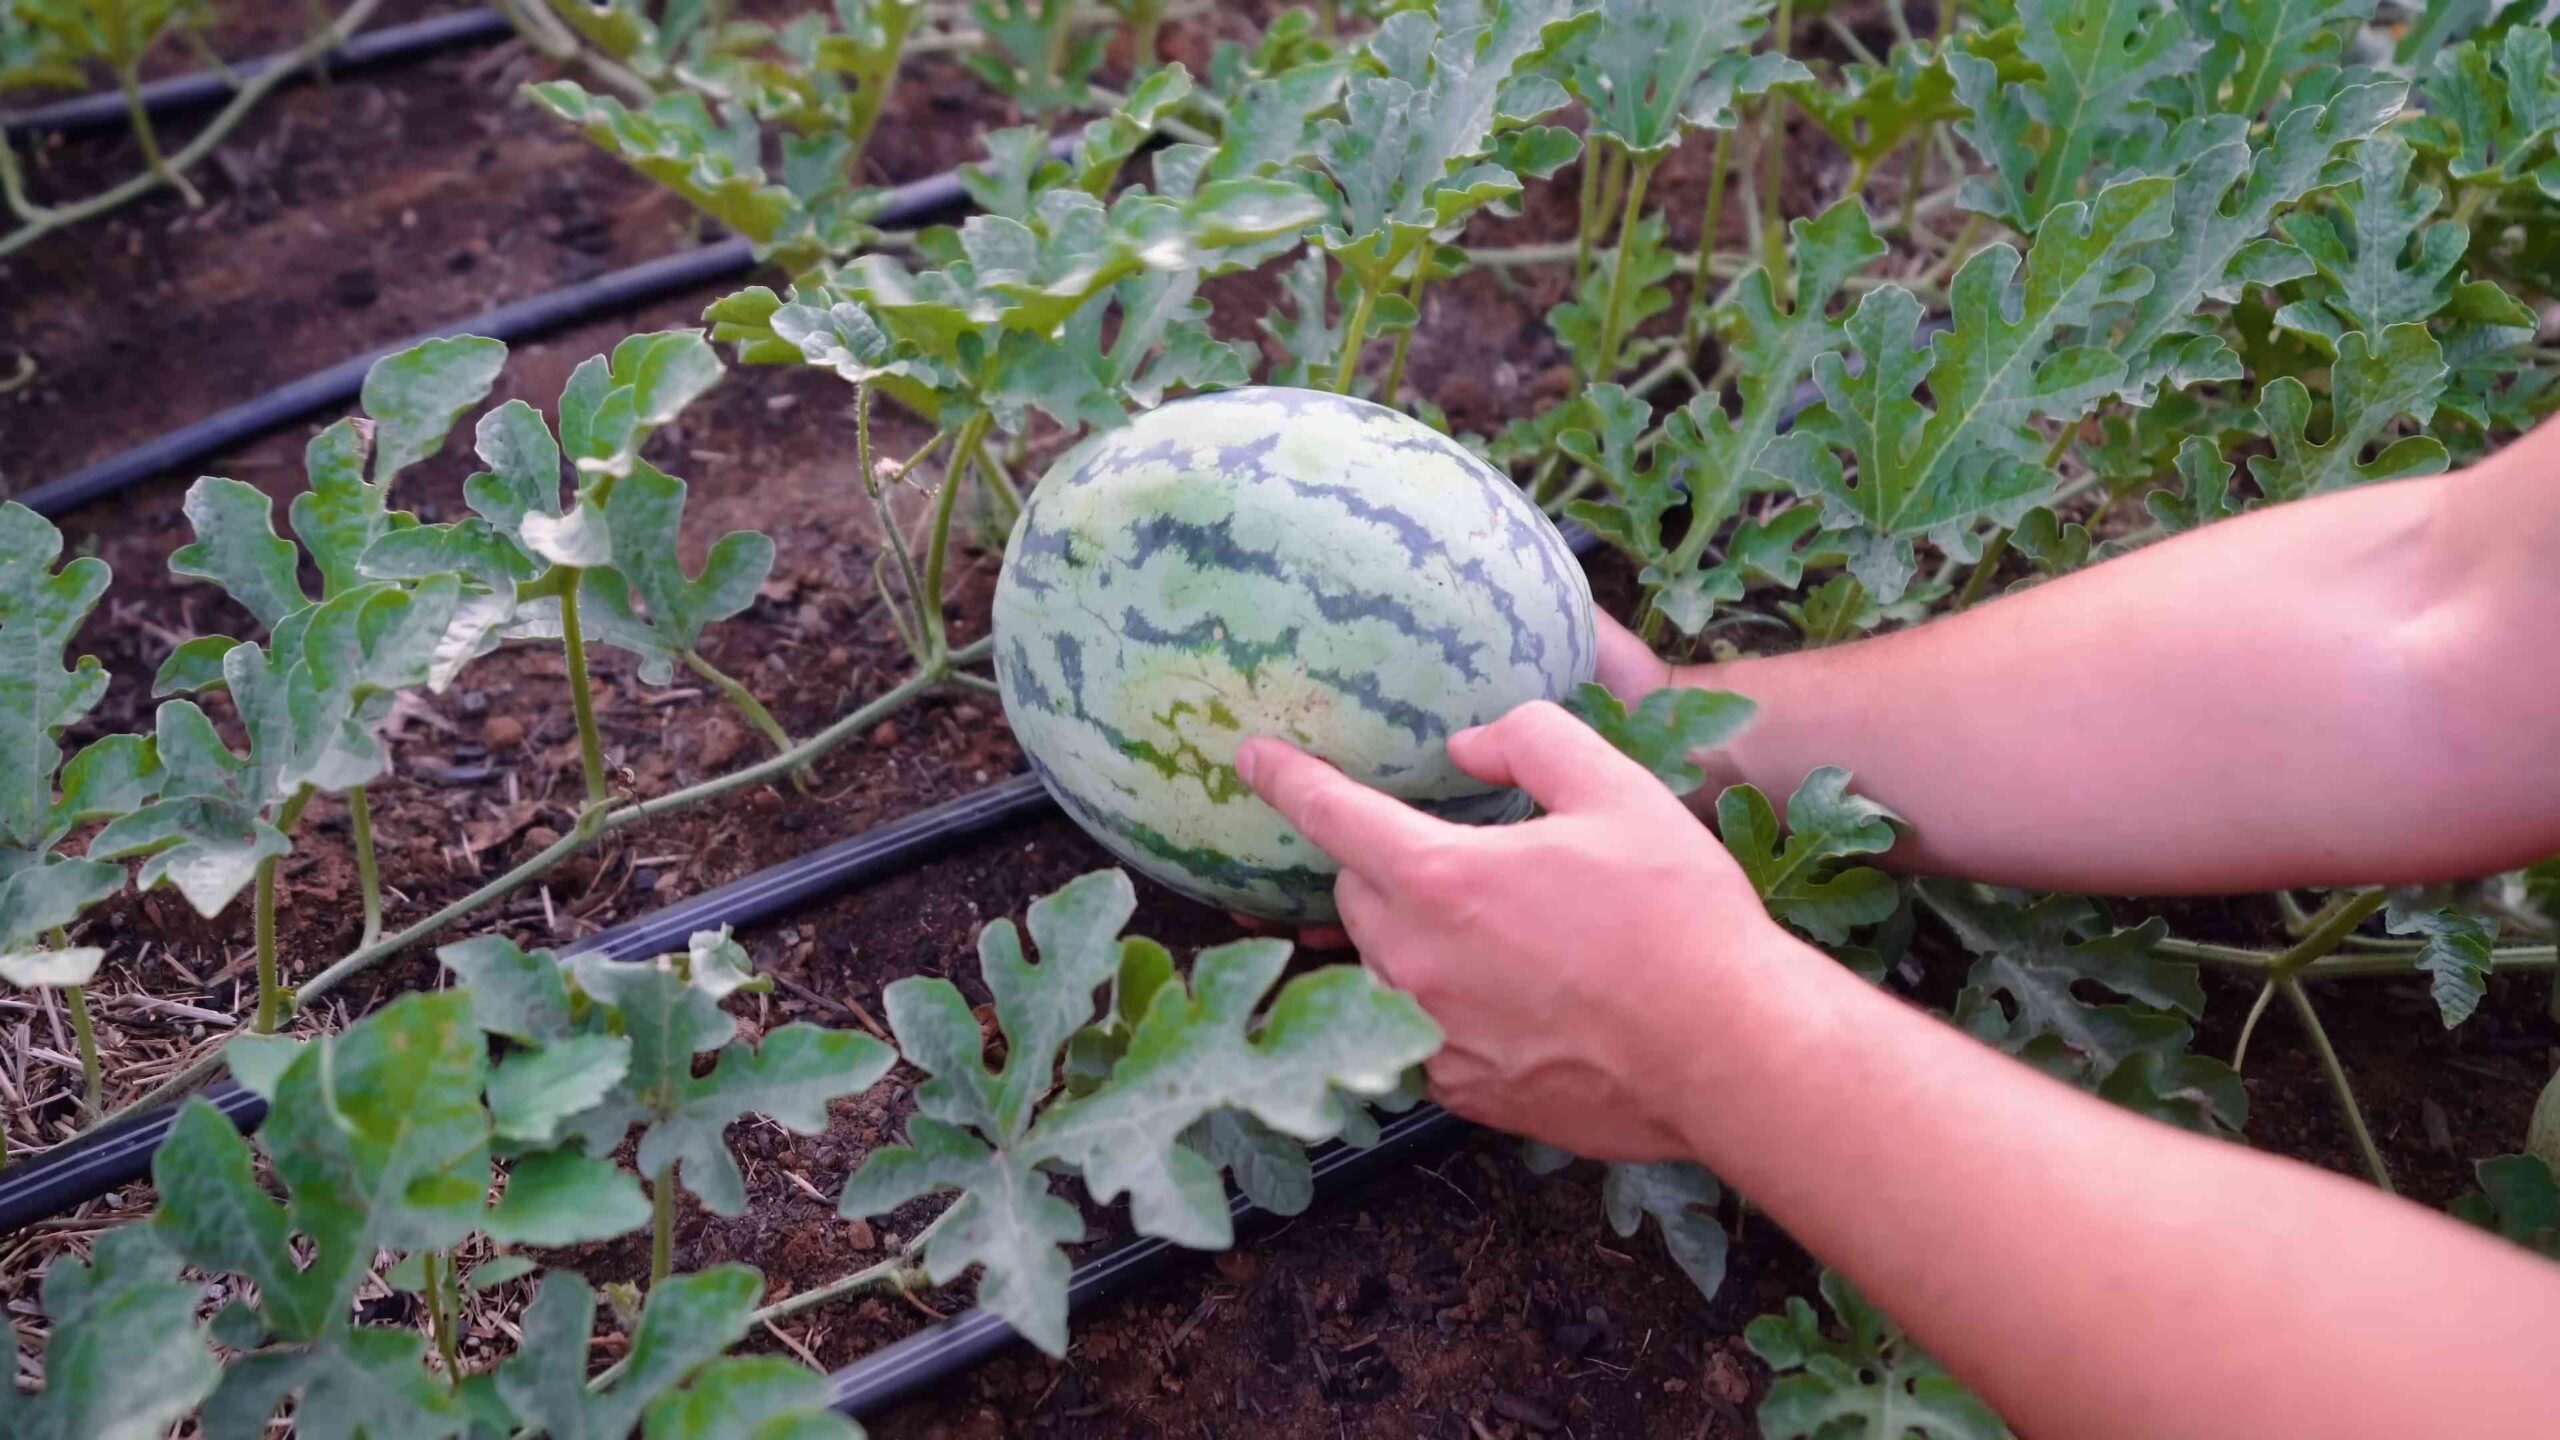
* Thump Test: Thump the watermelon with your knuckles. A ripe watermelon will sound hollow and deep.
* Tendril Test: The tendril closest to the watermelon stem will turn brown and dry.
* Ground Spot: The ground spot, where the watermelon rests on the ground, will turn from white to yellow.
* Skin Dullness: The skin of the watermelon will become dull and less shiny.
* Days to Maturity: Check the seed packet or plant tag for the days to maturity for your specific watermelon variety. This will give you a general idea of when to expect your watermelons to be ripe.
Once you’ve determined that your watermelons are ripe, use a sharp knife to cut them from the vine, leaving a few inches of stem attached.
Conclusion
So, there you have it! Growing watermelons in your backyard might seem like a daunting task, reserved for seasoned farmers with acres of land, but with these simple DIY tricks, a little patience, and a whole lot of sunshine, you can be harvesting your own juicy, sweet watermelons before you know it. We’ve demystified the process, breaking it down into manageable steps that anyone, regardless of their gardening experience, can follow.
Why is this a must-try? Because nothing beats the taste of a homegrown watermelon. The flavor is simply unparalleled compared to store-bought varieties. Plus, you have complete control over the growing process, ensuring your watermelons are free from harmful pesticides and chemicals. Think of the satisfaction of serving a slice of your own backyard bounty at your next summer barbecue! Imagine the bragging rights!
But beyond the taste and the bragging rights, growing your own watermelons is a rewarding experience in itself. It’s a chance to connect with nature, learn about the life cycle of a plant, and appreciate the hard work that goes into producing the food we eat. It’s a therapeutic activity that can reduce stress and improve your overall well-being. And let’s not forget the educational aspect – it’s a fantastic way to teach children about where their food comes from and the importance of sustainable living.
Now, let’s talk about variations. While we’ve focused on a general approach, there’s plenty of room for experimentation. Consider trying different watermelon varieties. Perhaps you’d like to grow a smaller, personal-sized watermelon like a Sugar Baby, or maybe you’re feeling ambitious and want to tackle a giant Charleston Gray. You can also experiment with different soil amendments to see what works best in your particular climate and soil conditions. Some gardeners swear by adding compost tea, while others prefer bone meal for extra phosphorus.
Another exciting variation is vertical gardening. If you’re short on space, you can train your watermelon vines to grow up a trellis or fence. This not only saves space but also improves air circulation and reduces the risk of fungal diseases. Just be sure to provide adequate support for the heavy fruits as they develop.
And don’t forget about companion planting! Watermelons thrive when planted alongside certain other vegetables and herbs. Marigolds, for example, repel nematodes, while basil deters aphids and other pests. Planting these companions can help protect your watermelons and improve their overall health.
The key to successful growing watermelons backyard is observation. Pay close attention to your plants, monitor their growth, and adjust your care accordingly. Are the leaves turning yellow? Are there signs of pests or diseases? The sooner you identify and address any problems, the better your chances of a successful harvest.
So, what are you waiting for? Grab your seeds, prepare your soil, and get ready to embark on a watermelon-growing adventure! We’re confident that with a little effort and these DIY tricks, you’ll be enjoying delicious, homegrown watermelons in no time.
We encourage you to try these techniques and share your experiences with us! Post photos of your watermelon plants, tell us about your successes (and your challenges!), and let us know what variations you’ve tried. We’re all in this together, and we can learn so much from each other. Happy gardening!
Frequently Asked Questions (FAQ)
What is the best time to start growing watermelons?
The ideal time to start growing watermelons depends on your climate. Watermelons are warm-weather crops and require a long growing season of at least 70-90 days. In general, you should start seeds indoors about 6-8 weeks before the last expected frost. If you live in a warmer climate with a longer growing season, you can direct sow seeds outdoors once the soil temperature reaches at least 70°F (21°C). Make sure to check your local frost dates to determine the best time to start your seeds.
How much space do watermelons need?
Watermelons are sprawling plants that require a significant amount of space. Each plant needs at least 6-8 feet of space in all directions. If you’re growing multiple plants, space them at least 3-4 feet apart in rows that are 8-10 feet apart. If you’re short on space, consider growing a bush variety or training your vines to grow vertically on a trellis.
What kind of soil is best for watermelons?
Watermelons thrive in well-drained, sandy loam soil that is rich in organic matter. The soil pH should be between 6.0 and 6.8. Before planting, amend the soil with compost or well-rotted manure to improve its fertility and drainage. Avoid heavy clay soils, as they can become waterlogged and inhibit root growth.
How often should I water my watermelon plants?
Watermelons need consistent moisture, especially during fruit development. Water deeply and regularly, providing about 1-2 inches of water per week. Avoid overhead watering, as this can promote fungal diseases. Use a soaker hose or drip irrigation to deliver water directly to the roots. During hot, dry weather, you may need to water more frequently. Reduce watering as the fruits ripen to prevent them from cracking.
What kind of fertilizer should I use for watermelons?
Watermelons are heavy feeders and benefit from regular fertilization. Before planting, incorporate a balanced fertilizer (e.g., 10-10-10) into the soil. Once the plants start to vine, side-dress them with a nitrogen-rich fertilizer to promote vegetative growth. When the fruits start to develop, switch to a fertilizer that is higher in phosphorus and potassium to support fruit production. Avoid over-fertilizing, as this can lead to excessive vine growth and reduced fruit yield.
How do I know when my watermelons are ripe?
Determining when a watermelon is ripe can be tricky, but there are several indicators to look for. First, check the tendril closest to the fruit stem. When this tendril turns brown and dries out, the watermelon is usually ripe. Second, look at the spot where the watermelon rests on the ground. This spot should turn from white to a creamy yellow color. Finally, thump the watermelon with your knuckles. A ripe watermelon will have a deep, hollow sound. If it sounds dull or solid, it’s not quite ready.
What are some common pests and diseases that affect watermelons?
Watermelons are susceptible to a variety of pests and diseases, including aphids, squash bugs, cucumber beetles, vine borers, powdery mildew, and fusarium wilt. To prevent pest and disease problems, practice good garden hygiene, such as removing weeds and debris, and rotate your crops regularly. Inspect your plants regularly for signs of pests or diseases and take action promptly. Use organic pest control methods, such as insecticidal soap or neem oil, to control pests. For fungal diseases, use a copper-based fungicide.
Can I grow watermelons in containers?
Yes, you can grow watermelons in containers, but you’ll need a large container (at least 20 gallons) with good drainage. Choose a bush variety or a smaller watermelon variety that is well-suited for container growing. Use a high-quality potting mix and provide regular watering and fertilization. Place the container in a sunny location that receives at least 6-8 hours of sunlight per day. You may also need to provide support for the vines as they grow.
How can I improve pollination of my watermelon plants?
Watermelons require pollination to produce fruit. If you’re not seeing many bees or other pollinators in your garden, you may need to hand-pollinate your plants. To hand-pollinate, use a small paintbrush to transfer pollen from the male flowers to the female flowers. The male flowers have a long, thin stem, while the female flowers have a small, immature fruit at the base. Pollinate the flowers in the morning, when the pollen is most viable.
What do I do if my watermelon fruits are cracking?
Watermelon fruits can crack if they experience inconsistent watering, especially during ripening. To prevent cracking, water deeply and regularly, but avoid overwatering. Reduce watering as the fruits ripen. Also, protect the fruits from direct sunlight by shading them with leaves or cloth. If you notice a cracked watermelon, harvest it immediately to prevent it from rotting.

Leave a Comment