

Growing Ginger at Home might seem intimidating, but trust me, it’s easier than you think! Have you ever wondered how to bring that zesty, aromatic flavor of fresh ginger from your garden directly to your kitchen? Well, you’re in the right place. For centuries, ginger has been revered not only for its culinary uses but also for its medicinal properties, playing a vital role in traditional medicine across Asia. From soothing upset stomachs to adding a spicy kick to your favorite dishes, ginger is a powerhouse of goodness.
But why should you bother growing it yourself? Store-bought ginger can sometimes lack that vibrant freshness, and let’s be honest, it can get a little pricey. That’s where this DIY guide comes in! I’m going to share some simple, effective tricks and hacks that will empower you to successfully start growing ginger at home, even if you have limited space or gardening experience. Imagine the satisfaction of harvesting your own ginger, knowing exactly where it came from and how it was grown. Plus, it’s a fantastic way to connect with nature and add a touch of green to your living space. So, let’s ditch the store-bought stuff and embark on this exciting gardening adventure together!
Growing Ginger at Home: A DIY Guide
Okay, so you want to grow your own ginger? Awesome! It’s surprisingly easy and rewarding. Imagine fresh, homegrown ginger ready whenever you need it for cooking, teas, or even just a little zing in your life. I’m going to walk you through everything you need to know, from choosing the right ginger to harvesting your very own crop. Let’s get started!
Choosing Your Ginger Rhizome
First things first, you need a ginger rhizome. This is the “root” (actually an underground stem) that you’ll be planting.
* Look for plump, healthy rhizomes: Avoid anything shriveled, dry, or moldy. You want something firm and juicy looking.
* Choose organic ginger: Non-organic ginger is often treated to inhibit sprouting, which is exactly what we *don’t* want. Organic ginger is more likely to sprout readily.
* Check for “eyes”: These are small, green buds or bumps on the rhizome. They’re where the new shoots will emerge, so the more eyes, the better!
* Source it right: You can usually find suitable ginger at your local grocery store or farmers market.
Preparing Your Ginger for Planting
Sometimes, your ginger might need a little encouragement to wake up and start sprouting. Here’s how to give it a boost:
* Soaking (Optional but Recommended): Soak the ginger rhizome in lukewarm water for 12-24 hours. This rehydrates it and encourages those eyes to swell. I usually do this in a bowl on my kitchen counter.
* Cutting (If Necessary): If your rhizome is large, you can cut it into smaller pieces, making sure each piece has at least one or two eyes. Let the cut ends callous over for a day or two before planting to prevent rot. I usually just leave them on a paper towel.
Planting Your Ginger
Now for the fun part! Getting your ginger into the soil.
* Choosing the Right Pot: Ginger needs room to spread horizontally, so choose a wide, shallow pot rather than a deep one. A pot that’s at least 12 inches wide and 6-8 inches deep is a good starting point. Make sure it has drainage holes!
* Selecting the Soil: Ginger likes well-draining soil that’s rich in organic matter. A good potting mix is essential. I usually mix equal parts of potting soil, compost, and perlite to ensure good drainage.
* Planting Depth: Place the ginger rhizome horizontally in the pot, with the eyes facing upwards. Cover it with about 1-2 inches of soil.
* Watering: Water thoroughly after planting, making sure the soil is evenly moist but not soggy.
Caring for Your Ginger Plant
Ginger is relatively low-maintenance, but here are a few key things to keep in mind:
* Light: Ginger thrives in bright, indirect sunlight. Avoid direct sunlight, which can scorch the leaves. An east-facing window is ideal, or a spot that gets filtered sunlight.
* Watering: Keep the soil consistently moist, but avoid overwatering. Let the top inch of soil dry out slightly between waterings. I usually check the soil moisture every few days.
* Humidity: Ginger loves humidity! If you live in a dry climate, you can increase humidity by misting the plant regularly, placing it on a pebble tray filled with water, or using a humidifier.
* Temperature: Ginger prefers warm temperatures, ideally between 65-80°F (18-27°C). Protect it from frost and cold drafts.
* Fertilizing: Feed your ginger plant every 2-3 weeks with a balanced liquid fertilizer during the growing season (spring and summer). I usually dilute the fertilizer to half strength to avoid burning the roots.
* Pest Control: Ginger is generally pest-resistant, but keep an eye out for common houseplant pests like aphids or spider mites. If you spot any, treat them with insecticidal soap or neem oil.
Harvesting Your Ginger
Patience is key! It takes time for ginger to mature.
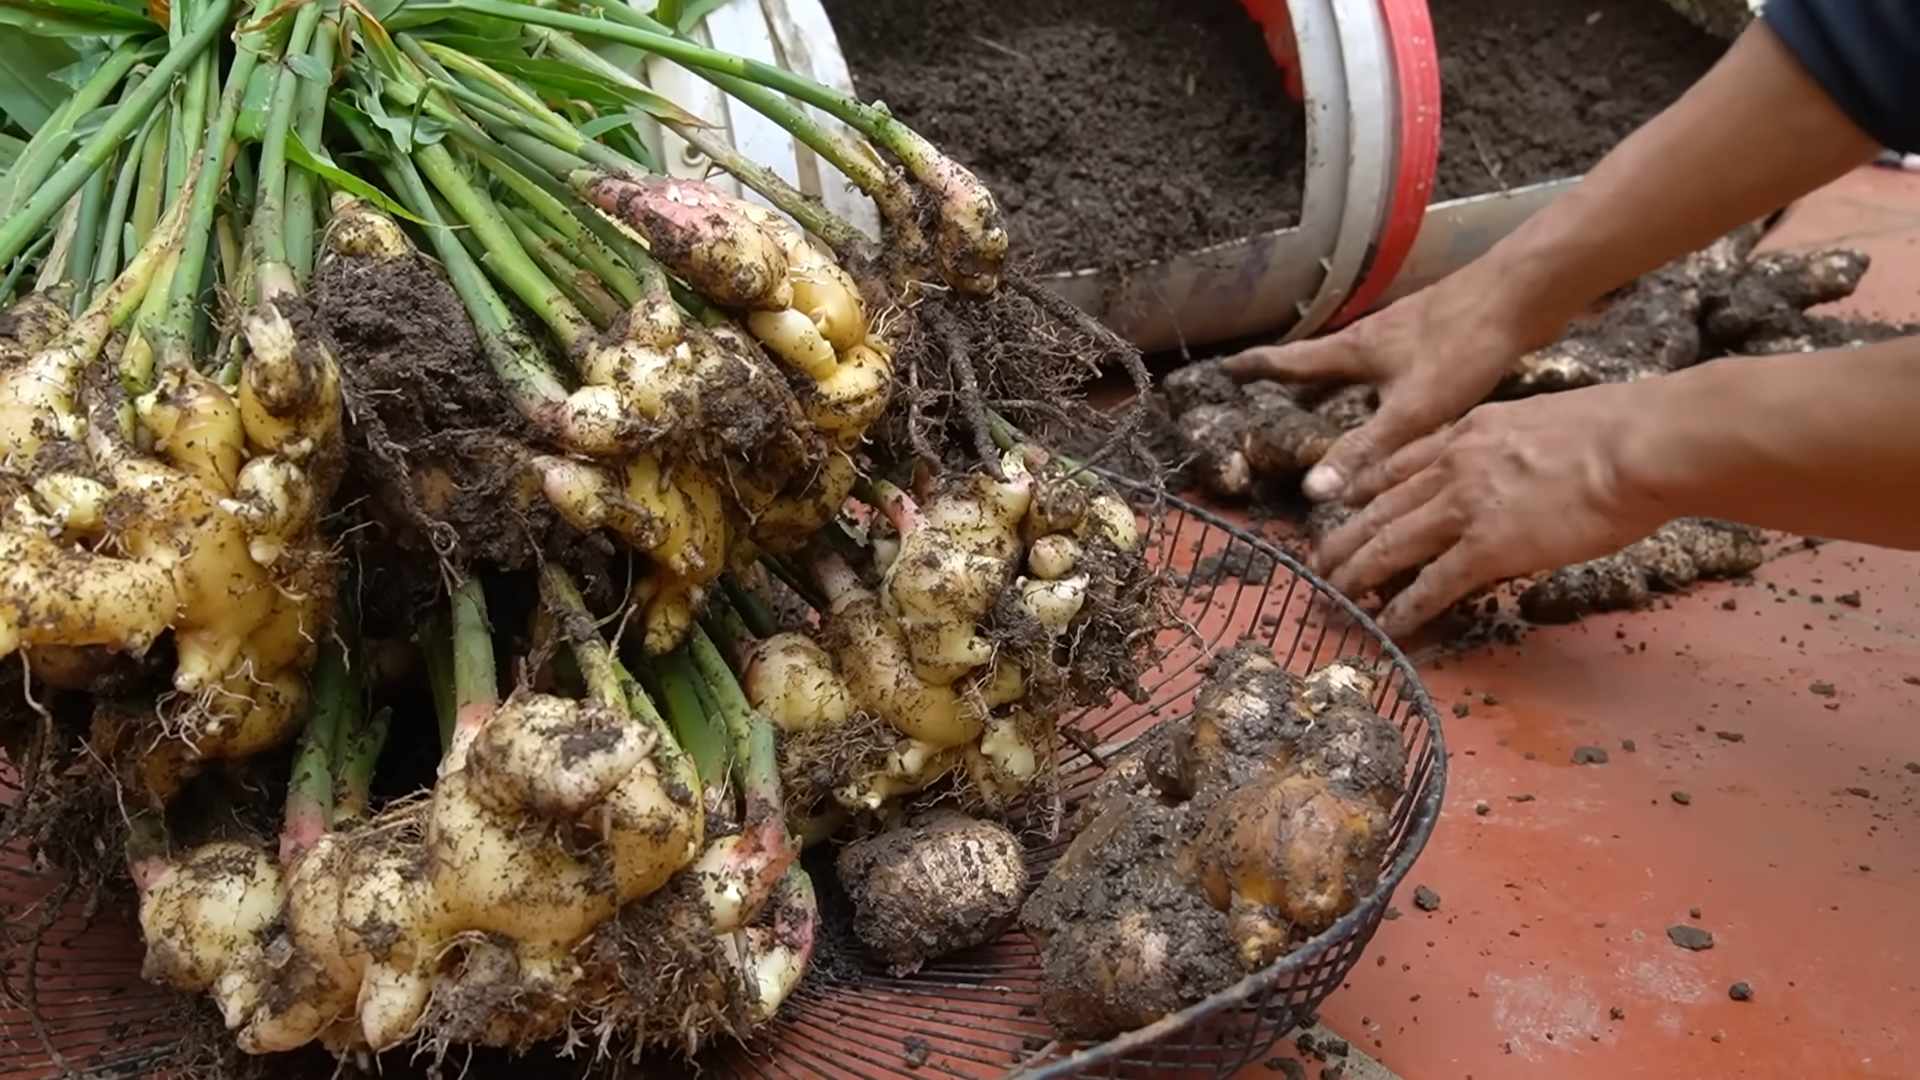
* When to Harvest: You can start harvesting ginger about 8-10 months after planting. The leaves will start to turn yellow and die back, indicating that the rhizomes are ready.
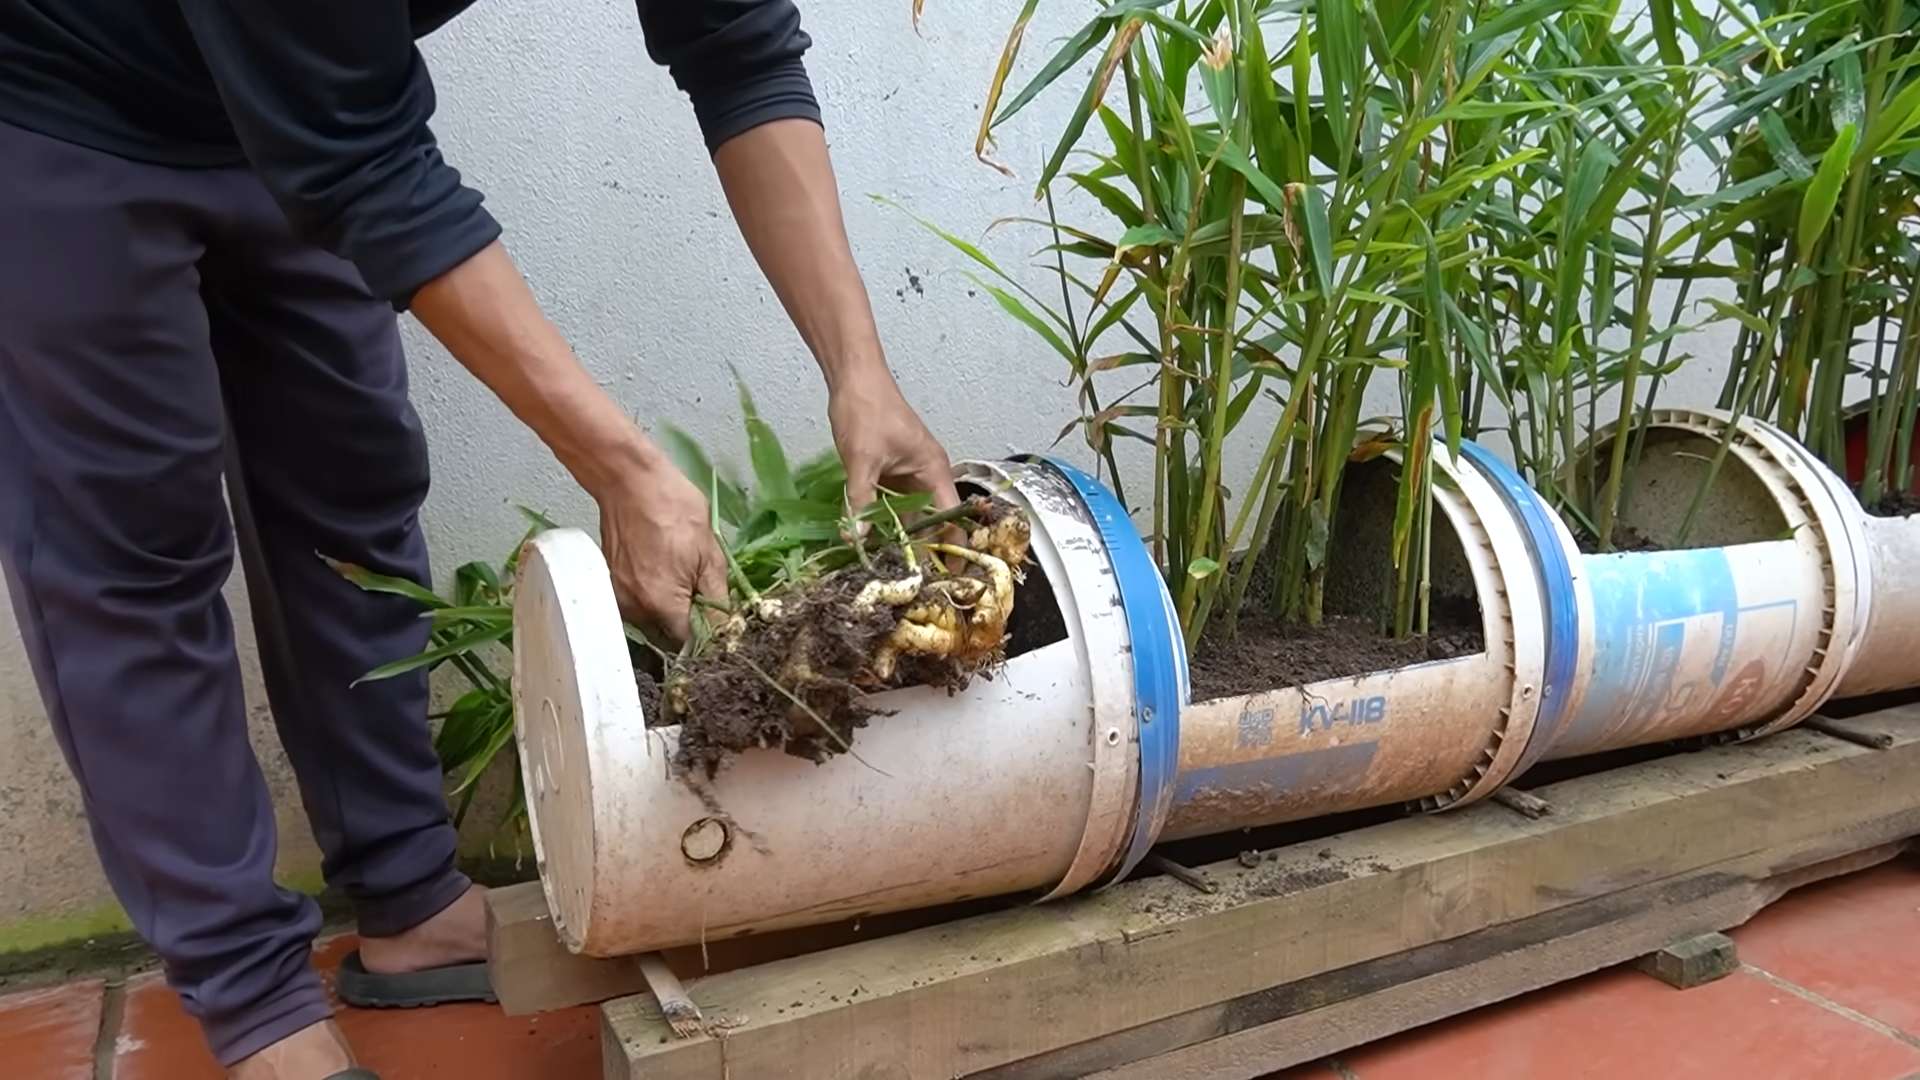
* How to Harvest: Gently dig around the plant and lift the rhizomes out of the soil. You can harvest the entire plant or just take a few pieces, leaving the rest to continue growing.
* Storing Your Ginger: Freshly harvested ginger can be stored in the refrigerator for several weeks. Wrap it in a paper towel and place it in a plastic bag. You can also freeze ginger for longer storage.
Troubleshooting
Sometimes things don’t go exactly as planned. Here are a few common issues you might encounter and how to fix them:
* No Sprouting: If your ginger isn’t sprouting, make sure it’s getting enough warmth and moisture. You can also try placing it in a warmer location or covering the pot with plastic wrap to create a humid environment.
* Yellowing Leaves: Yellowing leaves can be a sign of overwatering, underwatering, or nutrient deficiency. Check the soil moisture and adjust your watering accordingly. You may also need to fertilize the plant.
* Rotting Rhizomes: Rotting rhizomes are usually caused by overwatering or poor drainage. Make sure your pot has drainage holes and that the soil is well-draining. If you see signs of rot, remove the affected areas and repot the plant in fresh soil.
* Slow Growth: Slow growth can be due to insufficient light, nutrients, or warmth. Make sure your ginger plant is getting enough light and fertilizer, and that the temperature is within the ideal range.
Extra Tips and Tricks
* Ginger Tea: Use your fresh ginger to make delicious and healthy ginger tea! Simply slice a few pieces of ginger and steep them in hot water.
* Ginger in Cooking: Add fresh ginger to stir-fries, soups, curries, and other dishes for a flavorful kick.
* Ginger as a Houseplant: Even if you don’t plan to harvest the ginger, it makes a beautiful and fragrant houseplant.
* Experiment with Varieties: There are different varieties of ginger, each with its own unique flavor and aroma. Try growing different varieties to see which ones you like best.
* Successive Planting: To ensure a continuous supply of fresh ginger, plant new rhizomes every few months.
Section 1: Getting Started – The Basics
1. Acquire Your Ginger Rhizome: Head to your local grocery store or farmers market. Remember, organic is best! Inspect the ginger carefully. Look for those plump rhizomes with visible “eyes” (those little bumps that will become sprouts). Avoid anything that looks shriveled, moldy, or damaged.
2. Prepare Your Planting Container: Choose a wide, shallow pot with good drainage. Ginger roots spread horizontally, so a wide pot is more important than a deep one. A 12-inch wide pot is a good starting point. Ensure there are drainage holes at the bottom to prevent waterlogging.
3. Mix Your Soil: Ginger thrives in well-draining, nutrient-rich soil. A good mix is equal parts potting soil, compost, and perlite. The perlite helps with drainage, while the compost provides essential nutrients. You can find these at any garden center.
4. Optional: Soak the Rhizome: Soaking the ginger rhizome in lukewarm water for 12-24 hours can help rehydrate it and encourage sprouting. This step isn’t strictly necessary, but I find it gives the ginger a good head start.
Section 2: Planting and Initial Care
1. Fill the Pot: Fill your chosen pot with the soil mixture, leaving about an inch or two of space at the top.
2. Plant the Ginger: Place the ginger rhizome horizontally on top of the soil. Make sure the “eyes” are facing upwards.
3. Cover the Rhizome: Cover the ginger rhizome with about 1-2 inches of soil. Gently pat the soil down.
4. Water Thoroughly: Water the pot thoroughly until water drains out of the drainage holes. This ensures the soil is evenly moist.
5. Find the Right Spot: Place the pot in a location that receives bright, indirect sunlight. An east-facing window is ideal. Avoid direct sunlight, which can scorch the leaves.
Section 3: Ongoing Care and Maintenance
1. Watering Schedule: Water regularly, keeping the soil consistently moist but not soggy. Let the top inch of soil dry out slightly between waterings. The frequency will depend on your climate and the pot size. I usually check the soil every few days.
2. Humidity Boost: Ginger loves humidity. If you live in a dry climate, increase humidity by misting the plant regularly,
Conclusion
So, there you have it! Growing ginger at home is not only achievable but also incredibly rewarding. Forget those bland, store-bought rhizomes that have been sitting on shelves for weeks. Imagine the vibrant, zesty flavor of freshly harvested ginger, ready to elevate your culinary creations and soothe your senses. This DIY project is a must-try for anyone who appreciates fresh ingredients, enjoys a touch of gardening, or simply wants to add a unique and sustainable element to their kitchen.
The beauty of growing ginger at home lies in its simplicity and adaptability. You don’t need acres of land or a green thumb of mythical proportions. A simple pot, some well-draining soil, and a little patience are all you need to embark on this flavorful adventure. Plus, you’re in complete control of the growing process, ensuring your ginger is free from harmful pesticides and chemicals.
But the benefits extend beyond just fresh ginger. The lush, green foliage of the ginger plant adds a touch of tropical elegance to your indoor or outdoor space. It’s a conversation starter, a source of pride, and a constant reminder of the delicious possibilities that await.
Ready to take your ginger game to the next level? Consider experimenting with different varieties of ginger. While common ginger (Zingiber officinale) is readily available, you might be able to find other cultivars with unique flavor profiles and aromas. Look for varieties like galangal or turmeric, which are closely related to ginger and share similar growing requirements.
Another variation to explore is growing ginger in different mediums. While soil is the most common choice, you can also try growing ginger hydroponically or in a soilless mix. This can be a great option if you have limited space or want to experiment with different growing techniques.
Don’t be afraid to get creative with your ginger harvest. Beyond using it in your favorite recipes, you can also make ginger tea, ginger candy, or even ginger-infused oil. The possibilities are endless!
We wholeheartedly encourage you to try growing ginger at home. It’s a fun, educational, and ultimately delicious experience. And once you’ve harvested your first batch of homegrown ginger, we want to hear all about it! Share your photos, tips, and recipes with us in the comments below. Let’s create a community of ginger-growing enthusiasts and inspire others to embrace the joys of homegrown goodness. Your experience with growing ginger at home could be just the inspiration someone else needs to start their own journey!
Frequently Asked Questions (FAQ)
1. What kind of ginger should I use to start growing?
The best ginger to use for planting is a fresh, plump rhizome from your local grocery store or nursery. Look for a piece that is firm, with visible “eyes” or buds. Organic ginger is often recommended, as it is less likely to have been treated with growth inhibitors. Avoid ginger that is shriveled, soft, or shows signs of mold. The bigger the rhizome, the more energy it has to get started, but even a small piece with a few buds can work.
2. How long does it take to grow ginger at home?
Growing ginger at home requires patience. It typically takes around 8-10 months from planting to harvest. You’ll start to see shoots emerge from the soil within a few weeks, but the rhizomes need time to mature and develop their characteristic flavor. You can harvest small pieces of ginger after about 4 months, but for a full harvest, wait until the plant’s leaves start to turn yellow and die back, which indicates that the rhizomes are ready.
3. What are the ideal growing conditions for ginger?
Ginger thrives in warm, humid conditions with partial shade. It needs well-draining soil that is rich in organic matter. The ideal temperature range is between 65°F and 90°F (18°C and 32°C). Avoid exposing your ginger plant to direct sunlight, especially during the hottest part of the day, as this can scorch the leaves. If you live in a cooler climate, you can grow ginger indoors in a pot near a sunny window, but be sure to provide adequate humidity.
4. How often should I water my ginger plant?
Water your ginger plant regularly, keeping the soil consistently moist but not waterlogged. Overwatering can lead to root rot, so it’s important to ensure good drainage. Check the soil moisture before watering, and only water when the top inch or two feels dry to the touch. During the warmer months, you may need to water more frequently than during the cooler months.
5. What kind of fertilizer should I use for ginger?
Ginger benefits from regular fertilization, especially during the growing season. Use a balanced organic fertilizer, such as compost tea or fish emulsion, every 2-3 weeks. Avoid using fertilizers that are high in nitrogen, as this can promote leafy growth at the expense of rhizome development. You can also amend the soil with compost or well-rotted manure before planting to provide a slow-release source of nutrients.
6. Can I grow ginger indoors?
Yes, you can absolutely grow ginger indoors! Choose a pot that is at least 12 inches in diameter and fill it with well-draining potting mix. Place the pot near a sunny window that receives at least 4-6 hours of indirect sunlight per day. Maintain a warm, humid environment by misting the plant regularly or placing a tray of water near the pot. Water regularly, allowing the soil to dry slightly between waterings.
7. What are some common problems when growing ginger and how can I fix them?
Some common problems when growing ginger include root rot, pests, and nutrient deficiencies. Root rot can be prevented by ensuring good drainage and avoiding overwatering. Pests, such as aphids and spider mites, can be controlled with insecticidal soap or neem oil. Nutrient deficiencies can be addressed by fertilizing regularly with a balanced organic fertilizer. Yellowing leaves can indicate a lack of nutrients or overwatering.
8. How do I harvest ginger?
You can harvest ginger at any time after about 4 months, but for a full harvest, wait until the plant’s leaves start to turn yellow and die back. To harvest, gently dig around the plant and lift the rhizomes from the soil. You can harvest the entire plant or just take a few pieces, leaving the rest to continue growing. Wash the harvested ginger thoroughly and store it in a cool, dry place.
9. Can I regrow ginger from the pieces I harvest?
Yes, you can regrow ginger from the pieces you harvest! Simply select a healthy piece of rhizome with visible buds and replant it in a pot or in the ground. Follow the same planting and care instructions as you did with the original ginger rhizome. This is a great way to propagate your ginger plant and ensure a continuous supply of fresh ginger.
10. Is growing ginger at home worth the effort?
Absolutely! Growing ginger at home is a rewarding experience that provides you with fresh, flavorful ginger whenever you need it. It’s also a sustainable and eco-friendly way to source your ingredients. Plus, the lush, green foliage of the ginger plant adds a touch of tropical beauty to your home or garden. The satisfaction of harvesting your own homegrown ginger is well worth the effort.

Leave a Comment