

Growing Napa Cabbage might seem intimidating, but trust me, it’s a rewarding experience that brings fresh, crisp goodness right to your kitchen! Have you ever dreamt of creating your own vibrant, Asian-inspired dishes with ingredients you’ve nurtured from seed to harvest? This DIY guide will unlock the secrets to successfully cultivating this versatile vegetable in your very own backyard, even if you’re a complete beginner.
Napa cabbage, also known as Chinese cabbage, boasts a rich history deeply intertwined with Asian cuisine. For centuries, it has been a staple ingredient in dishes like kimchi, stir-fries, and soups, providing a unique texture and subtle sweetness. Its cultivation dates back to the 15th century in the Napa region of Japan, hence the name. But you don’t need to travel to Japan to enjoy this delicious vegetable!
Why should you embark on this growing Napa Cabbage adventure? Well, store-bought Napa cabbage often lacks the freshness and flavor of homegrown varieties. Plus, you’ll have complete control over the growing process, ensuring your cabbage is free from harmful pesticides and chemicals. Imagine the satisfaction of serving a homemade kimchi made with cabbage you grew yourself! This DIY guide provides simple, effective tricks and hacks to overcome common challenges and ensure a bountiful harvest. Let’s get started and transform your garden into a Napa cabbage haven!
Growing Napa Cabbage: A DIY Guide for Delicious Results
Okay, so you want to grow Napa cabbage? Awesome! It’s a fantastic vegetable – crunchy, mild, and perfect for everything from stir-fries to kimchi. I’ve had some great success growing it in my own garden, and I’m excited to share my tips and tricks with you. Let’s dive in!
Choosing the Right Variety and Timing
First things first, let’s talk about variety and timing. Not all Napa cabbages are created equal, and timing is crucial to avoid bolting (going to seed prematurely).
* Variety Selection: Look for varieties that are known for their heat tolerance and resistance to bolting. Some popular choices include ‘Blues’, ‘Optiko’, and ‘China Pride’. Read the seed packet descriptions carefully! They’ll often mention specific growing conditions and disease resistance.
* Timing is Everything: Napa cabbage is a cool-season crop, meaning it thrives in cooler temperatures. The ideal growing season is either spring or fall.
* Spring Planting: Start seeds indoors about 4-6 weeks before the last expected frost. Transplant seedlings outdoors after the danger of frost has passed.
* Fall Planting: Direct sow seeds in late summer or early fall, about 6-8 weeks before the first expected frost. This is often the preferred method, as the cooler temperatures are more conducive to healthy growth and less bolting.
Preparing the Soil
Napa cabbage needs rich, well-drained soil to thrive. Here’s how I prepare my garden beds:
* Soil Testing: Before you do anything, it’s a good idea to get your soil tested. This will tell you the pH level and nutrient content. Napa cabbage prefers a slightly acidic to neutral pH (around 6.0-7.0).
* Amending the Soil: Amend the soil with plenty of organic matter, such as compost, well-rotted manure, or leaf mold. This will improve drainage, water retention, and nutrient availability. I usually add a generous layer (2-3 inches) of compost to my beds.
* Fertilizing: Napa cabbage is a heavy feeder, so it needs plenty of nutrients. I like to incorporate a slow-release fertilizer into the soil at planting time. Look for a balanced fertilizer with equal amounts of nitrogen, phosphorus, and potassium (e.g., 10-10-10).
* Sunlight: Choose a location that receives at least 6 hours of sunlight per day.
Starting Seeds Indoors (Optional)
If you’re starting seeds indoors, here’s what you’ll need:
* Seed starting trays or pots
* Seed starting mix
* Grow lights (optional, but highly recommended)
* Heat mat (optional, but helps with germination)
Step-by-Step Instructions:
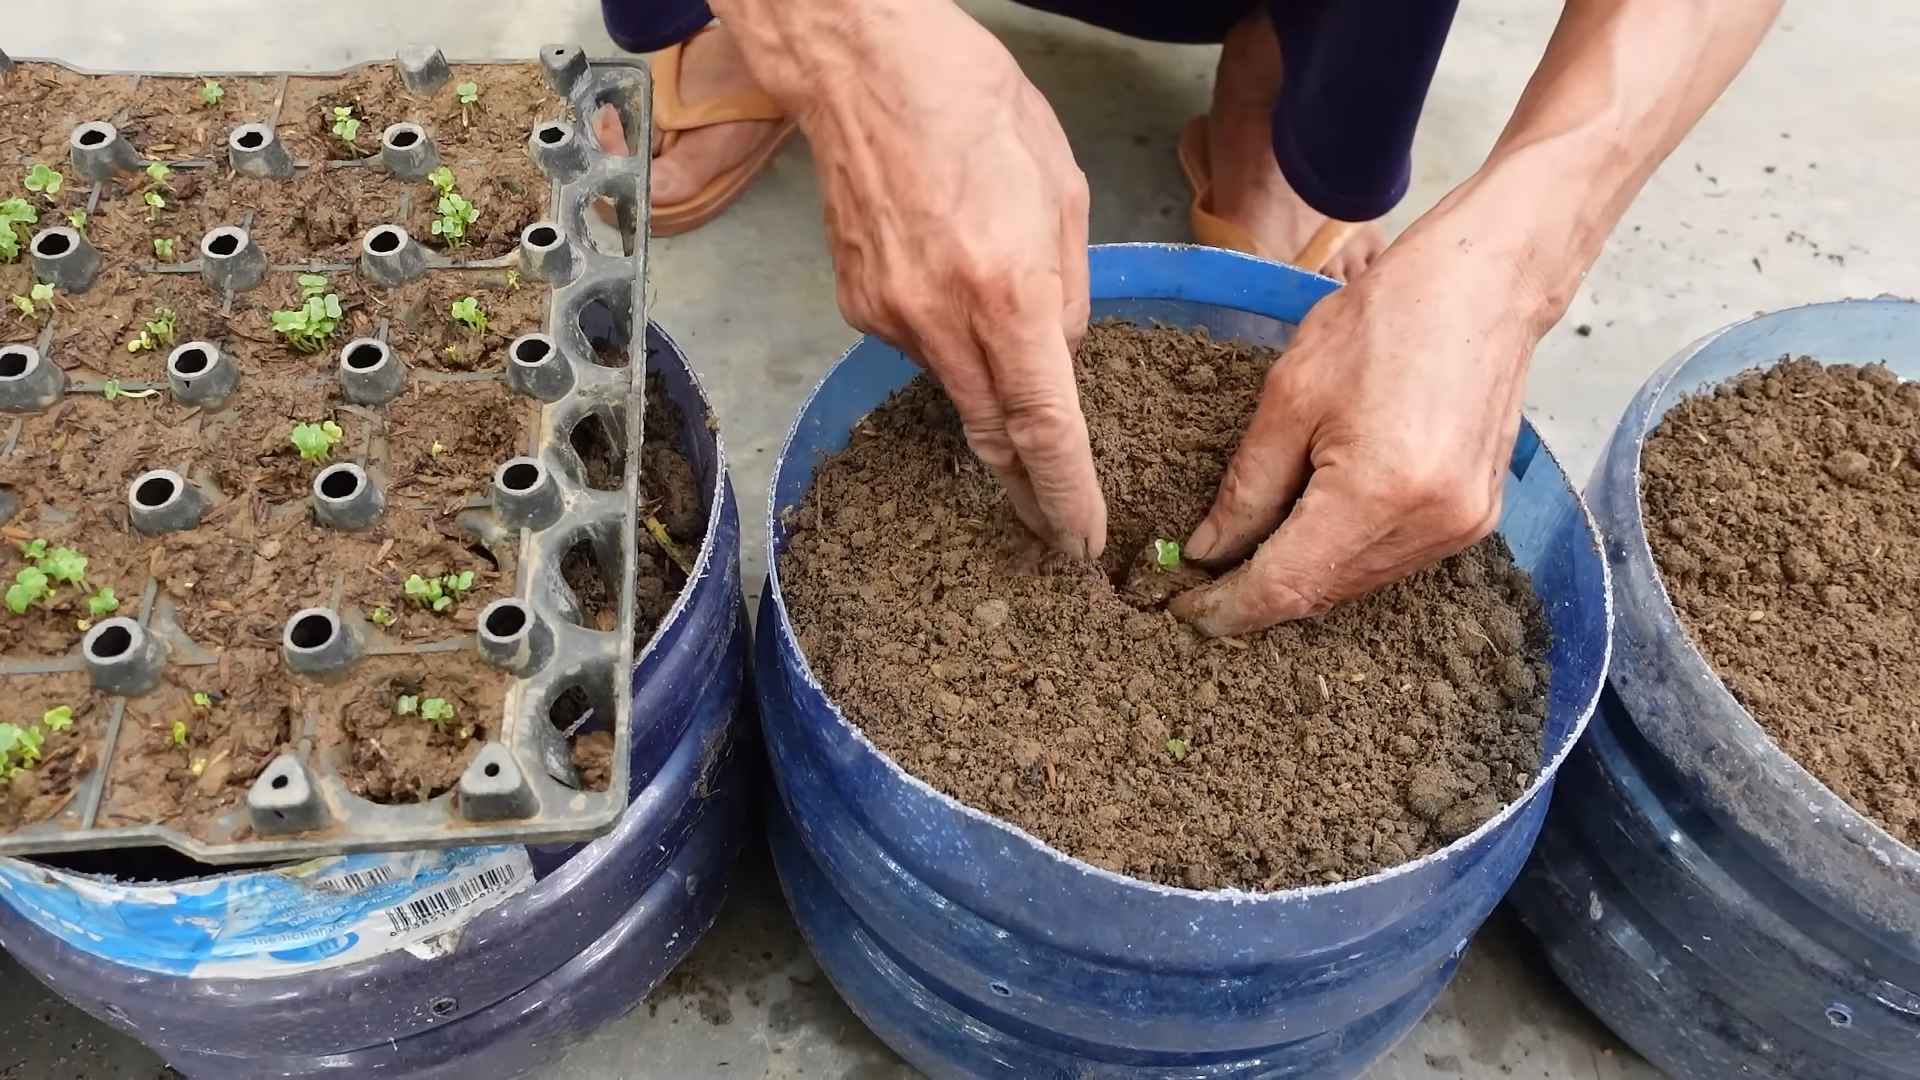
1. Sow the Seeds: Fill your seed starting trays or pots with seed starting mix. Moisten the mix thoroughly. Sow the seeds about ¼ inch deep. I usually sow 2-3 seeds per cell to increase the chances of germination.
2. Provide Warmth and Moisture: Cover the trays with a humidity dome or plastic wrap to retain moisture. Place them on a heat mat (if using) and under grow lights. The ideal temperature for germination is around 70-75°F (21-24°C).
3. Germination: The seeds should germinate in about 5-7 days. Once they germinate, remove the humidity dome and lower the heat mat temperature (if using).
4. Thinning: Once the seedlings have their first true leaves (the second set of leaves), thin them to one seedling per cell. Snip off the weaker seedlings at the soil line.
5. Hardening Off: Before transplanting the seedlings outdoors, you need to harden them off. This means gradually exposing them to outdoor conditions over a period of 7-10 days. Start by placing them in a sheltered location for a few hours each day, gradually increasing the amount of time they spend outdoors.
Direct Sowing Seeds Outdoors
If you’re direct sowing seeds outdoors, here’s what you’ll need:
* Prepared garden bed
* Seeds
* Row covers (optional, but helpful for pest control)
Step-by-Step Instructions:
1. Prepare the Soil: Make sure the soil is well-tilled and amended with compost and fertilizer.
2. Sow the Seeds: Sow the seeds about ¼ inch deep and 1-2 inches apart in rows. Space the rows about 18-24 inches apart.
3. Water Thoroughly: Water the soil thoroughly after sowing.
4. Thinning: Once the seedlings emerge and have their first true leaves, thin them to 12-18 inches apart.
5. Protect from Pests: Cover the seedlings with row covers to protect them from pests, such as flea beetles and cabbage moths.
Transplanting Seedlings Outdoors
If you started your seeds indoors, here’s how to transplant them:
Step-by-Step Instructions:
1. Prepare the Planting Holes: Dig holes that are slightly larger than the root balls of the seedlings. Space the holes 12-18 inches apart.
2. Remove Seedlings Carefully: Gently remove the seedlings from their trays or pots. Be careful not to damage the roots.
3. Plant the Seedlings: Place the seedlings in the holes and backfill with soil. Make sure the top of the root ball is level with the soil surface.
4. Water Thoroughly: Water the seedlings thoroughly after planting.
5. Mulch: Apply a layer of mulch around the plants to help retain moisture and suppress weeds. I like to use straw or shredded leaves.
Caring for Your Napa Cabbage
Once your Napa cabbage is planted, here’s how to care for it:
* Watering: Napa cabbage needs consistent moisture to thrive. Water deeply and regularly, especially during dry periods. Aim for about 1 inch of water per week.
* Fertilizing: Side-dress the plants with a nitrogen-rich fertilizer every 2-3 weeks. This will help promote leafy growth. I use fish emulsion or compost tea.
* Weeding: Keep the area around the plants free of weeds. Weeds can compete with the cabbage for nutrients and water.
* Pest Control: Napa cabbage is susceptible to several pests, including flea beetles, cabbage moths, and aphids.
* Flea Beetles: These tiny beetles can chew small holes in the leaves. Cover the plants with row covers to prevent them from reaching the plants. You can also use insecticidal soap or diatomaceous earth.
* Cabbage Moths: These moths lay eggs on the leaves, which hatch into caterpillars that can devour the plants. Handpick the caterpillars off the plants or use Bacillus thuringiensis (Bt), a biological insecticide.
* Aphids: These small, sap-sucking insects can weaken the plants. Spray the plants with a strong stream of water or use insecticidal soap.
* Disease Control: Napa cabbage can also be susceptible to several diseases, including clubroot and black rot.
* Clubroot: This soilborne disease causes the roots to swell and become distorted. Prevent clubroot by practicing crop rotation and maintaining a soil pH of 7.0 or higher.
* Black Rot: This bacterial disease causes yellowing and browning of the leaves. Prevent black rot by using disease-free seeds and practicing crop rotation.
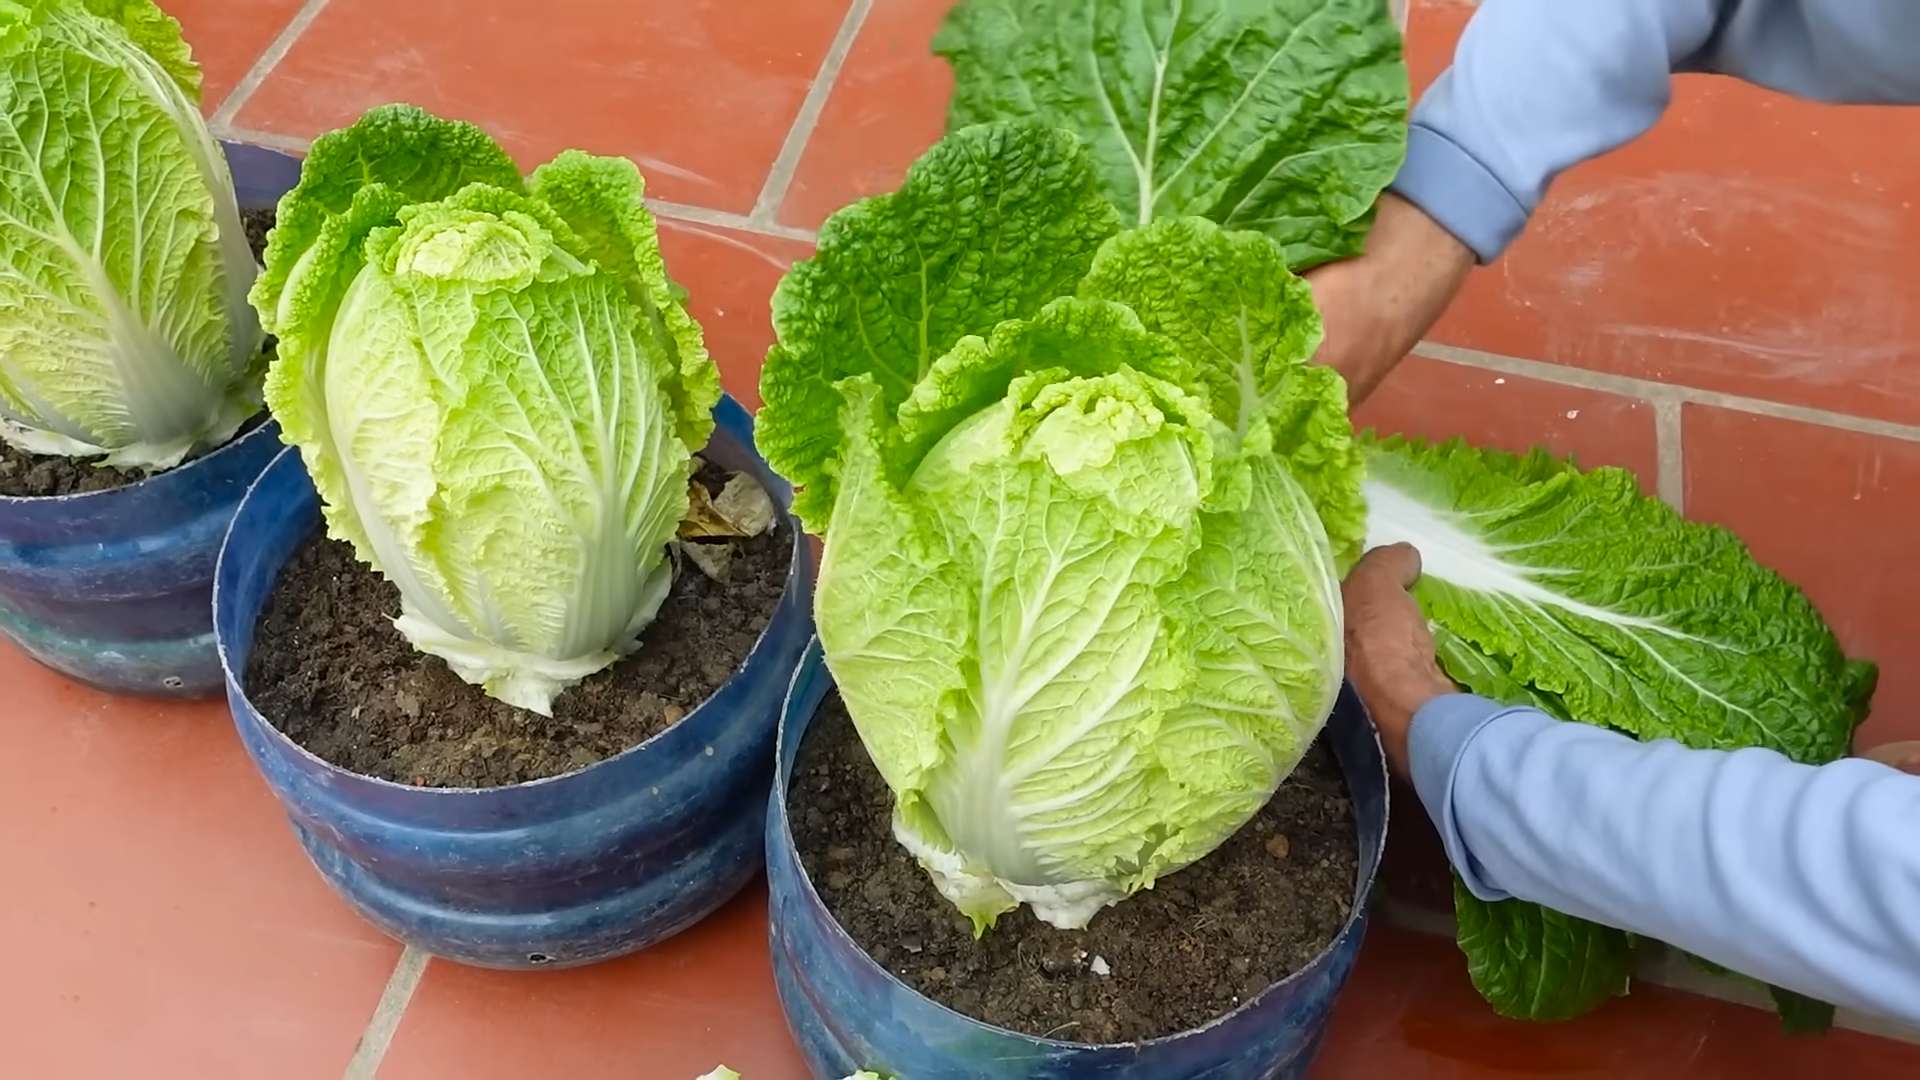
Harvesting Your Napa Cabbage
Napa cabbage is typically ready to harvest in 70-80 days from seed.
* Harvest Time: The heads should be firm and compact.
* Harvesting Method: Cut the heads at the base with a sharp knife.
* Storage: Store the heads in the refrigerator for up to 2 weeks.
Troubleshooting
Even with the best care, you might encounter some problems. Here are a few common issues and how to address them:
* Bolting (Premature Flowering): This is when the plant starts to produce a flower stalk instead of a head. It’s usually caused by stress, such as heat, drought, or inconsistent watering. Choose bolt-resistant varieties and provide consistent care.
* Slugs and Snails: These pests can chew large holes in the leaves. Use slug bait or handpick them off the plants.
* Tip Burn: This is when the edges of the leaves turn brown and dry. It’s usually caused by calcium deficiency or inconsistent watering. Make sure the soil is well-drained and water regularly. You can also spray the plants with a calcium solution.
Enjoying Your Harvest
Now for the best part – enjoying the fruits (or rather, vegetables) of your labor! Napa cabbage is incredibly versatile. Here are a few ideas:
* Salads:
Conclusion
So, there you have it! Growing Napa cabbage at home, while it might seem daunting at first, is incredibly rewarding and surprisingly achievable with a little planning and effort. We’ve walked you through the entire process, from seed to harvest, equipping you with the knowledge to cultivate your own delicious and nutritious Napa cabbage.
Why is this DIY trick a must-try? Because store-bought Napa cabbage simply can’t compare to the vibrant flavor and crisp texture of freshly harvested, homegrown produce. You control the growing conditions, ensuring your cabbage is free from unwanted pesticides and herbicides. Plus, there’s an undeniable satisfaction in nurturing a plant from a tiny seed to a beautiful, leafy head. Think of the delicious slaws, stir-fries, and kimchi you can create with your own Napa cabbage!
But the benefits don’t stop there. Growing your own vegetables is a fantastic way to connect with nature, reduce your carbon footprint, and save money on your grocery bill. It’s a win-win-win!
Looking for variations? Absolutely! Consider these options to tailor your Napa cabbage growing experience to your specific needs and preferences:
* Succession Planting: Plant seeds every few weeks to ensure a continuous harvest throughout the growing season. This is especially useful if you have a small garden and want to maximize your yield.
* Companion Planting: Plant Napa cabbage alongside beneficial companions like dill, chamomile, and rosemary to deter pests and attract pollinators. Avoid planting near strawberries, tomatoes, or beans.
* Container Gardening: If you’re short on space, Napa cabbage can be successfully grown in large containers. Choose a pot that is at least 12 inches in diameter and provides good drainage.
* Different Varieties: Experiment with different varieties of Napa cabbage to find your favorite. Some popular options include ‘Blues’, ‘Optiko’, and ‘China Express’. Each variety offers slightly different flavors and textures.
* Fermenting: Once you have harvested your Napa cabbage, consider fermenting it to make kimchi or other delicious fermented dishes. This is a great way to preserve your harvest and enjoy the health benefits of fermented foods.
We strongly encourage you to give this DIY trick a try. Don’t be afraid to experiment and learn from your experiences. Gardening is a journey, and every season brings new opportunities for growth and discovery.
And most importantly, we want to hear about your success! Share your photos, tips, and challenges in the comments below. Let’s build a community of Napa cabbage enthusiasts and learn from each other. What variety did you choose? What challenges did you face? What delicious dishes did you create? Your experiences will inspire and encourage others to embark on their own Napa cabbage growing adventures.
So, grab your seeds, prepare your soil, and get ready to experience the joy of growing your own Napa cabbage. You won’t regret it! Happy gardening!
Frequently Asked Questions (FAQ)
Q: How much sunlight does Napa cabbage need?
A: Napa cabbage thrives in full sun, requiring at least 6 hours of direct sunlight per day. However, in hotter climates, providing some afternoon shade can prevent the leaves from scorching. If you’re growing Napa cabbage indoors, supplement with grow lights to ensure adequate light exposure. Insufficient sunlight can lead to leggy growth and smaller heads.
Q: What kind of soil is best for growing Napa cabbage?
A: Napa cabbage prefers well-drained, fertile soil that is rich in organic matter. The ideal soil pH is between 6.0 and 7.5. Before planting, amend your soil with compost, aged manure, or other organic amendments to improve drainage, fertility, and water retention. Avoid heavy clay soils, as they can become waterlogged and inhibit root growth. A soil test can help you determine the pH and nutrient levels of your soil and guide your amendment choices.
Q: How often should I water Napa cabbage?
A: Napa cabbage needs consistent moisture to thrive. Water deeply and regularly, especially during dry periods. Aim to keep the soil consistently moist but not waterlogged. Mulching around the plants can help retain moisture and suppress weeds. Check the soil moisture regularly by sticking your finger into the soil about an inch deep. If the soil feels dry, it’s time to water.
Q: What are some common pests and diseases that affect Napa cabbage?
A: Napa cabbage is susceptible to several pests and diseases, including cabbage worms, aphids, flea beetles, clubroot, and downy mildew. Regularly inspect your plants for signs of infestation or disease. Use organic pest control methods, such as handpicking pests, using insecticidal soap, or applying Bacillus thuringiensis (Bt) for cabbage worms. To prevent diseases, practice crop rotation, ensure good air circulation, and avoid overhead watering. If you notice signs of disease, remove affected leaves promptly to prevent the spread.
Q: When is the best time to harvest Napa cabbage?
A: Napa cabbage is typically ready to harvest 70-80 days after planting. The heads should be firm and compact. To harvest, cut the head at the base with a sharp knife. You can also harvest individual leaves as needed, but this will slow down the overall growth of the head. Harvest in the morning when the leaves are crisp and cool.
Q: Can I grow Napa cabbage in containers?
A: Yes, Napa cabbage can be successfully grown in containers. Choose a large container that is at least 12 inches in diameter and provides good drainage. Use a high-quality potting mix and water regularly. Container-grown Napa cabbage may require more frequent fertilization than plants grown in the ground.
Q: How do I store Napa cabbage after harvesting?
A: Napa cabbage can be stored in the refrigerator for several weeks. Wrap the head in a damp paper towel and place it in a plastic bag. You can also store Napa cabbage in a root cellar or other cool, dark place. For longer-term storage, consider fermenting the cabbage to make kimchi or sauerkraut.
Q: Can I save seeds from my Napa cabbage plants?
A: Saving seeds from Napa cabbage can be challenging, as it is a biennial plant, meaning it typically flowers and produces seeds in its second year. To save seeds, you would need to overwinter the plants and allow them to flower the following spring. However, Napa cabbage is also cross-pollinated, so the seeds may not produce plants that are true to type. If you’re interested in seed saving, it’s best to start with open-pollinated varieties and isolate them from other brassicas to prevent cross-pollination.
Q: What are some good companion plants for Napa cabbage?
A: Good companion plants for Napa cabbage include dill, chamomile, rosemary, thyme, and marigolds. These plants can help deter pests, attract beneficial insects, and improve the overall health of your Napa cabbage plants. Avoid planting Napa cabbage near strawberries, tomatoes, or beans, as they can compete for nutrients or attract pests.
Q: Is Napa cabbage a good source of nutrients?
A: Yes, Napa cabbage is a good source of vitamins, minerals, and fiber. It is particularly rich in vitamin C, vitamin K, folate, and potassium. It also contains antioxidants and other beneficial compounds. Adding Napa cabbage to your diet can help boost your immune system, improve digestion, and protect against chronic diseases.

Leave a Comment