

Growing onions in plastic bottles might sound like something out of a science fiction movie, but trust me, it’s a surprisingly effective and incredibly rewarding way to cultivate these kitchen staples right in your own home! Are you tired of buying onions that seem to sprout the moment you bring them home? Or perhaps you’re dreaming of fresh, homegrown flavor but lack the sprawling garden space to make it a reality? Well, you’re in the right place!
For centuries, humans have cultivated onions, tracing their origins back to ancient civilizations in Asia and the Middle East. From flavoring humble meals to possessing medicinal properties, onions have always held a special place in our lives. Now, we’re taking this time-honored tradition and giving it a modern, eco-friendly twist.
This DIY guide will unlock the secrets to successfully growing onions in plastic bottles, transforming your discarded containers into miniature onion farms. I’ll walk you through each step, from preparing your bottles and soil to nurturing your seedlings and harvesting your flavorful bounty. Not only is this method space-saving and budget-friendly, but it’s also a fantastic way to recycle and reduce waste. So, grab your scissors, gather your bottles, and let’s embark on this exciting gardening adventure together! You’ll be amazed at how easy it is to enjoy fresh, homegrown onions, no matter how small your living space may be.

Growing Onions in Plastic Bottles: A Beginner’s Guide
Hey there, fellow gardening enthusiasts! Are you short on space but dreaming of fresh, homegrown onions? Well, you’re in luck! I’m going to show you how to grow onions in plastic bottles – a super easy and surprisingly effective method that’s perfect for small gardens, balconies, or even just a sunny windowsill. Get ready to turn those discarded bottles into mini onion farms!
What You’ll Need
Before we dive in, let’s gather our supplies. This is a pretty low-cost project, which is always a win!
* Plastic Bottles: The star of the show! I recommend using 2-liter soda bottles or similar sizes. The taller the bottle, the better, as it gives the onion roots plenty of room to grow. Make sure they’re clean and free of any sticky residue.
* Potting Soil: A good quality potting mix is crucial for healthy onion growth. Avoid using garden soil directly, as it can be too dense and may not drain well.
* Onion Sets or Seedlings: You can start with onion sets (small, immature onions) or onion seedlings. Sets are generally easier for beginners, but seedlings offer more variety. I usually go for sets because they’re readily available at my local garden center.
* Scissors or a Utility Knife: For cutting the plastic bottles. Be careful!
* Drill or Nail (Optional): To create drainage holes.
* Watering Can or Spray Bottle: For watering your onions.
* Gloves (Optional): To keep your hands clean.
* Fertilizer (Optional): A balanced liquid fertilizer can give your onions a boost.
Preparing the Plastic Bottles
This is where we transform those bottles into onion-growing containers. It’s a simple process, but take your time and be careful with the cutting tools.
1. Clean the Bottles: Give your plastic bottles a good rinse with soap and water to remove any dirt or residue. Let them dry completely.
2. Cut the Bottles: There are a couple of ways to do this, depending on how many onions you want to grow in each bottle.
* Option 1 (Single Onion): Cut the bottle in half horizontally. You’ll be using the bottom half as your container. The top half can be discarded or used for another project.
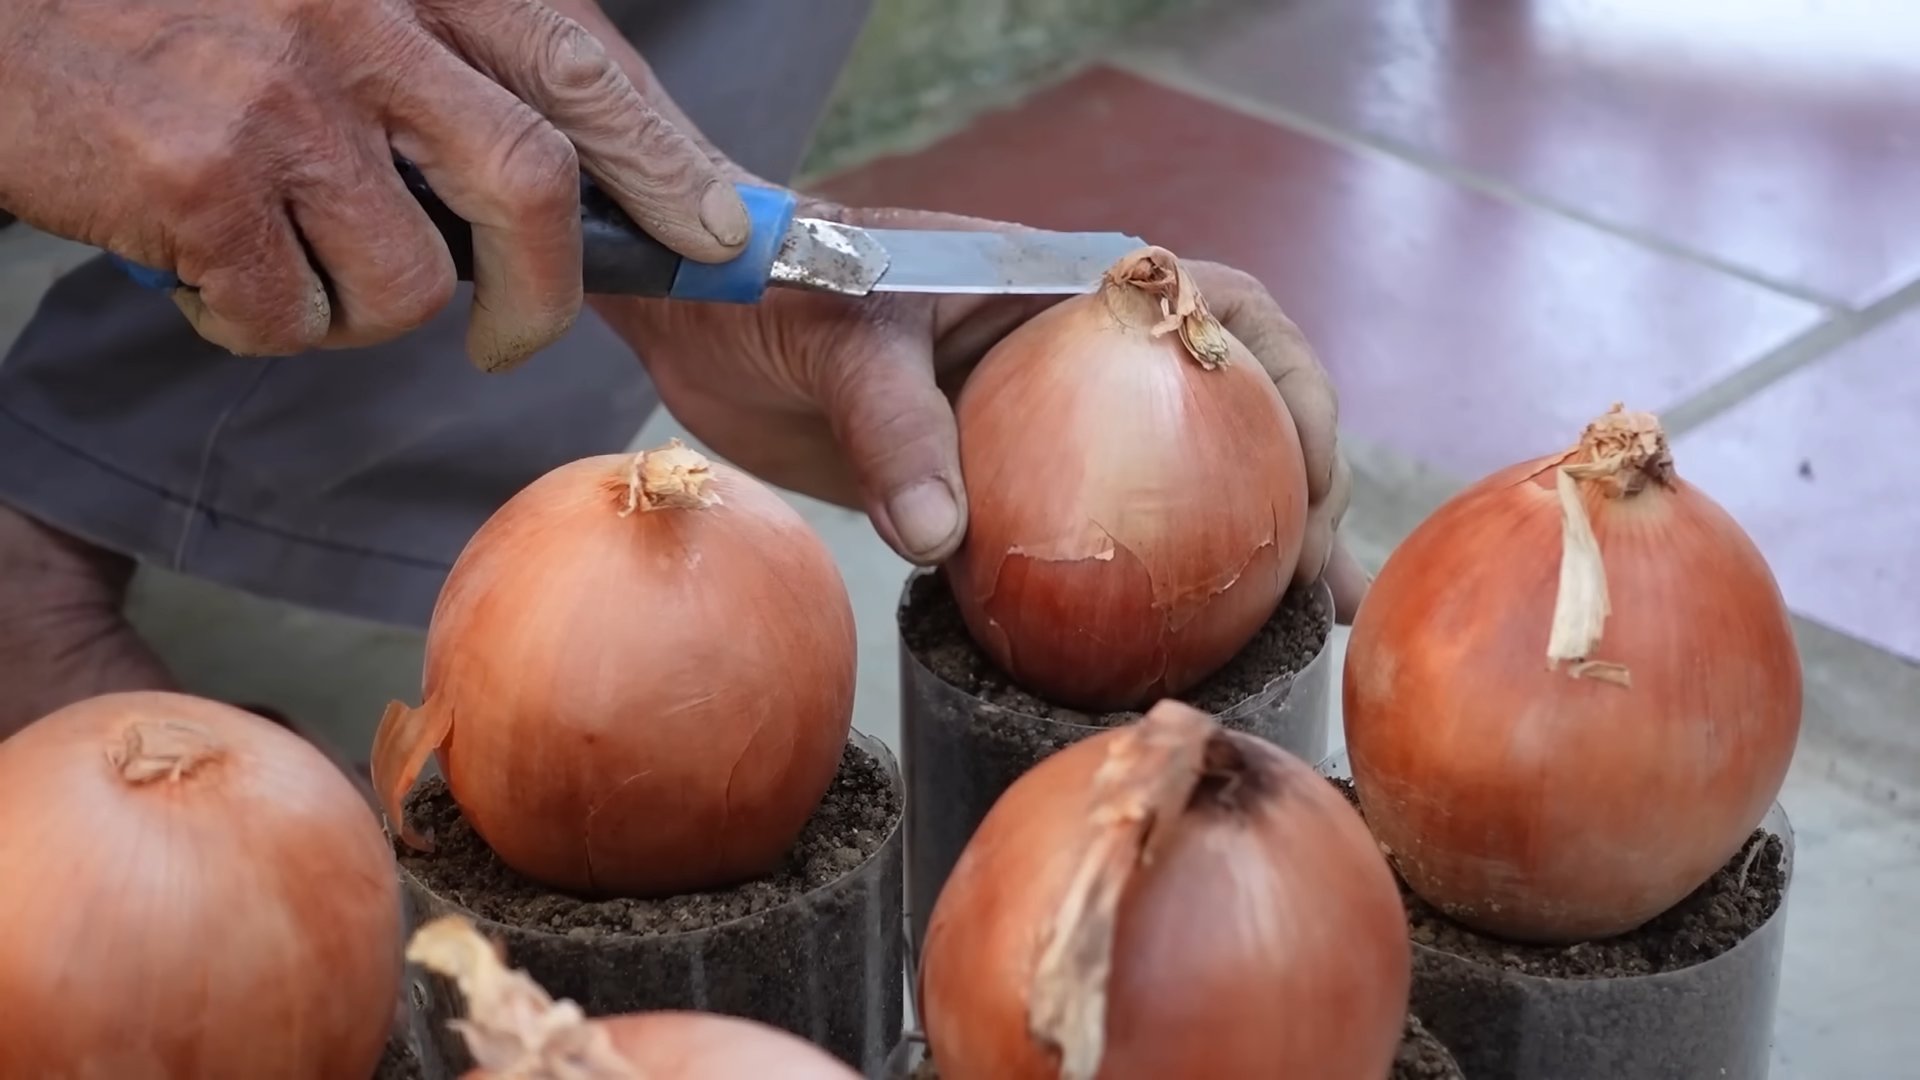
* Option 2 (Multiple Onions): Cut rectangular or circular holes around the sides of the bottle, leaving the bottom intact. The size of the holes should be large enough to accommodate the onion sets or seedlings. I usually make holes about 2-3 inches in diameter. Space them evenly around the bottle.
3. Create Drainage Holes: This is super important! Onions don’t like soggy soil. If your bottle doesn’t already have drainage holes, use a drill or nail to create several holes in the bottom. I usually make about 4-5 holes.
4. (Optional) Add a Gravel Layer: To further improve drainage, you can add a layer of gravel or small stones to the bottom of the bottle before adding the potting soil. This helps prevent the roots from sitting in water.
Planting the Onions
Now for the fun part – planting the onions! This is where you’ll start to see your mini onion farm come to life.
1. Fill the Bottles with Potting Soil: Fill the prepared bottles with potting soil, leaving about an inch of space at the top. Gently press down on the soil to remove any air pockets.
2. Plant the Onion Sets or Seedlings:
* For Onion Sets: Make a small hole in the soil, about an inch deep. Place the onion set in the hole, with the root end facing down. Cover the set with soil, leaving the tip exposed. Space the sets about 4-6 inches apart if you’re planting multiple onions in one bottle.
* For Onion Seedlings: Gently remove the seedlings from their container. Make a small hole in the soil, large enough to accommodate the roots. Place the seedling in the hole and cover the roots with soil. Space the seedlings about 4-6 inches apart.
3. Water Thoroughly: After planting, water the onions thoroughly until the water drains out of the drainage holes. This helps settle the soil and encourages root growth.
Caring for Your Onions
Once your onions are planted, it’s important to provide them with the right care to ensure they thrive.
1. Sunlight: Onions need plenty of sunlight – at least 6-8 hours per day. Place your bottles in a sunny location, such as a windowsill, balcony, or garden. If you don’t have enough natural sunlight, you can supplement with a grow light.
2. Watering: Water your onions regularly, but avoid overwatering. The soil should be moist but not soggy. Check the soil moisture by sticking your finger into the soil. If the top inch feels dry, it’s time to water. I usually water every 2-3 days, depending on the weather.
3. Fertilizing (Optional): To give your onions a boost, you can fertilize them every 2-3 weeks with a balanced liquid fertilizer. Follow the instructions on the fertilizer label. I like to use a fertilizer that’s specifically formulated for vegetables.
4. Weeding: Keep the bottles free of weeds. Weeds can compete with the onions for nutrients and water.
5. Pest Control: Keep an eye out for pests, such as aphids or onion maggots. If you notice any pests, you can treat them with an insecticidal soap or neem oil. I prefer to use organic pest control methods whenever possible.
6. Rotation: Rotate the bottles regularly to ensure that all sides of the onions receive equal sunlight. This will help them grow evenly.
Harvesting Your Onions
The moment you’ve been waiting for! Harvesting your homegrown onions is incredibly rewarding.
1. When to Harvest: Onions are typically ready to harvest when the tops start to turn yellow and fall over. This usually takes about 90-120 days from planting.
2. How to Harvest: Gently pull the onions out of the soil. If the soil is dry, you may need to loosen it with a trowel first.
3. Curing: After harvesting, cure the onions by laying them out in a warm, dry place for about 1-2 weeks. This allows the outer layers to dry and helps prevent rot.
4. Storing: Once the onions are cured, you can store them in a cool, dry place for several months. I like to store mine in a mesh bag or a well-ventilated container.
Troubleshooting
Even with the best care, you might encounter some challenges along the way. Here are a few common problems and how to fix them:
* Yellowing Leaves: This could be a sign of overwatering, underwatering, or nutrient deficiency. Check the soil moisture and adjust your watering schedule accordingly. If the soil is dry, water more frequently. If the soil is soggy, water less frequently. You can also try fertilizing your onions with a balanced liquid fertilizer.
* Slow Growth: This could be due to insufficient sunlight, poor soil, or lack of nutrients. Make sure your onions are getting at least 6-8 hours of sunlight per day. Use a good quality potting mix and fertilize regularly.
* Pests: Keep an eye out for pests, such as aphids or onion maggots. Treat them with an insecticidal soap or neem oil.
* Rotting Onions: This is usually caused by overwatering or poor drainage. Make sure your bottles have adequate drainage holes and avoid overwatering.
Tips and Tricks for Success
Here are a few extra tips to help you grow the best onions possible:
* Choose the Right Variety: Different onion varieties are suited to different climates. Choose a variety that’s well-suited to your local climate.
* Start with Healthy Sets or Seedlings: Choose onion sets or seedlings that are firm and healthy. Avoid sets or seedlings that are soft, mushy, or discolored.
* Don’t Overcrowd: Give your onions enough space to grow. Space the sets or seedlings about 4-6 inches apart.
* Water in the Morning: Water your onions in the morning so that the leaves have time to dry before nightfall. This helps prevent fungal diseases.
* Mulch (Optional): Add a layer of mulch around the base of the onions to help retain moisture and suppress weeds.
* Experiment: Don’t be afraid to experiment with different varieties, fertilizers, and growing techniques. The best way to learn is by doing!
Enjoy Your Homegrown Onions!
There you have it! Growing onions in plastic bottles is a simple, fun, and rewarding project that anyone can do. With a little bit of care and attention, you’ll be enjoying fresh, homegrown onions in no
Conclusion
So, there you have it! Growing onions in plastic bottles isn’t just a quirky gardening experiment; it’s a genuinely effective and space-saving method that can bring the joy of fresh, homegrown onions right to your windowsill or balcony. We’ve explored how this simple DIY trick transforms discarded plastic bottles into miniature onion farms, offering a sustainable and rewarding gardening experience.
Why is this a must-try? Because it democratizes gardening. You don’t need acres of land or expensive equipment to enjoy the taste of freshly harvested onions. This method is perfect for apartment dwellers, urban gardeners, or anyone looking to maximize their yield in a limited space. It’s also a fantastic way to teach children about the life cycle of plants and the importance of sustainability. Plus, let’s be honest, there’s a certain satisfaction in turning trash into treasure, and watching those little green shoots emerge from a repurposed plastic bottle is incredibly rewarding.
But the benefits don’t stop there. Growing onions in plastic bottles allows for better control over the growing environment. You can easily monitor the soil moisture, adjust the sunlight exposure, and protect your onions from pests and diseases. This level of control can lead to healthier, more robust plants and a more abundant harvest.
Looking for variations? Absolutely! Experiment with different types of onions. Shallots, scallions, and even garlic cloves can be grown using this method. You can also try adding different amendments to your soil mix, such as compost or worm castings, to boost the nutrient content and promote faster growth. Consider using different sizes of plastic bottles to accommodate different onion varieties or to create a tiered garden effect. For a decorative touch, paint the bottles or wrap them in burlap. Get creative and personalize your onion bottle garden to reflect your own style and preferences.
Furthermore, think about the placement of your bottle gardens. South-facing windowsills are ideal for maximizing sunlight exposure, but if you don’t have a sunny spot indoors, consider using grow lights to supplement the natural light. During warmer months, you can move your bottle gardens outdoors to a patio or balcony, just be sure to protect them from extreme weather conditions.
The key to success with this DIY trick is consistency and attention to detail. Regularly check the soil moisture and water as needed. Fertilize your onions every few weeks with a balanced liquid fertilizer. And be patient! It takes time for onions to mature, but the wait is well worth it when you finally get to harvest your own homegrown onions.
We are confident that you will find growing onions in plastic bottles to be a fun, rewarding, and sustainable gardening experience. So, gather your supplies, follow our simple steps, and get ready to enjoy the taste of fresh, homegrown onions.
Now, we want to hear from you! Have you tried growing onions in plastic bottles? What were your results? What tips and tricks did you discover along the way? Share your experiences, photos, and questions in the comments below. Let’s create a community of bottle gardeners and learn from each other. We are excited to see your onion bottle gardens flourish! Don’t forget to tag us in your social media posts using #OnionBottleGarden. Happy gardening!
Frequently Asked Questions (FAQ)
What type of plastic bottle is best for growing onions?
Ideally, you should use clear or translucent plastic bottles that are at least 2 liters in size. This provides enough space for the onion roots to grow. Avoid using dark-colored bottles, as they can absorb too much heat and damage the plants. Soda bottles, water bottles, and juice bottles all work well. Make sure to thoroughly clean the bottles before using them to remove any residue.
What kind of soil should I use?
A well-draining potting mix is essential for growing onions in plastic bottles. You can use a commercially available potting mix or create your own by combining equal parts of garden soil, compost, and perlite or vermiculite. The compost will provide nutrients, while the perlite or vermiculite will improve drainage and aeration. Avoid using heavy clay soil, as it can become waterlogged and suffocate the onion roots.
How often should I water my onions?
Water your onions regularly, keeping the soil consistently moist but not waterlogged. The frequency of watering will depend on the weather conditions and the type of soil you are using. In general, you should water your onions every 2-3 days, or when the top inch of soil feels dry to the touch. Be sure to water thoroughly, allowing the water to drain out of the drainage holes at the bottom of the bottle.
How much sunlight do onions need?
Onions need at least 6-8 hours of direct sunlight per day to thrive. Place your bottle gardens in a sunny location, such as a south-facing windowsill or a balcony. If you don’t have enough natural light, you can supplement with grow lights. LED grow lights are energy-efficient and provide the full spectrum of light that onions need to grow.
How do I fertilize my onions?
Fertilize your onions every 2-3 weeks with a balanced liquid fertilizer. Look for a fertilizer that is specifically formulated for vegetables or herbs. Follow the instructions on the fertilizer label for the correct dosage. You can also add compost tea or worm castings to the soil to provide additional nutrients.
How long does it take for onions to grow in plastic bottles?
The time it takes for onions to mature will depend on the variety of onion you are growing and the growing conditions. In general, it takes about 90-120 days for onions to reach maturity. You can harvest the green onion tops at any time, but the bulbs will need to mature before they are ready to harvest.
How do I know when my onions are ready to harvest?
Onions are ready to harvest when the tops start to turn yellow and fall over. You can also gently dig around the base of the plant to check the size of the bulb. If the bulb is large and firm, it is ready to harvest. To harvest, simply pull the onion out of the bottle.
Can I reuse the soil in the plastic bottles?
It is generally not recommended to reuse the soil in the plastic bottles, as it may contain pests or diseases. However, if you want to reuse the soil, you can sterilize it by baking it in the oven at 200 degrees Fahrenheit for 30 minutes. Be sure to let the soil cool completely before using it.
What are some common problems when growing onions in plastic bottles?
Some common problems when growing onions in plastic bottles include overwatering, underwatering, pests, and diseases. Overwatering can lead to root rot, while underwatering can cause the plants to wilt. Pests, such as aphids and spider mites, can damage the leaves and stems. Diseases, such as fungal infections, can cause the plants to rot. To prevent these problems, be sure to water your onions properly, provide them with adequate sunlight, and monitor them regularly for pests and diseases.
Can I grow other vegetables in plastic bottles using the same method?
Yes, you can grow other vegetables in plastic bottles using the same method. Some vegetables that grow well in plastic bottles include lettuce, spinach, herbs, and peppers. The key is to choose vegetables that have shallow root systems and don’t require a lot of space. Be sure to provide the vegetables with adequate sunlight, water, and nutrients.
Leave a Comment